
Likes
Comments
Share


@djsalin
Follow
Starting to low-stress training.
Replaced water.
Added 1 tsp per gal of MaxiGro, 1 tsp liquid b1 Vitamin, 1 tsp liquid iron, and 1 tbsp hydrogen peroxide.

Likes
45
Share


@AsNoriu
Follow
So, short week , because i just got back.
Girl is fine, two more weeks of heavy feed and thrn flush.
Smells amazing and she will have new tent on my first dayoff.
Next run is pushing her out ;)))


Likes
35
Share


@DjDaveAtHome
Follow
Massive PH swings are now levelling out. Using Organic Alaskan Bloom to lower the PH instead of the huge amount of PH Down it usually take. Needs less (about 5-10 ml) to lower the PH back to 5.7 from 6.4.
BHB2 is more Sativa in appearance but is going to finish about 1-2 weeks ahead of BHB1 which is more indica like. (Appearances can be deceiving!). Have already flushed BHB2 for 24 hours with fresh RO water, replaced half with fresh then added GHE Bloom, Micro, CalMag, then the organics (Hygrozyme, Tarantula, Microbe Tea *Formula below.)
Will do a final three day RO water flush when all the trichomes are cloudy (My fave harvest. More 'up') and about 10% amber.
Am not worrying about PPM or EC at the moment. The microbes and organics are kind of messing with it. Had a potassium deficiency in BHB1. Treated with more GHE Bloom. Seems ok now.
Blueberry Headband (2) from Humboldt Seeds.
https://www.humboldtseeds.net/en/blueberry-headband/
Lighting
https://www.horticulturelightinggroup.ca/products/260w-qb-v2-led-kit
DWC Nutients
https://generalhydroponics.com/floraseries
FloraGro .5 ml/l
FloraBloom 2.5 ml/l
FloraMicro 1.5 ml/l
Cal Mag 1.5 ml/l
https://generalhydroponics.com/calimagic
Diamond Necter: N/A
https://generalhydroponics.com/diamond-nectar
SuperThrive: .5 ml/l
https://superthrive.com/
Epsom salts
Tarantula
https://www.advancednutrients.com/products/tarantula/
https://hylineproducts.com/products/hygrozyme/#one
Grozyme: 2.5 ml/ltr
Brown Slime Root Rot Organic Microbe Tea
8 liters RO water
5 ml (1 tsp) organic sulphur free molasses
5 ml Alaskan Organic grow fertilizer (or something comparable)
5 ml Alaskan bloom fertilizer (or something comparable)
5 ml Seaweed or kelp fertilizer
Handful of composted horse pucky
Worm castings, sea soil, Gaia General Purpose and Bat Guano Phosphate optional
* add after brewing
2-4 ml Advanced Nutrients Tarantula

Processing
Likes
25
Share


@Luna91
Follow
Hey Guys,
this week my girls are showing a great sign of happiness, I cant see any deficiencies or over feeding problem! Leaves are very healthy and strong!
I think Im getting a good results from 3 of them. Although it is my first grow and some experienced ppl and ppl on the internet said not to do all of the trainings, but im very glad that i did so... my girls are autos but im guessing i’ll get a good yield after all. I hope you agree with me.
i have attached a video from inside my tent! I hope you like it.
Happy growing

Likes
1
Share


@SessionMeister
Follow
I put the clones into bigger Pots once their roots were fully established. Immediately started LST and put in the clones at an angle so that light is distributed more evenly. Autos also growing well but Panty Punch is lacking because of crippled leaves. I still let her live to see how she develops. I plan to bend the clones in a circular shape so they grow into an even canopy.


Likes
13
Share


@Ieiogrow94
Follow
Eccoci qui...
Finalmente dopo uno stop per il lavoro torno ad aggiornare il diario con il capitolo finale...
Test 1 davvero sorprendente mi ha dato una genetica che è sia veloce che vigorosa vedremmo nei test successivi!!!
Grazie a @Xpertnutrients per la collab e a tutti per il supporto🔥🌲❤️
NE VERRANNO DELLE BELLE
Likes
4
Share


@DocGreenjeans
Follow
It's all about the soil. I love my soil I've cultivated it and in turn it cultivates my ye yo's


Processing
Likes
1
Share


@Luv2Grow
Follow
Day 71 - Starting week 11 and she’s really starting to fill in quite nicely. Did a little bit more of leaf tucking and will be giving her a feed of nutes in the next day or two. She’s got a really sweet smell to her right now.
Day 72 - All looking good and not much new today. I did give her a feeding of nutes today and checked the runoff again and a tiny bit higher than I’d like, sitting at 7.1. Other than that, just removed a few leaves and tucked the rest.
Day 73 - Noticed a couple leaves that have a couple “rust” spots on them so gonna try and get that fixed. Other than that she’s progressing nicely and will probably end op giving her some more water in 2 days.
Day 74 - Nothing new happening right now. I’m just letting her do her thing and feeding her when she calls for it. I did rearrange her in the tent a little bit but that’s about it for today.
Day 75 - The girl is still fattening up nicely but other than that, there’s not much else happening today. She’ll be ready for some water tomorrow.
Day 76 - Gave the girl a heavy watering of plain water today and the PPM is at 223 right now so next watering will definitely be a feeding of nutes. She’s has quite some time left before harvest so not wanting to cut the nutrients yet.
Likes
6
Share

@DogDoctorOfficial
Follow
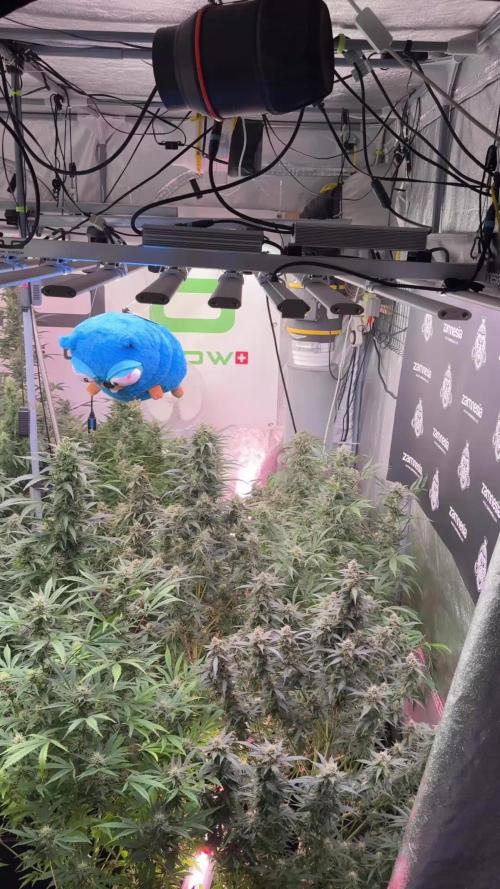
🌱 Week 11 from Seed — Week 7 Flower
LSD — The Observation Phase
We’ve reached that point in the run where the work becomes less visible… but more important than ever.
For anyone just joining us, this run has been built on consistency. From seed to now, we’ve maintained stable environmental conditions — temperatures, humidity, feeding, and watering practices have remained unchanged because the plant has been responding exactly how we want. No need to fix what isn’t broken.
This is key:
progress doesn’t always come from doing more — sometimes it comes from doing less, but doing it right.
⸻
👁️ What This Week Is
This is a monitoring week.
At this stage, the plant is fully focused on flower development. Buds are stacking, structure is defined, and now the priority shifts from pushing growth… to protecting it.
Our role right now:
* Stay consistent
* Stay present
* Stay observant
We’re still hand watering, still giving them that direct attention, still reading the plant daily. Not reacting — interpreting.
⸻
⚠️ What This Week Is NOT
This is not the time for:
* Big changes
* Heavy feeding adjustments
* Unnecessary stress
And most importantly —
this is not the time to “get bored” and start doing things just to feel productive.
Because right now, overdoing is more dangerous than underdoing.
⸻
🔍 The Importance of Observation
Even if it looks like “nothing is happening”… everything is happening.
This is where experience shows.
We’re actively watching for:
* Early signs of mold or bud rot
* Humidity pockets within the canopy
* Powdery mildew risks
* Any late-stage deficiencies or imbalances
Catching something early here makes all the difference. Waiting too long can cost the entire run.
So yes — it might look calm.
But this is one of the most active mental phases of the grow.
⸻
🌿 Presence Over Action
There’s something else here that doesn’t get talked about enough:
Just being there matters.
Walking into the room.
Looking at them closely.
Understanding their rhythm.
You start noticing the small things — the details that don’t show up in charts or numbers.
This is where growing becomes less mechanical… and more intuitive.
⸻
🔮 What to Expect Next Week
We’re moving deeper into flower maturity.
You can expect:
* Continued bud swelling
* Increased density
* More pronounced aromas
* Resin production becoming more visible
What not to expect:
* Explosive vertical growth (that phase is behind us)
* Major structural changes
From here on, it’s refinement.
⸻
🧤 Mr. Baggy Report
Mr. Baggy is still on duty, as always —
making sure everything is exactly where it should be.
Quiet week for him too… but we all know those are the ones where he’s watching the hardest 👀
⸻
🤝 Shoutouts
As always — this doesn’t happen alone.
Shoutout to:
* The Grow Diaries platform
* The community following along week after week
* The OGs who’ve been here since day one
* The new eyes joining the journey
* The supporters, the critics, the silent watchers
* The genetics behind this LSD run
* And everyone who takes a moment to learn, share, or grow alongside us
From grower to growers — respect.
📡 DELETED @ 1K Please stay tuned.we never quit https://www.youtube.com/@TheDogDoctorOfficial NEW 🙏 Thank you for your patience and continued support.
FOR DISCOUNT CODES AND MORE JUST FOLLOW THE LINK https://website.beacons.ai/dogdoctorofficial
📲 Don’t forget to Subscribe and follow me on Instagram and YouTube @DogDoctorOfficial for exclusive content, real-time updates, and behind-the-scenes magic. We’ve got so much more coming, including transplanting and all the amazing techniques that go along with it. You won’t want to miss it.
GrowDiaries Journal: https://growdiaries.com/grower/dogdoctorofficial
Instagram: https://www.instagram.com/dogdoctorofficial/
YouTube: https://www.youtube.com/@dogdoctorofficial Deleted by Youtube - https://www.youtube.com/@TheDogDoctorOfficial NEW
Vimeo : https://vimeo.com/dogdoctorofficial Under construction stay tuned ⸻
Explore the Gear that Powers My Grow
If you’re curious about the tech I’m using, check out these links:
🔆 Lighting & Environmental Control
• Future of Grow — Advanced LED lighting technology
https://www.futureofgrow.com/
DISCOUNT CODE: DOG20
• Lumiflora — Under-canopy LED lighting
https://lumiflorade.com/
• TrollMaster — Environmental controllers and automation gear (past collaboration)
⸻
Genetics
• Zamnesia Seeds — Genetics used in this project
https://www.zamnesia.com/
⸻
🌱 Soil, Substrates, Boosters & Root Support
• Plagron — Substrates, bio mixes, and supportive products
https://plagron.com/en/
⸻
🎒 Storage, Curing & Preservation
• Grove Bags — Curing and storage solutions
https://grovebags.com/
⸻
📸 Photography Equipment & Tools
(Not sponsors, but part of my creative toolkit)
• Sony A6700
• Sony full-frame macro lens + few more
• Stacking photography workflow - learning
• iPhone (for behind-the-scenes shots)
We’ve got much more coming as we move through the grow cycles. Trust me, you won’t want to miss the next steps, let’s push the boundaries of indoor horticulture together!
As always, this is shared for educational purposes, aiming to spread understanding and appreciation for this plant. Let’s celebrate it responsibly and continue to learn and grow together.
With true love comes happiness. Always believe in yourself, and always do things expecting nothing and with an open heart. Be a giver, and the universe will give back in ways you could never imagine.
💚 Growers love to all 💚
📸 P.S. – The Eye Behind the Lens
All photos in this diary (for now — except for the ones showing the camera, which I took with an iPhone) are taken with a Sony A6700 paired with a Sony full-frame macro lens and a few more.
Photography is part of the story — it’s how we share the fine textures, the glow, and the quiet details that words can’t always capture.
I’ve also started experimenting with photo stacking — a technique where multiple images, each taken at a slightly different focus point, are layered together to create one perfectly sharp image from front to back.
It’s not digital enhancement or AI; it’s pure photography — a way to reveal the plant’s beauty in microscopic depth, from trichome to petal.
You’ll even see a few shots of "ghost me" capturing the shots — camera, lens, setup — because every grow deserves not just to be cultivated, but documented like art.
FOR DISCOUNT CODES AND MORE JUST FOLLOW THE LINK https://website.beacons.ai/dogdoctorofficial
NEW DISCORD - Official Server Invite Link : https://discord.gg/ksjAkA5T74

Likes
17
Share


@Elpicor
Follow
The harvest is coming soon also for Strawberry Gorilla and Orange Sherbet, news this week the strawberry pie has grown, who knows if it will make buds full of resin or seeds, maybe both? We will see! the story continues...
Processing
Likes
3
Share


@PunjiNinja
Follow
So the very small plant that had a couple of bud I took it down, and was pretty surprised by the potantcy.
Now the other 3 plants are doing pretty good and they look very nice, and now I know what not to do with my grow and why they ended up so small, and thanks to the comments.
On plant #2 I believe that I'm about a week more and can be harvested and plant#3 looks about the same and plant #4 could be about another week or two

Processing
Likes
2
Share


@dubmusicrocks
Follow
One plant looks like it needs cal mag...the one with the biggest bud development so far, actually. the other 2 are doing good. I think these will yield more than the outdoors ones I grew. Humidity has been high, damn basement!!
Likes
9
Share


@Cestlaweed
Follow
Comienza el engorde en algunas cepa.
Se cambió el sistema de extraccion de temperatura (cooltube) y de olor y aumento distancia de foco, logrando reducir temperatura de 31-32 a 27-29.
Primer doblés a LSD 25, primeros signos de entrar a prefloración.

Likes
9
Share


@BLAZED
Follow
Germination (4-6 to 16-6)
White Widow - Green House Seeds Co.
Genetics: Brazilian x South Indian.
25.76% THC, 60% Indica, 40% Sativa.
Flowering time: 8 weeks.
I chose this strain because i bought it alot in the coffeeshop in 2018, nowadays the White Widow tastes nothing like how i remember it to be.
So i decided to grow it my self.
I read somewere that Green House has the most original genetics and its the seedbank where i am the most familiar with so thats an easy choice!
4-6
Today i put 2 White Widow seeds into a wet coffee filter to germinate.
6-6
After 48 hours the 2 seeds are ready to be put into a 0.5L pot filled with some Plagron Lightmix.
The lightmix has some nutes for the first 3 weeks or so, i will feed nutes when i transplant them into 18L AutoPots with 70/30 Coco-Perlite.
I made a feed with 0.5 gr Calcium and 0.2 ml Rootstimulator per liter. EC: 0.4 PH: 5.8, and watered the pot a bit.
I let them stay in the dark untill i see them above the soil.
7-6
After 24 hours they are above the ground and i removed the plastic foil covering the pots.
8-6
Temperature: 19.5 to 24.1 degrees
Humidity: 41% to 70%
Watering: 20 ml.
9-6
Temperature: 18.8 to 23.4 degrees
Humidity: 62% to 74%
10-6
Temperature: 19.4 to 23.9 degrees
Humidity: 60% to 74%
11-6
Temperature: 19.4 to 25.2 degrees
Humidity: 43% to 71%
Watering: 25 ml.
12-6
Temperature: 21.2 to 25.4 degrees
Humidity: 44% to 60%
13-6
Temperature: 22.2 to 25.9 degrees
Humidity: 44% to 71%
Watering: 15 ml.
14-6
Watering: 60 ml.
A week later and today is the last day of the germination phase. They are starting to grow faster from now on.


Processing
Likes
9
Share


@HollowSource
Follow
The nugs looks super dense already. Hard to get a smell from her yet. Perhaps a hint of cheese. She is set to give quite the yield. Nothing new to report.

Likes
25
Share


@PrairieFrostGrow
Follow
***** Week 7 Veg - January 16/21 to 22/21 *****
Week 7 will be their last week being able to take them out of the tent😟 SCROG netting going in on the weekend ahead. Not really a lot to report this week as the girls are doing well and I am just wanting their side branches to grow longer to help filling in the canopy anyway. Performed more LST this week and bending over the branches daily. Didn’t do any HST this week, will once the net is in and I have a better visual of how the branches need to bend.
They have come a long ways over the last 2 weeks when you look back at pictures. They have filled out with more side branching and other than battling a little purple striping on the main stems they seem pretty happy. Leaf colour is good and should be in good shape for the flip soon. Will go through all of week 8 before flipping so hopefully week 9 will be transition week and week 10 the start of flower.......have to get through next week first though😀👍
Switching over to tap water again. I have been struggling with calcium and magnesium deficiencies on all grows for the last year. I can’t seem to get the right amount added back to the RO water I use in all feedings. So running with straight water again now. Ppm coming out is 325 so I will work with that. Going to explore my own RO system in the house rather than bottled water, a system that adds back calcium, magnesium, and iron. It’s been flowing okay for the first week and will continue on for now. Using RO water I have been feeding full strength on the nutrients and have been working on backing them down a bit to compensate for the starting point of 325 now.
They have continued to be fed once a week roughly and supplemented with calmag and microbes.
Little more detail.......
Jan 16/21, Day 43 Veg
- 3L each of full line at full strength in RO water
- 1150ppm and 5.8pH given to the girls
- didn’t add any other nutes other than IPP line.
Jan 17/21, Day 44 Veg
- dry out day
- pulled down all the girls again tonight to train them outwards.
- side branching doing very well on Candyland girls.
Jan 18/21, Day 45 Veg
- 3L for each girl today with tap water and CalMag @ 1ml, Microbes @ 2ml, Nature’s Candy @ 1.5ml
- 700ppm and 5.7pH is what that works out to.
- have to use a considerable amount of pH down to adjust the tap water, over 6ml in 16L
Jan 19/21, Day 46 Veg
- measured the girls today and Candyland1 is 14” tall and CL2 is 13” tall. They were topped already😀
- dry out day for the girls.
Jan 20/21, Day 47 Veg
- 2.5L each with plain tap water
- 295ppm and 5.8pH.
- all the girls are looking big and bushy today.......they are ready for flip soon.
Jan 21/21, Day 48 Veg
- dry out day for the girls.
Jan 22/21, Day 49 Veg
- pulled all the girls down again......repeating the same LST each day manually rather than tying down for now.
- this should be water day but leaving for today as I am going to lolipop the lower branches and a heavier leaf stripping tomorrow.
- will feed tomorrow as they will benefit more.
Very solid week ETS......the girls are taking off and expect to see lots of leaves popping out over the next couple of weeks😀👍 Work on reducing the small stresses they seem to be experiencing more next week.......continue tap water and give a feed with Epsom Salts new week.

Likes
13
Share


@Northern_Ent
Follow
June 6: cool and rainy today. Bigger one is tall enough to tie down so I did. Used a piece of wire to hold apical tip below the other growth tips. Will do this for about week and will release once the lower sites are bigger and apical dominance has been broken.
June 8: adjust tie down but a couple hours later I noticed the stem had shifted and folded. Patched this unintended supercropping using green floral tape which you can barely see on the stem. Floral tape is great and readily available at florists at the local mall. Breathable, flexible, very helpful for this kind of thing.
Likes
49
Share


@masterofsmeagol
Follow
7/4 SUN was poking out a little bit. Plants loved that little feeding and seen to he noticeable larger this morning. I'm considering starting the nutes. At least the organic ones as well as upping the water intake I've been scared to water with all this rain and my experience last time. I plan on applying BT this afternoon and doing some work on the bottoms of the plants. I also saw a chipmunk in my cage so I have some spots in my fence that need to be patched. I know I can't compare this year to orher years as these are seeds and all the other years were clones. I CAN say for certain that my plants are healthiest they've been out of any of my journals. Previous plants were much larger but I was fighting numerous fungal, pathogens and pests at the sane time. Ear wigs would've lollipopped most buddies by now but I've seen no sign of them. I'm going to apply more poison where they were and add some rat traps inside the cage for the chipmunks. Once I fix the cage I think I'll be good.
UPDATE: Went back over and fixed the holes on my cage from high winds. I found an old wire trap or cage and just cut sections and ziptied them to the existing wire and to the structure thus covering any open holes. I'll need to put lathes aroubdvtge outside because if a rodent REALLY wanted in they could get in. My belt had been wearing thin but I use shit until it breaks (yesterday the heal came off my shoe lol) so I was working hard sweating my nuts off and my belt gives out totally. At least ive got the major stuff done. I took a few videos too. I'm imagining it was this little bit of sun that gave these plants that boost of growth but I'm wondering if the added nutes had anything to do with it. Bags weren't light and I could feel moisture in the soil so I didn't water. I'll check again tomorrow morning. Since I didn't see many plants or even leaves for that matter with damage I decided to hold off ob the BT and the plant doctor. Only time will tell if that was the right decision.
7/5 Plants look fantastic. I see a few more holes in leaves sporadically amd I'm hoping it's pillars. I've seen lots of lightning bugs on my camera though and grasshoppers are abundant. Not one growth shoot has been chewed (knock on wood) which is what the earwigs had always done. I watched a video from last year and by nowcthey had lollipopped all lower leaves. It may not be the best weather growing season wise but despite the rh consistently in the 90's I still don't have pm or fungal pathogens. Need to get the BT out. Didn't water as we've had all that rain. I'll water either tonight or tomorrow morning. Sunny high in the 90s low is 66. Tomorrow looks good too.
UPDATE WENT BACK OVER AROUND FIVE. IT WAS 88 DEGREES SO I WANTED TO CHECK THE GROW BAGS. THE POTS ARE FINE. IT WAS HUMID AS HELL. ONE PLANT WAS SLIGHTLY DROOPY BUT VERY LIGHT AND DRY. I FOUND TWO OTHERS THAT SEEMED LIGHTER THAN THE REST BUT HADNT DROOPED. I MIXED TWO GALLONS OF WATER WITH 1TSP KANGOROOTS AMD PHED IT CLOSE TO 6. I FED THE 3 PLANTS THAT WERE SUPER DRY LIKE A HALF GALLON AND SPRED THE REST OVER THE OTHER EIGHT PLANTS. THEY WERENT DROOPING BUT THEY WERE VERY DRY. I PLAN ON A FULL WATER TOMORROW. I WOULDVE DONE IT TODAY IF THE TEMPS WERENT SO HIGH. ITS RAINED A MONTH STRAIGHT SO I HAVENT HAD TO WATER. I MADE A COUPLE VIDEOS BUT I'LL HAVE TO UPLOAD TOMORROW.
7/6 Another super hot day. I hefted the pots and they still had some weight but I could tell they were dry. This rain has messed up my watering schedule. Well it made it so I didn't NEED to water. These are big plants now. I need to get a schedule to stick too. They're going to probably need a gallon a piece at least. I'm still nervous watering. Right now I'm just reading the plants. I added .5tsp kelp me/you to 1 gallon of water to help with heat stress. I fed an additional two gallons to the garden this morning including the two container plants in the back. They were dry on top too but I know they have water deeper down. Next watering I'll be more consistent and try to give them there 10%. It's great having the bags elevated. I can finally see when I start getting run off. I could even measure the ph of it instead of relying on that meter. Ill check the ph when I go back over. Still a few 🐛 holes but they are few and far between. I really don't want to spray for such a small problem but if I cant find them at night that's what I'll do.
UPDATE: Another 90 degree day. I went back over and gave the garden a gallon of water as they were dry and it didn't rain. Tried to use a soil ph meter to check ph. First couple were 6.4, 6.5 then I got 7.3 and I accidently dropped it. Then I got somethings that were high eights and even one 9! Obviously the Meter shit the bed. I'll lower the ph of the water slightly when I fully water tomorrow and I'm going to measure the runoff.
7/8 I must've messed up the journal again as the dates are off. GAVE PLANTS A FULL WATERING. Each girl got a gallon. I couldn't upload my videos this morning as I had to break up a fight. 3 on 1. Didn't give me a chance to put the videos up. I'll take some stills then I can upload them. I took stills and they all uploaded but didn't fucking save. I'm nit going to keep trying to upload if it's not going to. Noticed a few more holes in leaves and one skeletinized leaf so I need to either spray the bt or something more versatile. I'm putting more poison around the cage and de between the bags. I'll go check things out tonight. Sick of writing a book and uploading to just hace them disappear
7/9 Did a quick video today. Noticed the bags were fairly light despite the plants being soaked amd the pallets wet. I was pressed for time. I gave two gallons to the entire garden. I hope that will hold them over until tomorrow. I'll need to up how much water I give them. Going with a gallon and a half next time. I see more pillar spots and a moth took off when I shook the plants this morning. So I'm gonna have too apply the BT. I figure if I go over before dark tonight I might be able to see aju nocturnal insects around. Luckily my dad feeds the birds and they are always there. I think they help with pests.
UPDATE IT WAS A LITTLE COOLER TODAY BUT MICH MORE HUMID. I WENT AROUND SIX TO MAKE SURE THE GIRLS WERE OK WITH WATER AND TO GIVE THEM A TREATMENT OF BT. I WENT THROUGH THE GARDEN ANDCGOUND THREE LEQVES TO DEFOLIATE AND LITERALLY A COUPLE LEAVES ON TWO PLANTS WITH PILLAR HILESM WHEN I ARRIVED TWO BIRDS FLEW OUT. A HORNET CAME IN WHILE I WAS THERE. THIS DO LESS APPROACH SEEMS TO BE REALLY WORKING. I DODNT SEE NEARLT ENOUGH DAMAGE TO WARRANT SPRAY8NG MY EXTREMELY HEALTHY GIROS WITH ANYTHING. ILL KEEP AN EYE ON THEM AND CLEAN THEM UP A BIT. I DO NEED TO INSTALL THE VERY8CAL TRELLIS FOR SUPPORT. THEYRE PRETTY HEALTHY THOUGH. ONE PLANT IS ABOUT AS WIDE AS IT IS TALL. STILL......PLANTS ARE EXPLODING AND ITS GETTING TIGHT IN THERE. I NEED TO GET THE TRELLIS UP THOUGH.
7/10 I went over and was planning to water. Plants were wet and it's raining. Top of the medium was moist but the bags were light. ONE bag was super light but seeing that we are having showers all day and an additional half inch of rain coming tonight so I didn't water them. Especially since they looked great. Decided to to spray BT yet as the damage is so small and i think the birds have been taking care of the pillars for me. Now I'm wondering if I should've gave that ONE plant a little bit of water but it will be find. Did a video. I'm being careful not to over water. Last year this is when all my buddies were devoured by earwigs. And no senescence like the years before. I think it was hust those earwigs. I haven't lost shot for leaves. Even the stalks are bright green and look amazing.

Likes
3
Share


@PalmaGrow
Follow
Se inicia nueva semana del 26 - 1 se aprecia buen crecimiento pronto estará lista para poda y transplante.