
Likes
Comments
Share


@Waves420
Follow
Can you give me feedback on this plant. Using different colour leds some red lights and white. How is the plant coming along?

Likes
3
Share


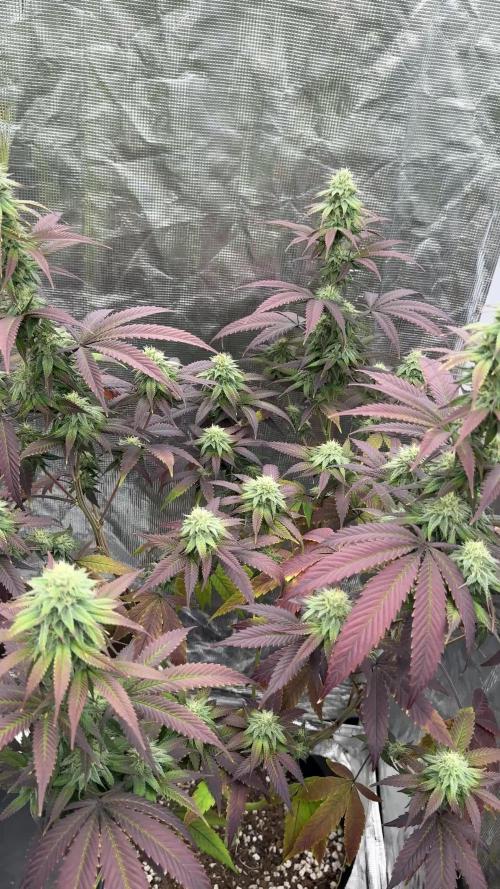
@Happydays58
Follow
10/02 - DAY 69
- Staying on course. Aromas are getting strong even with the exhaust & filter running 24/7.
- Mo is still drinking 2 Gal every ~36hrs. All buds are getting their purple on without low night temps.

Likes
39
Share


@J_diaz420
Follow
El cambio de fotoperiodo para el inicio de floración fue el día 18 de la semana anterior.
Desde ese momento de han hecho riegos con vegetativo y floración.
Generalmente en 3°o 4° semana de floración elimino el vegetativo.
También se a regado estimulante de floración delta 9 de manera foliar aprox cada 10 días.
Recordar que doy 1 riego de fertilizante cada dos de agua sin fertilizantes por semana, donde en los riegos sin fertilizantes añado microorganismos, enzimas y calmag.

Processing
Likes
30
Share


@CBD_Sweden
Follow
2018-04-10 Day 1
I gave the girls water and nutrients yesterday so nothing to drink today.
Turned them 90 degrees today, to give my girls as much lightexposure as possible.
The flowers get bigger and bigger for each day,
Overall the ladies look really good, the colors are very nice, they look healthy.
Sour Ripper nr 1 is 79cm
Sour Ripper nr 2 is 77cm
Added some new videos of the girls, check them out 👌
--------------------------------------------------------------------------------------------------
Strain information
After much effort Ripper seeds can introduce one of the most appreciated varieties by genetic collectors.
They have worked to get one of the few lines of Sour Diesel feminized version preserving the main qualities of a good Sour D: flavor and potency.
Sour Ripper has a sativa structure with a wide distance between branches, little foliage and a more compact and desirable bud than the Original Sour Diesel we work.
It's flowering period is 65-70 days.
The most "undergrown" taste of the United States available for your collection.
Vegetative: 1 to 2 weeks
Genotype: 60% Sativa / 40% Índica
Indoor flowering: 65/70 days.
Outdoor flowering: Mid October
Yield: Medium / High
Effect: Powerful.
--------------------------------------------------------------------------------------------------

Likes
54
Share


@TragicTerps
Follow
A full organic grow, started with hermie issues and a location change and many other factors I'm impressed with the outcome. I will say the genetics seem to be prone to easy foxtailing but the overall bud density is arguably my most preferred. About the density of a big marshmellow? I don't know how else to explain it.
Either way when it's all dry I will likely end with 3-4oz dry and trimmed. No larf really everything is a size that I would deem useable.
Smoke report next!

Likes
11
Share


@Papastroumf
Follow
Day 66 : This lady continues fattening, faster now. Also crystal production increased. The breeder suggests 70-75 days. For now all crystals are almost milky with some cloudy. So she need 1 week for sure, maybe a bit more. That gum smell is so attractive, you want to eat it. Reduced bio grow and removed Calcium.
Edit 70 : I saw the first ambers, very little. So i watered for last time with juices Next watering will be flush to reduce the juices in the soil. So if initially has 1200-1300ppm i want to reduce it to 350-500ppm. After flush continue pure water until chop chop. This is my approach for all ladies always.

Processing
Likes
3
Share


@GanjaFarmerGrow
Follow
Dispite the bad air and heat that she took..
she is starting to recover...
I hope she heals...
She has started to produce some flowers...
fingers crossed.. 🙏

Likes
11
Share

@jellyjelly
Follow
Came back from vacay to a healthy girl!!!
The once warm dumpster smell is now replaced by a LOUD aroma full of piney sweet candy musky notes - classic gelonade to me
Fan leaves are turning purple but more importantly calyxes are swelling AND best yet, crazy trichome density and abundance.
So many flower sites, some fan leaves beginning to wilt. ALSO - this is the first time I’ve had a branch sag on its own weight!!!
Minor health concern - speculating here, possibly nutrient deficiency? Im seeing some minor yellowing on top leaves, only on the side tips curiously
Might make sense given the pot size. Trying to fix that with amendments and nutes, damn small pots
Regardless, can tell this will be a good one as I continue to dial it in - fiiiiireeee incoming!!!!

Likes
2
Share


@Gingerbeard
Follow
So the majority is already in jars just the largest tops still hanging and will need a few more days. Smells great, really nutty with a sour sharpness. Smooth smoke, had one pheno which produced dark solid buds but the other 3 were lighter in colour and had a somewhat airier bud structure, still very resinous and smelly though.


Processing
Likes
15
Share


@MG2009
Follow
04/18/2020
#5 is growing fast, as you can see in pic of the roots. #1 getting tall,#2,#4, will repot when roots come out of drainage holes.
I believe #5is a male but no signs of sex yet just fast and large growth lead me to believe that. #1 seems sativa leaning, #2,#3,#4, are on the smaller side very tight internodal spacing.
I also applied some egg shell and banana peel tea, (not #3 hydro 1/2 strength nutes) #5 loved it all the other plants got a little burned, tea batch to strong! Should have diluted more😒. All seem to be recovering well🙏
04/19/2020
Reppot #2 today #4 still in waiting.
04/23/2020
#4 potted up
And #3 got her first full strength feeding with advanced nutrients GMB, 4 ml. per liter hope she likes it we see next week🙏


Likes
15
Share


@B4nkz
Follow
As you can see today I heavily defoliated the plant and adjusted the ties to gave her the desired shape.
I‘m watering every 3 days
Likes
10
Share


@Unnamed
Follow
Removed 20l from the reservoir and filled it up with fresh nutrients.
Added Yara Kristalon Orange, Yara Calcinit and a little bit of Haifa GrowClean to the reservoir.
Adjusted PH/ORP, PH- adds P and ORP adjustment adds K.
Topped it up with tap water every second day, the dehumidifier pulls ~12l/day, most of it should be from the plants I've got in my tent.
I am struggling to keep ORP at ~100, might be a sign of root trouble.
Nothing else to report.
Values are average of the day.
DATE - °C - RH% (Tent Temp/RH)
20241125 23.9 61.9
20241126 23.6 60.9
20241127 23.3 60.3
20241128 22.8 60.7
20241129 23.2 60.4
20241130 22.7 61.3
20241201 22.3 60.3
DATE - PH
20241125 5.99
20241126 5.94
20241127 5.96
20241128 5.95
20241129 6.02
20241130 5.98
20241201 5.93
DATE - ORP (mV)
20241125 103
20241126 95
20241127 92
20241128 67
20241129 127
20241130 88
20241201 72
DATE - EC(us/cm)
20241125 1955
20241126 1852
20241127 1864
20241128 1914
20241129 1988
20241130 2052
20241201 2135
DATE - CF
20241125 19.55
20241126 18.52
20241127 18.64
20241128 19.14
20241129 19.88
20241130 20.52
20241201 21.35
DATE - °C (Reservoir)
20241125 23.1
20241126 22.3
20241127 22.2
20241128 21.9
20241129 22.3
20241130 21.8
20241201 21.2


Likes
86
Share


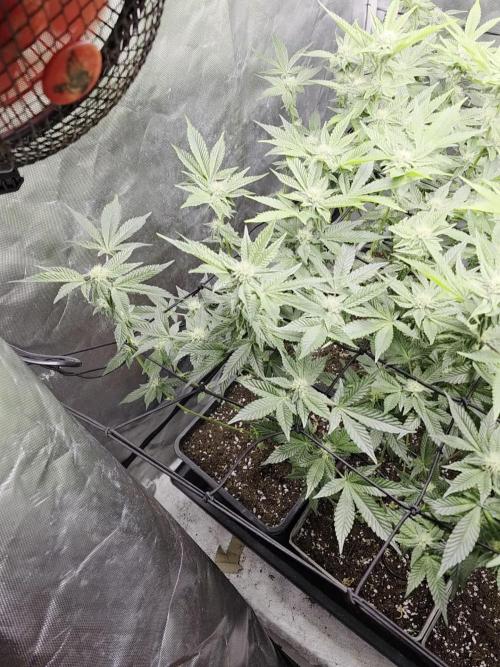
@CANNASIM
Follow
------GENERAL COMMENT------
Girls are moving forward, a lot of growth for the week, the two strains are absolutely different in terms of structure. Unfortunately the three Candy Kush did not sprout, so I will run only this two girls for this cycle. Down a bit the watering mainly doing a feed every other day, trying to manage the root mass to expand. Choose to do natures candy also in veg since i'm using recharge regularly, is 0-0-0 not noticing a lot of EC raise with it, velo kelp came in to play also. One dose of sensi Cal Mag this week since i notice some paling going on, my medium is inert by the way.
------GG.AK COMMENT------
This strain is going slower compared to her sister, looks good though, less foliage, stretching more, I see more sativa elements taking over.


Likes
11
Share


@CrushedCana
Follow
La planta se empezó a estirar y a mostrar sus primeros pistilos y ya empieza a marcar esas puntas que irán florando
