The Grow Awards 2026 🏆 


Likes
Comments
Share
@Walter_the_Ragamuffin
Follow
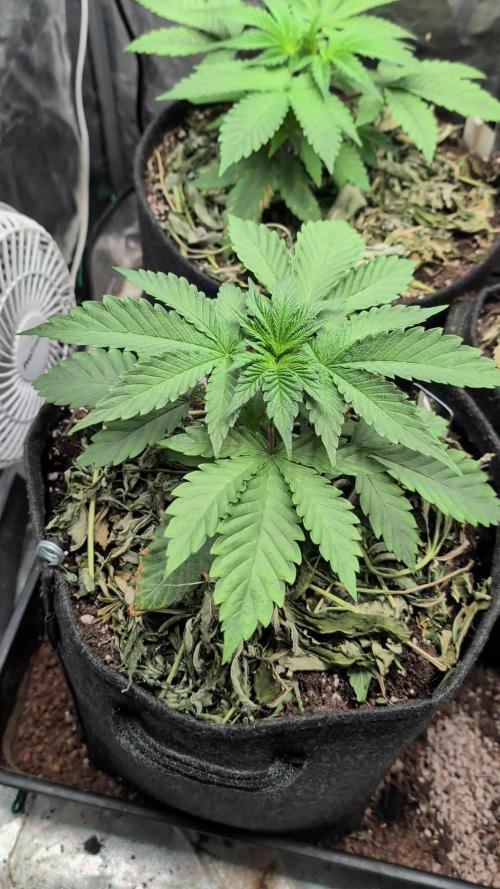
More Fantastic Grow News! They have been still doing great and developing the flowers and buds - I am VERY happy with how everything has been turning out! When opening the tent you are immediately hit with the subtle smell of maturing, ripening ganja - Each flower has a mixture of white hairs, orange hairs and an incredible amount of frosty leaves and trichomes. I notice that my Cherry Gorilla x Sol Sonic #2 is sprouting the red hairs faster than the rest - I hope she can hold off until the rest of the girls are completely finished!
The Cal-Mag seems to be working - I am noticing dark, dark green leaf color right next to the biggest buds - I am guessing that this is the Cal-Mag doing its thing. I see that the leaves that were damaged from the deficiency are slowly turning back, however I feel as it is this far along, the plants are most likely focusing on the flowers rather than the leaves - which seems to be what I wanted. The dark color next to the buds give me hope it was a good remedy.
When touching each of the flowers, you are left with a VERY sticky, leftover goo than stays on your fingers. Each flower smells extremely distinct - which is somewhat unexpected. This just goes to show you the power of phenotypes! These seeds came from the same dispensary bag, and each one seems to be just a little different. You can especially see what I am talking about from the Macro shots I took this week - look at the descriptions for the full breakdown. Wish me luck! I am slowly approaching week 7 - 8 when I am going to be starting my flush process (I think?) Appreciate all the input, likes and follows!
Likes
20
Share
@FlavoursUk
Follow
Things picking up now. Set up my in tent camera so that I can monitor the grow room and temps from my Phone! Great little gadget! Makes my work a lot easier too. More pictures of the girls shortly.
My instagram had been deleted for no reason exactly, I don't know. So if you could take a moment to follow the new one; flavours_uk Would appreciate it a lot as I post more there than I do here. Thanks and stay tuned!
Biggest Stardawg girl is 25cm tall on Day 29. Also updating on Youtube.
Stardawg now 31cm tall on Day 31, impressive growth.
DAY 32: Done some slight LST and leaf tucking to expose the bud sites to more light for more tops as I can tell pre flowers will soon start to appear.

Likes
13
Share
@Flatuz
Follow
• Unteres Drittel entlaubt: Entfernen der unteren Blätter zur besseren Belüftung und effizienteren Energienutzung der Pflanzen.
• Gorilla Zkittlez getrimmt: Zwei schwache, kleine Triebe entfernt, um das Wachstum der stärkeren Bereiche zu fördern.
Ausblick: Weiteres Beobachten und gegebenenfalls weiteres Beschneiden zur Förderung des Wachstums.
Likes
14
Share
@Greenmartini
Follow
All good this week too. The strawberry lemonade turning purple!:)) gg#4 it’s a hermy… the other plants are good! White widow xxl it’s the first to harvest…In 3 weeks…. Fxxk

Likes
92
Share
@DogDoctorOfficial
Follow
Week 10 - Second Week of Flowering 🌸
As week two of flowering begins, the garden’s growth is unstoppable! These ladies are thriving, stretching up while staying beautifully vibrant and green. Every inch of this tent is optimized—each plant is soaking up light, nutrients, and water precisely as they need, filling the room with energy.
Room Conditions 🌡️
• Temperature: 27.3°C
• Humidity: 62.6%
• CO₂ Levels: 800 ppm
• VPD: 1.36 kPa (excellent range for robust flowering)
• Lighting Intensity: 818 PPFD
Solution & Medium 💧
• Solution Temp: 21.5°C | TDS: 470 ppm | pH: 6.02
• Medium: Moisture 100% (recently dried to 67%), TDS 510 ppm, Temp 22.5°C
The “dry-out” to 67% was a strategic move, helping boost nutrient uptake and root strength. Meanwhile, our slight increase in reds seems to be having the desired effect, nudging these ladies further along in the flowering process.
Eye Safety & LED Lighting 🌞🕶️
With powerful LED systems like the ThinkGrow and ICL-300, eye protection is critical. LED grow lights emit high-intensity light across the full spectrum, including intense UV and infrared components that are not easily detected by the human eye. Long-term exposure without adequate protection can lead to eye strain, and in extreme cases, damage to vision.
• Blue Light Hazard: LEDs often have elevated levels of blue light, which can harm the retina over time if proper precautions aren’t taken.
• UV Protection: Even low doses of UV can accumulate and harm eyes, so grow glasses with UV protection are essential for any indoor gardener.
Investing in quality grow room glasses can help protect from glare, UV, and infrared rays, making plant care safer and more comfortable.
Lighting Enhancements: ICL-300 In-Depth 🔆
The ICL-300 is our newest addition, specifically designed for inner canopy illumination. This LED offers a targeted light boost under the canopy, enhancing flower growth in lower and shaded areas—ideal for maximizing yield and light efficiency.
• Dual Spectrum Technology: The ICL-300 provides a custom spectrum designed to penetrate deeper into the plant canopy, promoting robust bud formation throughout.
• Enhanced Light Distribution: With strategically positioned diodes, the ICL-300 reduces shadowing and balances light distribution to all parts of the plant.
• Energy Efficiency & Heat Management: This light is designed to be energy-efficient, running cooler and reducing the risk of heat stress within the grow space.
The inner canopy light gives the plants exactly what they need, particularly during the flower stage when bud sites deep in the canopy can benefit from more direct exposure. However, after noticing slight leaf burn on some plants, I’ll hold off a bit longer before fully integrating this light to ensure optimal adjustment.
Looking Forward 🌟
As we continue dialing in conditions, it’s all about balance, precision, and taking proactive steps to optimize every aspect of the grow environment. We’ll keep a close watch on the canopy height, and next week, I’ll aim to fine-tune the light integration even further with the ICL-300.
P.S. - ICL-300 and CO₂ Sensor 🌱
The TrolMaster CO₂ Sensor (MBS-S8) has been crucial for real-time CO₂ adjustments, ensuring the plants get exactly what they need without constant monitoring. Combined with the ICL-300’s spectrum flexibility, these tools make an unbeatable setup, allowing for nuanced control over plant growth and development.
As always, a huge thanks to the Grow Fam for the tips, support, and enthusiasm! I’m excited to see what these next weeks will bring as these plants reach their full flowering potential. Stay tuned for more updates, and don’t forget: eye safety first, growers! 🌞🌿
Discount Codes so you can save big on your next check out 💚💚💚
Kannabia - DOGDOCTOR 30% off
SeedsmanSeeds - DOGDOCTOR 10% off
CannaKan- DOGDOCTOR 15% off
terpyz.eu - DOCTOR 15% off
The Neutralizer - PORKIT5-DOG 15% off
As always thank you all for stopping by, for the love and for it all , this journey of mine wold just not be the same without you guys, the love and support is very much appreciated and i fell honored and so joyful with you all in my life 🙏
With true love comes happiness 💚🙏 Always believe in your self and always do things expecting nothing and with an open heart , be a giver and the universe will give back to you in ways you could not even imagine so 💚
Friendly reminder all you see here is pure research and for educational purposes only
Growers Love to you all 💚💚💚


Likes
2
Share
@ProlificGrowth410
Follow
Super lemony smell with hints of berries kinda like a berry lemonade
Likes
17
Share
@Huntress007
Follow
Black Opium is looking gorgeous at this point she has been moving into flowering stage brilliantly, I can see flowers forming and emerging! Can’t wait to see her buds!

Likes
8
Share
@AERO_Grower
Follow
2° Semana- Aeroponía - Ligera mejoría de las plantas, el daño de la primera semana aún sigue afectando, sin embargo ya comienzan a tomar forma. Se mantienen las condiciones de cultivo. Los dos videos son de la misma semana pero en distintas etapas.
---------------------------------------------------------------------------------------------------------------------------------------------------------------------------------------------------------------------
2° Week- Aeroponics - Slight improvement of the plants, the damage of the first week is still affecting, however they are beginning to take shape. The two videos are from the same week but in different stages.


Likes
13
Share
@Lazuli
Follow
because shes so huge i can not move her an inch.. so no flush happened and i went straight in to ripen feed. I hope she finishes up by next week because i have to cut buds away every day with mold. Lol its still going to produce a lot
Likes
15
Share
@DudeGrowsWeed
Follow
October 16. 2021
The Dinafem Quick Critical popped first on October 12th, then the CBD Medi Kush popped the next day. As of October 16th Critical Sour and Dr Bruce Banner have not popped. Seeing a few fungus gnats, but nothing to worry about. I sprayed the top of the soil with water to keep the top of the soil, and the seed, from drying out. I also dropped second seeds for Critical Sour and Dr Bruce Banner. Check in next week to see what happens next! 😎


Likes
5
Share
@Eljardindemargarita_grower
Follow
Ya en macetas de 5 litros
Estamos con los preventivos previos al paso aflore
Ellas en pocos días afrontaron con buenas ganas en último trasplante, y de eso vamos a ir adelantando algún tiempo , ellas ya parecen que muestran su madurez sexual , así que ellas van calentando motores
En días cviamos xliclo
En nada empieza la marcha
Un gran saludo

Likes
6
Share
@Growtopus
Follow
Das Umtopfen fanden die drei nicht ganz so nice, anderes Licht, weniger RLF, niedrigere Temperaturen haben die Umgewöhnung ordentlich erschwert. Durch die extrem niedrigen Temperaturen die letzten Tage habe ich das Zelt nicht über 18 Grad bekommen. Jetzt haben wir wieder ca 20 Grad und jede Pflanze hat ca. 5 Liter bekommen.
Ich denke, dass wir in den nächsten Tagen mehr Wachstum sehen und es wieder spannender wird.


Likes
43
Share
@420DeepGrow
Follow
Gracias al equipo de Kannabia Seed y XpertNutrients, sin ellos esta magia no seria posible.
🍁💐: Si Runtz se ha ganado su popularidad a pulso, esta versión autofloreciente es digna heredera de sus atributos. No es de extrañar que nuestros criadores hayan acertado con su programa de reproducción, al combinar dos de las cepas más fascinantes de la actualidad: Zkittlez y Gelato.
planta resistente y robusta, de cuerpo esbelto y fuerte ramificación lateral, que se puede cultivar prácticamente en cualquier entorno; pero prefiere los veranos largos y cálidos, tal y como quiere la madre naturaleza, donde bañada por el sol se eleva hasta los 120 cm. para producir unos rendimientos muy gratificantes de 100-150 gramos por planta.
En interior, y tras solo 70 días desde la semilla, también recompensará con cosechas abundantes de hasta 500 gr./m²
Inmediatamente después de encontrarte con ella, lo primero que notarás es su aroma descaradamente afrutado, con un toque tropical cortado con reminiscencias terrosas y amaderadas, que se entremezclan de forma agradable para ofrecer un combo que hace salivar las papilas gustativas.
Ofrece un sabor confitado, refrescante y similar a sumergirse en una piscina de frutas cítricas y flores de fragancia intensa. Al inhalar, obtienes la bondad de la dulzura; al exhalar, el humo se convierte en suave y cremoso, dejando suficiente profundidad en cada bocanada para satisfacer a aquellos que buscan los matices más complejos.
⛽ XpertNutrients: es una empresa especializada en la producción y comercialización de fertilizantes líquidos 🍶y sustratos🐛, que garantizan los mejores resultados y cosechas de la más alta calidad. A través de una cuidadosa selección de materias primas y un proceso de producción avanzado, sus productos son sinónimo de resultados confiables.
🛒 Consigue aqui tus fertilizantes:
https://xpertnutrients.com/es/sobre-nosotros/#:~:text=Xpert%20Nutrients%20es%20una%20empresa,de%20la%20m%C3%A1s%20alta%20calidad.
📆 Semana 2:
Esta remesa va algo mejor que la de la semana anterior ya que la temperaturas van siendo algo mas elevadas 🌞🌡️.
🌱 sigue con la luz del sol + 12 horas de luz artificial con el Marshydro TS-3000, el frio y la baja humedad dificulta su crecimiento, en los próximos dias ira a su lugar definitivo en medio de algun lugar donde mostrará todo su potencial 🚀😎.
La he estresado debido a la aplicación de infusión de ajo y jabon potasico casero (error) porque las que tengo en el exterior han sufrido la mordida de algun insecto y no quiero que me pase esto con esta XD.
Likes
46
Share
@Capo420
Follow
Week has had ups and downs🙃
Plants seem to be growing fine 🙂 But there is yellowing and spotting still that I cannot resolve.🙄
Day 22- Still having some kind of deficiency/issue. They are growing well, don't really seem to be stunted. I think I may have burnt them with nutes.🤧 Flushing may help. 🤷♂️😅
Run-off pH is at 6.08, PPM 266
I have flushed them, lowered feeding... I'm driving myself crazy. Hahaha
Update 119 Day 23- Things are looking better. I definitely have been overfeeding them.😅
They are responding well to half nutes.🙌
Issues seem to be getting much better.
Happy Growing!
🤙💚💪🌱😎🌱💪💚🤙
Likes
39
Share
@MrSpooky882
Follow
Es sieht alles sehr sehr gut aus, ich gieße nur noch mit klarem Wasser und ich denke die Pflanzen sind so in 3 bis 5 tagen fertig!
Dann wird für 2 Tage die Lampen ausgemacht und dann wird geerntet 🤩🤩🤩😁 der Geruch ist der Wahnsinn bis jetzt ich bin gespannt wie es in paar Wochen ist 🤤🤤🤤
Everything looks very, very good, I only water with clear water and I think the plants will be ready in 3 to 5 days!
Then the lamps are turned off for 2 days and then we harvest 🤩🤩🤩😁 the smell is amazing so far I'm excited to see what it's like in a few weeks 🤤🤤🤤

Likes
76
Share
@MagnoliaFrost
Follow
SETUP:
-MIGRO 100
-Grow space 60X60X160 (Mammoth PRO 60).
-Grow medium is Gold Label Special Mix Gold edition Premium, Airpot (10l).
_____________________________
29th August - Day 6 (Day 8 Beer Cup) - Gave them 50ml of 💧each. The Beer Cup one is looking like she needed more water.
_____________________________
1st September - Day 9 (Day 11 Beer Cup that's been transplanted) - I need to support both cause the tip over if not :(
_____________________________
6th September - Day 14 (Day 16 "Beer Cup") - Gave Final Pot 100ml of 💧. Nothing for "Beer Cup". Increased the LED from 1/5 of strength to 2/5 of strength.
Likes
3
Share
@babaweed
Follow
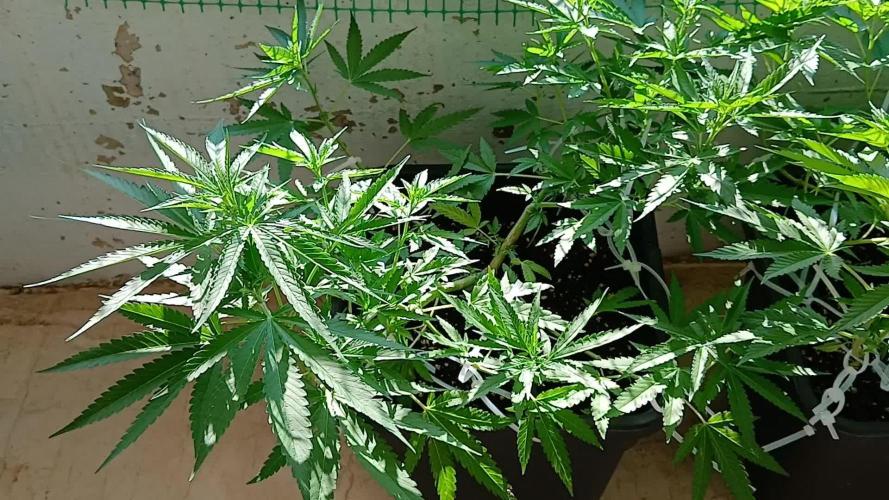
The plants are really beautiful with this huge top, the flowers underneath are large and very fragrant. They are dark green and white really nice. The resin is really sticky and fragrant, I can't wait to harvest

Likes
19
Share
@Naujas
Follow
everything turned out very well :) and it's only with 50w and with 40x40cm space :) It was an interesting journey with her, a slightly different cultivation and old mistakes were discovered :) the flowers are not dense, but they are really very, very sticky :) I'm happy:)
Likes
15
Share
@Nimas
Follow
Hello everyone 🍀
The girls are in pre flowering stage!
So far so good 🙏
Cheers 🍀 ❤️


