


Likes
64
Share


@SmokingTiki
Follow
This is the last week 💀 There are less pictures than usual but nothing special happened except the yellowing of the plants due to the nutrients cut. Wait for the "Harvest" week for the final photo shoot 😎

Likes
37
Share


@The_Bearded_Grower
Follow
welcome to Day 29 15/1/21 she has grown so much in 1 week and that makes me happy as she was quite small. I have done light trimming of the lower leaves and toped up the res with the addition of flower nutes.
that's all for this week happy growing and as always keep your stick on the ice

Likes
9
Share


@Drtomb
Follow
Just purchased a new Gorilla grow Tent, and completely redid my setup in my 4x8 veg area and my new 4x8 Flower area.
First the Veg area. It consists of a 4x4 flood table, the other side contains 13 4gal buckets full of hydroton. Also 1 control bucket. This control bucket not only floods the flood buckets, but also floods the table.
The plants start off from the moms, they are moved from the flood table into s flood bucket and vegged to produce at least 9 clones (hopefully more like 15) . They are then cloned and after 1-2 weeks they are moved into the 4gal buckets. They sit for ~1month growing bigger, all while waiting for there flowering spot to be opened up.
While vegging they are topped and have 3-4 tops selected and focused by trimming any branches that start to reach for light. By the time they are moved they are about 16" inches high. All have 3 tops and are approximately the same height.
They are moved into the flowering spot snd immediately are switched from veg nutes to bloom nutes.
Over the next 3 weeks i will trim branches that reach away from the 3 main cola stems by more than 2". Also if one or 2 branches on the plant are having a bugger growth spurt, i pinch the tops. This allows the plant to focus growth hormones to the other tops.


Likes
11
Share


@Gonach
Follow
Al principio de la semana se subió la luz a 70 cm aproz de la planta, reduciendo la potencia al 50%. Se regó a cada una de manera foliar con Alg-a-mic de biobizz para regularizar la deficencia de nitrógeno. A mitad de semana se regó con 3 ml x litro de biobizz a c/u. Cada planta consume aproximadamente 1.6 lt.
Al final de la semana se cambio el ciclo a 12/12 y los resultados como se puede ver en el video.
Gracias a todos x sus posteos....

Likes
120
Share


@DogDoctorOfficial
Follow
The Harvest Prelude:
After a patient wait and 48 hours of darkness, the moment arrived. The Tropical Tangie Lego Ninja, standing proudly like a silent guardian, was ready for the grand harvest. The sound of each cut echoed through the grow space, reminiscent of felling a mighty tree. The compact structure of the buds was awe-inspiring, a testament to the ninja's disciplined growth.
The Lego Ninja, like a stoic warrior, was then hung upside down, beginning a two-week drying ritual. Maintaining an ambient temperature of around 21°C and a relative humidity of 60%, this slow-drying process allowed the buds to retain their essence, preserving the symphony of terpenes and cannabinoids.
The trimming phase unfolded like a fragrant masterpiece. Each bud, adorned with a glistening layer of resin, transformed the trimming process into a sensory delight. The zesty aroma of oranges enveloped the room, a tangible expression of the tropical lineage. The compact buds made every snip a careful dance, revealing an abundance of frosty trichomes.
The moment of reckoning arrived with the scale's unveiling. The Tropical Tangie Lego Ninja, from a single plant, bestowed upon me 309 grams of dried medicine. Each gram was a treasure trove of cannabinoids, a promise of euphoria and relief. The sheer compactness of the buds translated into a concentrated potency that left me in awe.
In parallel, the clones, nurtured with equal care, showcased a fascinating divergence. A twist in the tale unfolded as the intense oranges of the mother transitioned into vibrant tangerines. This unique expression, I believe, was a testament to the clones weathering a summer heatwave differently, bringing forth a distinct personality.
The clones, resilient and generous, gifted me a bountiful 549 grams of pure joy. This now my keeper of the garden, an embodiment of the Lego Ninja's legacy. The harvest dance, though familiar, carried the nuances of tangerine zest, a refreshing twist that left me eager to explore its intricacies.
Both harvests shared a common thread—their resinous abundance. The trim bin, akin to a treasure chest, gleamed with golden trichomes and fragrant joy. Sticky fingers became a badge of honor, a tangible connection to the resinous richness that filled the room.
Shout Outs:
No harvest report is complete without expressions of gratitude. A special nod to @DutchPassion_Official for crafting the genetic marvel that is the Tropical Tangie Lego Ninja. Their expertise paved the way for this epic journey, and I tip my hat in acknowledgment.
In conclusion:
As the dust settles on this epic harvest saga, my heart brims with happiness and excitement. The Tropical Tangie Lego Ninja has proven itself not just as a plant but as a living masterpiece. Stay tuned for the smoke report, where we delve into the true essence of this botanical ninja's legacy. Until then, fellow cultivators, may your gardens flourish, and your harvests be as bountiful as the joy they bring.
As always thank you all for stopping by, for the love and for it all , this journey of mine wold just not be the same without you guys, the love and support is very much appreciated and i fell honored and blessed with you all in my life<3 <3 <3
#aptus #aptusplanttech #aptusgang #aptusfamily #aptustrueplantscience #inbalancewithnature #trueplantscience
With true love comes happiness <3 <3 <3 Always believe in your self and always do things expecting nothing and with an open heart , be a giver and the universe will give back to you in ways you could not even imagine so <3 <3 <3
Friendly reminder all you see here is pure research and for educational purposes only
<3 <3 <3 Growers Love To you All <3 <3 <3
P.S- I must extend my sincerest apologies for the missing video reports. Regrettably, Grow Diaries is still facing some technical issues that are preventing me from uploading them. Rest assured, as soon as the situation is resolved, I'll share those videos to give you an even closer look at this fascinating journey. or in my case apparently GD dont let me do uploads over 100mb with is super small file if you working and editing videos , doing my best here to upload them all but GD is not making my life easy on this <3 <3 <3

Likes
6
Share


@Aleks555
Follow
Blue Gelato - Royal Queen Seeds, 118 days from seed and 70 days in flowering. We're watering her with pure water and ice, preparing for the harvest. We've also tried smoking the lower buds, and the result is simply incredible—very potent and flavorful. Now we're waiting for full maturity and root flushing to experience the full strength of this beauty.

Likes
9
Share


@Cannabot
Follow
Dense hard chunky buds.Love it,overall very impressed with this strain.Grow was good with no issues.
Likes
4
Share

@Green_Zyphoria
Follow
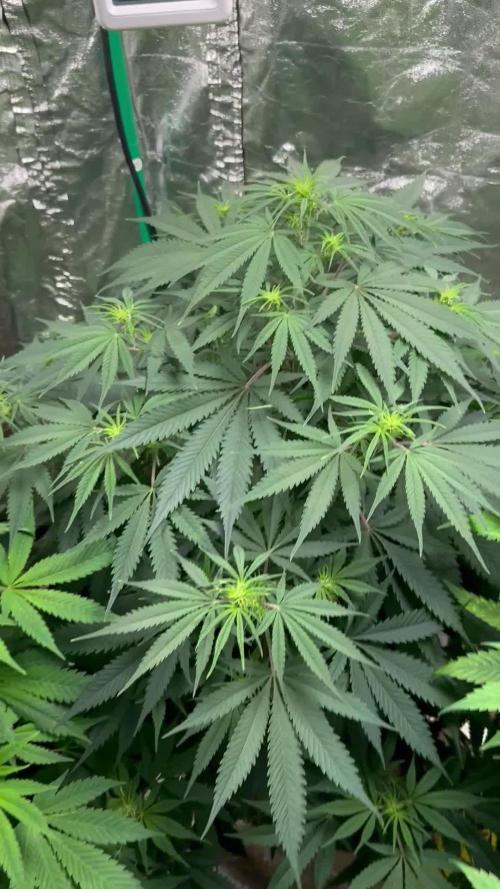
We’ve reached Day 56 of bloom. The Papayton #3 is showcasing a spectacular "black autumn" fade, with fan leaves turning a deep charcoal-violet, making the frost-covered buds stand out brilliantly. The resin production has hit its peak; the buds are incredibly sticky, feeling like superglue to the touch. Due to rising outdoor temperatures and tent peaks of 29°C, I’ve strategically dialed back the Sanlight to 80%. This preserves the sensitive terpenes and allows the lower flowers to ripen steadily without stressing the main colas.
Likes
7
Share


Likes
10
Share


@DaddyPrime2
Follow
8/28 beautiful plant with nice nodal stacking. not too much stretching. she stretched outwards more than up. love the structure of this plant. this week fed her with 3 tsp 711 grow and 2 tsp 374 bloom. top dressed and still topping with diatomaceous earth as needed.


Likes
27
Share


@w33dhawk
Follow
Läuft.......... 😁😁😁
Gab nur Wasser diese Woche und die Ladys haben sich flott entwickelt.
Jeden Tag die Lampe hoch ziehen um 1 bis 2 cm Ach ja vorschaltgerät läuft seid dieser Woche auf 300watt hatte das gefühl die Ladys bräuchten mehr Licht

Likes
60
Share

@World_Breeders
Follow
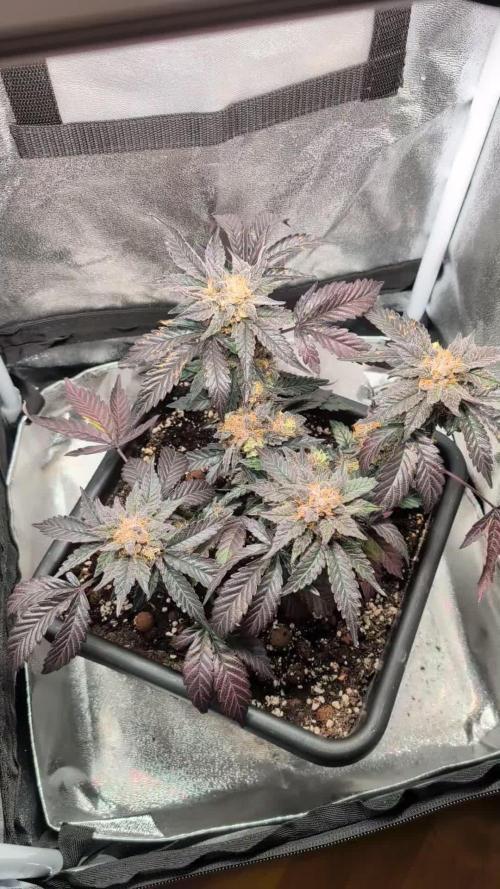
🌾 Harvest Week 🌾
What an incredible journey this has been. Hokuzan has reached the finish line, and she's looking absolutely stunning. The buds are fully developed, covered in an incredible layer of resin, and the deep purple tones have become even more pronounced over the last few days.
Most of the pistils have darkened, the flowers have finished swelling, and the aroma is now at its strongest. Every time the tent is opened, the terpene profile fills the room and reminds me why this genetic has been such a pleasure to grow.
The trichome coverage is simply outstanding, coating every bud and sugar leaf with a thick blanket of frost. The plants have stayed healthy from start to finish, making this one of the smoothest and most rewarding runs I've had.
It's finally time to harvest. I'll be cutting them down now and moving on to drying and curing, where the real magic continues. I can't wait to see the final results after a proper cure.
Genetics: Hokuzan (World Breeders)
🌍 Breeder: Hidden Group Genetics


Likes
36
Share


@Salokin
Follow
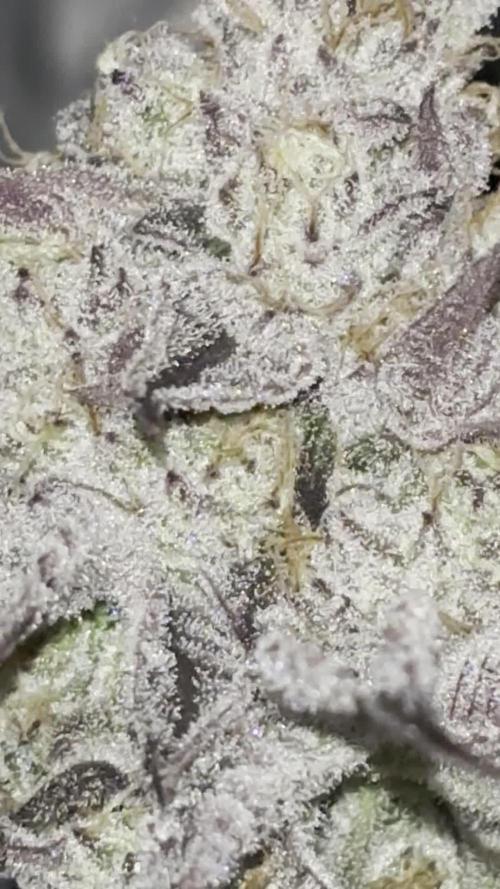
Week went again very uneventful, she is not very hungry anymore and had to constantly refill the reservoir with water to keep the ec in check. Trichomes are all cloudy and start to turn amber. She has developed that amazing purple hue and is sticky to the max, so definitely showing her glue heritable ;) I will continue to feed her until Wednesday this week and then start the flushing and darkness. Harvest will be next week end.


Processing
Likes
2
Share


Likes
16
Share


@BLAZED
Follow
1-11
At the end of the day i chopped her down, did a small wet trim removing some big leaves, and hang the buds to dry.
2-11
Temps: 19.3 to 20.5 degrees
Humidity: 55% to 64%
3-11
Temps: 17.1 to 20.4 degrees
Humidity: 54% to 66%
4-11
Temps: 18.1 to 19.6 degrees
Humidity: 62% to 66%
5-11
Temps: 17.9 to 20.1 degrees
Humidity: 56% to 64%
6-11
Temps: 17.6 to 19.4 degrees
Humidity: 59% to 67%
7-11
Temps: 17.8 to 19.2 degrees
Humidity: 60% to 66%
8-11
Temps: 17.4 to 19.9 degrees
Humidity: 58% to 67%
9-11
Temps: 17.8 to 20.1 degrees
Humidity: 62% to 64%
10-11
Temps: 18.2 to 20.5 degrees
Humidity: 62% to 65%
11-11
Temps: 18.7 to 20.4 degrees
Humidity: 57% to 65%
12-11
Temps: 18 to 20.1 degrees
Humidity: 54% to 66%
13-11
Temps: 17.8 to 20.2 degrees
Humidity: 61% to 67%
Started trimming today.
14-11
Finished trimming.
I was afraid of finding a lot of budrot, luckily it was only the one cola.
The buds are very frosty, the bottom at the base of the branch looks a bit brownish on some buds, i inspected it with a microscope and didnt find any mold or weird things. There are a lot of amber trichomes tho.
I think that's why it looks brown like that. It smells and smokes good, so i think its fine.
If someone thinks otherwise, let me know!
End results:
Buds: 92 Grams
Small Buds: 18 Grams
Trim: 16.7 Grams
Total weight of the buds: 110 Grams.
I calculated that i used a total of 72.3 watts this grow, that makes it 1.52 grams per watt!
Very happy with the end results, and its by far my personal record hahaha.