
Likes
Comments
Share


@Chumpkilla
Follow
8/19/23 - Day 67 - Things are still looking good. We just had a water change. A couple more weeks!
8/21/23 - OK, ok ok, we have a lot of work coming up. Right now is like the calm before the storm. The storm I'm talking about is harvest, trimming, drying, and curing. This is the kind of labor that you LOVE to HATE. Especially with how many buds ill be pulling from this LEAF box.
Let's talk about progress real fast. She is getting bulkier every day. Overnight she drank about 300+ ppm of nutes. She likes the nutes a lot. I'm taking this as a reason for all the little snowy crystals and the enlargement of the buds.
Flushing:
For about a week before harvest I will empty the water+Nutes and refill only with Water. We want the plant to suck up and replace all the nutes in the buds with water. This is called flushing.
Trimming plans and Tools:
When it's time to trim the plant, I've got a plan in mind. I'm going to trim the buds while they're still wet, and I'll leave them attached to the stems. To simplify the drying process, I will split the LEAF into two parts – the top and the bottom. Since space is a bit tight in the LEAF with this grow, I will keep just the buds on the branches. This will help the air circulate the buds better. I've even found this cool trimming tray on Amazon that I'm planning to use.
I've realized that having the right tools for trimming is essential. Just like I'd put on gloves to work on a car, I will use nitrile gloves to keep things clean while trimming. And I'll use proper trimming scissors instead of regular ones. These scissors are designed for this job and should make the process much smoother.
Amazon - Trimming Tray - (somewherr brand pictured above)
Amazon - Nitrile Gloves
Amazon - Trimming Scissors
Drying Plans and Tools:
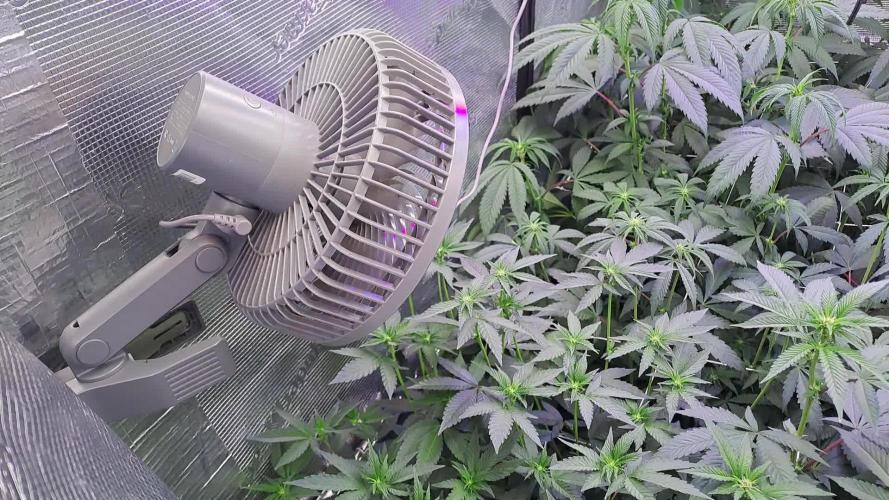
Once I'm done trimming, it's time to dry the buds. I'm thinking of using simple tension rods, like those small shower curtain rods, to hang the branches. This way, I can create two levels inside the drying box. The lower part can rest on a SCROG net to ensure good airflow and even drying for all the branches. The LEAF box will handle the drying parameters. The environment inside the LEAF box will focus only on keeping the humidity at 60% and moving the air around getting the buds to a non-mildew amount of humidity.
Amazon - Tension rods 16-28”
Curing Plans and Tools
After the buds are dry (60% humidity), the next step is curing. This means I'll be storing the buds in sealed glass jars. I've got mason jars and hygrometers to monitor humidity levels. Once the jars are filled with buds, I'll seal them and put them in an cool, dark spot. I plan to open the jars briefly every day to let in some fresh air. (15min). I'll know the curing is done when the humidity inside the jars stays around 62% during these "burps." That's when my perfectly cured buds will be ready to enjoy!
Amazon - Hygrometer 12 Pack
Target - 32oz Ball Mason Jars 12 Pack
I use a smell-proof duffle bag. It has double zippers, and smell prof lining. The brand is www.420stock.com, and the model I use is the X-Large Trap Pax Duffle Bag.
8/23/23 - 20% more nutrients were added. She went from about 900 at the beginning of the week to about 330. Now she's back up to 500ppms. We change the water in one more day.
8/24/23 - Day 72 - It's official: I have moved the smell slider up! Holy shit, does it smell potent. I put my arm in there through the Weed forest, and when my arms came out, I was attacked by the Skunk BOSS. I had to shower and change my outfit to eliminate the smell.
If you are looking for this experience, check out https://www.getleaf.co/

Likes
7
Share

@Pierrougarou21
Follow
Salut les Growmies,
l'installation du filet à 80 cm fait des merveilles. Les plantes sont toutes ultra vigoureuses. Le stretch va être difficilement géré. Mais comme un enfant j’attends avec impatience le résultat de cette chasse. Demain soir je lance l'opération Clones et sauvegarde des phénotypes.
11/01/2026 Derniers jours de la deuxieme semaines depuis le switch en 12/12.
Je viens de decouvrir que la Tiger Paws #1 a créé des couilles . Je lui laisse une journee de chabce et je vais voir commznt les choses évoluent sinon la Tiger Paws #2 et la Velvet Cream #1 sont juste magnifiques et tres vigoureuses
Sincèrement


Likes
36
Share


@brownbae420
Follow
Day 91
- No water for 6 days
- White pistils apparent
- Watered ONLY
- Vibe: 😳
"What happens to a dream deferred? Does it dry up like a raisin in the sun?… Or does it explode?" — Langston Hughes

Likes
14
Share


@Viking_s_farm
Follow
Ciao a tutti, cari amici coltivatori guerriglieri e non!🤙🏼 questa terza settimana è stata abbastanza impegnativa perché ho iniziato ad applicare la piegature (o Lst come la si voglia chiamare). Solitamente uso questa tecnica perché trattandosi di una varietà autofiorente è meno stressante per la pianta e abbinata ad una “regolare” defogliazione permette di ottenere dei risultati interessanti in termini di raccolto. Oltre a questo, la parola d’ordine di questa settimana (fortunatamente conclusa) è solo una: FREDDO! infatti, dopo un inizio settimana di temperature piuttosto miti, la temperature sono diventate più fredde. Ah…che sia chiaro, quando dico "freddo" mi riferisco a temperature più basse dei valori ottimali che comunque che rendono più stentato lo sviluppo e la crescita della mia piccola bimba (dovrei cercare un nome da darle😅). Nel complesso però la mia piccolina boxeuse si difende alla grande!🥊
01/05/2022. 1l d’acqua:
Ph: 7.0
Ppm: 397
T: 24º
Altezza:7,5 cm
T Max: 29º
T Min: 18º
Hum Max: 87% Hum min: 46%
Sembra in buona salute, ha un colore verde vivo ma la crescita sembra un po’ lenta. Ancora niente prodotti.
01/08/2022. 1l di soluzione nutritiva:
Ph: 6.20
T: 21,6º
Ppm: 679
Temp. Max (lampada accesa): 27,4°
Temp. Min (lampada spenta): 18,1°
Hum. Max: 71%
Hum. Min:49%
Oggi si iniziano a dare un po’ di nutrienti, io utilizzo la linea dell’advanced nutrients ph perfect Grow/Micro/Bloom come Base (1ml x 1L di acqua demineralizzata per ciascun prodotto) più B-52 e Voodoo Juice (2ml x 1L d’acqua demineralizzata). La piccola non presenta problemi, ha un’altezza di 10 cm e sta sviluppando il 3° internodo, se continua così tra qualche giorno si inizia con LST.
01/10/2022. Oh oh…😲 le foglie più giovani mostrano una leggera clorosi ai bordi con venature leggermente più scure, potrebbe essere dovuto a un Ph sbilanciato oppure a una carenza di calcio e magnesio. Forse conviene darle una leggera fertilizzazione tramite spray fogliare.
01/11/2022. Bene, la clorosi fogliare 🍁 perdura quindi proviamo a risolvere il problema con uno spray fogliare :
Advanced Nutrients Sensi Cal Mag Xtra: 2ml x 1L d’acqua.
Una bella spruzzata generale sia sulla pagina superiore delle foglie che sulla pagina inferiore in modo da permettere agli stomi di assimilare la soluzione.
Iniziato LST piegando la cima apicale fino a farle quasi toccare il bordo del vaso.
Likes
23
Share


@Horseluisweed
Follow
Básicamente lo mismo, aunque está semana pilló bastante más horas de luz(tuve que irme fuera de casa dos findes seguidos, en los cuales la dejé con la luz encendida full 24/7 en la caja)
Como experiencia utilicé café reposado 48h para "alimentarla" e intentar bajar el Ph de la tierra (coco ph6+hummus ph7+vermiculita ph8= ph total 7)
El otro experimento fue cubrir la tierra con coco para que el tallo eche raíces y aprovechar su espigamento!
Las horas de luz solía dejarla 8h en bombilla mientras duermo, y el día la pongo en la ventana a que tome el fresco, pero apenas tiene luz directa, me da la sensación que crece más rapido cuando vuelvo del finde, estoy replanteandome tenerla más tiempo en la caja con luz, porque la veo aún pequeña, y quizá ponerle un ventilador de pc o algo🤔..veremos, aún tengo el papel de aluminio al lado de la caja y ni se lo he puesto, con eso os lo digo todo☝️🎃
Likes
10
Share


@heeelion
Follow
Nov 3rd- She responded so well to the higher feeding, i never knew a plant could be that hungry but it helped loads. The video is a sneak peak at my automated humidity control using cheap lugin wifi controls and smart life triggers with a manual knob humidifier so it turns one when notified of the humidity in the tent :D
Note- There are odd markings on the leaves i dont know if this septoria leaf spot, or just a deficiency (looks like calcium deficiency but im not sure) i did accidently water without rasing the ph so that water/feed could have been from 5 - 5.5ph BUT these spots were appearing before hand. I also noticed the lower leaves yellowing so i increased the nitrogen a very small amount and it shaped up (itis yellowing again but i believe that may because of the possible ph imbalance) much better overall im happy so far!

Likes
8
Share


@LokalGrenz
Follow
Week5
March 1st day 30
I transplanted one( the one with no broken branch) inti the 7gal today watered and did some LST I really hope it adapts to its new home I’ve never transplanted before I used extreme garden MYCOS hope it works also moved the light up a bit and plan on going 100% once I transplant the other one
March 2nd transplanted the other one (broken branch one) my shop didn’t have 3.0😔😔😔😔😔😔😔 so i used DNC Great Lakes water only soil hopefully this works and I mixed some 3.0 I had left from the other pot cross fingers for nice transition to its new home
March 5 been three days since transplant can’t really tell if they adapted to there new homes yet some sings of stretching since transplant I’ve never transplanted before and I’m not sure if they need water or not so imma chill let them go for couple more days then I’ll water scared to over water them right now since I transplanted them don’t want to over stress them other one in 3.0 seems little droopy to me compared to the one in Great Lakes but Great Lakes soil seems bit dry sooooo idk I’m going keep an eye on them
Likes
39
Share


@CURATI_DA_SOLO
Follow
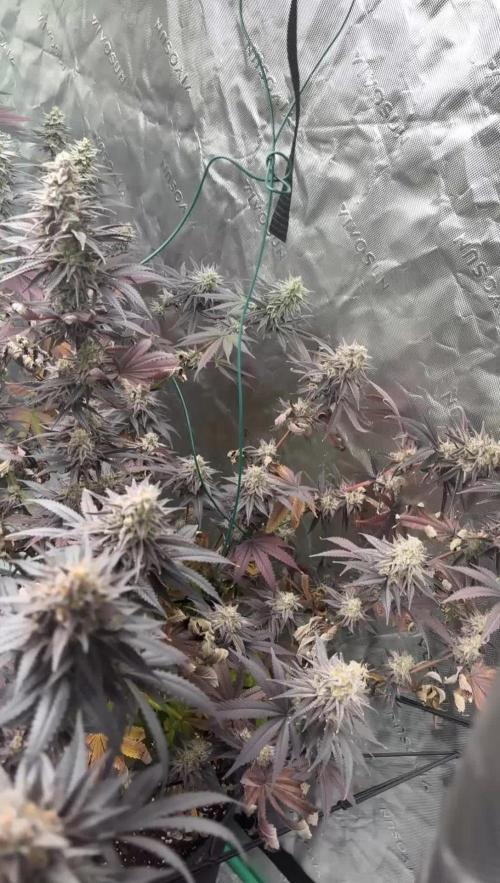
Una gioia infinita poter raccogliere questi buds ricoperti di gelo.
È stata una delle genetche più belle e resinose in questa cultivar e sicuramente la coltiverò ancora una volta perché è veramente troppo soddisfacente!
Gli odori dei terpeni hanno completamente invaso la casa (ed anche la strada).
La prossima volta la coltiverò con una alimentazione diversa per vedere i comportamenti con una linea bio/minerale.
Restate sintonizzati e ringrazio tutti voi per essere passati da qui a lasciare il vostro like ❤️
Ricordati di seguirmi su Instagram! 🌈
Likes
3
Share


@KannaGrowing
Follow
Esta semana, poca cosa a añadir, tan solo que continuamos como la semana pasada.
Riegos alternos entre abono y agua, según tabla de fertilización de JUJU Royal by BioBizz.
Hemos aumentado la potencia de extracción para evitar olores.
Likes
57
Share


@Roberts
Follow
Runtz Punch is grow great, even with several issues. I neem oil treated her again yesterday. I did the whole area to be safe. It looked to help a lot the first time. Just it seems to always boost the nitrogen levels when I use it. I need to train her some to stop her from getting much taller too soon. Thank you Athena, Spider Farmer, and Herbies Seeds. 🤜🏻🤛🏻🌱🌱🌱
Thank you grow diaries community for the 👇likes👇, follows, comments, and subscriptions on my YouTube channel👇.
❄️🌱🍻 Happy Growing 🌱🌱🌱
https://youtube.com/channel/UCAhN7yRzWLpcaRHhMIQ7X4g .


Likes
1
Share

@Albinius
Follow
🌱 GROW LOG: Gorilla Cookies Auto (x3)
╭────────────────────────────────────╮
🗓️ MONDAY 25/08/25 - DAY 33
╰────────────────────────────────────╯
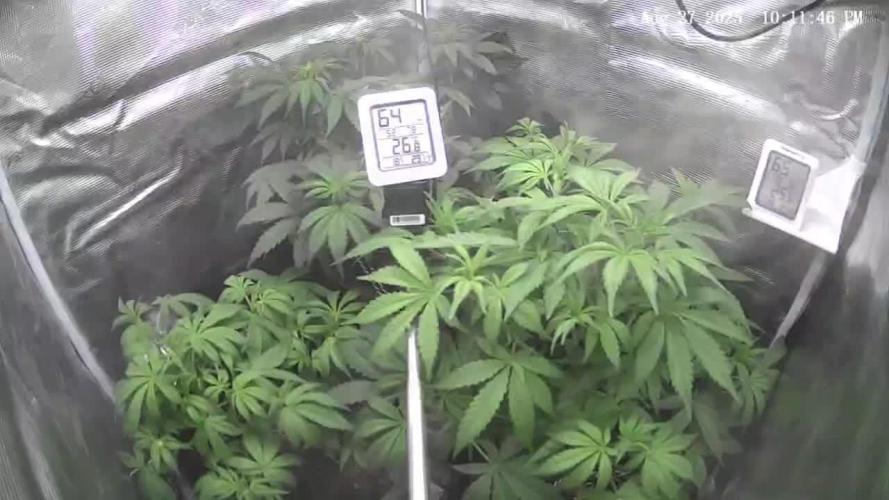
→ All stats in range, no attention needed
🌡️Temp (Day/Night): 24°C / 22°C
💦 Humidity (RH): 65%
🔁 VPD (Vapor Pressure Deficit):1.0
⚡ Soil EC mS/cm: 0.3
💧 Soil Water Content (WC): 21%
💡 Light: 75% @ 25cm from canopy
🔆 PPFD (μmol/m²/s): 700
🌬️ CO₂ (ppm): 480
╭────────────────────────────────────╮
🗓️ TUESDAY 26/08/25 - 💧WATERING - DAY 34
╰────────────────────────────────────╯
→ All stats in range, no attention needed
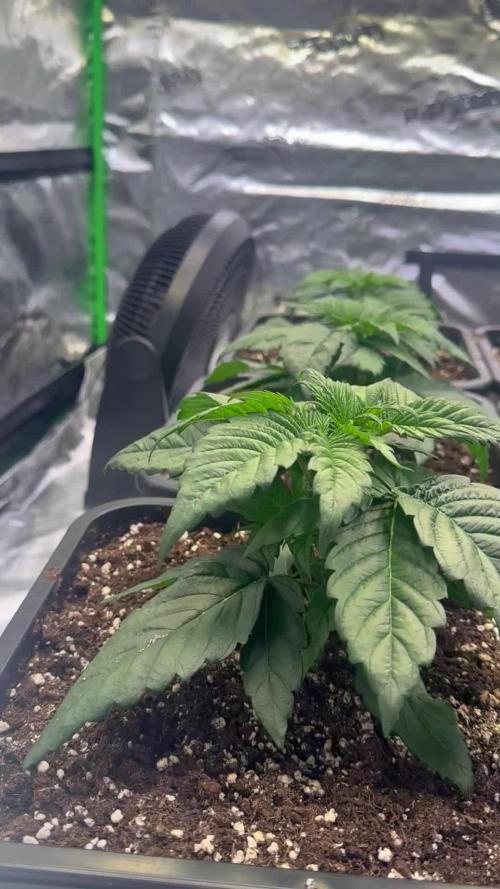
→Defoliated some leaves
🌡️Temp (Day/Night): 24°C / 22°C
💦 Humidity (RH): 65%
🔁 VPD (Vapor Pressure Deficit):1.0
⚡ Soil EC mS/cm: 0.3
💧 Soil Water Content (WC): 21%
💡 Light: 75% @ 25cm from canopy
🔆 PPFD (μmol/m²/s): 700
🌬️ CO₂ (ppm): 480
╭────────────────────────────────────╮
🗓️ WEDNESDAY 27/08/25 - DAY 35
╰────────────────────────────────────╯
→ All stats in range, no attention needed
→ Notices Calcium Deficiency
🌡️Temp (Day/Night): 24°C / 22°C
💦 Humidity (RH): 65%
🔁 VPD (Vapor Pressure Deficit):1.0
⚡ Soil EC mS/cm: 0.3
💧 Soil Water Content (WC): 21%
💡 Light: 75% @ 25cm from canopy
🔆 PPFD (μmol/m²/s): 700
🌬️ CO₂ (ppm): 480
╭────────────────────────────────────╮
🗓️ THURSDAY 28/08/25 - 💧WATERING - DAY 36
╰────────────────────────────────────╯
→ All stats in range, no attention needed
→ Added extra calcium to water
🌡️Temp (Day/Night): 24°C / 22°C
💦 Humidity (RH): 65%
🔁 VPD (Vapor Pressure Deficit):1.0
⚡ Soil EC mS/cm: 0.3
💧 Soil Water Content (WC): 21%
💡 Light: 75% @ 25cm from canopy
🔆 PPFD (μmol/m²/s): 700
🌬️ CO₂ (ppm): 480
╭────────────────────────────────────╮
🗓️ FRIDAY 29/08/25 - DAY 37
╰────────────────────────────────────╯
→ All stats in range, no attention needed
🌡️Temp (Day/Night): 25°C / 24°C
💦 Humidity (RH): 60%
🔁 VPD (Vapor Pressure Deficit):1.2
⚡ Soil EC mS/cm: 0.3
💧 Soil Water Content (WC): 21%
💡 Light: 75% @ 25cm from canopy
🔆 PPFD (μmol/m²/s): 700
🌬️ CO₂ (ppm): 480
╭────────────────────────────────────╮
🗓️ SATURDAY 30/08/25 - 💧WATERING- DAY 38
╰────────────────────────────────────╯
→ All stats in range, no attention needed
🌡️Temp (Day/Night): 27°C / 25°C
💦 Humidity (RH): 59%
🔁 VPD (Vapor Pressure Deficit):1.3
⚡ Soil EC mS/cm: 0.3
💧 Soil Water Content (WC): 21%
💡 Light: 75% @ 25cm from canopy
🔆 PPFD (μmol/m²/s): 700
🌬️ CO₂ (ppm): 480
╭────────────────────────────────────╮
🗓️ SUNDAY 31/08/25 - 💧WATERING- DAY 39
╰────────────────────────────────────╯
→ All stats in range, no attention needed
→ Defoliated some leaves
→ Very early Signs of flowering
🌡️Temp (Day/Night): 28°C / 26°C
💦 Humidity (RH): 58%
🔁 VPD (Vapor Pressure Deficit):1.3
⚡ Soil EC mS/cm: 0.3
💧 Soil Water Content (WC): 21%
💡 Light: 75% @ 25cm from canopy
🔆 PPFD (μmol/m²/s): 700
🌬️ CO₂ (ppm): 480
╭────────────────────────────────────╮
🌿 OVERVIEW
╰────────────────────────────────────╯
The Gorilla Cookies Auto trio cruised through a steady week! 🌱 From Monday to Sunday (Days 33–39), all stats stayed in range with no issues. Watering happened on Tuesday, Thursday, Saturday, and Sunday, with light defoliation on Tuesday and Sunday to keep things tidy. Temps ranged from 24–28°C (day) and 22–26°C (night), humidity held at 58–65%, and VPD was 1.0–1.3. Lights stayed at 75% @ 25cm, delivering consistent light intensity, and CO₂ remained stable. 😎
Lessons:
→ Stability is Key: Consistent environment and watering kept plants happy—no surprises! 🌿
→ Light Defoliation Works: Occasional leaf removal maintained airflow and light exposure. ✂️
→ Monitor Trends: Slight temp and humidity shifts didn’t disrupt growth, but stay watchful. 👀
Takeaway: Smooth sailing with stable conditions and routine care. Keep the steady vibe and light pruning going! 🚀
Likes
4
Share


Likes
5
Share


Likes
3
Share


@WeedM8
Follow
Hello m8 welcome to this journey with me in this diary will have very interesting strains hope u find something useful
O.G. Kush Titanium
- [ ] 1st week Veg: germinated in substrate lighting very close so it jets medium high humidity after the 3rd day they started sprouting
- [ ] 2nd week Veg: this week my ventilator broke down and as the temperature stayed very warm nothing developed much
- [ ] 3rd week Veg:fortunately this week i had fixed the ventilation and the temperature has go down a bit allowing the little plants to develop and reinforce
- [ ] 4th week:very good developments in this week I already started feeding a bit two times but i didn’t have to…once was enough
- [ ] 5th week Veg
- [ ] 6th week Veg
- [ ] 7th week Veg
- [ ] 1st week Fl
- [ ] 2nd week Fl
- [ ] 3rd week Fl
- [ ] 4th week Fl
- [ ] 5th week Fl
- [ ] 6th week Fl
- [ ] 7th week Fl
if this was useful please like and follow


Likes
1
Share


@alexb420
Follow
been AFK for while, been focusing on work and my new main tent run. here’s the update
2 on the left and the one back right are my strains, the AF x Turk. back right is the one in the video, stacked main cola. smells range from a earthy spice to a foul rotting fruit smell. the rotting fruit sting the nostrils it’s so powerful. the one in the front left is a Terp Town Ticket from a controversial UK breeder named blue skies vienna. he claims to have real deal skunk genetics from OldTimer1, a legend in the UK weed scene. he apparently played a part in getting the skunk to the dutch, and these are “pre dutch” skunks. mine smells like a cherry coke with a real musky/funky/ “skunk” smell, but not full on skunk spray. she’s about 2-3 weeks behind my ladies. will probably post when everything is done and dried.


Likes
23
Share


@StantonGrowsUk
Follow
Switched it up to 600w on the digital ballast. Plants really love the extra heat. 2 plants hermied unfortunately so they were "Outta There"
Which left me with 4 healthy stretch ladies. Still no loud smell yet but it's got something there.
We got some likkle buds too 😍
Girls are doing well they took well to the foliar spray I was applying twice a week. They are loving the extra space to stretch it seems.
Feeding with water this week to regulate ppm within substrate.
Proud parent 👏
See you guys next week
Be good
Stanton..
