
Likes
Comments
Share


@FarmZOG
Follow
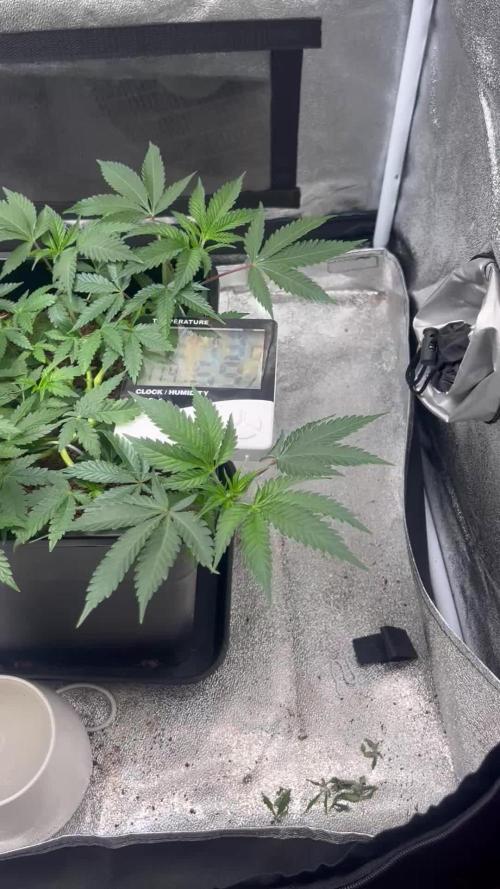
Week 7
Day 42
our VPD is getting higher day to day, we in the 1.2 - 1.4 range
hard week of defoliation this past week and its not over
Day49
we had good development but we still fighting environmental conditions all over the place
We need environment concistency and we're not getting it
💚

Likes
17
Share


@Dr_Boom
Follow
With the males out of the tent, I have a little more room to spread them out. One plant is much different than the rest. It's short and squat. Another is pretty narrow, showing minimal side branch growth. The rest are similar, and I like the way they are developing.
I took the top fan leafs all the plants to open up the lower nodes. They all seemed to respond well, and I'm seeing good side branch growth. What a week!
Likes
1
Share


@Kusemono
Follow
Juju grow 2ml
Juju flowa Bloom 3 ml
Juju Green Mystic 3 ml
1liter Water
Each plant 130 ml

Likes
4
Share


@MXHerc
Follow
Up-potted the 4 weedlings, pink wooly is looking the best for non auto and chemdawg for auto. Kiwi x kiwi is still the smallest plant. They were all topped and foliar fed after being transplanted into a soil blend


Likes
29
Share


@Gc_Dank_Aus
Follow
These ladies were a treat to grow and even better to smoke, looking forward to my next run 👌🤙


Likes
20
Share

@squalino
Follow
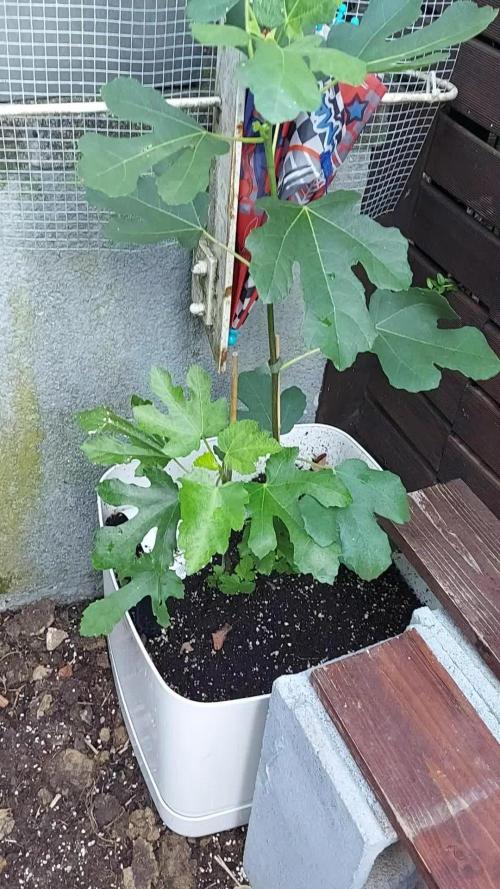
franchement je suis assez satisfait. les engrais biotabs fonctionnent à merveille je trouve .bon je suis pas un expert en figues 🤣🤣 mais celon moi elle grandi bien , elle a refait une belle jeune pousse qui grandit bien a l'ombre de sa mère malgré ses chaleurs accablante de cette dernière semaine.
Likes
21
Share


@Mosquito_Haarlem
Follow
White Truffle Automatic exceeded expectations in terms of aroma, resin production, and especially yield under a modest 100W LED.
The sativa-like scent gave the whole thing a surprising old school twist.
Perfect for growers looking for top quality in a small space.
Another topstrain from Zamnesia 👌


Likes
11
Share


@TheMadHasher
Follow
The ladies are thriving and loving the Advanced Nutrients Organic Line. The smell in the tent is amazing I could literally breathe that air in all day! My CandyLand has been the biggest through all three plants lifecycles. But all three are looking strong and healthy. The lights will be transitioned into the flowering schedule throughout the week.
To all my fellow greenthumbs I hope everyone has an amazing grow week. 🤙🏾


Likes
35
Share


@eldruida_lamota
Follow
Venga familia que ya viene la cosecha de estas Cereal Milk de RoyalQueenSeeds, que ganas que tenia ya de darles machetazo.
No veas que pinta que tienen estas plantas.
Las flores aparte de prietas se ven bien resinosas, con 70 dias de floración.
a sido una genética con la que disfruté mucho cultivarla, es resistente , y no es para nada complicado cultivarla por lo menos en interior.
Agrobeta:
https://www.agrobeta.com/agrobetatiendaonline/36-abonos-canamo
Mars hydro:
Code discount: EL420
https://www.mars-hydro.com/
Hasta aquí es todo , espero que lo disfrutéis, buenos humos 💨💨.

Likes
22
Share


@Prilyfe13
Follow
July 7, 2024 Day 78
This week we switch to Overdrive and stop the Big Bud. It's the last 2 weeks of flower and then a week of flush. Then 2 weeks of drying and then about 3 to 4 weeks of curing. after that, I can smoke it. Lol.
All 4 ladies got a half gallon top feed with just recharge, and the reservoirs refilled with the new nutrients. I was going to water until runoff, but I think it's just a waste at this point. Plus bottom feeding doesn't require runoff. Depending on how they feel tomorrow, I might add the other half gallon to each and get that runoff. Or very close to it.
Sour Diesel A has started picking up the pace with drinking. She is drinking just as much as C and D. Super frosty and starting to really pack on the weight. A couple branches are starting to sway at the slightest touch. Hopefully the heavy buds won't pull the branch down.
Sour Diesel B is looking great! A little bit of foxtailing and larf on the bottoms, but the tops look great! Tons of bud and big buds to boot.
Sour Diesel C is also swaying a bit at the slightest touch. I expect that from her. Her branches are strong but thin and long. Her buds definitely didn't swell up like B and D, but they are solid and covered in trichomes.
Sour Diesel D was the dry one this week. I ended up dumping the whole reservoir from the other day so I could start the new regimen. She was dry and anaerobic for a bit. The half gallon of top feed really helped. It took some time to get it all wet, but in the end, the half gallon seems to be fine.
The environment is still high humidity in the morning and lower when the AC kicks on. Currently it's 81° outside and the temp in the tent is 75°. But with my personal AC on, it drives the humidity way up. Currently it's at 62% in the tent. It'll probably climb even more now that I watered everyone.
Grow System Environment:
Temp: 75.6°
RH: 58.0%
VPD: 1.24 kPa
July 8, 2024
Not much going on today. All 4 ladies have their water and feel good.
Sour Diesel A looks great! As usual, frosty and smelly as ever.
Sour Diesel B has slightly canoeing leaves. They are also starting to brighten up. Must be getting close to the end.
Sour Diesel C has drooping leaves. Not sure why. I'll have to research.
Sour Diesel D is looking super good. Lush green leaves. Huge main cola and more frost.
The environment is the same as yesterday. High humidity, but somehow today it's below 60%. Hopefully it will go below 50% this afternoon.
Grow System Environment:
Temp: 74.6°
RH: 57.5%
VPD: 1.21 kPa
July 9, 2024
It's picture day! Not much else going on though. Just a check up on the plants and that's it.
Sour Diesel A looks great! One issue I know I'm going to run into is sagging branches. One of her branches already needed to be pulled back up and tied to a bigger branch. The buds just weight a lot for the branch. Funny though, I've been using silica and that should have strengthened the branches. Not that they are super weak, but they are thin. I'll have to keep an eye on her.
Sour Diesel B is outstanding. Huge solid buds. Tons of frosty frost. I'll probably start checking trichomes next week. It's too early to see anything significant.
Sour Diesel C is a little lighter than the other 3. She also has some seriously droopy leaves and I have no idea why. I don't think it's a lighting issue. Underwatering could also be a thing, but she got top fed 2 days ago as well as the bottom feed system. It's moist, but definitely not as wet as I would have hoped on the bottom. I think I'm going to actually have to water to runoff with her. I don't really know what else to do.
Sour Diesel D is looking good as well. Super fat buds and super hard to boot. And it hasn't even been 3 days of the Overdrive. I can only imagine how hard the buds will be at the end.
The environment is starting to calm down a bit. Unfortunately I have to keep my crap ass AC on and it's bringing in humidity as always. So the humidity in the tent is around 59% to 60%.
The temp was high this morning at 80°. A bit warm for this stage. It should be around 74° to 75°. But it's back to the mark now.
Grow System Environment:
Temp: 76.1°
RH: 56.2%
VPD: 1.31 kPa
July 10, 2024
Watered all 4 ladies today. Each got a half gallon full nutrients with Recharge. Only 1 needed to get a reservoir refill.
Sour Diesel A is looking super good. I had to tie another branch up today. The frost on her buds is super insane. I'm loving it. I'm sure there is better frosty plants, but this is awesome.
Sour Diesel B is looking super good. Her leaves are canoeing and starting to point up. A sure sign she's starting to finish up. She also has 1 purple sugar leaf. So it looks like the fade is also starting as well.
Sour Diesel C is looking kind of weird. Her top fan leaves are droopy and the bottoms are fine. But it's only the big top leaves. Strange indeed. If anyone is reading this, any insights? Comment below with what you think it may be.
Sour Diesel D is super frosty as well. Her buds are massive and heavy. It seems like her side branches are starting to get weighed down a little bit. She's not even close to fading, but her leaves are a beautiful lush green. She needed a full reservoir top off today. The rest are about half empty now.
It's super humid today. 79% outside. Her temp is still right where it needs to be, but the humidity is higher than it has been lately. Obviously due to the super humid day.
Grow System Environment:
Temp: 74.4°
RH: 58.7%
VPD: 1.17 kPa
July 11, 2024
It's picture day! Not much going on today.
Sour Diesel A is looking really good with her super frosty buds. She seems to be holding the water from yesterday and also trimming from the reservoir. Looking good.
Sour Diesel B is amazing. Her buds are all dense and bright green like Sour Diesel is supposed to be. She's super frosty, but she is also canoeing. Not sure why. Maybe too much light? I doubt it though. The DLI is around 45 mol/m²/d.
Sour Diesel C needed more water. She was already half the weight she was yesterday after watering. She's also drinking the reservoir. So she got another half gallon top feed today. I even got some runoff. She should be good for the next couple of days. Her buds are super frosty, just like A. Honestly, I think they are the same phenotype. I thought A was more similar to B in the beginning of the grow, but the bud structure and leaves are all the same between A and C. Smaller tight buds. Tons and tons of frost.
Sour Diesel D is looking pretty good. I really wish she had taken off like she should have. I expected a much taller plant without training. It's fine though. The massive cola is making up for it. Maybe it will be a 2 oz cola. Lol.
The environment is still a mess. It's rainy and humid today, but not too warm. The humidity in the tent currently is 66%. Ridiculously high. The temp is around 79 for now. I need to turn my AC back on I think and just deal with the humidity. The temp can't stay over 78° if I want super frosty buds.
Grow System Environment:
Temp: 75.6°
RH: 60.2%
VPD: 1.18 kPa
July 12, 2024
Not much going on today. Just the daily picture. Some observation and that's about it. No watering is needed and the reservoirs are all filled with water.
Sour Diesel A is looking great! Her buds are definitely getting super fat and swelling up. A couple tops are making little flowers all around. It makes them look even fatter.
Sour Diesel B is happily starting the fade. Just one leaf for now, but the rest aren't far behind. I'm guessing over the next week, we will get a beautiful fade. Hopefully the buds stay lime green. They are so pretty.
Sour Diesel C is looking good as well. The top leaves are still drooping, but not quite as bad as they were yesterday. I'm guessing it's a mix of underwatering and nutrient deficiency. Which nutrient, I don't know. But the top feed was the full nutrient regimen. So she should be good.
Sour Diesel D is looking super hefty. She has plenty of water and is super a healthy green. No fade though. It's only B that's fading.
A note about the lighting. I'm going to check the DLI. It should be at 45 mol/m²/d. That's the deepest red spectrum I can pull out of my light. I think I now understand the difference in wattage for wavelength. I'll learn more about this for future runs. I think I'm fine, but if I'm right, I may be able to increase the power back up to 80%, but we will see. I do t have room for the light to go up anymore, so I have to be really careful. Unless I decide to put the exhaust fan outside of the tent. Then I'll have about 6 inches of space. That may be the best plan of action if need be. The light is still 22" from the main canopy. Bringing it up to 28" will give me the ability to increase the power and get the lowers lit up as well. The supplemental lighting is or isn't working. I honestly cannot tell. I really wish I had added the bars in again weeks ago. It's too late now. I just don't have the want to do it.
The environment was way off this morning. The temp was at 78° and the humidity at 66%. So I turned my AC on and dropped the temp back down to 76° but the humidity stayed roughly the same. Now the central air kicked on so the humidity should drop fairly quickly for the rest of the day.
Grow System Environment:
Temp: 75.4°
RH: 62.7%
VPD: 1.09 kPa
July 13, 2024
Picture Day! And this week's video.
Sour Diesel A looking really good. Super dense buds and tons of frost. Not much else to do. Her reservoir should be empty tomorrow. If not later tonight.
Sour Diesel B is definitely starting to fade. Her leaves are rapidly changing color all over. Not much, but you can absolutely tell she will have a really nice fade in the end.
Sour Diesel C emptied her reservoir pretty quickly and is still holding her weight. What that means is the plant is finally drinking. I added the rest of the half gallon from the other day. The half gallon should line up with the rest of the reservoirs.
Sour Diesel D has this stupidly massive cola for the size of the plant. Her color is still a super lush green. The frost is pretty good, but still not as good as A and C, but she has the largest cola of the bunch. Not as many colas as the rest, but still the biggest.
The environment is still just a mess. Mornings suck. Currently the humidity is at 62% with a near perfect 76°. The humidity will of course drop down in an hour or 2.
Grow System Environment:
Temp: 75.4°
RH: 58.9%
VPD: 1.20 kPa


Processing
Likes
7
Share


@Bills1995
Follow
Everything going as planned. Will take more pictures soon.day 85(getting phatter)


Likes
3
Share


@Inertia_Collective
Follow
Really starting to take off. Hoping they settle out but I am off on vacation next week gonna let them run while I'm gone to test my setup. Wish them luck! Just worried about humidity.

Likes
Comments
Share

@eldruida_lamota
Follow
Vamos familia, actualizamos la segunda semana de floración de estas Granny’s Home de Seedstockers, salieron las 2 de 3, 66% ratio éxito.
Aplicamos varios productos de Agrobeta, que son increíbles para aportar una buena alimentación a las plantas.
Temperatura y humedad dentro de los rangos correctos dentro de la etapa de floración.
La tierra utilizada es al mix top crop, por cambiar.
De 2 ejemplares me quede con los 2 para completar el indoor, también cambie el fotoperiodo a 12/12 y aplique una poda de bajos, se ven bien sanas las plantas, tienen un buen color progresan a muy buen ritmo por el momento, las flores están empezando a formarse, hasta aquí todo.
Agrobeta:
https://www.agrobeta.com/agrobetatiendaonline/36-abonos-canamo
Hasta aquí todo, Buenos humos 💨💨💨

Likes
27
Share

@Mosquito_Haarlem
Follow
Haar laatste week,
Wat een gigantische schoonheid zeg!!
Haar toppen zijn keihard en zitten vol thc!
De hoofdtop is te zwaar, zonder ondersteuning valt ze om.
Wat is dit weer een geweldige strain van Zamnesia!
Ik ben echt supertevreden.
Ik zal meer foto's updaten dus hou het in de gaten! ❤️
Likes
5
Share


@tNASTY3k
Follow
Day 14 - She's thriving it seems so far. She's bursting with tri-leafed nodes. I've changed the environment a bit. I have not been successful cooling the room enough to bring down the VPD from 1.3kPa or so. Instead I'm approaching it from a humidity perspective. I have the threshold up to 70%RH. I'm peaking the humidity to lower the VPD to .9kPa since I can't really effectively cool the tent to the low 70's. There is a slight aroma from the seedling. The infamous skunky smell is only observable when very close to the plant. I have not been using the filter on the exhaust fan though.
Likes
10
Share


@DeltaEye
Follow
I put the plants into an NFT system couple weeks ago. I could have waited a bit longer for the plants to develop a stronger root system before placing the rockwool cubes into NFT but I was being impatient because of the slow start and wanted to get the plants under proper light. Now two weeks later they are growing well with good root development.
I switched the lights to flowering cycle about a week ago so they should start stretching soon. No preflowers yet.