
Likes
Comments
Share


@GrownyStark
Follow
*This is not pictures of the 4 leaf baby*. That one died…moving on With This OG Kush auto pictured I haven’t done anything other than a few feedings and some water. I didn’t do any lst, topping or stress training. I am using air pots with some vermiculite, a bit of worm compost mix from local store, and a dash of 20/20/20 when it was a seedling.

Likes
13
Share

@Srp710
Follow
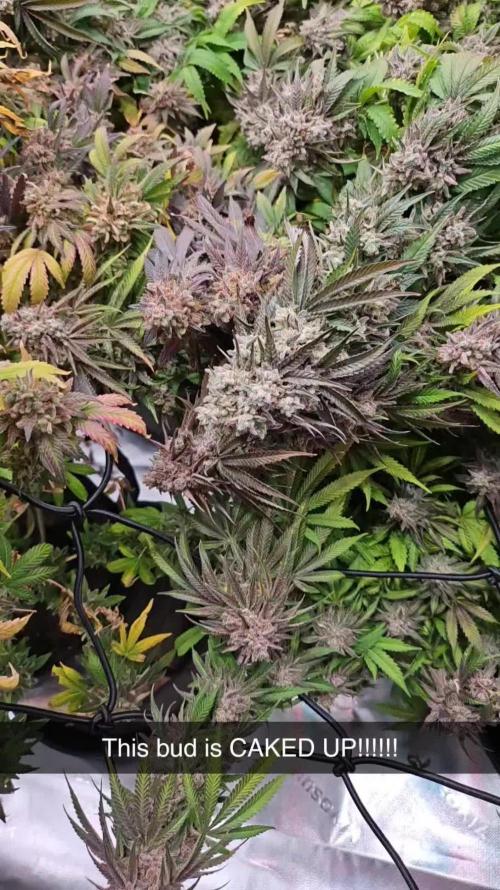
2 weeks have passed since last update. A lot has happened, plant in front/back falling over on itself since it was LST'ed too far from main branch, have been trying to use the trellis net and tie some of them up. Runtz muffin on the right looks ready to harvest, the mandarin cookies look like they will both need another week or two. Trichomes milky on the runtz muffin, 10-20% amber and pistils all coiled towards the plant, beautiful orange color and the buds are caked with trichomes. Gearing up to be an amazing first grow in the books!!! Wish I had refrained on last dose of fert, wasnt expecting to harvest these quite this fast. Mandarin cookies definitely seeing some nutrient problems, assuming thats just because of how late we are into flower.


Likes
45
Share


@valiotoro
Follow
Very very sticky i had to change gloves every 2-3 buds!🤓
Delicious smell🤤

Likes
28
Share


@MrGrowthSpurt
Follow
This strain was easy to grow, she started flowering on the 5th week and reached maturity on the 13th week (8th week of flowering). I had 2 of these plants growing at the same time. White LSD#2 took on a reddish/burgundy tone which made it look completely different from#1 All in all it was really a easy grow.


Likes
18
Share


@Rinna
Follow
As said before, I'm incredibly happy that I got to harvest a little bit. Never expected her to make it, but she kind off did! The smell was pungent and sweet like an amnesia haze should be, hoping that will be even better after drying and curing!


Likes
21
Share


@cadur
Follow
Still going, a few amber thrichomes but no way near 30%....
Just gonna have to wait....

Likes
12
Share


@mucho_loko
Follow
Last week in the vegetation season
From the photos can anyone tell me which sex of the plants?
I'm not sure if they're male or female. I believe that next week I will know for sure
As I will change to the flowering period, I applied the LOLLIPOPPING technique, to try to have bigger top buddies.
Likes
6
Share


@CalGonJim
Follow
8/26 Monday morning 12am They are doing good. The camera fell into a plant...so lucky it didn't hurt the plant..that never happened before. My grow is HAUNTED!!!! Dark Devils are doing pretty good. All the others are great. I need more dirt in Blueberry Auto by Seedsman I'll do top filling later this week.
2am got the microscope 👍👍👍👍 I swear she is like a pet and she’s playing dead with her tongue hanging out. It’s hilarious. I’m really enjoying this one. This is gonna be a lot of fun.👻👻👻👍👍👍👍. 11 am I ordered a new microscope!!!
8/27 Dark Devil looks pretty cool. All other plants are doing just great!!
8/28 turned lights up to 52 looking good 4/28 Dark Devil Auto Monster crawls out of Hell!!!! Dark Devil Auto looks like the war boy that figured out Furiosa stole the War Rig. !!!!
I put a light tent over Dark Devil monster. I will need to trim the roots and make sure the trays aren't in standing water. Blueberry is in mostly Perlite doesnt take up water the same.
New microscope nice picture but no zooming in, I got the kind with the wider mouth, narrow mouth is better getting close to plants.... after 2 years I just NOW figured out the plastic cover comes off?? not the lens cap....im retarded there's just no other way to explain it
8/29 She's ALIVE and wow! got some amazing pics a little blurry and shaky but Dark Devil Auto by Sweetseeds is the coolest thing ive seen. Doing the seed surgery worked.
8/30 Some amazing progress on the Dark DEvil. The others are great Medusa F1 is the strongest followed by Gorilla Strawberry. The lights on the right side of the Mars Hydro light dont seem to be as strong as the ones on the left is ill rotate the plants today.
8/31 5 am lights up to 55 Watts. They are doing good. RSQ Medusa F1 showing the strongest so far, not a surprise there! Fast Buds Straw Gorilla taking off strong next. Pink Kush CBD and Blueberry Auto by Seedsman up next and surviving in almost all Perlite. I will put more dirt in when she gets taller. Dark Devil is going steady and very strong just amazing.
9/1 Growing nice now I will top them all above the 3rd node to keep the grow small

Likes
11
Share


@CanabisLoverHobbyGrower
Follow
Well I've done a final tie down going to give them 5 days to a week and then flip them into flower, they react to training so well and are so flexible, think these are going to be one of the best looking ones the training on the bigger plant looks ace, roll on next week, flower time

Likes
9
Share


@Jbuttch
Follow
Fertilizante organico a base de platano, el proceso inicio desde la deshidrataciòn hasta llegar ser polvo. Rico en potasio.
Likes
6
Share


@Beanz2Budz
Follow
From what I've learnt since, by defoliating and not ensuring sufficient reserves in the Substrate after taking their reserves from the bigger fan leaves at strip, this left 1 pheno more hungry than the others, but still all 4 suffered to some degree which was really disappointing. I was too busy enjoying the festive period with family so its a good enough excuse! ;)

Likes
119
Share


@Roberts
Follow
I harvested this plant about a week ago. Gd was suffering some update issues still, but appears to be resolved. The plant grew great. I am impressed with the results myself. Nice big colas of frosty goodness. She bounced around a bit in growing under different lights. The results were great. I was even running the flowering light lower since she stretched a little too close to it. That was probably my biggest issue during the grow. I am anxious to try it once I get it processed. Thank you Spider Farmer, and Divine Seeds. 🤜🏻🤛🏻🌱❄️


Likes
38
Share


@LittleBigTrees
Follow
I've been pulling the top small fan leaves to allow the side's to catch up.
One plant is really tall and stretchy ,
One plant is very short and compact .
The other 4 plants all look very similar to each other at this stage .

Likes
12
Share

@GERGrowDesigns
Follow
Welcome to Flower Week 3 of SuperStrains OreoZ
I'm excited to share my grow journey with you from my
SuperStrains Project . It's going to be an incredible ride, full of learning, growing, and connecting with fellow growers from all around the world!
For this Project , I’ve chosen the Feminized Photo Strain OreoZ:
Here’s what I’m working with:
• 🌱 Tent: 225x150x150
• 🧑🌾 Breeder Company: SuperStrains
• 💧 Humidity Range: 50
• ⏳ Flowering Time: 8-9 Weeks
• Strain Info: 22%THC
• 🌡️ Temperature: 26
• 🍵 Pot Size: 20
• Nutrient Brand: Hy-Pro
• ⚡ Lights : 600W x 2
A huge thank you to SuperStrains for allowing me to try my Best with this amazing collection from Photo Strains they managed to Sponsore side by side with theyre Hy-Pro Nutriets . Big thanks for supporting the grower community worldwide! Your genetics and passion speak for themselves!
I would truly appreciate every bit of feedback, help, questions, or discussions – and of course, your likes and interactions mean the world to me as I try to stand out in this exciting competition!
Let’s grow together – and don’t forget to stop by again to see the latest updates!
Happy growing!
Stay lifted and stay curious!
Peace & Buds!
Likes
65
Share


@Tonino
Follow
Looking at how good she looks now it would be very hard to tell she had a broken arm not too long ago she’s looking strong bushy ready to be flipped into flowering next week but before will do a nice defoliation and change her nutriments
Durga Mata I:I CBD Feminised Seeds by the cannabis seeds breeder Paradise Seeds, is a Photoperiod Feminised marijuana strain. This Indica strain produces a High Indoors:400 gr/m2; Outdoors: 500 gr/plant yield. These seeds are ready to harvest in 7 - 8 weeks in early October. This Feminised seed grows well in Indoors, Outdoors conditions. It has a Low (5-10%) THC Content. The CBD content of the strain is High (5% +). This strain can be used to treat a variety of medical conditions including, Anxiety, Inflammation, Nausea, Pain
BREEDER Paradise Seeds
VARIETY Indica
FLOWERING TYPE Photoperiod
SEX Feminised
THC CONTENT 7%
CBD CONTENT 8.5%
YIELD Indoors:400 gr/m2; Outdoors: 500 gr/plant
GROWS Indoors, Outdoors
FLOWERING TIME 7 - 8 weeks
HARVEST MONTH early October
MEDICAL CONDITIONS Anxiety, Inflammation, Nausea, Pain
MEDICINAL PROPERTIES Anti-convulsion, anti-inflammatory, anti–nausea, anxiety reducing effects, effective for the relief of many types of pain
TASTE / FLAVOUR Fruity, Spicy / Herbal, Sweet
EFFECT Relaxing

Likes
5
Share


@Ninjabuds
Follow
The snow is really coming down out there. Big fat flakes are piling up on the ground, and it doesn't look like it's going to stop anytime soon. I guess that means no outdoor plans for today. Might be the perfect day to get cozy inside with a warm drink and a good book
The pound cake auto plant is growing like crazy! I'm so happy to see all the progress we've made. Yesterday, I finally got around to tying it down – it's amazing how much more stable it feels now. I can't wait to see what this plant looks like in a few more weeks.
Processing
Likes
14
Share


@Cannibalgardens
Follow
Wow I've been growing dinafem since I first started and this strain doesn't disapoint at all it's a very hardy plant . The girl took off so fast when I transplanted her into the new pot . She stinks like that gorilla glue smell all ready when you run the stem down with your fingers . I'm glad I got this freebie with an order I did last year and now I can't wait to see how this girl is going to do in the next week . The LST training has been paying off and I'm so anxious for next week ..cheers canna family ...