
Likes
Comments
Share


@Mrs_Larimar
Follow
2023-09-08
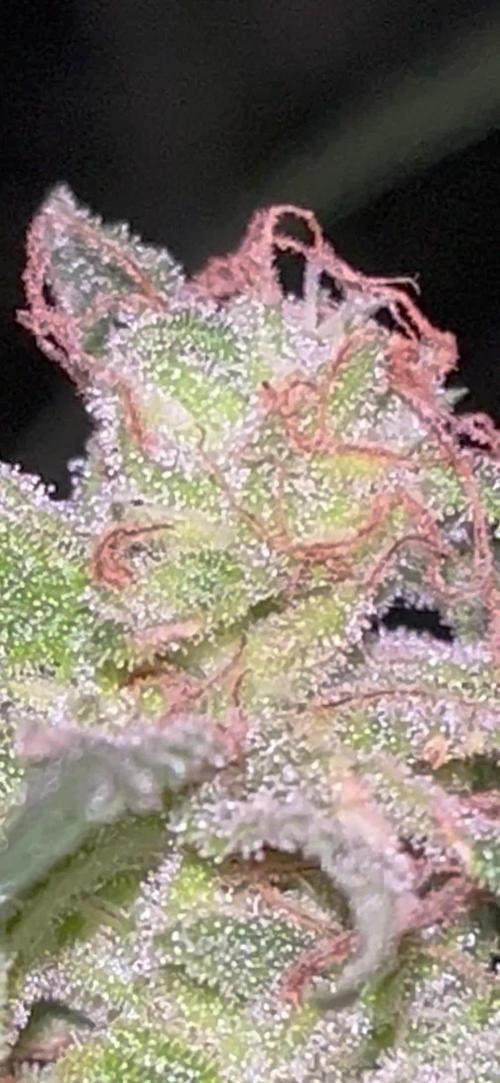
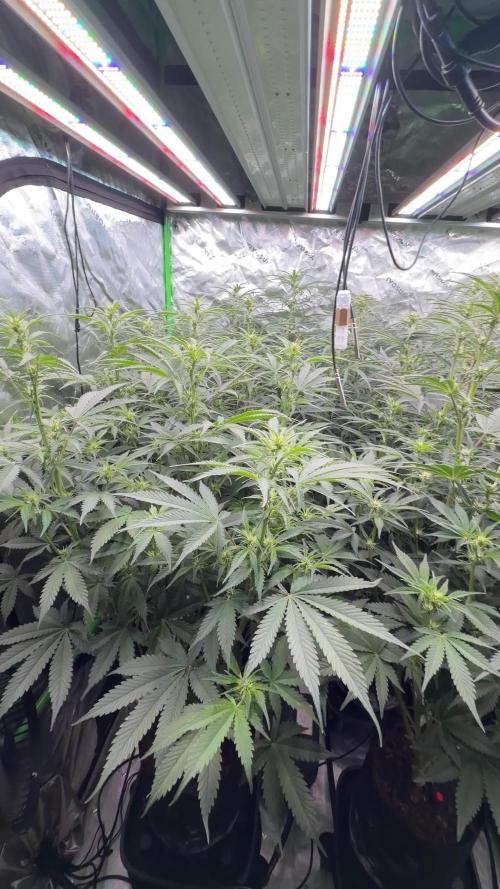
First of ll, thank you team @Kannabia, especially to Zoraida.
he hnded me the Freebees at the Spannabis this Year, after i showed him my previos Kannabia
Grow.
He said, "Oh as you liked our Strain " La Blanca" you will love the Super OG Kush"
he was right, i was fascinated from beginning how vigour and well structred those OG Kush were growing
and when Buds appeard i was totally overwhlmed.
so for me the Perfect Strain.
👉easy to grow
👉super structure
👉great ratio from Buds to Leaves
👉wonderful packed Colas
👉crusted with Trichomes
👉for me absolutely recommendable Strain👉👉https://www.kannabia.com/en/feminized-cannabis-seeds/super-og-kush


Likes
17
Share


@El_argentino
Follow
Comienza la pre floración.
Esto me dan indicios de que los tiempos del banco no son reales ya que comenzada flora restarán unos 60 días.
17/6/22
Solo riego con agua con calcio y magnesio ya que las plantas tienen mucho nitrógeno y antes de abonar para flora decido terminar los nutrientes del suelo para no tener una sobre fertilización producida por exceso de fertilizantes

Likes
5
Share


@CannaIGrow
Follow
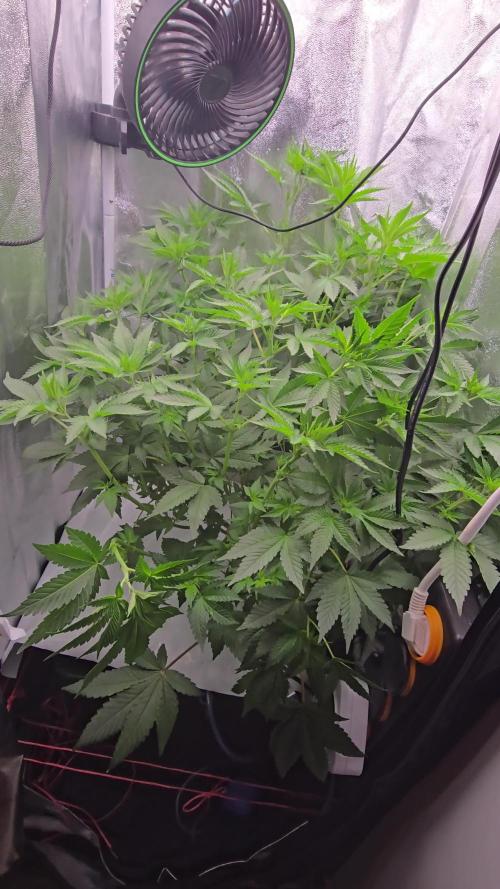
This plant seems to have grown much denser and better than my first plant. I just got the ac infinity ventilation setup with controller 69 for my 2x2, still trying to learn, hopefully grow #3 goes even better. Stay tuned
Likes
85
Share


@Organic_G
Follow
Meine Schätzchen sehen sehr gesund aus.
Sie bekommen alle 2-3 Tage 5 Liter Osmose gefiltertes Wasser.
Aus Erfahrung immer etwas vorsichtiger als zu viel.
Dazu werden Sie alle zwei Wochen mit den angegebenen Nährstoffen versorgt.
Ich bleibe gespannt, aber rein vom Wachstum ist Sie top, alle 8 h sehe ich schon eine Veränderung in der Blattmasse und Größe.

Likes
1
Share


@ThatsmyGrow
Follow
Bisschen schwieriger start, viele tage weg gewesen aber trotzdem soweit alles super

Likes
36
Share


@SensimillaP
Follow
Beautifull strain with crazy smell and huge amount of thc. All you want in your weed and more 🙏💪
Pictures were took after one week of drying, will post more and the real weight in the near future.


Likes
4
Share


@matias_scrog
Follow
ESTA SEMANA ES LA ULTIMA APLICACION DE BIG ONE, Y EMPEZAMOS A PONERLE ADEMAS DEL CANDY Y EL BLOOM EL TOP BUD CON MINIMA CONCENTRACION. ES INCREIBLE LA CANTIDAD DE RESINA QUE ESTAN LARGANDO LAS NENAS!!!
Likes
20
Share


@WeEdandGrowLover
Follow
The lil Big Bud is still growing really well😎.
I started to add master grower massive bloom from hydropassion since day 45.(0.3gr/L).
She really starts to smell good😊.

Likes
43
Share


@Coopmc
Follow
One starting week 3 the other starting week 1 I’m so impressed!!
So excited!!
Likes
4
Share


@Lazuli
Follow
It took its time to fmower but damn what a tree.. the big bud and overdrive really helped push the weight
Likes
10
Share

@HanzzCZ
Follow
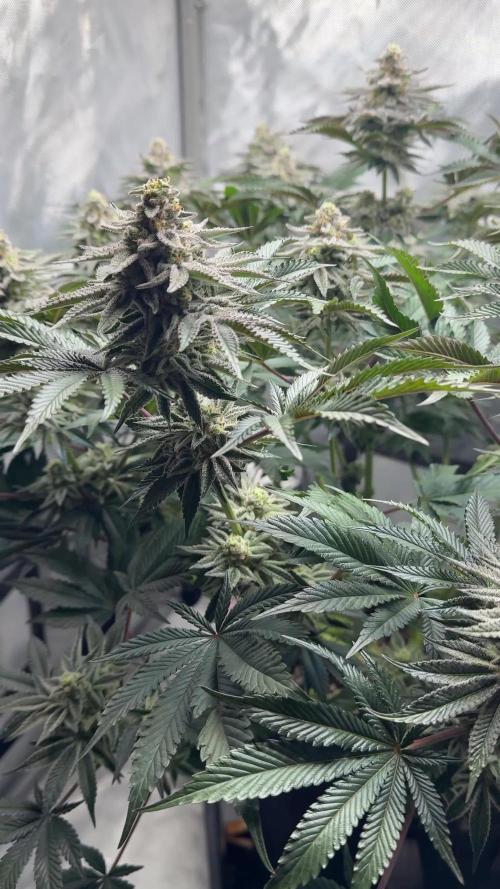
What’s uppp! Week fifteenth (six in bloom) is behind us.✌️🌼
This week the buds swelled up a bit more. They’re starting to harden and smell amazing! This one’s definitely going to be sticky 👌
Reducing the CalMag had a good effect. She’s no longer that dark green. We’re also starting to see some purple colors coming through!
I’d estimate around 3–4 weeks left, but we’ll see. At this point, hopefully nothing goes wrong anymore 😂🙈
Good luck every one! ✌️
Any tips or advice are always welcome 😂🔥
CZ
____________________________________________________________________________________________________________________________________________________
Servus, čtrnáctý týden, šestý týden v květu, máme za sebou. ✌️🌼
Tento týden šišky trošku nakynuly. Začínají tvrdnout a vonět! Bude to lepidlo👌 Ubrání calmagu mělo dobrou reakci, holka už není tak tmavá. Začínáme barvit trochu do fialova! Odhaduji ještě tak 3-4 týdny, ale uvidíme. Ted už by se to pokazit nemuselo 😂🙈
Ať se daří! ✌️kdyby měl někdo nějaký typy/rady uvítám váš komentář. 😂🔥
Likes
15
Share


@Bluemels
Follow
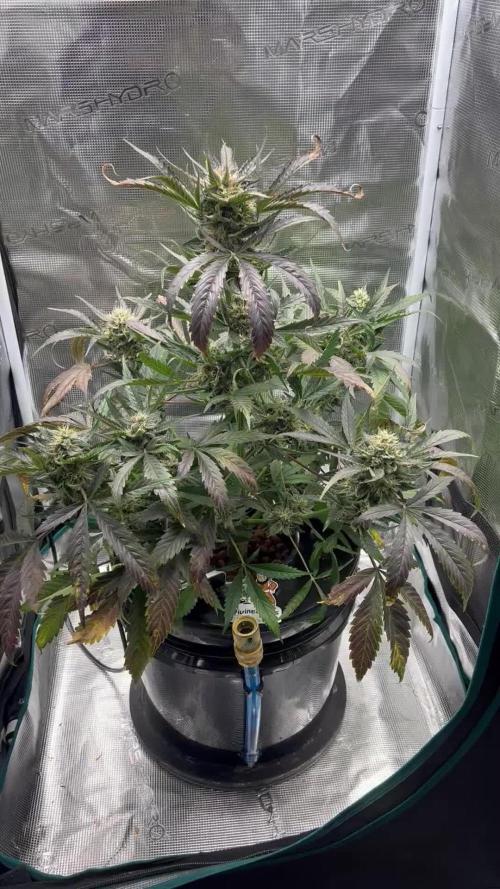
Tag 70 : Die Triple G ist mein Sorgenkind. Die Gute hat sich ordentlich gestreckt 😱
Die Lampe hängt schon auf Anschlag 😨 Somit ergibt sich ein Lampenabstand von 20cm - 30cm.
Ich hoffe das alles gut geht 😬
Die Pflanze hat nur wenig Blüten, aber ist unglaublich durstig, lässt sich aber nur schwerlich gießen.
Tag 72: Mit erschrecken musste heute feststellen das ersten Blätter in der Mitte schon gelb werden😱
Es ist mir durch viel bastelarbeit gelungen den Lampenabstand wieder auf 30cm statt wie vorher auf 25cm zu bringen😃
Der Filter jetzt zwar ziemlich dicht an der Decke, aber was solls 😁

Likes
263
Share


@Vincent_Van_Grogh
Follow
For a first time grower, the SCROG is definitely a bitch and a half... But worth it once you see 75-80% of your tent filled with buds, praying upwards to the light.
Thankfully, they have slowed down vertically. So no more twice a day SCROG adjustments for a while --- hopefully anyway.
I'm having a hard time with lowering RH. Although a fellow grower has suggested not to worry with RH as long as you apply BT bacteria... True?
Any advice on RH management on late flower stage for a noob? I'm always willing to learn!
Happy growing everyone! May your plants be merry and happy! 🌿 🌱 😎
NOOB GROWER THOUGHTS, WEEK 7 --
GrowDiaries along with other online forums on growing are filled with helpful individuals who are generous with their time. But maaan, sometimes you really come across people who take this shit waaaay too seriously. Lol! Reddit, here, autoflower network... Everywhere! I suppose that's true in any community. You will always have people of that same ilk. Just funny... I thought wine snobs were bad... GrowSnobs are worse!!!!
Have you ever encountered a GrowSnob?

Likes
19
Share


@ProfessorAutoflower
Follow
It’s the start of week 4, day 21. Topped today at day 21. Day 22 plant is showing no signs of stress from being topped. I will start lst at the end of the week.

Likes
4
Share


@pzwags420
Follow
On day 1 week 4 flower the girls are bulking up smelling great and some pistils are turning orange. The trichomes are still mostly clear with some milky trichomes starting. On day 3 one of my blumats had a runaway I believe from fertilizer sediment all I can do this late in the game is to lower the flow rate and hope that will solve the problem. It is strange that this is the same blumat that flooded when I went on vacation earlier on in the grow. I will inspect the blumat closer when I finish the grow. I tightened the carrot down 1.5 carrots. Except for the minor flood the girls are doing very well, even though they are too close to my grow lights :). On day 6 almost all the buds are starting to have a second growth spurt with some small white pistils showing, the trichome concentration is visibly growing and I expect to harvest the girls between week 8 and 9 of flower.

Likes
22
Share

@Still_Smoq
Follow
Week 9, 3-9 October 2025
3-9 Oct - Observed and let the plant grow.
Buds continue to develop and swell as it grows toward maturity. The smell continues to intensify as well. A lot of trichomes have developed and the hairs are just starting to turn brown. Because of the plants smaller size, I don’t have to do a weekly reservoir change, it’s more like every 10 days. She just doesn’t consume as much as a larger plant would.
- 2 Oct changed nutrient solution
- 2 Oct updated feeding schedule
- Using reverse osmosis water with EC/TDS at 0
- Adjusting PH to 6.1 daily using GH up/down
- Nutrient solution EC 2.1 at 72 degrees F
- Light power at 75%, DLI 45 canopy coverage at 18hrs
- Using PYPABL, Air Pump, 400GPH
That is it for this week. Thanks for the look, read and stopping by.

Likes
12
Share

@Stoney_Stark
Follow
Sticky Broccoli Auto – Week 7 Update
Week 3 of Flower
Stretch appears to be finished and the plants have transitioned fully into flower production. Bud sites are forming across the canopy and stacking is beginning nicely. Trichomes are already visible on a couple of the plants, which is a great early indicator of strong resin production.
Aroma is developing into a sweet, skunky, earthy profile. Overall plant health looks excellent with strong color and structure. There is very minor tip burn visible on some leaves, which may be the result of allowing the coco to dry back slightly too much between feedings. Allowing coco to dry too far can concentrate salts in the medium and temporarily increase EC around the root zone.
⸻
Light & Environment
• Plants have finished stretch and are now focusing energy on bud formation.
• UV-A and UV-B supplementation introduced this week at low intensity.
• UV schedule: 30 minutes halfway through the light cycle.
• Final defoliation completed to open the canopy and improve airflow and light penetration.
⸻
Feeding Log
All nutrient measurements are per gallon.
3/3
Started using low intensity UV-A and UV-B for 30 minutes halfway through the light cycle.
Mixed ~4 gallons of feed solution. Each plant received about 15% runoff.
940 ppm
5.7 pH
• .5 ml Silicium Bloom
• 2 ml MagCal
• 5 ml Cocos A
• 13 ml Cocos B
• 4 ml Pure Zym
• 2 ml Green Sensation
• 2 ml Power Buds
• 5 ml Ruby Fulvic
• 6 ml Photosynthesis Plus
⸻
3/4
Added Royal Rush to the schedule at 8 ml per gallon once per week as recommended on the bottle. Interested to see how the 8-0-0 nitrogen boost performs during flowering.
1200 ppm
5.8 pH
• .5 ml Silicium Bloom
• 2 ml MagCal
• 5 ml Cocos A
• 15 ml Cocos B
• 4 ml Pure Zym
• 3 ml Green Sensation
• 2 ml Power Buds
• 5 ml Ruby Fulvic
• 8 ml Royal Rush (weekly)
• 6 ml Photosynthesis Plus
⸻
3/5
Final defoliation completed.
Mixed 4 gallons.
1140 ppm
5.8 pH
• .5 ml Silicium Bloom
• 2 ml MagCal
• 5 ml Cocos A
• 15 ml Cocos B
• 4 ml Pure Zym
• 3 ml Green Sensation
• 2 ml Power Buds
• 5 ml Ruby Fulvic
• 6 ml Photosynthesis Plus
⸻
3/6
Mixed 4 gallons.
Auto-watering system ran until about 10% runoff.
1160 ppm
5.8 pH
• .5 ml Silicium Bloom
• 2 ml MagCal
• 5 ml Cocos A
• 15 ml Cocos B
• 4 ml Pure Zym
• 3 ml Green Sensation
• 2 ml Power Buds
• 5 ml Ruby Fulvic
• 6 ml Photosynthesis Plus
⸻
3/7
Auto-watering system activated until about 1 gallon remained in the reservoir.
Each plant watered to runoff.
1180 ppm
5.8 pH
• .5 ml Silicium Bloom
• 2 ml MagCal
• 5 ml Cocos A
• 15 ml Cocos B
• 4 ml Pure Zym
• 3 ml Green Sensation
• 2 ml Power Buds
• 5 ml Ruby Fulvic
• 6 ml Photosynthesis Plus
⸻
3/8
Mixed 4 gallons. Approximately 2.5 gallons used.
Each plant received a healthy amount of runoff. Plants are looking very healthy and bud sites are stacking nicely.
1100 ppm
5.8 pH
• .5 ml Silicium Bloom
• 2 ml MagCal
• 5 ml Cocos A
• 15 ml Cocos B
• 4 ml Pure Zym
• 3 ml Green Sensation
• 2 ml Power Buds
• 5 ml Ruby Fulvic
⸻
3/9
Mixed 3 gallons. Each plant watered to light runoff. About 1.5 gallons of feed solution remained.
885 ppm
5.8 pH
• .5 ml Silicium Bloom
• 2 ml MagCal
• 5 ml Cocos A
• 15 ml Cocos B
• 4 ml Pure Zym
• 3 ml Green Sensation
• 2 ml Power Buds
• 5 ml Ruby Fulvic
⸻
3/10
Finished the remaining nutrient solution from 3/9.
No runoff.
⸻
Nutrient Function Overview
Silicium Bloom
Provides potassium silicate to strengthen cell walls, improve structural strength, and increase resistance to environmental stress during heavy flower development.
MagCal
Supplies calcium and magnesium which are critical for chlorophyll production, cell structure, and preventing deficiencies common in coco.
Cocos A & B
Primary base nutrient supplying macro and micronutrients needed for flowering growth.
Pure Zym
Enzymes that break down dead root matter and organic debris in the root zone, keeping the rhizosphere clean and improving nutrient uptake.
Green Sensation
Bloom enhancer designed to increase flower density, resin production, and final yield.
Power Buds
Encourages rapid flower initiation and increased bud site formation.
Ruby Fulvic
Fulvic acids improve nutrient chelation and transport, helping plants absorb nutrients more efficiently.
Royal Rush
High nitrogen microbial feed that stimulates beneficial microbes and increases metabolic activity in the root zone.
Photosynthesis Plus
Beneficial bacteria that enhance photosynthesis efficiency and root zone microbial activity.


Likes
77
Share


@Ukfarmer420
Follow
Hi guys I hope your all good,
So its been a mad week! Had to have a switch around.
So the mimosa sherberts have been a nightmare but I think I got them back on track, there a good few weeks behind now.
Gelato cakes are doing brilliant! Frosting up lovely and smell amazing, I reckon 4 weeks max left on these 2 autos, then its waiting on the sherbert mimosa to show me some nice buds.
I have 1 blue cheese fem and 2 x dark phoenix vegging in there now. I will repot them when the autos are all done and finished.
Happy growing guys 👌💪💚
Hi guys I just got around to defoliating and tieing back down the sherbert mimosas, its looking like each node is a 40cm long main, I cant wait for these to start producing now.
Happy growing guys.
