
Likes
Comments
Share


@Grow4Releaf
Follow
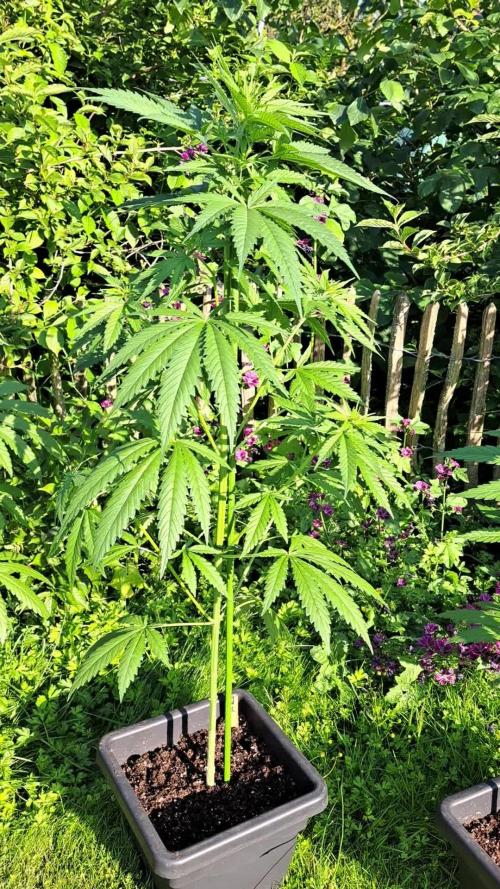
She didn't care for the high dli I had goin apparently.
Seems she topped herself from the light , dimmed back to a 40DLI and all is well looking. Rest of her looks nice and healthy just my mistake trying to push alil more with the co2 going for the photos In the room.
But really strong smell of candy with this one right now, Skittles or Starburst I can quite place it without having the candy in my face too.
Curious to see how it finishes tho, 57 days roughly from seed so she's going pretty well.
Not looking for any specific number of days. She goes till It's goes basically ..
Into week 8 we go !!

Likes
10
Share


@ZweetZkittlez
Follow
Unos días más y ya pasamos a florar. Realizada un poco de la defoliación y saqué los esquejes. El día que pasemos a florar, haré una nueva defoliación más “violenta”, conocida como Schwazze o Schwazzing.
Veremos qué sale de este cultivo, viene todo muy bien 👍 😎💪


Likes
20
Share


@BudXs
Follow
Well, it looks as if one of the 3 plants is a male. I live in denial for one more day and then I toss it. Not sure which plant it is, as I painted over the strain names when I painted the cups grey. Smooth. So I will find out soon. Otherwise, good weather and some good growth. Roots are balled up at the bottom of the dutch bucket reservoir, Im sure, because I let the drip go dry for a day or two and the plants were droopin (coco)

Likes
9
Share

@Oyziphar
Follow
It's been a busy week :
👉 I defoliated the plant by removing 8- 10 very big fan leaves, to allow more sunlight to reach the lower branches
👉 I took 2 cutting of my plant(s)
👉 I removed the six lowest branches and used the cuttings to make cuttings.
👉 I started the light deprivation technique by moving the plants to my darkroom to force flowering.
👉👉👉👉Every morning at 8:30 am I move the plants in the greenhouse.
👉👉👉👉Every evening at 8:30 pm I move the plants inside the darkroom.
👉 Once a week I give the plants a liquid booster with OPF 4:2:8 ; Fulvic 25 ; Yuccah ; Biovin liquid ; Earthworm compost extract.
Big Thanks to Luc from Plant Health Solutions / Bioplantenvoeding dot nl 🙏🙏🙏👉
👉 We had an excellent week with high temperatures🌡️, lots of sun 🌞, and rain during the night 🌧️
Plant #1 ; height : 111 cm
Plant #2 ; height : 88 cm
Plant #3 ; height : 83 cm

Likes
29
Share

@ElNass
Follow
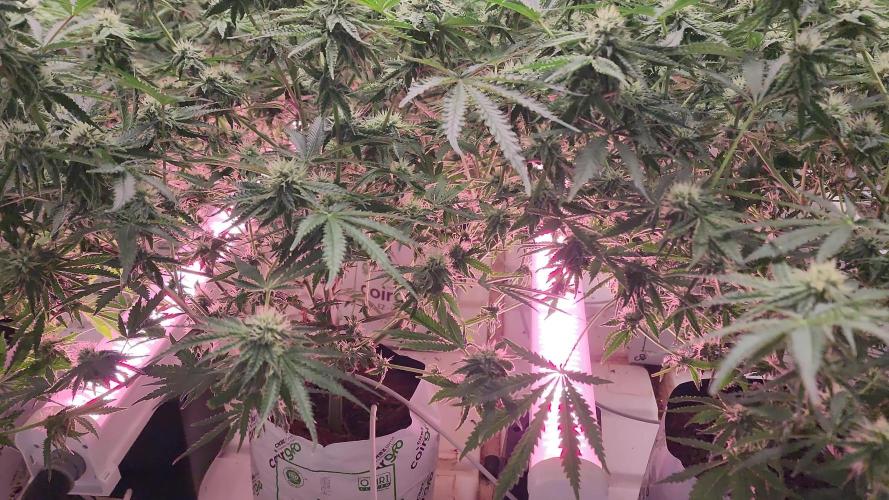
🔥 General Development
Bubblegum has been pushing strong this week. Buds are noticeably swelling and the trichome production finally started to increase on all tops. The smell became way more defined, a sweet bubblegum/candy aroma every time I open the tent. Pistils still mostly white but starting to curl in some spots.
🌿 What I Did This Week
• Light adjustment: maintained good distance, stable PPFD with no signs of bleaching.
• Enzyme tea (light mix) to stimulate microbial activity and keep the root zone clean.
• Moisture balance kept stable with 5–6 L per watering.
💚 Health Status
Very healthy overall. No nutrient burn, no excess, no deficiency. Leaves slightly lighter due to high flower metabolism but still within normal living soil behaviour. Bud formation is symmetrical and stacking nicely.
📈 This Week’s Progress
• More resin than last week.
• Buds noticeably thicker.
• Aroma intensity x2 compared to last update.
✨ Closing Note
Bubblegum is officially entering the “bulking phase.” Nothing explosive yet, but solid and steady, exactly what this strain is known for. Next week should be the big resin jump.
Stay tuned! 🍬🔥
#livingsoil #organicgrow #elnassgrow #seriousseeds #bubblegum #nemessis200w #season2 #ledgrow #microbelife

Processing
Likes
3
Share


@mr_smooke
Follow
we pass 5. week, in this week i been spred my girls and make some defoliation. she grow nicely week by week. in next week i will flip them on flower mode. tent is ollmost full
I am lose some pics of defoliation

Likes
1
Share

@Ketamine
Follow
Really bulking up. Did some defoliation this week. For a low yielder not too bad, crop steering + under canopy lighting is pushing these above and beyond. Trellis up today, really bulking up
Likes
3
Share


@Out_of_flowers
Follow
Flowering time. To much PK on start. Now not nutrients. 1 week flushing.

Likes
35
Share


@madlangs
Follow
All going well. Apart from cream mandarine who’s leaves are not happy.
25.10.21
Dg
Week 6.
3.5L
Wc
Week 5.
3.0
Gb
Week 5
3.5
Chem
Week 5
3.5
Cream. Week 5.
2.5
Hubba. Week 4.
3.5
Orange. 1. Week 4.
3.0
0range 2
Week 4.
3.0
Silica 2ml/1. Calmag 0.5ml/1. Gave grow instead of fish
27.10.21
Dg
3.5. Ph6.7
Wc
3.3
Gb
3.0
Chem
3.3
Cream.
2.5
Hubba.
3.0
Orange. 1.
0range 2
2.0
Gave all week 5 except dg got winter frost. Silica 2ml/1. Gave fish instead of grow. ph6.4 forgot to give calmag
27.10.21
Spectrum king 80cm
Lumatek 53cm
29.10.21
Dg
3.0L ph6.5
Wc
2.5
Gb
3.0
Chem
3.0
Cream.
3.0
Hubba.
3.5
Orange. 1.
3.0
0range 2
2.5
Gave all week 5 except dg got winter frost. Silica 2ml/1. Calmag 0.8ml/L. Gave grow instead of fish. Recharge. Mammoth p

Likes
18
Share


@MonkeeHaze
Follow
Starting the scrog net, gonna let her stay in veg state till 120 days.😎
Likes
17
Share


@Nicogreen
Follow
Så fedt at have bestilt og så lige op til en konkurrence det jo perfekt 👌 💪 😇 🇩🇰 💚 Hope the Best grower win. Best regarts Nicogreen 💚
Likes
74
Share


@Mr_Maes
Follow
We are officially in full bloom. The have been enjoying 6-7 hours of sun light per day for about 4 days now, then brought back in under the cobs. The girls are all exploding with growth and stacking what I expect to be huge buds.


Likes
10
Share


@420lor
Follow
Ya está aquí, última semana que tendremos a esta preciosidad en la maceta!! Menudo aroma desprende hermano, para comérsela!!!!
Una maravilla de variedad, aunque me he pasado un poco con el fertilizante promete unos humos jugosos

Likes
9
Share


@Rock_n_Roll_Randy
Follow
DID SOME MAJOR DEFOLIATION TO SLOW THE GROWTH ABIT. IM GOING TO PUT THE 15 PHOTOPERIODS IN THE 8X8 TENT TO FLOWER BUT I NEED TO HARVEST THE AUTOFLOWERS FIRST.
FOR EVERYTHING MARS HYDRO VISIT:
www.mars-hydro.com
www.marshydroled.ca
PROMO CODE: rocknroll
VISIT THE ALIEXPRESS STORE:
@marshydro_aliexpress
Instagram: @marshydropenny
Thanks for taking the time to read and check out my diary🤜🤛
TS3000 FEATURES:
WIDEBAND SUNLIGHT FULL SPECTRUM LED GROW, Infinite close to natural sun light, suit for all plants whole stages indoor growing, rapid plant response from seed to flower, achieve maximum quality and quantity, much better than traditional HPS grow systems.
HIGH REFLECTIVE & NOISE FREE-Fanless LIGHT BOARDS design will make your growing life easy and quiet, quickly heat dispersing material aluminum reducing light lost to aisles and walls, increase the light intensity up to 20%, allowing your plants receive more energy and without burning your plants for maximum headroom.
HIGH EFFICIENCY ENERGY SAVING PLANT LIGHT, high-power NEW LED grow, Compares to traditional 3000 watt HPS lamp and other brand led grow light while only 450 watts true output with 1016 LEDs, more scientifically and energy-efficient! Perfect for 5' x 5' veg stage, 4' x 4' bloom stage, higher intensity in a MARS HYDRO grow tent, reflective area, or by crossing over using multiple TS3000.
BOOM YIELD LARGE GROW LIGHT, NEWEST SMD LED technology provide highest PAR/LUMEN output(1095.6umol/), makes you get 30% higher yield compare OLD led lights, can get max yield at 2.5g/watt, less pay but get more yield, bring a amazing grow trip to any home grower as it beams huge amounts of light energy to plants below.
COMMERCIAL LED GROW LIGHT, Updated easy dimming & daisy chain function, main light controlled, especially come with two waterproof and dimmable Mean Well Drivers, auto sensing power supply works on both 120VAC and 240VAC and 277VAC, suit for Large Rooms and Commercial Setups.
Low Energy-Consuming LED Grow Light: Consuming 300w and also mounted with 1016 chips, TS3000 has the ability to replace a 450w HPS light while reducing 40% power intake.
High Efficiency LED Grow Light: With overall light output PPF 343umol/S as well as amazing PPE 2.3 umol/j, it's 50% even more photon efficient and can assure a 30% more return than the old HPS/MH lights.
Patent Highly-Reflective Hood Shape: The reflector design on TS3000 is patented, which can effectively gather the light dispersed in all directions to enhance its light intensity as well as assist plants in absorbing more light.
Full Spectrum Plants Favorite Spectra: By the unique mix of spectra that makes most light in the 400-700nm waveband, incredibly conducive to plant photosynthesis. Adequate IR(730-740nm) is additionally consisted of in the range to generate larger buds.
Dimming And Daisy Chain Feature Available: Upon an independent dimming button on the external driver, backing 0-100% settings adaptation and up to 30 LEDs daisy-chained in a group, it supplies different light levels for various plant stages meanwhile saving energy.
Safety Certifications And Service Warranty: CE, ETL, RoHS, UKCA security certifications accepted, 50,000 hours durability, 5-year service warranty, and local after-sales repair
5x5 GROW TENT:
LOCK ALL LIGHT INSIDE MARS HYDRO Indoor Grow Tent interior is made of diamond mylar which is highly reflective. (Other brand's mylar and reflective rate is as low as 50%, won't provide efficient light. )MARS HYDRO 1680D canvas, being double stitched, it is tear proof and has perfect light locking. Mars Hydro's grow tent keeps 100% lighting beams inside and helps your plant absorb more lights. EXTRA-THICK --No light leaks or rips at all
DURABILITY GROW TENT Stable metal corner adapters and poles are the trustful supporters of the tent, standing sturdy, neither rusting nor paint-falling, quick easy tool-free installation. Mars Hydro's heavy-duty metal zippers, with double layer black lining, are the best on the market which create a light-proof seal
EASY OBSERVATION FOR YOUR PLANTS. Special observation windows are made by double layers of cloth. Observe the growing conditions of your plants without opening the tent and avoid disturbing plants. The observation window also serves to dissipate heat and ventilate air
AUTOMATIC 6 INCH EXHAUST FAN KIT W/ CONTROLLER:
Mars Hydro 6'' Inline Fan uses a mixed-flow design to maintain peak performance in a high static pressure environment.
GROW TENT FAN: MARS HYDRO inline fans are designed to ventilate hydroponic grow rooms, transfer heating/cooling, cool AV closets, and exhaust odors.
EFFECTIVE VENTILATION: Variable speed controller for easy fan speed adjustment. Optimal ventilation for your planting.
LOW NOISE LEVEL: Durable plastic fan housing and blades for extremely low noise(32dB-A); create a truly quiet growth environment.
EASY INSTALLATION: Removable duct ends with locking tabs for quick removal and easy maintenance and a cord length of 4.9 feet for hassle-free setup. This grows tent fan with a controller for easy fan speed adjustment.
BASIC PARAMETERS: Ventilation exhaust fan size: 6” | Dimensions: 315mm*225mm*210mm. | Weight: 2.7. | Airflow: 402CFM | Noise: 32dB-A | Bearings: Dual Ball.


Likes
22
Share


@ILoVeThiSpLaNt
Follow
Giorno 80
La Sweet Cheese è stata tagliata. Purtroppo già dalla seconda settimana avevo pensato di rimuoverla per lasciare spazio alle Crystal Candy che erano belle grosse ma alla fine dato il suo odore di formaggio/frutta ho deciso di tenerla.
Le Crystal Candy anche loro sono a sola acqua da 10gg e entro 4/5gg verranno tagliate.Loro hanno sempre il solito odore di caramelle fragola/melone.
A presto con qualche foto dei fiori 😊👍
Likes
24
Share


@nonick123
Follow
Día 30 (01/07) Riego con 250 ml H20 pH 6,5. Se muestran sedientas
6 días después del topping, las nuevas ramas se están formando rápidamente!
Día 31 (02/07) Se muestran saludables y potentes!
Día 32 (03/07) Riego con 500 ml H20 pH 6,5
Día 33 (04/07) Las plantas están creciendo muy rápido! Me planteo hacer supercropping o LST en algunas de ellas...
Día 34 (05/07) Se muestran sedientas. Las macetas se le empiezan a quedar pequeñas
Riego con 250 ml de H20 pH 6,5
Día 35 (06/07) Training session! Aplico LST a todas y supercropping a la OnionOG mutante con 4 colas por nodo
Riego con 500 ml H20 pH 6,5
Día 36 (07/07) Riego con 500 ml de Té Vegetativo de Lurpe Solutions
Aplico foliarmente Kelp hidrolizado a 0.25 ml/l
Ajustes de LST. Están respondiendo estupendamente al entrenamiento! 😍💥
💦Nutrients by Lurpe Solutions - www.lurpenaturalsolutions.com
🌱Substrate PRO-MIX HP BACILLUS + MYCORRHIZAE - www.pthorticulture.com/en/products/pro-mix-hp-biostimulant-plus-mycorrhizae

Likes
8
Share


@Jays_Not_Here_Man
Follow
18 weeks from seed to harvest. Love 34 street seeds, quality genetics for a fair price. These garlic cookies showed no disease or pest issues, no mold or powdery mildew. Easy enough to grow, no surprises, no super stretch in flower, but I would recommend training or SCROG to control them. Pungent Pine is what I am callling this smell, over 800 grams wet weight. They are hanging to dry in my tent as I write this, 60 %RH and about 71 degrees of freedom units! Can’t wait to try it out 🇨🇦❤️🌱😎💨

Likes
4
Share


@Alejangrow
Follow
Took well too last weeks flush. 💧
Did some defoliating to allow light deeper into the canopy. ☀️
Putting back on recommended strength nutes.💉

Processing
Likes
6
Share


@dank604
Follow
She's picking up steam. Already showing white pistils. I was a bit late again with the LST so hopefully I dont get another gigantic main cola. I fed her first nutrients a few days ago and she looks healthy and no signs overdoing the nutes, yay! I should mention I ended up putting more soil into the pot around at week 2 as is compacted quite a bit which is why it measures a bit on the smaller side.