
Likes
Comments
Share


@BruWeed
Follow
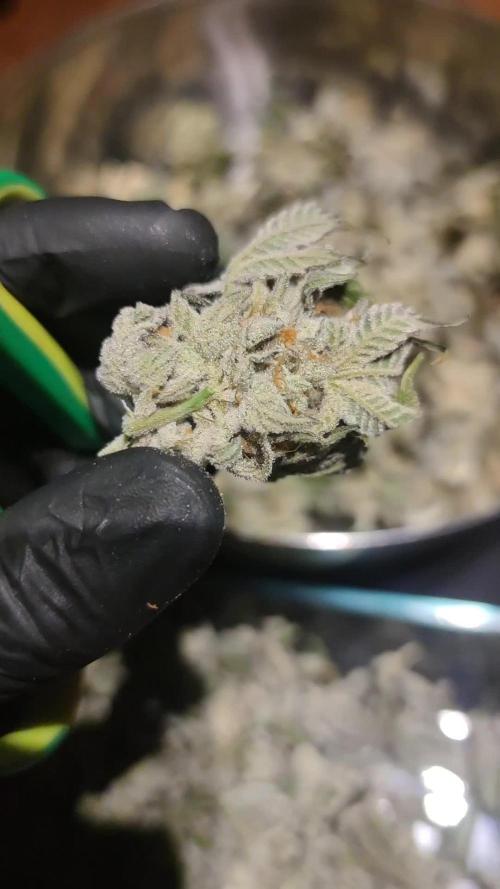
🍀Estuvo bien en toda su etapa, no tuve ningún problema. Los resultados fueron muy buenos, se encuentra muy resinosa y con aroma a dulce.
🍀En total saque 143g de una sola planta.
🍀En total estuvo 105 días de vida desde su germinación.
🍀Recomiendo esta genética, por el momento son cocos Premium, ya quiero probarlo para saber que sabor tiene.
🍀Ahora se encuentra en etapa de secado, cuando ya estén para la etapa de curado subiré más imágenes.
🍀🇦🇷Podes seguirme en Instagram como @bruweed_arg🍀🇦🇷

Likes
16
Share


@Andres
Follow
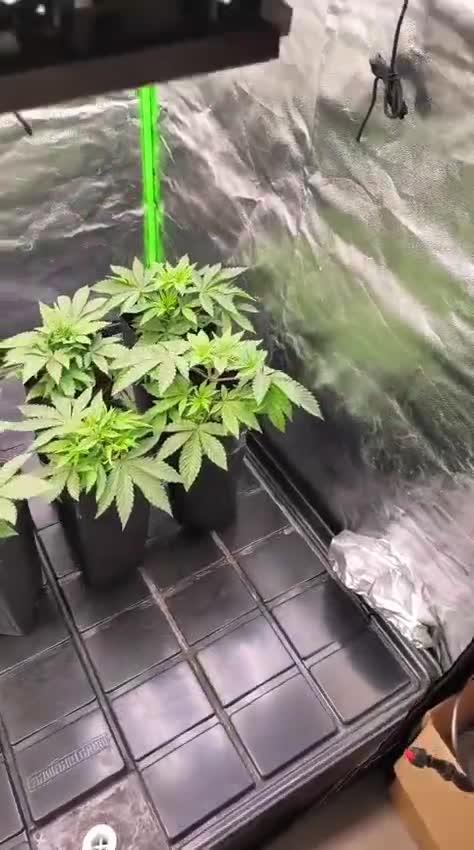
she is growing happy ... this week I will pass her directly to a 20 liter pot ...
Likes
11
Share


@Sejnik
Follow
Nové větve hezky vyrostly. Dám jim ještě 2 týdny a potom bych rád přepnul světlo na 12/12
Na rostlinách se objevují lehké náznaky popálení živinami. Některé listy mají hnědé konečky ale opravdu jen v malé míře
D51 Pondělí:
Použil jsme LST abych udržel rostliny v jedné výšce.
Během LST mi z 50% praskla 2 větve u HazeBerry 2 ve spoji po posledním zastřižení . Jedna větev je v pořádku. Druhá po 3 dnech vypadá že přežije i když vypadala velmi špatně.
Holky dostaly 1L vody s 0,5ml/1l RQS Booster Bigger Flowers.
D54 Čtvrtek:
Poslední velké LST a Defoliace, kdy jsem z každé rostliny odstranil celkem 16 spodních listů
D55 Pátek:
Dostaly 1,5L vody s vypsanými živinami
Holky jsem postříkal výluhem z hmyzího trusu, který má repelentní účinky téměř na vše.

Likes
55
Share


@Xpie77
Follow
Red Wine was a joy to grow. Very easy plant that not need a lot of nutrition to eat. Smell is out of this world, cant pinpoint because Ive never done Red Wine ever... But its fruity and a hint of berries. From Seed to flower it took 11 weeks. Thats a fast growing plant

Likes
19
Share


Likes
2
Share


@DrBud420
Follow
02.11.'24
After 5 days of drying, this little girl who was a little bigger than a meter gave 950 grams and a little bit of popcorn...this picking was 870 and a little bit of popcorn, and 4-5 weeks ago during a storm, one branch broke, which yielded about 100, but let's say 80 for sure, a total of 950 grams of beautiful, huge, potent buds

Likes
7
Share


@Nikkov
Follow
Well, another week has passed and the end of the second week has come and the pistils have already shown themselves and I continue watering with top crop bloom, first time testing this fertilizer and I'm only using two of them, top veg and top bloom, next cycle I'm going to use General Hydroponics fertilizers because I have a friend who uses them and he's having great results, I still want to talk to my friends about this strain because I think it hasn't grown as it should, but anyway we're studying to improve ourselves for the next ones, the rest is all experience for the next ones it grows. =D
Likes
82
Share


@WhiteEdge
Follow
26.03.2024
Continue into week 4
Update firmware on TrolMaster Tent-X (3.6)
Replace all filters, remove and clean drain buckets and tubing.
Mix new batch with 56ml AN connoisseur AB + 4.5g Big Bud Powder + 7.5ml Silica - total 30l @ 1.34EC. NPK Ratio is 1-2-3 , Cal/Mg ratio is 4-1.5
Target EC for this week is 1.2 start and end week with 1.3. Checking plants will determine timing of strength
Donne one pass off long misting (3min) with diluted solution @ 0.84@C
Set Day/Night misting cycle @ 60s ON time
Finally have time for managing canopy, pull down taller branches and position all tops to fit under screen without touching. Try ro spread them evenly across the net, top per square of net
Defoliating all girls, remove all fan leaves and prune lots of smaller branches from middle. Lot of foliage is removed!
After stripping humidity drop significantly (41%) , need to install humidifier again to keep RH @ 50-52%
Set dehumidifier thermostat to work @ 50% RH. Reduced light intensity for this day, let girls recover from stress
PAR map 1150max/650min PPFD, VPD -1.2-1.3, DRH 50-54%, NRH 45-49%, NT-20-21c, DT-24/25.5c, Leaf temperature 22-23c, Light distance 45-55cm, CO2 700+ppm
HLG Scorpion Diablo @ 65-75% - 45-55cm distance
60s ON time 20min OFF time @ Day Time
60s Off time 30min OFF time @ Night Time
NT-Nutrient Tank - PH -5.90-, EC -1.32, Temp-20-21
27-28.03.2024
All girl looking great after defoliation,)
Clean benches and floor in box
Replace all filters
Set dehumidifier thermostat to work @ 47% during night times, 50% @ day. Humidifier is also connected and set @ 49% Day and 45% @ night, if needed
Inkbird humidity controller stop executing's automation for day/night settings. Start manually to change day/night values for now
Next several days, until weekend, temperatures outside will be high , 29c max. Hope it will not raise temperature in box to much.
Light is set on TrolMaster Tent-X controller to dimmed at 28c
AC Infinity fans are set to AUTO mode with height temp set at 26c and high RH set at 54%
Top up tank with 25ml AN connoisseur AB + 4.5g Big Bud Powder + 7.5ml Silica - total 75l @ 1.34EC
PAR map 1180max/680min PPFD, VPD -1.2-1.3, DRH 50-52%, NRH 45-48%, NT-21-22c, DT-24/25.5c, Leaf temperature 22-23c, Light distance 45-55cm, CO2 700+ppm
HLG Scorpion Diablo @ 80% - 45-55cm distance
60s ON time 20min OFF time @ Day Time
60s Off time 30min OFF time @ Night Time
NT-Nutrient Tank - PH -5.90-, EC -1.26, Temp-21-22
29-30.03.2024
Refilled the tanks with 20l of fresh mixture. 25ml AN connoisseur A+B + 3g Big Bud Powder + 7.5ml Silica - total 20l @ 1.21EC
Refilling is done in two passes, one time before light up, and second time early in morning, two hours before night time.
This give additional nutrient cooling without running water chillier. Refill solution is @ 18c
Checking EC and PH 2-3 times a day. The electroconductivity values are around 1.24EC.
I maintain the strength until it drops or rises. For now, I’ve caught the perfect strength, the liquid is almost static with very small oscillations in electroconductivity and PH.
Replaced all filters in the system, replaced on washing… Every other day is enough, during daily cleaning there is no dirt on the filters.
The girls are handling the environment well, leaves are raised as they should be, they seem like very happy plants.
Formation and enlargement of flowers can be noticed with the naked eye.
The wave of warm weather continues all this week. Expected temperatures for the next seven days range from 25-29c. Need to pay attention to that
Raise light 10cm, top of canopy now is around 50-55cm
PAR map 1180max/650min PPFD, VPD -1.2-1.3, DRH 50-52%, NRH 45-48%, NT-21-22c, DT-24/25.5c, Leaf temperature 22-23c, Light distance 50-55cm, CO2 700+ppm
HLG Scorpion Diablo @ 80% - 50-55cm distance
60s ON time 20min OFF time @ Day Time
60s Off time 30min OFF time @ Night Time
NT-Nutrient Tank - PH -5.95-, EC -1.24, Temp-21-22
31.03.2024
Girls totally recovered from defoliation. Almost all gig leaves grow again on all girls.
Tropicana Cookies have most apparent bud development, in size as well
Purple Lemonade is going to be a biggest in height in this grow . They already around 85+cm with SCROG branches.
Tropical condition continue. Temperatures going from 26-29c, night temperatures still colder and stay around 16c
Outside temperatures affected water temp in nutrient tank, will se if i need for a water chiller or i will cool with adding cooler nutrient solution.
Lower wattage on light , set Diablo @ 75%
Replaced all filters in the system, replaced on washing…
Refilled the tanks with 15l of fresh mixture. 25ml AN connoisseur A+B + 3g Big Bud Powder + 7.5ml Silica - total 15l @ 1.21EC
PAR map 1180max/680min PPFD, VPD -1.2-1.3, DRH 48-52%, NRH 42-48%, NT-22c, DT-25/25.5c, Leaf temperature 22-23c, Light distance 50-55cm, CO2 700+ppm
HLG Scorpion Diablo @ 80% - 50-55cm distance
60s ON time 20min OFF time @ Day Time
60s Off time 30min OFF time @ Night Time
NT-Nutrient Tank - PH -5.95-, EC -1.21, Temp-22-24
01 04.2024
Outdoor Climate: It’s hotter outside. I’ve set the Diablo at 73% to maintain temperatures in the box within the 25-26°C range.
Humidity: After defoliation, the humidity is low, which is great! The dehumidifier hardly worked this week.
Misting Routine: I start the day with a 3-minute misting session; this will be the routine for now.
Nutrient Solution Temperature: I’m keeping the nutrient solution temperature between 20-23°C. I refill the tank twice a day to cool down the solution.
Light Parameters:
PAR Map: Maximum PPFD is 1080, minimum PPFD is 650.
VPD: Ranges from -1.2 to -1.3.
Daytime Temperature (DT): 25-26°C.
Nighttime Temperature (NT): 22°C.
Leaf Temperature: 22-23°C.
Light Distance: 50-55 cm from the plants.
CO2 Levels: 700+ ppm.
HLG Scorpion Diablo: Set at 73%, positioned at a 50-55 cm distance.
Lighting Schedule:
Daytime: ON for 60 seconds, followed by 20 minutes OFF.
Nighttime: OFF for 60 seconds, followed by 30 minutes OFF.
Nutrient Tank (NT):
pH: Maintained between 5.9 and 6.1.
EC: 1.18.
Temperature: 20-23°C.
Week 4 off Flowering in Summary
120 litter off RO water,
210ml+210ml AN connoisseur A+B, 18g Big Bud Powder, 45ml Growth Technology Liquid Silica
70kW electricity in total for light, Pumps and AC Infinity Fans. 63kW for Light + 2kW Dehumidification + AC Infinity ventilation
Week start @ 1.31EC, nutrient strength., keep strength @ 1.24 till the end of the week
Girls look superb all time, Wedding Cheesecake have two pheno, realy like buds on one girl
Tropicana Cookies fill bud sites this week a lot, Purple Lemonade is going to be talles from all three stains. Nice bud formation also.
PH was stabile and move from 5.90 min to 6.2 max.
Light distance for this week - 50-55cm from tallest top , PPFD levels around 1100 in center, trough whole week. Lowest reading 680 @ corner
Temperature are from 23c at start off day to 26c max at some points. AC Infinity T6 extracting fan program in AUTO to kick in @ 26c
Night temps around 21-23c, dehumidifier work less this week. Outside humidity is low this week
Water temperatures in middle off week start to rise, reffiling solution is cooled to bring temp back from 23-24 to 20c
Defoliate girls on first day off ths week, pruning off smaler branches, lots off foliage is removed
After defoliation humidity drop inmediately in box. Need to bring back humidifier for couple of days. RH was low trough whole week
Day RH is moved from 45% to 50% max, at night times drop to 40-45%
Next week outside temperatures continue above average for this time of the year.
Continue in next week, starting probably with one more light defoliation, bigger fan leaves only


Processing
Likes
15
Share


@eldruida_lamota
Follow
Buenos días familia, increíble, sin palabras con esta variedad, lástima la lie y perdimos una a principio, pero estas 2 crazy cookies crecen una locura.
Ph controlado en 6,5 y una humedad por encima de 40% así que todo fenómeno.
Una cepa bastante fácil en sus primeras semanas.
Veremos próximamente como se forman nuestras flores familia

Likes
22
Share

@TrickzGrowz
Follow
Eine absolute Washer Genetik. Jedes Blatt ist komplett voll mit Trichomen.
Likes
59
Share


@Insaniac_0
Follow
(11/25-12/01)
Hope everyone enjoys the daily progressions of overhead and side profile (Organized Chaos) Unfortunately they have too much of a toll for me to keep up with with 3 sets of grows going now, so this was the last week I am doing them on this set. I will try to add a video and black back or cover pics by end of week every week.
Week 3 Notes & Observations:
As mentioned last week, Plant 1 remains the supreme plant now and is producing nice stretch in the node spacing but is still showing a different type of leaf shape than plant 2. No issues from the mainline topping and they seem to be going okay. I will be topping again this weekend for the second of 3 total topping sessions. This topping will be 2 tops off the ends of the last and will produce 4 main colas.
**OOPS**
was being a little too aggressive in my HST while trying to set the mainline on both plants today. P1 was just a little rip of the skin, I taped her up and suspect she will be fine. However, on P2, I nearly snapped the whole branch off. I taped it and crossed my fingers hoping it works out in a week or two, but have serious doubts it will be able to mend such a large break. We'll see because I am posting ALL of the grow, the good and the bad.
VPD and PPFD:
This week I will hold the humidity in the tent to about 70-75% and temps will be monitored for 70- 75F daytime and 66-71F overnight. Im not adjusting my lights and look to control them 350ppfd max. Meaning slight increase over last week but mostly just growth increase.
Feed & Monitor:
***All feeds with nutes use either a whole ratio or combination of "Veg Mix" and "Bloom Mix"concentrates DILUTED in water until a total ppm of add-in is reached using a (Total Dissolved Solids) TDS Meter measured in PPM (parts per million). The "Veg Mix" concentrate will eventually be added in smaller ratios and "Bloom Mix" concentrate will eventually replace the "Veg Mix" concentrate entirely. The ppm and ratios of each feed will be listed when I feed. Veg mix recipe is on week 2. Bloom Mix recipe will be noted in this top message of the week that I make it.***
Day 28 (last feed was day 22)
Tested and Calibrated my ph pens. Starting weight from each pot was 18 lbs and 8 oz, P1 weighed 15lbs 12oz and P2 was 15lbs 4oz before feed. Each plant got 1 gallon of de-chlorinated tap water with 300ppm Veg Mix concentrate added (recipe on week 2 and makes 1 gallon at about 3600 to 4000ppm concentrate to dilute each feed, i.e. I only fed 300ppm above the purified water ppm this feed) The ph on this feed was balanced to 6.0ph to combat the original higher runoff ph from the first runoff feed. After feed P1 weighed 22lbs 3oz (21lbs 2oz after last feed) and P2 weighed 21lbs 14oz (20lbs 14oz after last feed). I got about 5cups of runoff on P1 (9 cups last feed) and 5 cups on P2 (7 cups last feed) . Runoff for P1 ph was 6.45 with 1170ppm (6.45ph with 980ppm last feed) and P2 was 6.45 with 1230ppm (6.45 with 1130ppm last feed). Top soil tested at: P1 6.35,6.3,6.33,6.33 for an avg of 6.327 (6.497 avg after last feed) and P2 tested at 6.47,6.37,6.26,6.51 avg 6.402 (6.46avg after last feed) - next feed will be 6.3ph as Im liking where the ph is so I dont see any issues, but will continue to monitor this way.
Day 34 (last feed was day 28)
Tested and Calibrated my ph pens. 1st Starting weight from each pot was 18 lbs and 8 oz. Before feeding this time, P1 weighed 14lbs 14oz (15lbs 12oz before last feed) and P2 was 14lbs 7oz before feeding (15lbs 4oz before last feed). Each plant got 1.5 gallons of de-chlorinated tap water with 98ppm Veg Mix concentrate added to flush any salt builds in the soil (recipe on week 2 and makes 1 gallon at about 3600 to 4000ppm concentrate to dilute in each feed, i.e. I only fed 98ppm above the de-chlorinated tap water ppm this feed) Due to this soil showing a possible calcium deficit, I am starting a 1ml per gallon add-in to test on all plants using this soil, so I added 1.5ml of CaliMagic (General Hydroponics 1-0-0) to each plant's feed then I ph balanced before feeding. The ph on this feed was balanced to 6.3ph. I used knitting needles to help both aerate the soil and create new water pathways for the roots. (a practice I may consider a new feeding standard) After feed, P1 weighed 21lbs 9oz (22lbs 3oz after last feed) and P2 weighed 21lbs 7oz (20lbs 14oz after last feed). I got about 11cups of runoff on P1 (5 cups last feed) and 11 cups on P2 (5 cups last feed). Higher runoff volume was expected with the feed volume increase for flush this round. Runoff for P1 ph was 6.65 with 838ppm (6.45 with 1170ppm last feed) and P2 was 6.60 with 879ppm (6.45 with 1230ppm last feed). Top soil tested at: P1 6.58,6.57,6.58,6.67 for an avg of 6.600 (6.327 avg after last feed) and P2 tested at 6.47,6.61,6.64,6.64 to avg 6.590 (6.402 avg after last feed) - next feed will be 6.0ph as I'm still liking where the ph is, but rather see it closer to 6.3 or 6.4 top and bottom. I dont see any issues with the feed's data other than the possible calcium deficit and I will continue to monitor runoff ppms as I expected this to be higher with more runoff.
Hope everyone enjoys the daily progressions of overhead and side profile (Organized Chaos) Unfortunately they have too much of a toll for me to keep up with with 3 sets of grows going now, so this was the last week I am doing them on this set. I will try to add a video and black back or cover pics by end of week every week.


Processing
Likes
12
Share


Processing
Likes
6
Share


@420keef
Follow
Finally got somd fertillizer from bio-bizz, and i tied the top stems more to the the bottom to increase lower growth thanks to @Doggy for the help
Likes
14
Share


@RFarm21
Follow
Week 19 november - 25 november
23 november - D1 flowering
I watered it a little too much. as it is colder I will start giving 1.5L of water instead of 2L
Likes
3
Share


@Squaregrouper
Follow
This blueberry is amazing tried-and-true easiest cloner almost a hundred percent success rate when cloning with or without clonex

Likes
7
Share


@JeyGanesha
Follow
4 sett.ho iniziato subito con un hst.non voglio che cresca troppo alta in balcone

Likes
26
Share


@Jsammy09
Follow
Hello, Hello!
This week has been another pretty solid week. Kind of continuing where we left off from last week. Just continuing to monitor the grow room conditions and make adjustments as need, though its been super solid and not a lot has been needed. I did lower the power of my light back down to 50%, some of my leaves were starting to taco and I came to the conclusion it was due to some of the branches being closer to the lights, but other than that no real issues. I did up the EC by .1 this week so now we are running at 1.0 EC and 5.9-6.1ph. These ladies are really starting to pack on the weight and trichomes this week and looking forward to see the changes over the next week or so! Temps have been pretty stable around 77-78f and around 50-55RH. I did do another round of light defoliation on the day of water change, but nothing too crazy. Getting excited to see these girls finish!
As always, any tips, comments, or recommendations are greatly welcomed and appreciated. Thanks everyone, you guys rock!

Likes
16
Share


@NMGDOC
Follow
Semana del 12 al 18 de abril
Cada día más bonitas. Estoy feliz porque como hay menos humedad ambiental, hay menos humedad en el indoor. Incluso llegando a 43% de humedad, así que me confirmo. La temperatura suele andar por 24-26 grados Celsius así que bien.
Tenía unas 10 hojas dañadas por la mosca negra, así que el 12 de abril apliqué el insecticida tec fort (foto del producto en la semana anterior). Lo apliqué a las 17:00 hrs y a las 22:30 del mismo día no vi ningún bicho. Dentro de 5-6 días volveré a aplicarlo igualmente (1ml por cada litro).
Al menos dos de las cuatro plantas están tomando otro color, así que me conformo.
