
Likes
Comments
Share


@Trippin66
Follow
Hi growmies
well found, today the vadi are still full of water so no watering
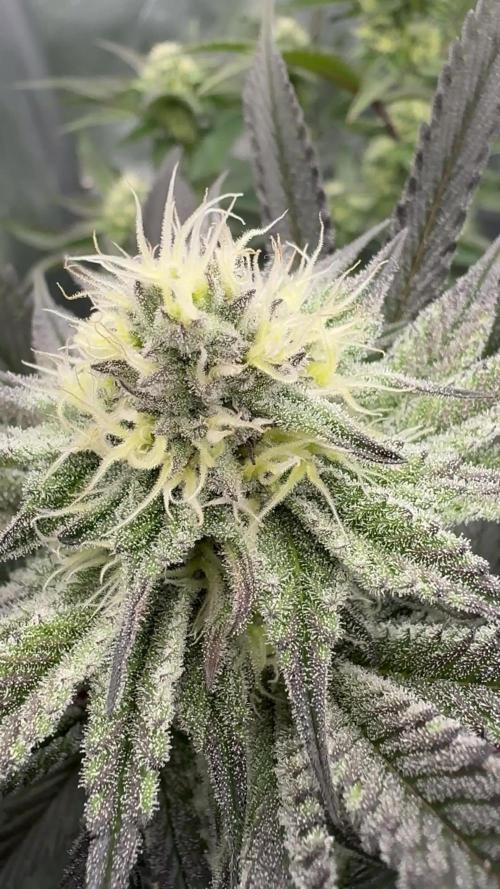
pheno 2 mimosa is demonstrating her hulk genes too bad pheno 1 can't do the same too much stress for her two feline attacks were too much even runtz suffered only one but in a too premature phase by the way yesterday while I was trying to make it open a little I patched it the plant shows that it is not elastic perhaps a little silica would do me good but I will use it in the next stressful event in another race I implemented on Monday when I watered green sensetion and sugar royal for the two mimosas that the small runtz and the zenzation are now flowering which is doing well even if in two weeks back it reacts well to the lst I hope it can reach large sizes in the next week and then start flowering when it wants
for runtz and zenzation the usual mix remained, calmag 4mlxlt, rizotonic 40mlx10lt and whiteshark 2 spoon x 36lt ph 6.2/6.3 added the scrog net in which the mimosa is having a lot of fun
I'm very sorry about how the other plants have suffered from stress, the feline demon has been banished from the room where the girls sleep
but I won't give up, I'll bring the result home in mid-December, we'll see what nature and my ability are able to do
have a good week and cultivation everyone thanks for the comments and likes never stop growing👍🏼✅

Likes
48
Share


@Nvchods3
Follow
esta semana le aplique big one de forma foliar para empezar a estimular la Pre-floracion !
Likes
4
Share


@BioGrowBayer
Follow
Vorblüten. Insgesamt wirken sie gesund, mit kräftig grünen Blättern und ohne Anzeichen von Mangel oder Stress.
Die Beleuchtung läuft nun im 12/12-Zyklus. Der Abstand zur Lampe wird regelmäßig kontrolliert und angepasst, um Verbrennungen zu vermeiden. Die Temperaturen liegen tagsüber bei etwa 26 - 28 Grad, nachts bei 18–20 Grad. Die Luftfeuchtigkeit pendelt sich bei etwa 45 bis 50 Prozent ein.
Die Pflanzen werden alle zwei bis drei Tage nach Bedarf gegossen. Diese Woche gab es die erste Gabe Blütedünger mit reduziertem Stickstoffanteil und mehr Phosphor und Kalium. EC- und pH-Werte liegen im optimalen Bereich. Ein Schädlingscheck verlief ohne Befund. Alles läuft reibungslos.
Likes
18
Share


@valiotoro
Follow
Hello everyone 😎
Week 6 of flower for the RuntzZz🌸
Love the smell super fruity & creamy🤤
For the nutrient it’s time for Green Sensation 1ml/L🚀
Max 2 more weeks for the two little one✂️
Top buds of the monster runtz harvested✔️
Solid like a diamond how I like🤩the smell is earthy & sweet🤤

Likes
15
Share


@SamDo
Follow
Hello, enfin je peux faire le dernier update.
Nous voici à un peu plus de 15jours de séchage,,, la manucure est faite,
Je ne suis pas déçu du résultat final, même si il reste encore plein de choses à améliorer,,,
Hâte de relancer un nouveau cycle, pour tenter d’atteindre d’autres objectifs... plus de 500gr/m2🙏

Likes
16
Share


@Dr_Rook
Follow
Las niñas siguen su ciclo de vida. Veo que van muy poco avanzadas para llevar ya dos semanas a 12/12 (no sé si por poca luz o algunos errores que cometí)
Le eché el estimulador de floración demasiado tarde por interpretar mal la tabla de nutrición, mejor dicho por no seguir la correcta.
Estuvo varios días muy cerca de la luz con lo que se pudieron estresar.
Le estoy temiendo a la altura, ya que han estirado más de lo que preví en principio, quedándome muy poco margen de error. A unas malas tendré que ingeniármelas doblándolas hacía abajo o algo.
El punto positivo es que estoy controlando mejor la humedad.
A pesar de todo seguiré dando lo mejor para que salga lo mejor posible 💪🏼

Likes
28
Share


@Salgeezi
Follow
Here we are week 6/7 in this post. Slowly fattening up. I don't think they will swell much more. Sugar leaves are showing signs of amber but actual bud there's still many clear Tris.
Breeder says 8 weeks. My grows tend to go over breeder specs of strain lol. I'd like to push it as far as I can ALOT of the plants bid sites are very small was expecting them to get alot bigger.


Likes
Comments
Share


@Skinnytalls420
Follow
Day 32-26/08/22 these 2 chemdawg are doing very well it’s my first time using Plagrom lightmix and I can say that so far it’s very good!! Will start to give bloom nutes this week on next watering tomorrow!!!

Likes
11
Share


@blackcald
Follow
Drop humidity to 45%. Stop add nutrients, start flushing soon. I looking at trichomes and think this week is last one.
Likes
16
Share


@JUNGLE_B4RNS
Follow
Water
FC6500 @ 60%
Harvest
Mars-Hydro LED’s are definitely the future for growing 👍


Likes
22
Share


@PrairieFrostGrow
Follow
***** Week 6 May 16 to 22, 2020 - Days 36 to 42 from germination *****
Calling this a flower week but it certainly is more of transition week.
Been battling a busy life along with pH issues this grow. Starting to get both under control😃
These girls were transplanted into 3 gal plastic pots after battling pH issues and unable to bring down below 7.1 until cut out of fabric pots.........piss off!!!
Cheap fabric pots from Amazon are a thing of the past!!!! 😡😡😡 Ordering Radical bags👍
During transplant GSC2 took it hard. She got twisted coming out of the old pot and it was a bit of a disaster😢..........GSC went very well and her root mass stayed together.😃
GSC2 is a freak and I am learning more from her. Growing out almost sideways from the pot. Keeping an eye on the main stem to ensure she doesn’t start to rot at the soil level........may trim off a couple of more branches. Her root mass won’t be very big so think I will take more branches and let her focus on building the density of a few bud sites rather than spreading a little to several sites.
LST introduced this week as well.
Started the introduction of Rezin and Terpinator now.
Little more detail..........
May 16/20 - Day 36
- 2L each girl of Massive @ 3ml, VeloKelp, Rezin, @ 2ml, Sensyzime, Liquid Wt, Dual Fuel @ 1ml = 1000ppm and 4.5pH
- stop lower the pH as much next feeds. 5.5 idea now and see how they react. I really want 6.2 going in!!!!😞
- GSC2 is concern as she took the transplant poorly with her whole root mass being flipped over and on top of herself.
May 17/20 - Day 37
- Mixed 3L water with Massive @ 2.5ml, Piranha, Voodoo, Dual Fuel @ 1.5ml, Rezin, Liquid Wt, CalMag @ 1ml = 1050ppm and 5.5pH
- GSC given 2L and GSC2 only 1L.
- giving them more microbes and beneficials next couple of feeds with more Piranha and Voodoo again.
- stripped more leaves today. GSC2 took more lower stuff as well.,,.....so bushy on the bottom.
May 18/20 - Day 38
- mixed 3.5L water with Massive @ 3ml, Piranha, Voodoo, Dual Fuel, Rezin, Liquid Wt, Vitathrive @ 1.5ml = 850ppm and 5.7pH
- checked some runoff numbers today......
- GSC runoff was 400ppm and 5.8pH.
- GSC2 runoff was 550ppm and 6.2pH
- PH is back in line!!!!!!🙌🙌
- GSC is coming along but her branches are not as thick as I would like. Side branches are getting longer.
- GSC2 is a mess in general😀 She is shooting out fan leaves and they leaves are getting bigger but she is not getting any bigger??
- LST day today and GSC had some branches pulled down. Leaving GSC2 for now.,
May 19/20 - Day 39
- dry out day
- just left them alone today😃
May 20/20 - Day 40
- 2L each girl of water with Rhino skin, CalMag, Sensyzime @ 1.5ml, Dual Fuel @ 1ml = 650ppm and 6.1pH
- there was some runoff from GSC2 only.
- girls look happy overall today.
May 21/20 - Day 41
- 3L water mixed with Rezin and Terpinator @ 1.5ml = 160ppm and 5.7pH
- was going to be a plain water feed but changed last minute and its time for Terpinator.
- the girls are not overly happy today.....not sure why
- all girls seem to be responding well to the LST over last couple of days.
May 22/20 - Day 42
- dry out day
- Both girls still trying to set bud sites but no success yet.
Processing
Likes
14
Share


@Canadian
Follow
This girl is turning out to be a very impressive Beast exotic colours and her smell at fruitiness with a air of skunk it's quite remarkable there's really not much to say about her except that she's cruising through at great speed and looking like she is on steroids remarkable genetics from sweet seeds.
From now on I don't think I'm going to be able to take her out of the tent because those huge branches are filling up with big heavy flowers . One interesting note about this girl is that she does not drink that much water and does not require much nutrients looking forward to see this girl finish thank you for reading I will continue to update have a happy grow
Likes
34
Share


@Treenoded
Follow
I really recommend this strain for indoors. Do some topping and lst and you will be more than fine. The plant can take a lot! Train her hard and you will be rewarded with full of pistils nugs!

Likes
5
Share


@OnlyTomatoes
Follow
[ Information ]
For all grow information, including strain and room details, please see the first week of veg.
[ Updates ]
(Flower) Day 1 - Light intensity increased to 65%. C02 increased to 1300ppm average. Day temp/humidity 85/70 (1-1.2VPD), night temp/humidity 75/65 (.8-1VPD). Fed a diluted compost tea mixture before lights on. Base water was R/O and tap water mixed lightly with silica and Tribus microbes. Tea was a mixture of Fish Hydrolysate, Bat Guano, Molasses, Fulvic/Humic, Kelp, and Earthworm Castings. 8 gallons of tea were added to 72 gallons of water mixture for an 80gal batch total. The batch was mixed for a half hour before feeding to the room. I did not PH or PPM test the mixture, organic material is hard to get an accurate PPM reading so the numbers are useless to me. I will be working to bring the lights to 100% power over this first week of flower.
Day 4 - Light intensity increased daily, currently at 90%. Will raise to full power tomorrow. C02 increased to 1800ppm average. Temp and humidity for day and night are still the same. Lights were raised slightly to maintain 12 inches from canopy height, and a few growth nodes that were above the canopy got topped. Watered today with an 80gal (1.25gal p/pot) mixture, 10% tap 90% r/o water. 6.8 PH, 2.2ec. Foliar sprayed yesterday before lights off with a neem mixture for weekly IPM. Canopies are stretching relatively evenly, though I will be adding in support nets within a few days to help maintain the even spread. I've run this strain before so I'm fairly confident that I know what to expect during these few stretch weeks.
Day 7 - Lights have been at 100% since day 5. C02 still 1800-2000ppm on average. Plants are stretching quickly into the lights, I have yet to readjust their height. The best growth usually happens when I do nothing, and I've done almost nothing the past couple days besides enjoy the unusually warm spring weather my area is currently experiencing. Watered today, 100gal (1.5gal p/pot) mixture, <1ec. Mainly an organic feeding for microbe health, also wanted a bit more runoff than normal due to the high ec feeding previously.

Likes
37
Share


@The_Projexx
Follow
Welcome to week 8 of flower for this wild project! We will be looking to check trichomes over the coming days to see how things are coming along. I know for sure PGC#2 will be ready far before the rest but we will check all of them none the less. As we reach the race for the finish line Im very pleased with what i've accomplished with these plants this grow!
Huge shout outs go to @MarsHydroLED as well as @Seedsman for their outstanding gear and genetics to work with!
HUGE shout out goes to all my followers and people who stop in a like! Keep giving inspiration to grow!
-The Projexx
Day#50F Pictures N/A. Ladies are starting to slow down on new pistol growth and focusing on ripening up.
Day#51F Watered ladies 6L each at 160PPM. We've began flushing them.
Day#52F PGC#1 leaves starting to turn quite purple, Banana Krumble still has a while to go. Checking trichomes tomorrow.
Day#53F Pictures N/A. Watered ladies 6L each at 160PPM. PGC#1 trichomes are doing well mostly cloudy little amber, Banana Krumble still has lots of time to go and PGC#2 is almost ready displaying lots of amber and lots of milky trichomes gonna give her a few more days.
Day#54F Pictures N/A. Banana Krumble still thickening up , PGC#2 is looking quite ready and PGC#1 is far behind her sister!
Day#55F Harvested PGC#2. Watered ladies 6L at 160PPM. PGC#1 is turning more purple by the day quite the lovely show!
Day#56F Pictures N/A. Banana Krumble still thickening up but displaying more orange pistols , she's gonna be a 70 - 77 day girl but I'll get big rewards! PGC#1 ripening up daily!
Recap: Over all things went super well this week! We harvested the smallest plant in the room and ended up with almost 500G of wet weight roughly 6-7 ounces off that plant dry, she smells very very gassy with light hints of candy and fruit very pleasing combination to say the least. We are coming up on the finish line quickly for this project Im excited to see what the other plants will yield!

Likes
5
Share


@lonelystoners
Follow
Totally forgot to change the status to flowering haha. 8 weeks in, i see some cloudy trichomes but hope that they will grow a few weeks more for a thicc harvest!
Likes
24
Share


@Mr_Awesome_Badass
Follow
Well still on auto pilot for the most part.
Giving her a daily feeding till run off of the nutes my other girls are using. Other than that I'm just checking on her daily.
The main cola is big, fat and pretty dense. Not the hardest but everything considering I'm really happy. It's about the look anyway when it comes to cannabonsi plants.
Finished the roll of butt wipe so that looks pretty cool. Hope to harvest next weekend but we will see.
Thanks for following this has been a fun grow.

Likes
5
Share


@Jabberwolky
Follow
ok so i totally forget to keep track of the dates for this website..lol the plant is well on its way to being done.
buds are taking forever to get any weight to them ... but the smell is wonderful.
i dont know if its the light that is not lettin them get as fat as i want or not ...
we shall see
Likes
111
Share


@Salokin
Follow
Hi Growmies,
I feel I had a root issue, may have even been root rod. So as I saw a few of the very deeply submerged roots turning brownish and decay, I decided to generously cut away the affected areas and cleaned everything with hydrogen peroxide as good as I could and then properly rinsed the whole system.
It seems, however, like she has started a whole new set of roots that started to submerge after I started feeding the orca from plant success (can be seen in the video below). Can highly recommend this product! She has also not show any signs of stress due the suspected root issues.
Other than that she is a super pretty indica lady :) almost crazy how symmetrical she is. I have trained all main colas horizontally until the canopy had evenly opened up. Now I will let her grow towards the scrog and depending on her stretch, I will flip her at some point towards the middle or end of next week.
Here is the code that’ll give you 20% in Zamnesia‘s online store, just input ZAMMIGD2023 at checkout.
Thanks for stepping by and until next week!