


Likes
5
Share


@FlavourFarmer
Follow
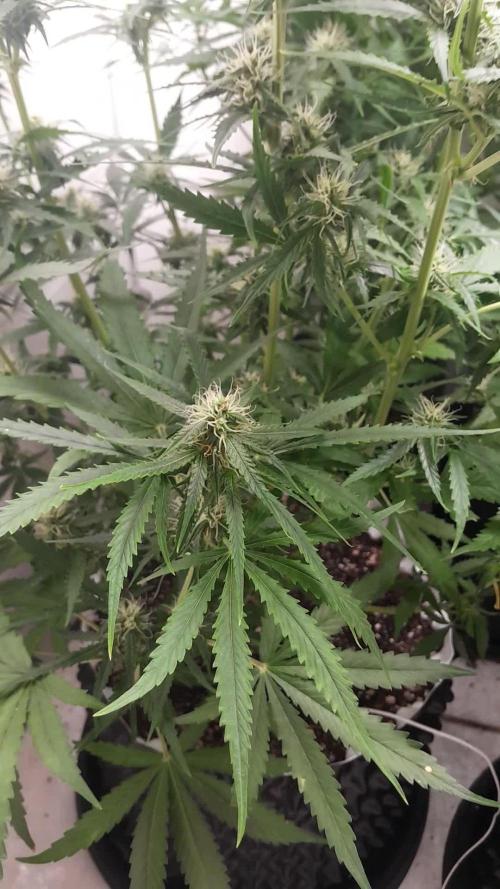
Back two are gorilla zkittles day 73 not ready just yet I don’t think
Cinderella looking like there nearly ready day 67 🤔

Likes
3
Share


@Marshydrots1000
Follow
Well been a interesting week to say the least. The one problem plant looked worse than ever so had the experience of a lifetime trying to take that springy net off of the plants ! Don't know who's more traumatised me or the plants ! But got there in the end and did a big flush through the ph was out of ballance at the root zone reading 5.0 /5.1 should of done it a little sooner I suspect. Unsure what caused it as there both of the same res ! But here we are, frosts really starting to build had to supper crop the other more sativa she was looking for taking off through the roof haha! Hopefully that's the end of the drama. These are some tough plants thats for sure and the potential as you can see is huge as I'm only just a begginer in coco and autopots ! See you all next week
Likes
13
Share


@Cannibalgardens
Follow
Man these seeds germinated to quick when I first planted them lol . The team over at this hemp company have been putting alot of work into their brand and seeds .. I was lucky enough to be able to try this @hokuseedsco "purple la berna " it's a hemp cbg/CBD cross measuring under 1%thc . I was interested in growing hemp and with the chance to start these I knew I was on the road to some killer buds. These plants were started indoors under my mars hydro ts-1000 and were grown in organic soil mix with organic nutes . Out of the seeds I planted I had a few males but a few females as well . After being Inside for a while I moved them all outdoors and transplant then into 7 gallon pails fabric and chill on them for a while . They loved outdoors and flourished I was battling hungry plants as I don't like to fed more then I have to or want to. In the end of it all I gave synthetic #future harvest nutes for a while and then I finished with the @dutchsciencenutrients "bloom" . My end result is a beauty pair of plants with one going down today and the other is this week end . The trained pheno was purple everywhere leaves stems and buds while the untrained pheno was tall over 6"feet and had bright orange Hairs with light green buds . I'm in love with this bud here and I'm eager for the next growing this spring.This stuff is the sweetest , danky smelling hemp I could have dreamed of. Crazy bag appeal and I can't wait to get the smoke report going as well .. my whole grow I also used @miicrobialmass every two or three weeks it's good at creating microbiology in the soil helping to release essential nutrients to their roots ..tasted good and gave over an ounce of buds they are sticky and light with very strong berry smells over powers THC cannabis near buy just wow ..calm smoke just kinda relaxes you away !
Likes
61
Share


@BlumenBot
Follow
3/29 - I'm not sure she needs another topping. I'm just going to spread out the current tall shoots and let her rip upwards!
Also swapped the light for the final veg lamp.
3/30 - training continues and she is taking up more water every day!
3/31 - feeding and defoliation of the larger and lower fan leaves
2L distilled water
5.9pH
65*F
780ppm
Grow 3.02g
Kelp 0.14g
Cal/Mag 0.56g
Amino Acids 0.48g
Enzymes 0.15g
Microbes Grow Stage 0.53g
Real Grows Recharge 0.1g
4/1 - Growth is significant since defoliation, I think it was well timed, she grew an inch overnight
4/2 - Great Friday! Another day of training and she is starting to look amazing!
4/3 - feeding day, took off some large fan leaves and trained just a bit more. I think this week she will be allowed to start growing vertically
2L distilled water
6.0pH
1040ppm
71*F
Grow 3g
Kelp 0.17g
Cal/Mag 0.56g
Amino Acids 0.5g
Enzymes 0.14g
Terpinator 5ml
Real Grows Recharge 1.26g
Great White 0.15g
Likes
2
Share


@Selectamikoo
Follow
Der Samen ist aus haze Gras entsprungen kein breeder. Wahrscheinlich amnesia oder silver haze. Zumindest rauche ich diese Sorten meistens und daher denke ich der Samen stammt von diesen Sorten ab.
Letztes Jahr war es das selbe und es waren Photoperiodische sativa strain.
Falls jemand weiß welche Sorte es wird kann mir gerne schreiben.
Heute umgetopft in seiner endgültigen Größe.


Likes
3
Share

@Jardineiro_Br
Follow
Agora sem aplicações de técnicas, apenas fertilizantes e água, para que a energia da planta seja usada nos botões, quero ver lindos botões, densos e resinados. Assim como a Blueberry, essas planta tem uma semana a menos , mas está um pouco mais alta , por conta da genética sativa.
Likes
170
Share


@Tropicannibis_Todd
Follow
👉Alrighty Then👈
This plant finished out just around 90 days from seed
👉Puffed a bunch of it , and its fire and I mean fire , Grape Berry mixed with a little earthy undertone 👈 the buds are tight and smoothered in resin 👌
Would definitely grow this one again and would recommend 😳 Facts
Persian Pie from Greenhouseseeds
Full Gas from Greenhouseseeds
Babba Kush from Greenhouseseeds
Rainbow Melon from Fastbuds
Papaya Sherbet from Fastbuds
Weddingcheesecake FF From Fastbuds
Purple Oreoz F1 From Seedsman
Slurricane From Premium Cultivars
Soil by Promix
Nutrients by Cronks
This was a crap ton fun 🙃
Thanks to all my growmies out there for stopping by its much appreciated 👈
👉Happy Growing👈


Likes
54
Share


@Coopmc
Follow
M1 looking good going to only follow her for the remainder of this Diary
Looks like easy light suggestions for training from heat on out !!
I love how the branches are evening out !!
Good heavy watering push out ild stale air and draw in some new!
Looking nice about ready to lash the tops down
6 nice snake heads! Started tying the top two down

Likes
6
Share


@GemansGoGreen
Follow
WEEK 4:
The plants are now in the third week of the growth phase. I topped all three plants on the main stem and cut off the 4 largest top leaves so that the side shoots have more light available.
Plant #1 is clearly the smallest and is not as developed as the other two. Since I only want to take two plants into the flowering phase, I tend to sort them out.
Plant #2 looks the most vital and has already developed a noticeable smell.
Plant #3 still has a strange leaf shape, although I have the impression that this has improved slightly
The plants in 6L pots and added 5% FLO (Living Soil Fertilizer). I let the soil develop for 14 days beforehand. Clear mycelia have formed and the soil has a very pleasant forest floor smell.
- Light Power: 40%
- Soil: BioBizz Light Mix + 5% FLO (Living Soil Fertilizer)
- Additives: Dynomyco mycorrhiza granules

Likes
21
Share


@BrieflyGrowing
Follow
These ladys are getting juicier and juicier day by day. Did some beauty macro shots with Mimosa Cake, should chop her up in the next few days. This week only very low PPM water to all except to NL 2 which flowered a bit later. Feeding schedule is for NL 2 only.
Likes
34
Share


@Salokin
Follow
Hello Growmies,
As we step into the eighth week of our Watermelon Candy F1 Hybrids' flowering stage, the dance of growth and aroma continues to enchant our senses. These delightful plants, sharing their space with Epic Buzz and Red Banana Pudding varieties, inch ever closer to the pinnacle of their bloom.
The Watermelon Candy cultivars are flourishing with an undeniable zest, their foliar tapestry thick with the potential of what's to come. The air is thick with their intoxicatingly sweet scent, a testament to their namesake, and their buds are expanding with satisfying robustness.
Plant #1 is maintaining its lead with a striking bud formation, clearly thriving in the consistent environment of the Tent-X system. Plant #2 and Plant #3 are not far behind, with each showing a wealth of budding sites and a sprawling canopy that speaks to a bountiful harvest ahead.
Despite being under a 12/12 light cycle along with the photoperiod plants, which may limit their yield compared to a 20/4 cycle, these plants are putting on a splendid show. They continue to swell, their trichome-frosted buds promising a powerful and flavorful finale.
Nutrition continues on a carefully scheduled five-day rotation, our blend of Alga Bloom, Sugar Royal, Power Roots, and Orca nurturing these beauties into their late flowering phase. The TrolMaster system diligently logs every parameter, ensuring our VPD and PPFD values are consistently optimized for peak performance.
As the eighth week unfolds, we see the evidence of our meticulous care in the uniform health and structure of the plants. The internodal spaces remain tight, the stems sturdy, and the flowering sites increasingly impressive.
With anticipation building for the harvest that lies ahead, we reflect on the journey so far. It's a path marked by shared knowledge and collective experience, all leading us toward what promises to be a remarkable culmination of our efforts.
Stay lifted,
Salokin

Likes
19
Share


@Comfrey
Follow
Tropicana flowers 🌞☀️🌤️🌦️🌧️
Plant is 15 cm high because of low stress training. The length is 31 cm.
Day 36:
Sun is shining, 15-23 degrees, high humidity. Tropicana gets two liters of pure rainwater. Spend the day in my veggie garden working. In the evening I brought some 🐞for Tropicana because I spottet a few lice. My mood changes drastically as I find spider mites eggs, first and second stadium. Don‘t overthink that and decide to defoliate the plant immediately.
I prepare a tee out of the leaves which brings fast relaxation. My mood is much better now.
Day 37
In the morning with better light I find more spider mites and decide to wash the plant with rainwater. Can‘t find after any more of these little killer dwarfs. I decide to bring more beetles and check the leafs more often. Temperature is felling under 20 degrees, it‘s raining and the humidity is 87%.
Day 38
In the early morning I couldn‘t find any mites on Tropicana. Got to continue controlling this in the next weeks regular. I‘m sure they are still there somewhere hidden in a dark spot.
🌦️ 13 - 21 degrees and humidity is around 60-70%.
Day 39
🌦️🌧️ Very rainy day. Just let Tropicana enjoy life and tie down the top one more time. 🐞 stay since some days. One on every plant. I think the mites are a result of their start inside and no hygiene at all. Have the same with my peppers some years.
14 - 21 degrees, humidity around 84%
Day 40
🌧️☁️🌤️☀️15 degrees, humidity 83% We listen to Roots Reggae, Tropicana is happy and quite busy with producing new roots, I guess.
Don‘t understand when to stop low stress training. I think it’s enough now. She needs a rest.
Day 41
🌧️⛈️🌧️🌧️ 15 - 19 degrees, humidity up to 89%
We had rainfall today around 65 liters of water. I collected enough of it for the next weeks.
Day 42
☀️ 6 - 23 degrees. Humidity is falling.
Tropicana enjoys the morning sun while she drinks and drinks and drinks…. Coffee. 😅
Likes
19
Share

@Tropicannibis_Todd
Follow
Alright Then
REMINDER I DO 2 UPDATES PER WEEK 👉WEEKLYROUNDUP👈👉MIDWEEKLY UPDATE👈
We just hit week 3 and all is well , have to admit she's ahead of all the others of same age , nice Growth in just 21 days😃 .......
Middle of last week I decided to start a little training by pulling her over to the side 👌
I was happy with the internode spacing but not the branching , begun heavy LST to try and bring the internode branching up👌 and I'm glad to report that it did workout and I decided to top her 👈
Very little water given ,so far and rain water to be used entire growth
Lights being readjusted and chart updated .........👍
I GOT MULTIPLE DIARIES ON THE GO 😱 please check them out 😎
👉I WISH GD HAD DISCORD SERVER SO GROWMIES COULD HAVE A PLACE TO HELP AND TALK THINGS RELATED TO GROWING IN REAL TIME.....👈
👉SO I CREATED ONE ALL YOU NEED IS TO JOIN THE GROWDIARIES DISCORD SERVER !!!!!!!!!!!👈
LINK IS 👉
https://discord.gg/zQmTHkbejs
AND SEE HOW IT PLAYS OUT !!!!!!!

Likes
25
Share


@PEAKYPLANTERS
Follow
Welcome back to everyone in the enchanted valley of Peaky!
Our splendid californian shoots continue to swell and produce sugars stuck under the net where we tried to give space even to the most underlying ones!
see you around
xoxo
Likes
28
Share


@Esoteric_growing
Follow
This one has gone real well even considering the cold night temps. Very strong plant that has been in great health from the start.


