


Likes
Comments
Share


@Dr81n
Follow
Last 2 autos coming up maybe week or 2 before done. Expecting the large Durban og auto to foxtail some as it keeps adding white pistols. Smaller plant lost track of strain as I didn’t much care but for a little gal she is pungent.

Likes
8
Share


@nijuana
Follow
The fastest germination I've seen in 24 hours !!!!!!
The Afghani ~ 30 hours 😁
100% success

Likes
70
Share


@Insaniac_0
Follow
All feeds with nutes use either a whole ratio or combination of "Veg Mix" and "Bloom Mix"concentrates DILUTED in water until a total ppm of add in is reached using a (Total Dissolved Solids)TDS Meter measured in PPM (parts per million). The "Veg Mix" concentrate will eventually be added in smaller ratios and "Bloom Mix" concentrate what will eventually replace the "Veg Mix" concentrate entirely with the ppm and ratios listed when I feed. Veg mix recipe is on week 3. Bloom Mix recipe is on week 5.
Day 56
Took some glamor pics with black background - not really for vanity (although there's a little) but for contrast. I see more of the lockout issue better in the pics this way. - on that note, the ph seems to be working as it's been two days since defoliation and knitting needle ph correction, and the progression is way slower than it was on the last leaves at 3rd day of identifying.
So with that, room VPD of 1.07kpa seems stable enough with temps about 76F/65%RH/33%ILV
I released the binds today to let her grow without them until they crowd each other too much and I need to restrain - so in a couple of days at max.
Day 62
Transfer day. Although at first I didnt think I would be able to until Saturday, I got pots and plant saucers today, so I ended up going ahead and doing it.
Started by calibrating/testing both meters. Double checked the soil mix from yesterday as the last time I used wood ash the ph rose the day after... however this time it was fully mixed to I wanted to know if there would be a higher ph - it was the same as yesterady - 5 reading avg of about 6.35 - the slurry of 1:1 soil and 7.7 ph water was tested at 6.3 also.
Made about .75 gallon of 75/25 veg/bloom juice water at 500ppm feed water. Tried to ph read the soil in the pot and seen it go from 6.6 down to 6.35 (took video) in the dry soil, so I decided to use the 6.35 new soil reading and ph balanced the feed to that.
Used the needles since it was 7 days since the last feed and I am using such a small amount. Poured over needles in 8 places and pulled each out to let water down. the vacuum pulls the water down when I lift the needles.
Then I mixed 5tsp of Dynomyco to the 5 gallons of new soil and mixed really good. I placed a layer of perlite on the bottom of the 10 gallon pot and then layered in some soil.
Then with the help of my wife we pulled the plant out of the pot and placed it in the 10 gallon. I place back in the tent and added about a quart of plain de-chlorinated water evenly over the new and older soil to help bind them.
I reduced lights by 100ppfd to have about 505 and 500 at center colas and 430 lowest on outer ring with most at 450 and 470 highest. Soil to light is 35 inches and the plant is about 14 inches so about 21 inches from leaves to lights.
I left the ring off today and will rebind as needed tomorrow after she rests. Today the leaves look wilted and limp.
Also reduced humidity to 60% so 58 to 65% should be the range and the temps are 73F with the lights lower.
PPFD was higher with the new growth - unbound and tucked in for better cola/light position, it reads 570 to 580 on outer colas and 590 at both center branches
Day 57
Getting 1 more day out of free range growth before I tie her back against a ring. So in that time I decided to take a few vanity pics.
Overall the ph block seems to have slowed or stopped and she's back to growing again. Will be thinking about flip at the end of this week or so.
VPD same stats 76F/65%RH/33%ILV - ppfd right at max so I'll likely tie her off tomorrow. 605 600 in center and 580 to 590 at the outer ring.
Day 58
VPD stats mostly steady again today - 76F/65%RH/33%ILV - ppfd was checked after LST, measured 600 at each center cola and the outer ring measured between 550 and 590 most at 580
So as I said, I did LST today to bind her more out while the 4 center 4 colas fill the middle. I had to bind to the pot base instead of the ring as the colas are still a little short to reach for binds at the ring just yet. There's a lot of space to fill and a few (about half) of the out colas are sideways for now.
Had a break at the center cola when I tried to pull it back for bind. I knew to hold the branch at the node but forgot to do it here and heard a "snap" ... taped the crack and moved on - will monitor obviously
Day 59
Did more light LST to ensure the branches are growing where I want. PPFD was mostly the same as yesterday only now there are more colas around 560 than 580 on the outer ring with the center colas at 610 and 590 (front cola was tied down to spread more away from the ring and fill center better.
vpd same as past week or so 76F/65%RH/33%ILV
Last feed was on day 54 and the soil still seems damp so I will check again tomorrow for the next day. (Day 61)
The broken branch doesnt seem to have affected either side of the split as both sides seem to have grown a little with little to no wilt or drooping leaves. Im hoping it heals okay and doesnt delay flip to recover more; still monitoring.
Day 60
Did some light LST today by releasing the lower binds to the pot and attached as couple to the outer ring now. So far I only have to bind a few as most are already holding where i want them to.
Took the tape off the split and seen I didnt seel the gap closed when I taped it so now Im considering a drop of super glue to bind the branch back in hopes it grows onto the other side again. If not at least it would be more secure than it is now. And since it's a main split for 4 colas, I dont want too restrict it by binding at the split and potentially cutting off the nutrient pathways.
ppfd after LST was 610 and 600 after more LST and the outer ring is still ranging 550 to 580 with more at 560 now.
VPD same as I havent messing with any of the variables. 76F/65%RH/33%ILV
Soil is a bit dry and it's been 5 days since the last feed flush, so I have about 3 gallons of tap burning of chlorine now for a feed tomorrow morning.
Might still update again later if I find superglue...
found some superglue - tried to take pictures but I cant hold, squeeze the applicator, and film with just two hands. So the idea gets through, I did both sides.
On a side note I discovered a root popping out of the soil from the top. Covered it up but wasn't sure if I should be concerned.
Day 61
VPD same as it's been for most of the last week - 74F/65%RH/33%ILV
PPFD was recorded after I turn the plant a quarter turn for the smaller colas struggling to get over he ring's edge to have more light. Most colas at 580 with a couple at 600 and a couple more at 550 - center colas are hitting 615 and 620, but I have plancs to reduce in the next couple of days now
On that note, the root growing out of the top tells me that she's hungry and needs more root space, even if that means growing through the top of the soil. So I plan to transplant to a 10 gallon and flip after the recovery. After reviewing more of NugBucket's journal I realized this is why he moves them when growing 16 colas.
New pots should be here Friday so I should be able do it on Saturday.
So I prepped soil (using more Happy frog with mycorrhizal fungi already growing in it for a few weeks) with de-chlorinated tap water
Started by ph testing the soil and the water (4 readings on soil at 5.03 avg) - added about 1/2 cup total of wood ash to bring up the ph , mixed and tested again - added water at (about 7.7 ph) and tested again... last 5 readings in soil was 6.24,6.3,6.35,6.37,6.38 avg of 6.328 - covered and let rest until needed.
Since I plan to transplant in a few days I felt it would be best to 'lightly' feed tomorrow, again on transplant day, and again 2 to 3 days later.
Since my wife was taking pics at this time, I could only find this one to show the roots growing into the perlite then we planted it in the bigger pot.
--------
(Day 62 root base picture from above)
I have a hypothesis that says these are so short because I intentionally tried not to move the plant without the base stand to keep it from grinding these up and allowed them to grow in the last 2 weeks. This is that test picture/results.
I like the idea of better/more drainage, but thinking I am doing more harm each time I hear those gravel pieces crunch as it cuts those and forces the plant to look somewhere else for root space. Notice how the small root lines have no finer pieces or laterals grow out from these - I believe that is because they are so new in growth and that the perlite chewed up the smaller laterals even with little to no movement over the last two weeks
I would like to see a root ball experiment that exposed the roots throughout the grow but for now I can see these roots do grow into the base perlite and need to be handled carefully if you want them to grow more freely or with a standard pot size. As you can see Im not root bound but my plant thinks it is and is growing roots out the top.


Likes
46
Share


@Targona
Follow
Targona: 29 days since my little girl sprouted from seeds🌱
Fourth week of vegetation of my Apple Fritter Automatic 🍎🍏🍎
Nutrients:
I use Advanced Hydroponics Of Holland nutrients - three basic components, still according to the table for growth during the flowering period 💓 -
- Dutch fertilizer Formula 1 Grow - supplies the plant with substances necessary for the perfect development of roots, stem and leaves; intended for the growth phase 🌾
- Dutch fertilizer Formula 2 Bloom - contains a large amount of nutrients necessary for rapid growth and fruit development, supplies the plant with energy; intended for the flowering phase 🌸🌿
- Dutch fertilizer Formula 3 Micro - increases oxygen intake, improves plant immunity, ensures better absorption of nutrients; intended for the growth and flowering phase 🌴
-----------------------------------------------------------------------------------------------
Plagron Power Roots - Root Stimulator Plagron Roots is a biological root stimulator that supports the formation of the root system. I use it until the fifth week of growth 🍃🍃 - I fertilize for the last time in the fifth week of plant growth.
-------------------------------------------------- -------------------------------------------------- --------
BioBizz Calmag - The special Calmag supplement was designed for professional and hobby growers who need to supply their plants with calcium and magnesium in organic quality for a long time or immediately. The 100% organic 💩💩 and certified BioBizz Calmag product is made of calcium carbonate and magnesium sulfate supplemented with humic acid.
-------------------------------------------------- -------------------------------------------------- --------
BioBizz Bio pH - is an organic pH regulator. An aqueous solution of citric acid, which occurs naturally in citrus fruits 🍋🍋
------------------------------------------------------------------- ----------------------------------------------
During the flowering period, I add Advanced Nutrients stimulants:
- JUNGLE X Environ is a highly effective complex preparation for stimulating flower formation. 🌸🏵️
- Bud Candy - carbohydrates for my girls 🍭🍭🍭
General:
Apple Fritter Automatic 🍎🍏🍎 - The girl started to bloom beautifully, so I changed the fertilizer dosage to match the flowering phase, and also added carbohydrate + flowering booster🌿💚 The girl grew a lot in height, I had to raise the light and I'm worried that her little sisters won't quickly reach for the light 💡🌞
Training:
Classic, I continuously perform defoliation and small LST - I tie up the branches that grow towards the pot just like the others so that they don't shade each other's buds💚🌞🌞
Light: Mars Hydro TS1000 The plants respond effectively and the light is technically very well managed - I try to have 50 cm between the light and the plants, so I regularly move it up 💡💡💡
Thanks for the likes :)
See you soon 😍😍

Likes
13
Share


@KAPT_SAVE_Da_HOE
Follow
I am seeing a magnesium deficiency with yellowing except the stems and veins.
Likes
14
Share


@MrGrowthSpurt
Follow
This wasn't my first rodeo with this strain, so I knew exactly what to expect. She delivered as usual. I love using this site to document my grows. It has been a resourceful guide for me as I navigate my way through my journey as a grower. Everyone who grows anything should use it. A great reference tool for yourself and others.

Processing
Likes
17
Share


@Mr_Bacon
Follow
The week is starting werry nicely. They keep growing, I think I didn't over or under water them.
9th day I'm starting to get the little conclusion, all the plants which are watered with Green Planet nutrients are looking a little bit bigger than their RQS rivals (when they were in the same day) Well anyways I think it's way to fast to make any conclusions. 2 days ago BlackBerry was bigger than Gg now I think it's the opposite so I won't make any conclusions before I'll smoke from both sides ;)
Well its Thursday today, this Saturday I'll go to a local growshop to buy some more coco and 2 more pots so they have to wait 2 days more :)
/edit. I decided to count only the days of first 3 ladies, other plants are like 4 or 5 or 6 days behind the first ones.

Likes
5
Share


@braxat420
Follow
It's just starting to form flowers, but it's looking like it's forming a ton of them. I'll probably go through and defoliate this afternoon. One of the plants has for sure overshadowed the other, but I think that's okay. I don't think I had enough room in the 3x3 for two plants the same size. I'm happy with this water/worm/frass only run.

Likes
42
Share


@JBoBz
Follow
Growing the Original Glue from GG Strain was an honor for me!
I loved this growth, from the first two little leafs to the hervest I was looking at them all the time because of the different structures compared with my previous and present experiences!
I'm glad to share this diary with all of you stoners!
Happy growing to everyone! 💚🦍💚


Likes
2
Share


@johnjoe9525
Follow
Without really knowing i think its starting to look pretty good, few mistakes with the way the stem is bent.

Likes
371
Share


@love_2_grow
Follow
D36.
We started the sixth week of veg, and the girls are rocking it in the tent.
Today, I moved the humidifier to the front and installed the scrog net. I'll let the girls fill the net before flipping them into flowers.
I gave each girl 2 liters of water @ pH 6.4, with 10ml/liter homemade bokashi juice.
------------------------------
D38.
I gave each girl 2-5-liters of water @ pH 6.4, with 10ml of humic acid.
------------------------------
D39.
The girls are slowly filling in the scrog. I'll leave them for another few days and then flip at the start of next week. Removed a few leaves below the scrog. (I like to defoliate as I go along.)
I moved the mushroom kit over to the side of the tent. No shrooms yet, but it will be more out of the way there.
------------------------------
D40.
Brewed a simple compost tea (worm castings, rock dust, molasses) and gave each girl 2 liters @ pH 6.4.
These ladies don't like too much light during veg, and I'm seeing taco leaves toward the end of the day, indicating that they have had enough.
I will slightly drop the DLI tomorrow and see how they respond.
------------------------------
D42.
The last day in the sixth and final week of veg. The girls are looking great! The scrog is a bit empty in the middle of the second girl, but I'm hoping some lower branches will fill those holes in the coming days.
Healthy and vibrant, and they are ready to move on. I flipped the lights to the flower-inducing program after the girls went to sleep to give them a fresh start when waking up.
The clones I took last week have rooted, and I'll transplant them into 1-liter pots tomorrow.
I hooked up a drip watering system as I'll be traveling soon, and I want enough time to dial it in correctly before leaving.
Finally, I gave the girls a fulvic acid foliar spray. One of their last foliar sprays as we're heading into flower.
------------------------------


Likes
2
Share


@grungedetox
Follow
Everthing is cool
Pheno 02 is looking good for flower already
I'm keeping them very low with lst so when the strech they don't become a issue. Defoliate some leaves on the number 04 cos they were in the way of the light for the new


Likes
16
Share


@GrowerGaz
Follow
This week are repotted the plants and will move the four in BAC lava soil up to my Dr120 this week. I have just cleaned it and like to leave it empty for a week , move the food source for any bugs. They have just had water this week and are bouncing back from being topped.
The two in dwc are staying in this tent.


Likes
8
Share


@Jenda1797
Follow
so far no problem. I only have problems with the temperature, but so far I can handle it somehow

Likes
13
Share


@XoticGROW666
Follow
🍓🍌🍧🍨
No toppin
No trainin
Jus test run
Little cupped leafs here & there due to cold temps!! But this strain a fighter and the nuggs on her gun be super dense not that big but Can’t wait to grow her again in full sun and see perform in full glory

Likes
Comments
Share

@MyLittleGarden
Follow
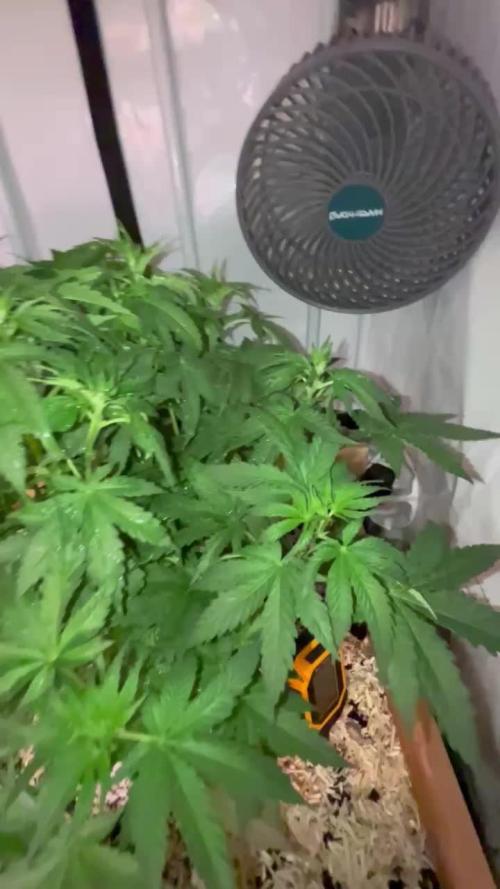
Blütewoche 1 - 15.06. – 22.06.2026
Mit Beginn dieser Woche wurde die Blue Sunset Sherbert offiziell in die Blüte geschickt. Am 15.06.2026 wurde der Lichtzyklus von 18/6 auf 12/12 Stunden umgestellt, um die Blüte einzuleiten.
Abgesehen von einer Bewässerung mit etwa vier Litern Wasser wurde die Pflanze weitestgehend in Ruhe gelassen. Weitere Eingriffe oder Trainingsmaßnahmen fanden nicht statt. Der Fokus lag darauf, die natürliche Entwicklung nach der Umstellung zu beobachten.
Bereits in der ersten Blütewoche zeigte die Pflanze eine beeindruckende Reaktion auf die Lichtumstellung. Der Stretch fiel deutlich stärker aus als erwartet. Innerhalb von nur sieben Tagen legte die Blue Sunset Sherbert etwa 20 Zentimeter an Höhe zu. Gleichzeitig nahm sie nicht nur an Höhe, sondern auch sichtbar an Volumen zu. Die zuvor bereits buschige Pflanze entwickelte sich noch weiter in die Breite und füllte den verfügbaren Raum im Zelt zunehmend aus.
Optisch präsentiert sich die Pflanze weiterhin in einem hervorragenden Zustand. Die Blätter zeigen ein sattes, gesundes Grün ohne erkennbare Mangelerscheinungen, Verbrennungen oder Anzeichen von Stress. Insgesamt wirkt die Pflanze äußerst vital und kräftig.
Besonders erfreulich war die Beobachtung der ersten Blütenansätze. An zahlreichen Triebspitzen erschienen die ersten weißen Blütenfäden, wodurch das Geschlecht nun eindeutig bestimmt werden konnte. Nachdem der vorherige Samen dieser Sorte männlich war, bestand bis zuletzt eine gewisse Unsicherheit. Umso größer war die Freude, als sich die Pflanze eindeutig als weiblich herausstellte.
Damit ist die Grundlage für einen vielversprechenden weiteren Verlauf gelegt. Nun bleibt spannend zu beobachten, wie lange der Stretch noch anhält, wie sich die Blütenstände entwickeln und wie sich die kleine Greenception GC4 im weiteren Verlauf der Blütephase schlagen wird.


