
Likes
Comments
Share


@magicbudsgrow
Follow
Apesar do calor causado pelo El Niño no Brasil, as genéticas se revelaram tolerantes e resistentes ao calor.
Controle do VPD está sendo monitorado nessa fase final da floração.


Likes
2
Share


@ThatsmyGrow
Follow
Ich hab die Woche früher lollipopping angewendet als gewöhnlich, da ich erneut Probleme mit Luftfeuchtigkeit habe, aber alles kein Problem

Processing
Likes
15
Share


@DudeGrowsWeed
Follow
Lots of growth this week! 😃 So far, the indoor girls are looking fuller to me. They seem shorter with tighter nodes and more nodes than the outdoor girls. Also one of the outdoor girls seems to be a little bit of a runt. I'm hoping she catches up eventually, but I'm noticing the runty looking girl is also not symmetrical for some reason. I think this is a good comparison. I'm glad I'm growing 2 outdoors and 2 indoors so we can see a more fair comparison. If I only had one of each it might be a genetic thing causing the differences. Btw... the indoor plants are under 315w CMH on a 19/5 light cycle, 24" from the canopy. The outdoors are obviously dependent on the sunlight which is between 15-16 hours here now.
I don't care that the outdoor girls have stretched more than the indoor - they don't have a ceiling to deal with, nor will they grow too close to the light (unless I'm really lucky 😉 ). I am very happy that so far I do not see any damage due to bugs on any of the plants. I'm still feeding at 75% of the Fox Farm schedule. That seems to be the right level to me. I'm almost out of Big Bloom, just ordered another gallon.
What do you guys think? Please comment! Thanks!!!
Processing
Likes
12
Share


@2SeedsToParadise
Follow
Everything smooth inside the 2x2. Running 24hr light expecting upward growth in week 4
Likes
1
Share

@ibbzy
Follow
Sorry for the lack of posts but been dealing with a huge thrip infestation which is so devastating. Most tents are ruined but still salvageable and IPM on the way before next run!
Last photo is what's cooking in the background
Likes
1
Share


@FowerTwennyNoob
Follow
Put in jars to cure 6-12-2020
---------------------------------------
Chopped up plant and hang on some hanger. Will need to wait a bit to get dry weight and smoke report.
I did harvest some a week before the flush, the bud was decent and calming high with smooth smoke, very white ash.
Hang up plant to dry night on 6-10-2020
Likes
4
Share


@MoneyMorris
Follow
Looking like 3 more weeks until harvest. I’m going to start flushing in about 10-12 days

Likes
52
Share


@Salokin
Follow
The High intensity was to strong (clearly my fault) in the beginning which stunted her overall stretch, she however still delivered super dense, terpene and trichome loaded buds.

Likes
11
Share


@RFarm21
Follow
Week 9 november - 15 november
11 november - i did a little defoliation on the first 2 Nodes in branches.
I also gave the first bloom nutrients because in the next week it will be flowering and it looks like it was asking for more phosphorus
14 november - One more soft session of defoliation/lollipoping
Led power: 240W (80%)

Likes
27
Share


@Silverback_Guerilla
Follow
4/5:
Took 4 cuttings from the shortie
4/12:
All 4 are rooted and growing!
5/1:
Transplanted from 1gallon pots to 5 gallon pots.
5/3:
Decided to grow one of them in my tiny tent and the other 3 will go outdoors.
5/4:
Took 2 of them outdoors under the 270w and sunshine.
5/6:
Trained all of them today and fed some boomerang along with the kelp, molasses, big bloom, and silica. Foliar fed and took the last one outdoors.
The one in the tent is really flourishing!
5/7 - 5/17:
Excellent growth! The supplemental lights are making all the difference.👍
Did some more training on all of them early in the week.
The one in the closet is spreading out nicely and budding up pretty quickly...but what's very cool is that all 4 clones outdoors are flowering?!?!? I sure hope they go ahead and finish rather than starting to revegetate as the days continue to get longer.
Much rain for the past few days, but it let up long enough for me to install another 200w of waterproof 3000k LED lights a couple of feet above them. Very intense lighting, great bang for the buck. So now, I've got 350w of 3000k and 120w of 6500k in the outdoor garden. That's gonna have to do it, as I also am using 1400w in my indoor gardens, plus a/c..bills are getting ridiculous.
5/18 - 5/28:
The clone in the tent is still stacking up really well. I guess the ones outdoors are too, but next to the seedling plants, they seem puny. Many buds though...
Since they decided to flower early, I sprayed them all down with a product that is loaded with hormones and auxins and stuff that's supposed to retard vertical growth and promote branching. It's also supposed to speed arvest time by as much as a week. I hope they can finish before the summer solstice (June 21), otherwise they might try to reveg instead of finishing..
Hopefully it helps keep them from stretching so much that I'll have to supercrop them. Their mamma was a shortie, so they really shouldn't get too tall anyway.
I also foliar fed them several times this week with something called MicroLife Maximum Blooms, Pow! They love the stuff!
5/28 - 5/31:
I did some training on a two of the outdoor clones early in the week between rain showers, and foliar fed with Microlife maximum bloom formula. She was looking a little N deficient, so I assume the dry amendments have petered out. They were dry enough, so I top-fed her with another couple tablespoons of cavern culture and on the 31st. I gave them big bloom, tiger bloom, grow big, beastie bloomz, silica, endoboost, signal, humic acid, liquid kelp/fish emulsion, and liquid molasses. The indoor clone is looking awesome. I fed her heavily on the 30th.
It just feels so strange that I'll be harvesting outdoor photos in June!?!
That's it for week 8-
6/1 - 6/8:
Early in the week I gave them about a half gallon of water with liquid molasses, cal-mag, silica, and beastie bloomz only.
I foliar fed them a couple of times during the week, right at daybreak.
I fed them on Saturday, the 6th..about a gallon each..beastie bloomz, microlife maximum blooms, cal-mag, humic acid, grow big, big bloom, sweet & sticky, and signal.
They are looking very good..buds galore. The indoor clone got the same nutes, but on different days. She's also covered in buds, and they are beginning to fatten up.👍
6/9-7/4:
Busy with other gardens, so not many updates...
Indoor clone got to spend the last 2 weeks of her life in my closet under the quantum boards and UVB. I harvested and washed her buds on 6/28, let her hang dry and weighed and jarred her up on the 4th of July. She came in a 111g of cola and 45g of lower bud with only about 5g of larf. Nice!👍
She smells just like her mommy and has the same uber-dense buds. She was topped, so the buds aren't as mighty as the mamma's, but much more plentiful.👌
Outdoor clones:
I had a massive spider mite attack, and during the same week, I had a grasshopper invasion...I lost a few plants, one of which as a FFT1 clone.
I had just harvested my autos and my indoor clones from the closet, so I moved the remaining two clones in under the quantum boards. I treated them for spider mites several ways for several days and have given them much TLC. Hopefully their buds fatten up some more. They stanky, but they kinda slim...
7/11:
I harvested the last two clones tonight. So sticky!!! I washed them and hung them to dry.

Likes
21
Share


@Bluemels
Follow
An Tag 49 habe noch mal einige Zweige entfernt. Nachdem ich mich leicht verrechnet habe 😬
Ich benötigte für mein Netz nur die Hälfte aller Zweige 😨
Beim meinem nächsten grow toppe ich besser in Zukunft bei 4 Nodien, lässt sich besser aufteilen.
Nun ist Gute ziemlich spack geworden, das dauert jetzt ein wenig bis sie sich erholt hat, danach schick ich sie auch gleich in die Blüte 😃
An Tag 50 habe ich nochmals geschnippelt und ein 2 Netz eingesetz. Jetzt habe ich die richtige Menge an Zweige.
Nun dürfen die Zweige noch etwas länger werden bevor ich die Blüte einleite 😉
Likes
9
Share


@Goltala
Follow
Week 3
Might have went a little over board with the training...
LST'D
FIMMED
SCROGGED
She seems to be showing signs of flowering already and that may be because she was in seedling for 2 weeks instead of just a few days or just 1 week so I may be behind 1 week in my diary... We shall see.
I love the green on her, tells me she is enjoying her nitrogen and isn't starved.
Likes
20
Share


@Canadian
Follow
This girl has surprise me tremendously because for an auto plant it has a fairly generous vegetable time and with genetics that make them grow very big and tall and deliver such beautiful white snow coated buds looking forward for this one looking and smelling great. Thank you for reading I will continue to update have a happy grow
Likes
8
Share


@earthstarza
Follow
High humidity organic outdoor grow, keeping a watch on any mold. sprayed Magret Roberts for mildew and keeping and eye out for any worms Triple cheese is going to be finished soon

Likes
37
Share


@MG2009
Follow
09/19/2018
All going well buds filling out resin sparkle all over flowers and leaves this plant is destined for my top shelf of slow cured buds can't wait to taste each one and compare to each other,to see if my breeder was as good as I have hoped for. Sorry for the rambling on racy thoughts today need my Indica to slow my roll lol😎
Ps. Sorry I posted last weeks video,will fix in morning.
Sleepy 😪 time indicas doing her job!
09/23/2018
Pistils still coming out some turning brownish red,as new ones pile on top,hope she fattens up well cooler weather is on the way,maybe see some fall colors,we have probably 2-3 weeks before avg. 1st frost, but no hard frost for a month or two.? Our falls can be quite nice! If rain holds off👍🙏


Likes
8
Share


@MoneyGrows
Follow
Same nutes . Colors are in . The cereal killer is here !! 🔪 great grow and even better genetics ! Can’t wait to dry . Chopping after 24 hours darkness
Likes
Comments
Share


Likes
13
Share


@munchiesart
Follow
Our Story
I placed the Auto Lemon Haze seeds in seed starter cubes. After 2 days, 3 out of 5 seeds burst. I placed these 3 friends in 20L Air pots. At first, my goal was to raise 4 Auto Lemon Haze. But when 3 seeds exploded, I decided to plant 1XG13 Fem next to 3 Auto Lemon Haze. During this process, I had to place the G13 Fem, which I decided to grow later, in the remaining 12L flower pot, since I placed Auto in 20L pots. A few days later I germinated another 2XG13 Fem and placed them in 12L pots as well.
One of the biggest reasons why I started at 4 girls and went to 6 girls is that I have a balcony that gets sunshine all day. Since my place is very suitable for this, I can put the G13 fem' s on the balcony whenever I want.
In fact, my goal here is to somehow complete the veg process of fem while raising auto and to save time by taking cabinet fems that are empty when auto's are over.
Now these 6 girls are in the same cabin. I am aware that the area is narrow, but as I said, I have a nice balcony option that I can escape whenever I want. They are currently under 240W QB as light. I bought a driver with a dimmer for the light, now I am running it at 50%. My light range is at 50 cm from the beginning. In 1 month until flowering, I will add another 240W QB and complete the light to 480 Watt.
At the moment, Autolar are in their 2nd week and Photos are in their 1st week because they are behind. I use an electronic thermostat that automatically tries to keep the humidity constant inside the cabinet. Accordingly, when the humidity drops below 60%, the humidifier works automatically. When the humidity rises above 80%, it turns off automatically. The light cycle proceeds as 20/4. Girls were fed only with PH adjusted water and Voodo Juice.
Summary of the First Week
3X Auto Lemon Haze germinated and only fed PH regulated water and Voodo Juice. 1X G13 Fem germinated and fed only PH regulated water and Voodo Juice. 2X G13 Fem is on the way.

Likes
10
Share


@CanarianGrow92
Follow
Week 3 for our ztrawberries from fastbuds 🍁
We removed the 2 lower branches and leaves. We gave some master root this week.
Some of the plants already showed the first preflowers, flowering is starting soon!
We also placed a net above just in case we need to sustain the buds in later flowering
Likes
2
Share


@CannaIGrow
Follow
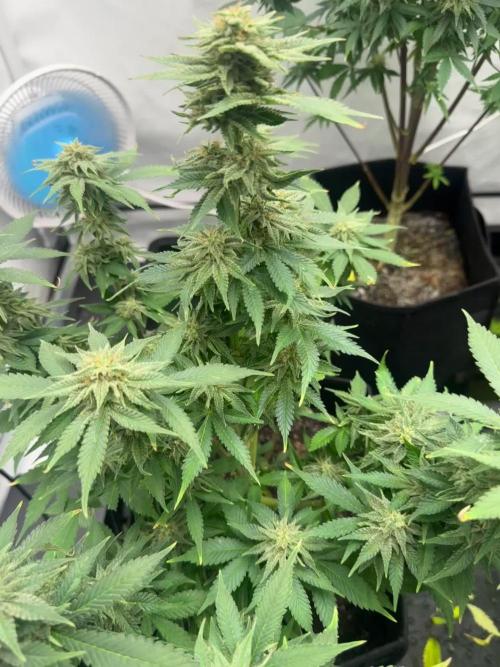
I did not top this girl, yet. Her top lowers started catching up to the top so I didn’t want to stop her yet lol. But all in all she’s looking healthy.