
Likes
Comments
Share


@Ultraviolet
Follow
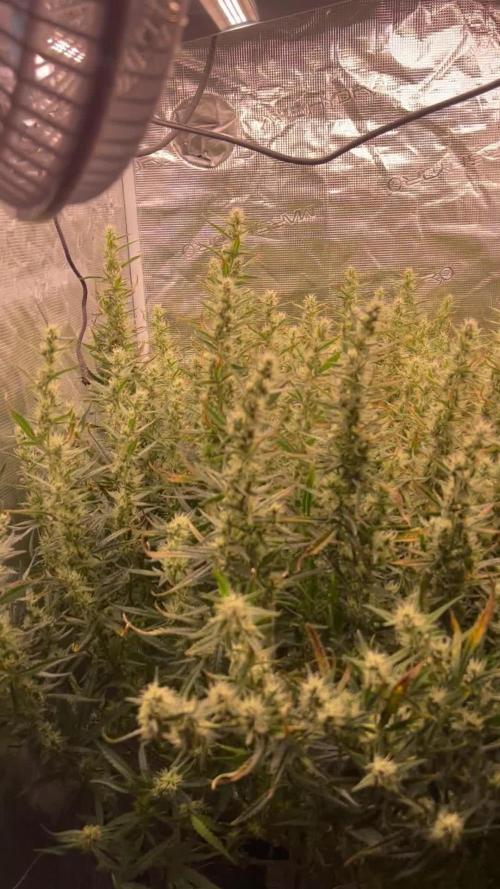
Hello 👋 🤗
Ripening
word-forming element meaning "beyond" (ultraviolet) or "extremely" (ultramodern), from Latin ultra- from ultra (adv. and prep.) "beyond, on the other side, on the farther side, past, over, across," from PIE *ol-tero-, suffixed form of root *al- "beyond." In common use from early 19c., it appears to have arisen from French political designations. As its own word, a noun meaning "extremist" of various stripes, it was first recorded in 1817, from French ultra, shortening of ultra-royaliste "extreme royalist."
There’s no specific formula for boiling the roots. It’s just boiling the roots, nothing out of the ordinary. Here’s a simple step-by-step process to boil cannabis roots during harvest for utmost potency;
Step 1: Detach the roots from the substrate without spoiling them. Some will break from the root ball but retain as many roots as possible. Note that the technique is only helpful when you leave the roots attached to the plants when you boil them.
Step 2: Soak the roots into boiled water for about 45 seconds. The water should be hot, bubbling hot, if you may.
Step 3. Hang dry the plants while still attached to the roots and let them dry until you can cure them
From here we ensure consistency, 60F/60RH with strict measures to ensure little fluctuations. for the next 4-7 days. (edit: Took 9 days)


Likes
26
Share


@BudBoutique
Follow
Welcome to Bud Boutique Grow Diary - really appreciate all your love and support :)
Dont forget to check out my other current grows!
🗓️ This Week:
- Day 38: stacking up pretty much - fading out moving on - lack of K and maybe calmag
- Day 35: praying up
Thank you for still staying with me 💚
___________________________________________
--- 🌱 Strain (Sponsor) ---
🏷️ Blue Cinderella 99 FF by MSNL
https://www.marijuana-seeds.nl/blue-cinderella-99-fast-flowering
--- 🥗 Nutrients and Feeding (sponsored by APTUS: APTUS Ambassador) ---
🍸 APTUS: full nutrient schedule extreme
-- Regulator, N-Boost, P-Boost, CaMg-Boost, K-Boost, Allin1 Liquid, Startbooster, Topbooster, Enzym+ every feeding
-- Fulvic-Blast, NutriSpray as Foliar each once a week
🔗 https://aptus-holland.com/
--- ♻️ Grow Control (Sponsor) ---
TROLMASTER: TENT-X + LM14 Light Adapter to dim/sunrise/sunset lights + Temp & rH Sensor all remote on App
🔗 https://www.trolmaster.eu/
--- 🚿 PetraGrow (Sponsor) ---
CannaFogger Foliar Spray
🔗 https://www.petratools.com/product/petragrow-cannafogger-atomizer-new-mini-fogger
--- 🏭 Grow Setup ---
💡LUMATEK Zeus Pro 600
* 🏠🌿 Indoor: Homebox 120x120x200cm (4x4)
* 📐🌀 PrimaKlima exhausting Fan 1180m3/h (running on 60-80%)
* 🌀 Can Light Filter 800m3/h & 1x Fanbox 1x Dyson fan for Air circulation
🔗 https://lumatek-lighting.com/zeus-600w-pro-29/
🔗 https://primaklima.com/de/shop/ventilatoren-de/ec-ventilatoren/pk160ec-tc/
🔗 https://canfilters.com/products/filters/
All Likes and comments are highly appreciated!!!
👨🌾 don't forget to check out my Instagram for daily educational content: budboutiquee
- Bud Boutique

Likes
19
Share

@Kirsten
Follow
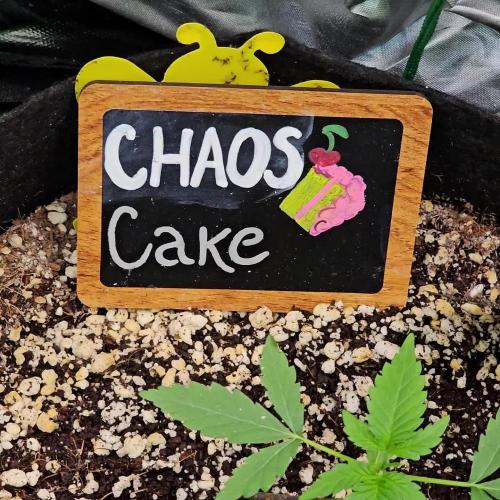
Unfortunately, I've let the Chaos Cake become too dry due to the fungus gnats, I had watered it too much, and afterwards, I just got a huge increase in the amount of fungus gnats.
So, I thought it was best to let it dry out for a while.
I think, however, I might have left it a little bit too long because it was incredibly dry.
So when I watered it, it actually made the plant fall over. So I've had to prop it up with some metal garden pegs.
Hopefully, she'll rectify herself if I make sure that the medium is properly. Watered.
Other than that, the plant is doing well. Hopefully, she'll start becoming a little bit more sturdy next week! 😅
I have added an additional 100Watt UVA/UVB lamp, as the uppermost canopy of Acapulco Gold is blocking pretty much everything in the tent.
Hopefully, this will aid the shorter plants in surviving until I can harvest it. There will be so much more space and lighting. Can't wait! 😅
Here is what I did this week.
28.9.25:
I watered with 1.5L of dechlorinated water PH'd to 6.2 with;
💜 Sea K .5TSP
💜 Biosys .5TSP
PH: 6.2
PPM: 565
The fungus gnats have really increased since I did a watering of the whole tent.
I have some more sticky traps set out, and I will not water for several days.
Once it has dried the top soil, I will add some more Diatomaceous Earth to the top 5cm.
Thanks for checking in this week, and see you in the comments 👌💚🙌🧡😁


Likes
9
Share


@TiRobotProds
Follow
Tout se passe bien jusqu'à présent les pistils commencent à sortir j'ai préparé le sol avec des engrais en poudre organique au dernier rempotage. Irrigation a l'eau uniquement. Remplacement de la 400wMh pour 400w SHP.
Likes
2
Share


@The_Doctor_Green
Follow
Hola a todos!. La planta viene creciendo bien y fuerte. se rego con 2ml x l de agua de oro negro de namaste.
En los próximos días estaré actualizando mejor el diario.
Likes
7
Share

@DogDoctorOfficial
Follow
Week 9 From Seed
Sour Diesel — 12/12 From Seed
(≈ Week 4 Flower)
First, a quick recap for anyone joining the journey now.
This Sour Diesel had a rougher start compared to the rest of the room. Earlier in the run she experienced stress that slowed her development, which is why she remains smaller than the other plants in the room.
That said, plants have an incredible ability to recover when given the right environment and a little patience.
And despite her size, she is now building beautiful flower structure and starting to frost up nicely.
Sometimes the smaller plants still carry the biggest character.
⸻
Current Room Conditions
The room is currently running slightly on the warm and humid side, but this is intentional and carefully controlled.
Environment
• Canopy temperature: ~28°C (gradually tapering toward ~26°C)
• Relative humidity: ~70% (slowly being reduced toward ~60%)
• CO₂: 1000+ ppm through passive enrichment
• PPFD across canopy: 800 → 1300 µmol
This might look risky on paper, but the room has very strong airflow and constant air exchange, including inner-canopy movement.
Good airflow changes everything.
Without proper air movement these numbers would be dangerous, but with healthy circulation and CO₂ availability, the plants are able to metabolize efficiently.
⸻
Nutrient Program (Current Week)
Feed EC: ~2.4
Soil EC: ~0.9
Current weekly top feed includes:
• CalMag Pro
• Terra Bloom (base nutrient)
• Power Buds
• Green Sensation
• Pure Zym
• Sugar Royal
• Vita Race (foliar where applicable)
⸻
Why Power Buds and Green Sensation Now
At this stage the plant has fully entered generative growth.
The stretch phase is finishing and the plant is shifting energy toward flower development and resin production.
Power Buds
Power Buds helps signal the plant to transition more strongly into flower formation. At this stage we want the plant focusing on bud site development and structure, and this additive helps push that direction.
Green Sensation
Green Sensation comes in as a flower booster, supporting:
• bud weight
• terpene production
• resin development
• potassium and phosphorus availability during peak demand
Around week 4 of flower, plants start increasing nutrient demand for flower building, which is why this product becomes relevant now.
⸻
Why Power Roots Was Removed
Early in the run the focus is on root system establishment.
Power Roots is excellent during:
• seedling stage
• early vegetative growth
• transplant stress
But once the root system is already developed and the plant has entered full flowering mode, the focus shifts from root expansion to flower production.
At this point it becomes more beneficial to direct the feeding program toward generative growth rather than root stimulation.
⸻
A Quick Note on Leaf VPD
Leaf VPD is always something to keep in mind, but we won’t go too deep here since we’ve covered it in previous reports.
What matters most is that:
• temperature
• humidity
• airflow
• light intensity
are all working together.
Even though humidity is currently around 70%, the strong airflow and active transpiration keep the plants functioning properly.
The leaves are still able to transpire and regulate themselves efficiently.
⸻
Plant Development
Despite the smaller plant size, the flower formation is looking excellent.
Bud sites are stacking well and trichome production is already beginning to show.
She is starting to frost up nicely, almost like a light snowfall on the sugar leaves.
The structure is surprisingly elegant for a plant that had a slower start.
Sometimes the plants that struggle early end up showing the most personality later in flower.
⸻
What to Expect Next Week
Over the coming week we should begin to see:
• increased bud stacking
• calyx swelling beginning
• more visible trichome development
• stronger aroma production
The plant should now start focusing more energy on resin production and flower density.
If conditions remain stable, the next weeks will likely show the true character of this Sour Diesel.
⸻
Final Words
To everyone following this journey:
Thank you.
To the OG growers, the new followers, the people quietly watching, the ones leaving comments, the ones sharing knowledge, and yes — even the haters.
Energy is energy, and every voice contributes to the ecosystem of this community.
Shoutout as well to the GrowDiaries platform, the broader growing community across platforms, and everyone who continues to support, question, discuss, and share knowledge.
We grow together.
And sometimes even the plants we think we messed up still remind us why we love doing this.
See you next week. 🌱
📡 Please stay tuned they can try and take us down but we never quit https://www.youtube.com/@DOGDOGTHEDOCTOR NEW
🙏 Thank you for your patience and continued support.
FOR DISCOUNT CODES AND MORE JUST FOLLOW THE LINK https://website.beacons.ai/dogdoctorofficial
📲 Don’t forget to Subscribe and follow me on Instagram and YouTube @DogDoctorOfficial for exclusive content, real-time updates, and behind-the-scenes magic. We’ve got so much more coming, including transplanting and all the amazing techniques that go along with it. You won’t want to miss it.
GrowDiaries Journal: https://growdiaries.com/grower/dogdoctorofficial
Instagram: https://www.instagram.com/dogdoctorofficial/
YouTube: https://www.youtube.com/@dogdoctorofficial Deleted by Youtube
Vimeo : https://vimeo.com/dogdoctorofficial Under construction stay tuned ⸻
Explore the Gear that Powers My Grow
If you’re curious about the tech I’m using, check out these links:
🔆 Lighting & Environmental Control
• Future of Grow — Advanced LED lighting technology
https://www.futureofgrow.com/
DISCOUNT CODE: DOG20
• Lumiflora — Under-canopy LED lighting
https://lumiflorade.com/
• TrollMaster — Environmental controllers and automation gear (past collaboration)
⸻
Genetics
• Zamnesia Seeds — Genetics used in this project
https://www.zamnesia.com/
⸻
🌱 Soil, Substrates, Boosters & Root Support
• Plagron — Substrates, bio mixes, and supportive products
https://plagron.com/en/
⸻
🎒 Storage, Curing & Preservation
• Grove Bags — Curing and storage solutions
https://grovebags.com/
⸻
📸 Photography Equipment & Tools
(Not sponsors, but part of my creative toolkit)
• Sony A6700
• Sony full-frame macro lens + few more
• Stacking photography workflow - learning
• iPhone (for behind-the-scenes shots)
We’ve got much more coming as we move through the grow cycles. Trust me, you won’t want to miss the next steps, let’s push the boundaries of indoor horticulture together!
As always, this is shared for educational purposes, aiming to spread understanding and appreciation for this plant. Let’s celebrate it responsibly and continue to learn and grow together.
With true love comes happiness. Always believe in yourself, and always do things expecting nothing and with an open heart. Be a giver, and the universe will give back in ways you could never imagine.
💚 Growers love to all 💚
📸 P.S. – The Eye Behind the Lens
All photos in this diary (for now — except for the ones showing the camera, which I took with an iPhone) are taken with a Sony A6700 paired with a Sony full-frame macro lens and a few more.
Photography is part of the story — it’s how we share the fine textures, the glow, and the quiet details that words can’t always capture.
I’ve also started experimenting with photo stacking — a technique where multiple images, each taken at a slightly different focus point, are layered together to create one perfectly sharp image from front to back.
It’s not digital enhancement or AI; it’s pure photography — a way to reveal the plant’s beauty in microscopic depth, from trichome to petal.
You’ll even see a few shots of "ghost me" capturing the shots — camera, lens, setup — because every grow deserves not just to be cultivated, but documented like art.
FOR DISCOUNT CODES AND MORE JUST FOLLOW THE LINK https://website.beacons.ai/dogdoctorofficial
NEW DISCORD - Official Server Invite Link : https://discord.gg/ksjAkA5T74

Likes
65
Share


@DudeGrowsWeed
Follow
Fast Buds Blue Dream'Matic looking beautiful!! Buds are looking frosty as hell. 👍 She still has a few weeks to go til harvest. She is back-center in the group pics.
Likes
Comments
Share


@SmithNuggets
Follow
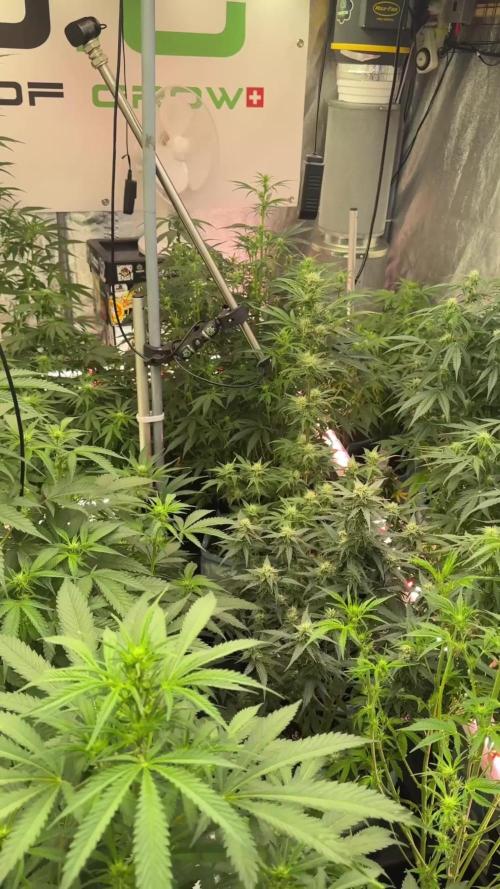
Flower tent is ac infinity 4x8 tent. With two spider farmer sf-4000. This tent has the exhale 360 co2 grow bag.
The nutrients are not what each plant receives. Each stage gets its appropriate nutrients.
I will be going back and trying to name each plant in the
2-7 feeding
Likes
1
Share


@Deebow
Follow
Have grown 3 gorilla cookies autos out to harvest and all three have been noticeably different in growth and characteristics
Likes
35
Share


@GODSGIFT_2005_JM
Follow
🍼Greenhouse Feeding BioGrow & Bio Bloom
⛺️MARSHYDRO
The ⛺️ has a small door 🚪 on the sides which is useful for mid section groom room work. 🤩
☀️ by VIPARSPECTRA (models: P2000 & XS 2000)

Likes
24
Share


@eh_eh_eh_buds
Follow
so were almost at harvest, have begun flushing this last week and hopefully will be chopping beginning of next week, then the cure... CAN NOT WAIT TO BUST UP SOME OF THESE NUGS AND PACK THEM IN THE BON 😆
Likes
125
Share


@Regenwurm
Follow
Die 10 Blütewoche ist erfolgreich abgeschlossen!
Tage der Wachstumsphase = 32 Tage.
Tage der Blütephase = 70 Tage
Wachstum h in Blütewoche 9= 0 cm
Blütenbildung: Hoch
Die Blütenkelche beginnen mit der Produktion
Der Wasserbedarf der Pflanze reduziert sich etwas.
Diese Woche 3 Tage die Pflanze austrocknen lassen.
Mutation 1= strähnige Blüten (wie bei der Dr. Greenspoon öfter mal vorkommt)
Mutation 2 = Gigantismus (doppelt so viele DNA Ketten wie regulär)
2 mal in dieser Woche mit Purolyt Mischung 1:25 besprüht
Lichtstärke: 90 %
Lichtabstand: 36 cm
Std Tag/Nacht: 12/12
Temperatur Tag: 25-26,5 Grad
RLF Tag: 55-61%
Temperatur Nacht: 20-21 grad
RLF Nacht: 50-55 %
VPD Wert: ca. 0,90-1,1
PH Wert Wasser/Düngelösung: 6,3
EC Wert: 1,5
Ventilator Oszillation: Stufe 2
Befeuchter: aus
Entfeuchter: mit Steuerung an
Zusätzlicher Entfeuchter: 1 Stk außerhalb vom Zelt im Raum
Bewässerung: 1* Wasser PH 6,6 EC 0,1/ 2 * bewässert mit Dünger mit den o.g. Mengen
Purolyt Besprühung: 2 mal
Controlling: Grow Control
Dünger: Greenbuzz Nutrients
Licht: Pro Emit Vollspektrum
Abluft: EC Carbon Active 750 m3 gesteuert/PrimaKlima 480m3
https://greenbuzznutrients.com/de/
Danke an Greenbuzz
Ihr bekommt 25 % Rabatt bei der Nutzung des Codes auf der GB Homepage
https://greenbuzzliquids.com/de/shop/
Code: GD42025
(Mindestbestellwert 75€)

Likes
13
Share

@DudeGrowsWeed
Follow
White Widow is coming along nicely. Good bud development this week. She still has several weeks to go. My attic (where my grow tent is) is getting pretty hot these days. I'll probably be moving her outside over the next couple of weeks to avoid heat issues in the tent. Hoping for the best! 🙏


Processing
Likes
34
Share


@Organijuana
Follow
Feeding nutes based on chart, water in (sameday) ..... clean compost brewer and brew new batch (sameday) ..... use compost tea once wk (nextday, water in lil) and discard and clean for next week.... defoliation a lil daily..... HENCE ... becoming more of a chore or should I say we have a great relationship right now. A coexistence, a sudden need for one another. They are my sheep and I am there shephard! Now lets harvest some cotton!


Likes
12
Share


@Lonelygrass
Follow
first strain runtz start 11/03 indoor, now outdoor guerrilla... hope for a good season
second strain watermelon zkittlez, hope for better wheater (actually indoor).
sicilianguerilla


Likes
20
Share


@eldruida_lamota
Follow
Que pasa familia, última semana de floración de esta farm cheese de genofarm, y que decir, es increíble vaya aroma y vaya flores repletas de tricomas.
Lleva su limpieza de raíces ,después se controló ph temperatura y humedad todo el cultivo, de principio a fin.
Variedad de 10 para trabajar en indoor, ideal para SOG .

Likes
24
Share


@GrownwithLED
Follow
In week 12 the humidity inside my HOMEBOX-tent is unfortunately still VERY HIGH (maximum of 73%). The combination of big buds and high humidity is BAD...I fear bud-rot. The 12 AK-47 plants from SERIOUS SEEDS continue to THRIVE! They all have a healthy green color and produce buds all over. All branches have formed HUGE colas at this point...its AMAZING to see how big the AK-47 can get. Every watering I add MILLS-nutrients following the feeding schedule of Mills from their website and the plants LOVE IT. The trichome production is INSANE, they are FROSTY AS HELL NOW! 😎 I cant wait to try this amazing smelling strain and see how good it works against my chronic back pain. The VERY STRONG aroma reminds me of Sandalwood end is THICK and HEAVY at this stage of flowering. The two SANlight Q5W-Gen.2 LED-lamps are doing an EXCELLENT job until now, the spectrum is PERFECT for cannabis. Both LEDs are dimmed to 100% now in week 8 of flowering, because FULL-POWER mode is needed for abundant flower production.I LOVE THOSE LEDs 😍 and I can only strongly recommend to every grower to give them a try!
