The Grow Awards 2026 🏆 


Likes
Comments
Share
@IndicaVibeMe
Follow
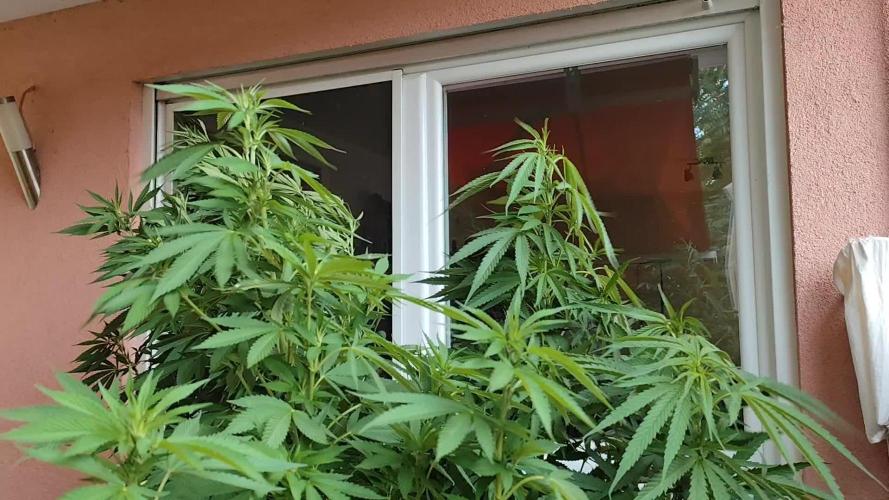
Going to yield POUNDs off this girl!!
12/19/23-- Update: Shogun is a big girl- for an INDOOR grow!. She's 3ft tall, and still shows vertical growth!
Considering I did not veg long. Shogun popped up out of soil on Oct 4th 2023, and she was switched to flower same day & time as my Royal Dwarf (aka Itty-Bitty) they've both been on 12/12 for over a month now. Itty-Bittyis an Autoflower, and Shogun is a photoperiod.
I can see now the difference between Autos& fotos in growth &bud development,
Shoguns trichomes have not appeared yet! She's definitely going to be in the flower stage for a few more weeks, perhaps another month?
As I said She's in middle of flowering and still showing vertical growth, and to measure HER I use a yard stick now lol
I think she's my favorite, along with the Cookies gelato (but don't tell my other plants!)

Likes
31
Share
@JeyGanesha
Follow
Gente! Come abbiamo il miele millefiori, mi sono fatto anch'io un estratto setacciato con 20 varietà di ganja differenti..e direi che
HASHISH 1000FLAWER È SPETTACOLARE ,come sapore e, effetto😂🤣😜

Likes
26
Share
@PedroAndHisPlants
Follow
Day 36:
"Hey everyone!
Just a quick update: I removed a few more leaves here and there and did one last round of LST (low stress training). 🌿 The plants are looking great, and I'm going to let them recover now before sending them into the flowering stage. I'm really excited to see them start blooming in 2-3 weeks!
Also, a quick update on our temperature issue: today, the temperature stayed below 26.8°C, which is great news! However, we still need to find a solution to keep the humidity levels up. Our 360 m³/h exhaust system isn't able to maintain the required humidity level. I've calculated that we need a humidifier that can evaporate 1800ml/h to maintain 60-70% humidity, which would help manage the temperature better.
Does anyone have tips for a good humidifier or other methods to control the humidity and temperature? Any advice would be greatly appreciated!
Day 37:
Hey everyone!
Tomorrow, we're planning to buy some Cal-Mag because we suspect the yellowing leaves might be due to a calcium-magnesium deficiency. We're also going to get a pH test kit to make sure everything is balanced properly.
Do you think this is a good idea? Any tips or suggestions would be greatly appreciated!
Day 38:
Hey everyone!
Quick update: it turns out the yellowing leaves were due to a nitrogen deficiency. We increased the fertilizer dosage today, so the plants should start looking better in 4 to 5 days. 🌿
Thanks for all the support and suggestions
Day 39:
Hey everyone!
Another quick update: after increasing the fertilizer yesterday to address the nitrogen deficiency, it should take about 4 to 5 days for the yellow leaves to turn green again. 🌿
We're already seeing improvements! The plants have grown significantly and are developing a dense canopy once more. It's great to see them bouncing back so quickly!
Day 41:
"Hey everyone!
Quick update: we've removed the bands we were using for LST (low stress training) and are now letting the plants grow freely. 🌿 We plan to keep them in the vegetative phase for about one more week before transitioning them to the flowering phase.
Excited to see how they continue to develop!"


Likes
10
Share
@eldruida_lamota
Follow
Que pasa familia, aquí andamos que vamos actualizar una semana más
Fumándonos un troncho de haribo con Rosin de Le Xupet Negre .
Mientras tanto os comento ya en la recta final de estas Red Cookies Gelato, siendo sinceros están muy pepinas y bien resinadas, los cogollos van muy tricomados y están súper hinchados, pero comento también que la variedad no es del todo estable, es algo complicada tienes que estar pendiente de ellas cada día observar que no salga un macho porque de 100 plantas habrán salido 3 machos y alguna hermafrodita , son frágiles.
Fue mi primer proyecto de cruce que aún así dentro de ser el primero a salido demasiado bien porque no esperaba ni resultados positivos pero ahí están y toda la gente que la probó, todos los que se molestaron en conocerla o interesarse por ella se agradece ,porque todos habláis muy bien de ella aún siendo así de frágil, se agradece y valora mucho vuestra opinión, Fieras.
Voy hacer estrés hídrico, cada vez regaré menos cantidad para que no se mueran las plantas pero si dejen de comer de las raíces de la parte de abajo, aparte van amarilleando las hojas más rápido y mientras terminan de madurar.
Hasta aquí es toda la semana y casi todo el cultivo como quien dice, así que buenos humos y hasta la semana que viene 💨💨💨
Likes
10
Share
@Growbody
Follow
Hallo und herzlich willkommen zu meinem Growbericht Outdoor 2025 mit den Sorten Power Flower Feminized, Royal Medic Feminized und Special Kush #1 Feminized, alle 3 von Royal Queen Seeds. Es ist das erste Mal, das ich Töpfe für den Outdoor grow verwende, bisher waren alle Gorilla grows und direkt in die Erde gepflanzt.
Die URL der Power Flower Feminized: https://www.royalqueenseeds.de/feminisierte-hanfsamen/120-power-flower.html
Die URL der Royal Medic Feminized: https://www.royalqueenseeds.de/cbd-samen/148-royal-medic.html
Die URL der Special Kush #1 Feminized: https://www.royalqueenseeds.de/feminisierte-hanfsamen/138-special-kush-1.html
Die Planung für den Grow ist, die Samen in easyplug Anzuchtwürfeln keimen zu lassen und danach in 0,6L und 2,2L Plastiktöpfen, dann letztlich in die neuen komplett doppellagigen ROOTIES 15 Liter Wide Version Stofftöpfe umzutopfen. Sobald die Witterung es zuläßt, sollen die Pflanzen an die frische Luft.
Es ist schon eine Weile her, das der Grow losging, die Bilder sind jetzt aktuell.
Tag 133: Die Power Flower fem. ist jetzt 170 cm, die Special Kush #1 fem. 170 cm und die Royal Medic fem. 145 cm hoch. Gestern haben die drei einen kurzen Regenguss abbekommen, war nicht schnell genug draussen. Heute ist das Wetter ideal, leicht bewölkt, 27°C und 45% Luftfeuchtigkeit. Es wird weiter 2x am Tag jeweils 1,5 Liter gegossen, den Schachtelhalmextrakt gibt's nur 1x alle 14 Tage.
Tag 135: Sehr windig und ein düsterer Himmel, den Rest des Tages verbringen die Großen unter'm Balkon.
Wenn's dir gefallen hat, schau wieder vorbei ✌️😎
Processing
Likes
19
Share
@ThatoneAKguy
Follow
The roots are all tapped in and taking up nutrients. I’m on the fence as to the prospect of using grow slabs under my rockwool cubes in the future as it seems to slow the growth in the early stages on autos when time is critical. I’m sure they have a better base to grow on but when the roots tap through the bottom of the medium and move about the totes is when the magic happens. Not much I can do about it now and it would be more than fine in my photo room to make healthy beast mode plants. They are on a full 1200 ppm of nutrients and the one mutant In the back I have no doubt will end up happy and beautiful in the end. She just had a hard time getting rid of her shell.
Likes
17
Share
@hachiko
Follow
Buds are looking great, still no signs of bud rot :)
I've been trying to keep humidity under control but every time I water, next night will reach 67-68%. I took a couple of measures but would have been simpler to get a dehumidifier
good thing is that I left lot of space between colas for airflow (I had bud rot in that area last time).
I'm allowing the plants to get dry and humidity to come close to 40% before watering again.
This will be the last week of fertilizers any way. Will add some ripen maybe 1 or 2 times during the week and then just plain water.
Likes
9
Share
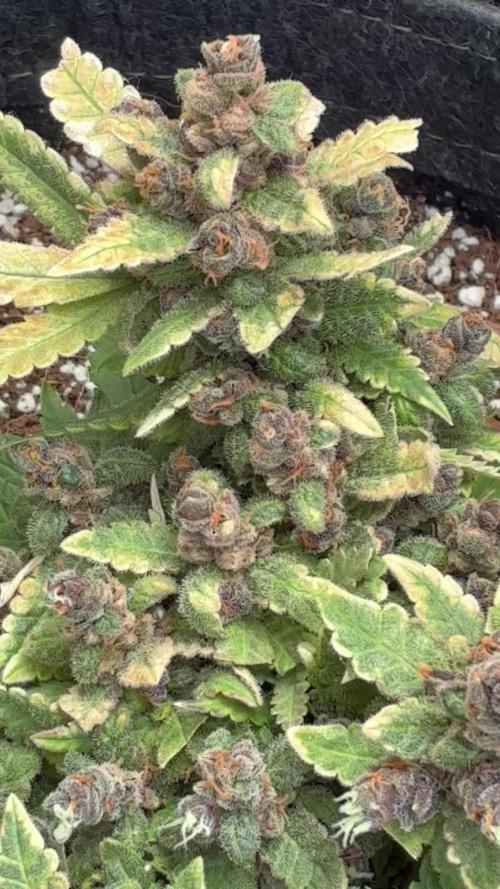
@Lazuli
Follow
Final 2 weeks the leaves start to fade on their own, today i stared feeding ripen
The buds look weird but frosty
The smell is insane
Likes
5
Share
@GrowFunMD
Follow
Plants are coming along. Looking good. Getting big/bushy. 6 Weeks (12/25/2024)

Likes
11
Share
@Ninjabuds
Follow
The Blackberry Moonrocks have a really solid structure, they're looking super healthy. They're nice and big, but it does seem like they could be stretching a bit more. We might need to adjust the lighting or the nutrients to encourage them to grow taller.
Well, another year has come and gone. Yesterday was New Year's Eve, and I want to wish all of you a happy and healthy 2025. May this year bring you all the things you've been wishing for. Let's make this the best year yet!

Likes
8
Share
@jeannoTapin
Follow
D109/F57: bud washing right after cutting
3*12L buckets
- 1 with 100g lemon juice and 100g baking soda
- 2 with plain water for rinsing
30 seconds in each bucket and then a lot of ventilation to remove excessive moisture.
Quite happy with this technique: So many fungus gnats and dust/hair caught.
I'll have to watch out for mold very frequently and carefully.
1) Fan full blast for 4 hours to reduce moisture induced by bud washing
2) Then put in tent with exhaust fan at minimum power
Temp is 18-19°C and RH 60-62%

Likes
5
Share
@SirBudAlotts
Follow
She is performing well...
Ran into a few deficiencies as her leafs started thining..
Not to sure if it has to do with genetics but nothing that can't be adjusted..
Other than that...flowering stage is looking absolutely good..
Thanks for tuning in much love

Likes
4
Share
@Growstopher
Follow
7.14.25. Harvest was 7.13. Glad this grow is over time to finish up!
Wet bud was 22.5 grams Bud looks decent sticky and smells pungent! Will starting next grow in month or 2!
Thanks for checking out grow!
Likes
31
Share
@TacoKart
Follow
They were started all around the same time but the zkittlez seems to be the runts of the grow. Can't get them to bush out as good as the sour grape kush.
Going to be adding a second light so its more even coverage. They are leaning more than Id like to the middle. Id rather train them in the directions I want so even light coverage coming the from top with a new light should help.
Noticed spotting caused by calcium deficiency and supplemented water with calmag and it seems to helping,
Also did first top on one of the sour grape kush plants.

Likes
7
Share
@HighQualityH2O
Follow
Week 3. Botanicare is working wonders. I went ahead and topped at the third node. And started giving plants full grow nutes. The Banana Biscotti looks so good I might clone it. The Ice Dream Cake hasn’t bounced all the way back yet.

Likes
6
Share
@xmackobox
Follow
Hola amigos arrancamos nuevo cultivito, por ahora os traigo los videos que subo a YT como ya sabéis le estoy dando caña al canal, buscarme allí, me llamo como aquí, xmackobox.
Poco mas, se empezaron a germinar el día 14/02/24. Algunas se pasaron a maceta el día 16, otras en 17 y se terminaron de plantar en maceta definitiva de 11 L el día 18/02/24.
Para la primera semana de crecimiento ya meto fotos detalle de todas.
**ACTUALIZADO**
26/02/24 llevamos 12 días desde que se empezó a germinar, todas brotadas perfectas excepto 1 que como veis parece atrofiada o con algún problema, no desarrolla el ojo principal es decir su punta apical.
Esperaremos a ver que hace esta plantita :D
Processing
Likes
11
Share


Likes
7
Share
@Uncle_Cabbage
Follow
It’s pretty cool to see how a plant can grow so fast! My nephew told me this could really be therapeutic for me so far so good!
I’m new to all of this and I’m starting to want to learn more I have about 9 more seeds left all auto. Photos kind of have me intimidated with all of the videos I’ve seen on YouTube…if you have any advice on them please send it my way. I want to know more about photoperiods.
-Uncle Cabbage
Likes
3
Share
@AdirondackGreen
Follow
Pulled 8 7-9g colas on the first struggler, well short of my qp per-plant goal. Ill increase my plant and yield count as I pull the rest. Still have 2 more plants that ahve gone another week and didnt miss the feed this one did. Hopefully we still get at least ~10oz from this run :(
