The Grow Awards 2026 🏆 


Likes
Comments
Share
@MendocinoGreeno
Follow
Hi to all friends of the green leaf,
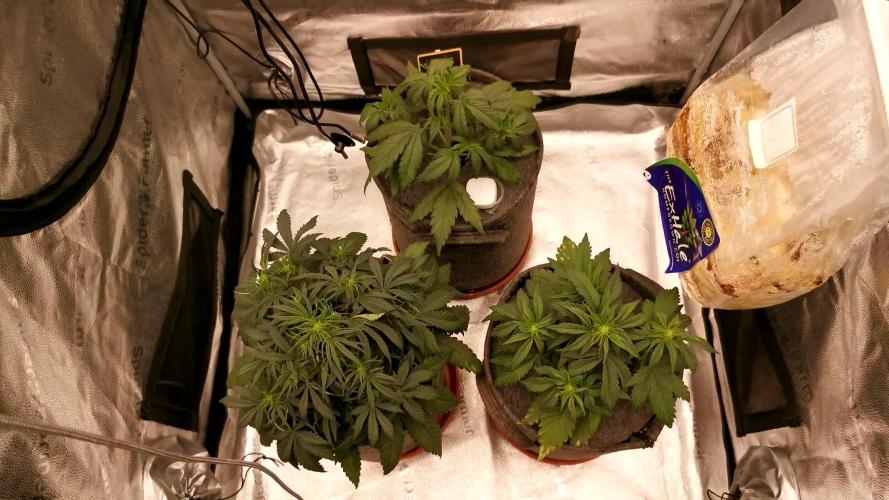
So, the move to the big tent went well, you can see the strawberries like the space, they started to expand immediately. Today I gave them one last "big" training, they are all starting to bloom nicely.
Oh, and lest I forget, for the first time I'm experimenting with adding CO2, I used the normal fermentation process, using yeast, sugar and water. I mixed it all up in a bottle, made a hole in the cap for the tubing, and placed the end of the tubing in a circulation fan.
So, have a nice time and keep it growing !
Peace✌️

Likes
3
Share
@Wackytabacky_420
Follow
This is a purple haze clone I received on 3/23. She has been topped and trained in prep 4 scrog!! She received her first @gaiagreenorganics all purpose 4-4-4 feeding on 4/23. Also installed scrog on 4/23. She received her second dose of 4-4-4 on 5/23. Installed Marshydro tsw2000 on 5/31. She received a 15 tablespoon dose of Gaia green worm castings on 6/2.This is what she looks like today!
💡 Grow Sponsor💡
@marshydroled__amazon
@marshydronnier
#marshydro
#TSW2000
#rvagrown ,#rvagrower , #cannabisgrower , #homegrown , #hightimes , #weed4ptsd , #weed4veterans , #veterangrown , #tricomes , #ledgrown , #weedstrains , #indoorgrow , #indoorgrown , #tentgrown , #supportlocal , #growlocal , #letsgrowrva , #weedismedicine , #420 , #veterangrower , #purplehaze , #sativa , #sativastrain


Likes
32
Share
@PEAKYPLANTERS
Follow
Hi guys, What's up?
Welcome back to Queen Peaky's Flower Gardens
We meet together again to wrap up another diary on these magnificent autoflowers
We started working on the roots by rinsing them with only pH balanced water and a few little girls and Ready to be dried, preparing it for a perpetually dry trimming

Likes
7
Share
@CannaArchive
Follow
Growth Stage: Early Flower / Pre-Flower
Environment:
Temperature: ~25–26 °C
Humidity: ~60–62 % RH
Light intensity: increased to ~500 PPFD. ☀️
Watering / Feeding:
The plant was watered with RO water + CalMag only. 💧
No additional nutrients were given during this week.
Observations:
Midway through Week 4, the first white pistils became visible, marking the start of flowering. 🌸
Amnesia Skittlez looks compact and healthy, with a tight structure compared to the Apricot Autos.
At this point, stretch is still limited, but expectations are high for the coming days. 🙂
No visible deficiencies or stress symptoms were observed.
Training / Work Done:
No training or defoliation was done.
The plant was left untouched to transition smoothly into flowering. 🌱
Notes:
Week 4 was a calm and stable transition phase.
With flowering officially starting and conditions dialed in, the focus now shifts to watching the upcoming stretch and early bud development. 👀🌿
Likes
3
Share
@420StonerLife
Follow
Hey, diese Woche ist jetzt der 2. Monat für die Großen Pflanzen und ihnen geht es gut. Hat sich nicht viel verändert außer das die Buds langsam großer werden. Sie haben schon ca. vor einer Woche mit dem strecken aufgehört. Ich geben ihnen momentan ca. 2l Wasser aller 3-4 Tage. Ich habe auch ein paar mehr Bilder gemacht zum besser betrachten 🔍.
Ich denke die beiden Purple Punch werden ca. in 2-3 Wochen fertig sein aber das schaue ich mit dem Mikroskop wie die Trichome aussehen 🤔, die anderen brauchen sicherlich noch 4-6 Wochen wenn nicht sogar noch länger aber das ist kein Problem sie können sich ruhig Zeit lassen 🧑🏽🌾. Die 4 neuen Pflanzen 🌱 wachsen sehr gut und schnell, sind jetzt knapp 2 Wochen alt. Ihnen gebe ich nur 1l normales Wasser (pH:6,7), ich denke in ca 1-2 Wochen kann ich das erste Training beginnen. Das war’s für die Woche von mir, over and out
Processing
Likes
5
Share
@Mr_nugs_lover_David
Follow
She's looking gorgeous on her 3rd week of life in this crazy world. Love this pheno and love how she's developing, let's see what we can do!

Likes
2
Share
@Aleks555
Follow
Our beauty is now 6 weeks old and has officially entered the flowering stage! She has gained noticeable height and bushiness, showing off her healthy growth and vibrant energy. We've installed a net and gently guided her underneath to maximize the potential of each branch and ensure even light distribution.
The light schedule remains 12/12. Daytime temperature is a steady 28°C, nighttime drops to 21°C, and humidity stays at 65%. We continue feeding her with Xpert Nutrients, providing all the essential elements she needs during flowering. CO2 supplementation also continues, supporting her vigorous development.
A huge thank you to Xpert Nutrients for their top-quality fertilizers — it’s thanks to them our girl is entering the flowering phase with such strength and confidence .

Likes
65
Share
@TheBudWhisperer
Follow
Background
Fingers crossed that these Spicy Bitch regs provide at least one male so that we can back build some stock of it. In the event that does take place we’ve got a single clone of each strain from the previous pollen chuck to sit in the tent with them so they can make babies for the next few months. The whole point of the last year was to start making some foundational genetics for a third generational cross we could call our own. If you’ve been following along than you’ll know that it’s been anything but easy. Our previous pollen picks didn’t pan out at all so we’re back to the drawing board with a new option from ExoticSeeds.
This’ll be a 10 plant run with 5 regs and 6 strains for pollination including the strain itself.
We’re running in a 2x4 MarsHydro grow tent all powered by a Mars Sp6500. That’s a little more than 600w packed into half the recommended footprint😳. Why? you ask - because we like our buds big and overcompensatory😂. Really, I’m just of the mind that we can pack more light into this space than recommended and get much better results. The math doesn’t lie. At least not as long as I wasn’t high when using the calculator again…..
Many thanks to @MarsHydroLED for the opportunity to test run the equipment👊.
In addition, we’ve also moved to a new nutrient system - Druid Nutrients out of the Netherlands. They don’t really have a presence on GD yet but you’ll be hearing about them very soon I’m sure. The beauty of this system is that it’s literally a 1 (one) component system for the entirety of the plants grow cycle. It really has changed the game in terms of ease of feeding and maintenance. It’s also very versatile and seems to provide everything needed across multiple different strains in the same ratios. Keep your eyes peeled for these folks. Pretty much a guarantee that they absolutely blow up once more people know about them👍👌😎.
Strain Background
Spicy Bitch: predominantly sativa, heavy yielder with a daytime kinda trip profile. It’s a cross of Queen Mother and a Pre-2000 AK47. We’ll pull what pollen we can and hope to have a female run out a larger supply of seed for the future.
Many thanks to @Exoticseeds for the chance to give these beans a go👍👊.
Pollination Strains:
Holy Surfer S1 - this is one of the focal points for this cycle. A fellow growmie was kind enough to ship over some S1 genetics I took an interest in. The only ask back was that if I did cross it to send a few his way for testing👍. Shoutout and cheers to @blendmedmedman. Hoping to have something back to ya in short order. For full details on this alluring hybrid option check my buddies link at seedfinder -
https://en.seedfinder.eu/strain-info/Holy_Surfer/Smiling_Tiger/
Northern Lights - this came from a particularly interesting batch of seeds that have shown a very dependable variegation trait. It’s a compact and squat plant requiring very little maintenance. Typical for the strain really. It’s been chosen as an option to potentially mellow out the high , shorten the stature of the resulting hybrid and inject it with some of that mellow indica effect.
Boogie Nights - total shot in the dark. Still haven’t even tried the strain myself yet but it was available at the right time and interesting enough to make a salad with. Big thanks to AMS who’ve been nothing short of an excellent seedbank to collaborate with. Expect similar growth characteristics to that of the Northern Lights. Better resilience however.
Blueberry - this particular clone is from extremely strong stock. Spliff seeds broke the mold with this strain. She’s lower maintenance than the NL, more resilient than anything else we’ve got on the menu and the terp. Profile on this girl is out of this world. If we can bring any of these qualities to the cross, then it could be magic👌.
White Widow - garrghh, I just can’t get away from this particular plant. Again, still haven’t even tested the buds yet and all I can say is that the growth characteristics are extremely vigorous and desirable. This plant is one of 3 unicorns that I have yet to tame due to a combo of extremely bad luck and circumstance.
All told, it’s still the same story: a VERY experimental breeding project designed to shotgun a broad swath of genetics against a reliable and dependable Breeder who’s put out proven fire 🔥🤟😎👍.


Likes
60
Share
@SooSan
Follow
12/12 + 102 jours
Vu qu’il y a 16 plantes mais que sur growdiaries on ne peut mettre que 8 variétés j'ai divisé en 2 diaries pour le bas de la tente
1️⃣
🏠 90x60x90
☀️ FC-E 4800 => puissance a 75%
🍁
1x Black Bomb / Philosopher Seed
2x Amnesia Lemon / PEV Seeds
1x Blueberry / PEV Seeds
1x Blueberry / 00 Seeds
1x Wappa / Paradise Seed
1x Dark Phoenix / Green House Seed
1x Quick Sherbet / Exotic Seeds
1x Mango Cream / Exotic Seeds
1x Banana Frosting / Sensi Seed
1x Hindu Kush / Sensi Seed
4x Fast Mix / Sweet Seed
📎 https://growdiaries.com/diaries/122084-grow-journal-by-soosan
📎https://growdiaries.com/diaries/124052-grow-journal-by-soosan
2️⃣
🏠 30x60x50
☀️TS1000 => 100w = 54g
🍁
Quick Sherbet - Exotic Seed = 12g
Quick Sherbet - Exotic Seed = 12g
Quick Sherbet - Exotic Seed = 17,5g
Quick Sherbet - Exotic Seed = 12,5g
📎 https://growdiaries.com/diaries/122080-grow-journal-by-soosan


Likes
8
Share


Likes
9
Share
@Headies
Follow
So this week after I gave it under nutrients I apparently gave it too much nitrogen while having a potassium deficiency. Shiney dark leaves, So i fixed that, but some didn't bounce back, and I tried nitrogen. I think they are doing pretty good considering everything I've put them through SO FAR. lol. Nutrients are NPK Raw's total lineup, follow their instructions at first, Fastbuds adjustments as of this week.
Likes
5
Share
@Bluemels
Follow
Tag 40: Ich gebe zusätzlich Alg a mic in das Gießwasser zur Stressbehandlung.
Tag 46: Ich habe mich entschlossen diesen Grow abzubrechen. Seit kurzem werden die Blätter hell und fühlen sich trocken an. Ich vermute es liegt daran das ich einmal ein großen Schluck zu hartes Wasser genommen habe. Ich hatte einmal zuwenig Gießwasser vorbereitet (PH wert eingestellt 6,3) und es lief unten nicht raus so nahm unvorbereitetes (PH wert 7 etwa) Wasser zum Schluss, zunächst wuchs die Pflanze normal weiter, doch nach 1-2 Wochen stagniert das Wachstum die Blätter sind hell und trocken, auch die neuen Triebe sehen nicht gut aus.


Likes
11
Share
@Thigh
Follow
Ich warte auf den richtigen Ernte Zeitpunkt. Farbe und Geruch kommt immer stärker. Werde sie nurnoch Spühlen.
In der Nacht an Tag 82 kamen sie ins Zelt für eine 48 Stunden Dunkelphase um sie zu stressen und den THC Gehalt zu erhöhen. An Tag 84-85 wird geerntet 👨🏽🌾🤪
Likes
25
Share
@Le_Duc_Du_Bud
Follow
Salut amis cultivateurs ✌️✂️🌿
Aujourd'hui je pose la nouvelle semaine 🗓️
Comment vous dire que je suis impressionnée ❗
Les plante ce développement a merveille voyait par vous même 🙏
Elles ont fortement grandi, je suis monter a 1.5L par plante, elle consomme la totalité des nutriments et me le montre très très bien 😍🤗
Merci Kannabia 🙏 encore des variétés merveilleuses 😊
J'espère que dame nature sera me récompense 🌿🍁
Pour plus d'informations par rapport à ces génétique, je vous laisse cliquer ici : https://www.kannabia.com/fr

Likes
39
Share
@Silverback_Guerilla
Follow
10/19:
I fed today. Only one plant has any signs of deficiency..an Orange Sherbet that needs more Mg than everybody else.
Serious stink now! Wow..gonna have to order another carbon filter..
I shot a little video of the soil remediation amendments I'm using these days. This will be the first time I use the Coast of Maine Lobster Compost. I usually use a different brand with added biochar and mycorrhizae, but I wanted to see what all the fuss is about the efficacy of lobster compost.
Recipe:
About 50 gallons of soil, previously flushed with TPS Liquidsoil to re-establish the microbial population.
1 cu ft - Coast of Maine lobster compost
15 lbs - Earthworm castings
4.5 lbs - Microgrow granular inoculant
4 lbs - Bokashi
4 lbs - Dr Earth Veggie, Tomato, and Herb organic fertilizer
2 lbs. - Nectar for the Gods - One Shot granular fertilizer
2 lbs - granular humic acid plus molasses
1/2 lb - texas greensand
1/2 lb - azomite
1/2 lb - dolomite
10/20:
Halle Berry(Blackberry A) is getting soooo fat..maybe 20" in circumference!
I spotted another couple of nanners on the Strawberry Pie and decided to leave them to do their thing..might be some very interesting hybrids as a result.
It occurs to me that it's almost time to start germinating the next batch of beans...👍
10/23:
Fed them and rotated the edge plants. Switched to Cha Ching.
10/24:
Halle Berry is foxtailing a bit ever since I upped the wattage in the tiny tent. She's fading nicely..I'll probably flush her towards the end of next week.
I started germinating the next batch of beans today, so I'm gonna need these bitches to hurry the fuck up now..
10/26:
Fed them and rearranged a little bit. I dialed back the ONE, increased CaMg and Sweet & Sticky. I flushed Halle Berry with 8 gallons of warm water and LiquidSoil. She's ripe, but I'll let her go another few days.
Likes
20
Share
@AsNoriu
Follow
They are runing well. More light would be better. Still doubt about defoliation. Thinking to make last heavy one on week 7 and start to flush at the end of it. Girls super healthy, i think i will easy beat 1g/w...
Fingers crossed ;)
Extra :
Made second round of defoliation. All looks great !
Plus some night footage before defoliation
If you ask where i found courage to make it again :
https://m.youtube.com/watch?v=m7j3GMgKEM0
Miami Mango conviced me again ;)
P.s. my plants where all time healthy, thats why i can try out such tricks. Anyway one plant no clearing, no lolitoping, no defoliation. We shall see the weight results, i have a competitor for her. On third week of flowering they both where the same. Time will tell ...
I rotate my plants everyday so they get even light and same feeding.
P.s.2 Plant in the midle is Choco Lopez auto, dont count her ;) i did all the same to her as to other photoperiod plants. She is the Beast ;)
P.s.3
24 hours after dofoliation they started to smell really hard... Citrus and berries aroma all the way .. No sign of stress and easy to see how healthy they are , still blooming ;)
P.s. 4
I always work with plants before watering them and when i harm them - i always water with ph water only. Soil is ritch enough and if damage will happen less feeding will reduse it ...


