The Grow Awards 2026 🏆 


Likes
Comments
Share
@GreenForce
Follow
Hey Growers,
Day 1 of Week 10
Two ladys harvested today you can see in fotos how they look in my opinion Amazing Hahah (but im the father lol).
Purple one its like a mix of exótic fruits
The orange one its like a a cream of a fruit.
Both seens very sweet!!
Soon i Will share strains!!
The another two ladys more sativas i think , looks like they need around more 10 days lets us see.
The taller one smeels like gasy citrus, And the another one its a mix of strwaberry And another touch that I dont discover yet.
Thank you all.
Nice week 4 everybody!!
_GrF_

Likes
37
Share
@Hawkbo
Follow
Everything's in flush mode, didnt take any pics this week we had alot of work to do with the flush and harvest of the big citradellic and everything is so close to the chop I figured I would just wait until the day of to get the final pics. The video is from Tuesday which is when the harvest happened. The fades are coming in hot and the aromas are heavy filling the tent. Over the next week they will be coming down and will do another update.

Likes
7
Share
@Hommero75
Follow
The first 7 days were good the plant is growing nicely. She just got fed for the first time with Goldleaf feterlizer. I had to raise the light higher because she is a little sensitive to the light.


Likes
7
Share
@RivenWaters
Follow
Topped today and getting ready for transplant to 5 gallon pots. Two weeks under new Mars Hydro 3000 and new AC infinity fan. The four plants are listed above, enjoy the video, my first!


Likes
1
Share
@Growing_Spartan
Follow
This was April 22nd, I installed a trellis net hoping to expand the plants rather than having them bunch up and shoot straight up.
Likes
27
Share
@Frosty_farm
Follow
Week 15....day 106. She's just going to get plain pH 6.0 water for the next few days. I know she wouldn't yield a lot but this plant taught me a lot so I'm satisfied with that. I'm sure from here out you guys will see better yields and quality from me. Day 108.... nothing much has changed but some of her old leaves are getting yellow and brown. Her buds are looking better every day. Day 109... Nothing changed. Day 111.....this plant still looks healthy because my ppm was at 1000. Gave her a couple of flushes and bought it down to about 200. I'll chop her down at the end of this week. Day 112.....last day for this girl, trichomes are looking good, she's not big but I'm loving it. I trimmed most of the big leaves down, I'll chop her down tomorrow and put her in my diy dryer. Very sticky buds, my fingers were sticking together even the clippers were sticking too. See you guys at the harvest

Likes
1
Share
@Zero0
Follow
Kinda didn’t water for a whole been away from the house it’s on week 9 definitely gonna be watering a bit more frequently to get it back to its healthy state

Likes
3
Share
@Bread_n_Buds
Follow
Our Permanent Markers are promising and we can't wait to taste one of the most famous strains of the moment.
Remember that we are growing 1 Plant worked with the techniques and one left to grow without cutting techniques only with a little LST.
She has been in bloom for two days, we consider these days vegetative and from the next we will narrate the exploits of the buds that form.
Comparison is the salt of experience so the plant in the other diary will be worked very differently go and see it to compare them.
We have started the Plagron fertilization program, we are in 100% organic configuration, the soil is recycled Promix + 1/3 fresh soil + 10% Perlite + RQS Mycorrhiza Mix (4 g in the mix, 1 g under the small fiber pot).
We are administering // 1 ml/l Power Roots - 1 ml/l Pure Zym - 1 ml/l Sugar Royal - 3 ml/l Alga Grow
We sprayed Vita Race Foliare 3 ml/l.
https://plagron.com/en
The doubts about the compatibility between Pure Zym and mycorrhizae have been dispelled, they can get along according to Plagron experts. If someone tells you that enzymes eat mycorrhizae, which in principle may seem possible, explain to them that it is not true.
https://www.royalqueenseeds.it/growing/452-easy-roots-mix-di-micorrhize.html
Try this variety, it is a top strain of recent years very high level of thc ---- // https://www.zamnesia.io/it/12508-zamnesia-seeds-permanent-marker.html
Brief description of Zamnesia // Here is a good opportunity to enrich your genetic library with another award-winning variety: Permanent Marker was crowned Strain of the Year 2023 by Leafly, thanks to its intense aromas, high levels of THC and its physical vivacity. Originally created by JBeezy and Seed Junky Genetics, our team managed to secure a cutting of this modern top cultivar, so you can grow it comfortably at home, whether indoors, outdoors or in a greenhouse. Permanent Marker fits perfectly in any environment!
--- // www.zamnesia.com

Likes
7
Share
@Coopmc
Follow
These all so fine this one I would say is but more Indica 2 was a bit more Sativa and 1 was about right down the middle
Oh man she beautiful all 3 about same small diffrence but all had good indoor struckture and so far high flavor all remind me of Skunk#1
Easy to trim big dence buds
Likes
20
Share
@Mr_nugs_lover_David
Follow
She's an octopus full of very stinky sweet nuggets man!. I'm in love with this black cherry punch #1 she's in a 30l pot and her performance has been amazing. Very happy with this lady. The aroma of the flowers is suuper sweet very like cherry and like strawberries. Such a pleasure to grow this Cherry pie 🥧🍒 cross 🔝💎👨🌾
PD: I had to tie some of the colas cause they were just Fallin cause of the weight of the nugs.
A set of 2 branches broke because of the weight of the nuggets so I chopped it down the 2 colas and put them in the drying room.
Likes
2
Share
@Takeaims
Follow
Here is the full tent can't be happier with how fast these girls are growing I have plants at all doffeent ages and others tent getting cleaned out for space f1 hybrids are just the best to grow so easy no problems and loads of fun
Likes
4
Share
@Xabii
Follow
The other plant in the setup had root rot and also infected this one, did a root wash and hope for the best.
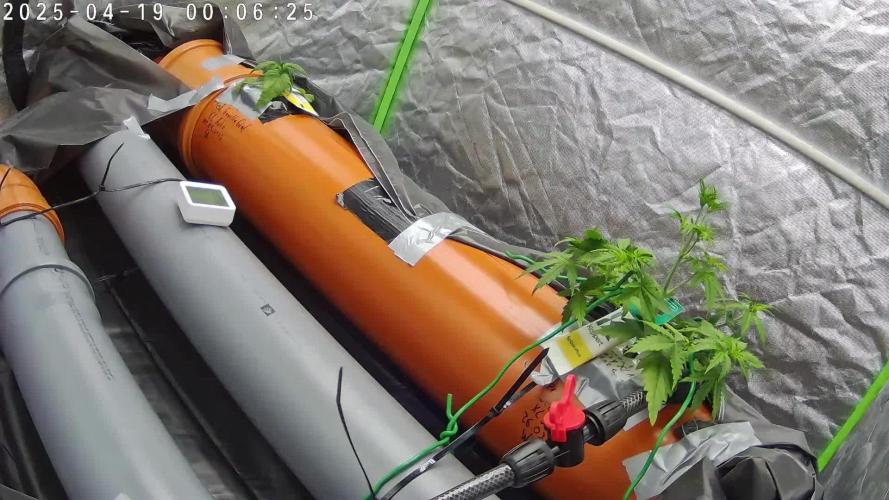
Values are average of the day.
DATE - EC(us/cm)
20250419 1638
20250420 1874
20250421 1891
20250422 1868
20250423 1845
20250424 1749
20250425 1774
DATE - PH
20250419 5.81
20250420 6.34
20250421 6.21
20250422 6.11
20250423 6.11
20250424 6.12
20250425 6.09
DATE - ORP (mV)
20250419 93
20250420 -1
20250421 64
20250422 199
20250423 156
20250424 143
20250425 250
DATE - °C - RH% (Tent Temp/RH)
20250419 23.9 48
20250420 25.1 53
20250421 24.0 53
20250422 22.9 58
20250423 22.4 57
20250424 21.6 59
20250425 22.7 55
DATE - °C (Reservoir)
20250419 19.1
20250420 20.1
20250421 20.3
20250422 20.5
20250423 20.1
20250424 19.5
20250425 19.3
DATE - CF
20250419 16.38
20250420 18.74
20250421 18.91
20250422 18.68
20250423 18.45
20250424 17.49
20250425 17.74
Likes
31
Share
@Mr_Motalovah
Follow
Hello growers and tokers! 👋 👩🌾 🧑🌾.🔥💨
As you can see these ladies are growing nicely.
They're both at the same height 59cm but one is wider than the other.
Quite nice so far. That's 12cm in one week same as the Royal Gorilla.
Evenly spread canopy, the one that had better shape from the start now has longer colas.
Both are stacking nodes nice and tight.
They have a nice green color to them but you can't really appreciate that in the pictures.
I'm still trying to get a hand of this new phone, I might just go back to the camera. 🤔
Starting to get a little shine to them, I think this strain will be the first in forming trichomes.
They give off a nice smell but I can't put my finger on it yet.
Feeding 1,5L each, every other day. Will be increasing as they ask for more.
How do they ask for more?
When feeding if the soil is drier than normal I give a 150-200ml increment of water.
I do that until they stop feeding so much then i just maintain that amount.
I start reducing if it takes longer to dry.
That works good for me. The old finger in the dirt trick. 👍
Nothing like knowing exactly what your ladies need first hand.
**Info and pictures were taken at day 12 of flower.**
Hope you enjoyed this week's update. Stay tuned for next week. 😃
If you like this check out the other diaries of the strains in the tent. 😄
Take care and stay safe!
One love!✌️🏽


Likes
3
Share
@GROJO
Follow
Whats up BUD! did some mild trimming and training on lower branches and fan leafs. These ladies have stretched more then 6 inches this week and the bud sites are coming alive

Likes
Comments
Share
@VeeDro203
Follow
Big day! Moved lights under the Mars Hydro tsw2000 low on the dial. Top feed light

Likes
12
Share
@Daviz_42
Follow
Como podemos ver ya todas están para el corte o casi, en algunas tendré que seleccionar el pheno, ya que hay alguna que me gusto más que la otra, en general un terpeno muy diferente en cada variedad y también la calidad de la resina, en general mucha resina, pero por ejemplo he podido observas que los tricomas de la Gorilla Melon son más grandes y se oxidan de una manera más lenta, ideal para hacer extracciones, en cambio, la Reinbow Melon .... ese terpeno dulce intenso tanto que es hasta abrumador...me muero de ganas ya de probarla... la Lemon Mandarín es exagerado el olor que tiene a mandarina si cierras los ojos y ueles fuere parece que te vayas a comer una buena mandarina y la Paya Sherbet tiene un olor dulce y muy agradable, pero nada que aún pueda relacionad del todo..... un saludo y buenos humos fam.
Likes
55
Share
@Hellishjam
Follow
Well there’s 6 weeks of veg down, tonight will be the first night of 12/12 with HPS bulbs in. I’m going to be running the lights from 9pm to 9am due to summer heat and hopefully the tent will run cooler at night. Everything was super cropped today to limit the stretch a little bit, she’s 95% indica so might not get to much stretch, I also don’t have a clue as this is my first photo run with the HPS. All light leaks to the room have been addressed with green bulbs in the room. I’m at least hoping to get an ounce per plant if more great just not really sure what to expect. I feel as tho there is still lots of N in the pots but maybe over the next two week they’ll chew right thru it. Maybe I should have lowered the lights but I’m just going to leave em at the top of the tent..... well that’s it for now, I leave tomorrow for work so the next time we see em they should have some bud starting hopefully!

Processing
Likes
2
Share
@wavycannabis
Follow
Just trimmed up the girls one last time before the flip, took about twelve clones off of them all in total because I need to select a blueberry x zamal mom from them. really hoping they stretch quickly in the first couple weeks to give me some extra room to work with in the canopy.