The Grow Awards 2026 🏆 


Likes
Comments
Share
@GreenForce
Follow
Hey Growers,
Day 1 of Week 10
Two ladys harvested today you can see in fotos how they look in my opinion Amazing Hahah (but im the father lol).
Purple one its like a mix of exótic fruits
The orange one its like a a cream of a fruit.
Both seens very sweet!!
Soon i Will share strains!!
The another two ladys more sativas i think , looks like they need around more 10 days lets us see.
The taller one smeels like gasy citrus, And the another one its a mix of strwaberry And another touch that I dont discover yet.
Thank you all.
Nice week 4 everybody!!
_GrF_

Likes
18
Share
@gottagrowsometime
Follow
Runtz from Zamnesia is came along from her tiny shape. Got a great clone and is also catching up. She's on about week 14 (the mother & clone on week 4). I have had to change things up a bit. The test with/out Green Sensation is still going forward. But, I'll be using Xpert Nutrients (for both mother & clone). Momma will go on Green Sensation after pre flower. The clone will be flipped on week 6-7. I won't make the contest. But, it'll still be a good test that I'm determined to finish. Giving results to show the clear difference with/out Green Sensation.
I've started the mother on Master Bloom from Xpert and Co. The clone has started a light Master Grow Feed (200ppm) with Master root.
Mother 70 days old
Clone: 10-12 days old.
Both are thriving. The mother got a little ph issues during the flip process but is fully undercontrol & has provided a good base for the test to continue without risk tainting the end results.
Clone will be transferred to a 9L pot. And fed more or less exactly as the mother.
(I've also got a spare clone) I'll be keeping in the veg state for the summer. As if I get really nice results from this pheno. I really want to make sure I have it again & again. Runtz been one if my favourite strains.
DISCOUNT CODES
20% OFF ZAMNESIA WITH CODE: ZAMMIGROW2024
20% OFF XPERT NUTRIENTS/KANNABIA with code: GGST
20% OFF ORINGAL SENSIBLE SEEDS WITH CODE:

Likes
42
Share
@Red_Rockst4r
Follow
Deliciously grow, without problems - super fine and satisfactory result.
Unfortunately I forgot to weigh it wet, but I will update with the dry weight as soon as it is dry - but a good bet is that it has been about 200+ grams wet and there will probably be about 50 grams dry.
I have added some videos from before and after, the top cola was cut - and some close up photos 😘
Update: 42 grams in total 😍
She taste so damn nice, super great !!

Likes
Comments
Share
@GREENPHOENIX6262
Follow
11/03 - Mother moved into her own 17 gallon tote - running lights on dome and in tote - super topped - running high humidity and high temps - nute feeds are the same - tied down all 4 coles thus far.


Likes
12
Share
@2Stones1Bird
Follow
Checkout my Instagram @smallbudz to see the Small budget grow setup for indoor use, low watt, low heat, low noise, step by step.
04/01/2020 - Did the last defoliation, removed about 1/4 of plant material.
06/01/2020 - Fed her 1.5l of 6.5PH water with 0,3ml Cal Mag (Atami) 0,25ml of Grow, 0,6ml of Bloom and 0,5ml Max, and 1ml of each: Heaven, Alga-mic and Vera, noticed some run off, I use about 1/3 of the nutrient dosage on the chart, to achieve about 200/300PPM (500 scale).

Likes
17
Share
@Young_agronomist
Follow
09.04.23- Замечен легкий дисбаланс на некоторых листьях , сегодня намерен смыть все клином и сделать флешь
11.04.23- сейчас рост растения составляет 135 см (надеюсь он закончится )
Смыл засол и убрал скрог сеть освободив пространство для роста .
Ppm держу 850 частей. Делаю флаш в конце каждой недели
На фото видно результат топлена в 28-ой день . Он заметно продлил вегетации и тем самым увеличив размер растения . Второе растение меньше в размере , но опережает в цветении на 2 недели
14.04.23-Размер растения составляет 154
К сожалению ничего сделать я не могу , т.к моя палатка не позволяет .
Посмотрим что из этого выйдет

Likes
1
Share
@Cannussy
Follow
6/15/25
She is doing good, the color is getting better and she is starting to show new growth and praying leaves. Can't wait for her roots to grow into the bucket.
6/17/25
Light is at 40% and ph is stable. Just between the 2 days you can see how she is starting to get growing again as her roots finally touch the water
6/19/25
The roots are looking good, no nute burn on leaftips so she appreciated the increase to 50% nutrientsolution.
6/21/25
All good. Topped her as she grew the roots nicely into the bucket.


Likes
8
Share
@Aranseed
Follow
Mejor de lo esperado. No había trabajado nunca con el banco así que no sabía exactamente que esperar pero al momento de ir avanzando en el cultivo, pude apreciar que la planta tomaba una forma hermosa e incluso en las bajas temperaturas se comportaba bastante bien. Cpe bastante recomendable incluso para cultivadores noveles


Likes
12
Share
@2Stones1Bird
Follow
Checkout my Instagram @smallbudz to see the Small budget grow setup for indoor use, low watt, low heat, low noise, step by step.
17/02/2020 - Fed her 1.5l of 6.4PH water with 0,2ml of each: Cal Mag (Atami), Grow, Bloom and Max, and 0,5ml of each: Heaven, Alga-mic and Vera, noticed some run off, I use about 1/4 of the nutrient dosage on the chart, to achieve about 100/150PPM (500 scale).
She's starting to smell like smelly feet.
22/02/2020 - Last feed, gave her 1.5l of 6.5PH water with 0,2ml of each: Cal Mag (Atami), Grow, Bloom and Max, and 0,5ml of each: Heaven, Alga-mic and Vera, noticed some run off, I use about 1/4 of the nutrient dosage on the chart, to achieve about 100/150PPM (500 scale).
Likes
12
Share
@QueenBZA
Follow
She was big but not nearly big enough needless to say we won't be growing her again


Likes
37
Share
@Brujha77
Follow
Beginn Woche 7 Blüte
Langsam legen die Buds an Masse zu.
Außer Tank füllen ist nix zu tun als Abwarten😉
Die 50l reichen so 4-5 Tage dann muss wieder nachgefüllt werden.
Tag 47 Blüte
Bei der rechten und mittleren scheint es Herbst zu werden🥀🥀
Die linke steht noch in einem recht Satten Grün.
Likes
10
Share
@Genussmittel420
Follow
manganese deficency is really eating her up quiet a bit.... defoliateing every 2-3 days because i just have to... wont add anything more so lets see how she goes from here
Likes
26
Share
@TheCannaProphet
Follow
😎Week 3
8/2- Here we go into week three and I'm looking to see some explosive growth happening in the tent soon!😃 The girls are all running 2 1/2" to 4" in height with the Seedsman Gelato OG's and FastBuds Purple Lemonade currently kicking all the others butts!💪 Gave a good watering this morning 2hrs after lights on with non-chlorinated water ph'd to 6.4. I plan on maintaining that watering schedule from here on out. I refilled the humidifier with non-chlorinated water ph'd to 6.5. Love the new setup with the two HLG quantum boards, 4 plants per light, and currently running at 400w per light. I'm looking forward to some record yields with this new setup using these 650R's! Temp's/RH/VPD are where they need to be at this point with daytime temp's maxing @ 83 Deg F/ nighttime @ 68 Deg F, RH @ 55%, VPD @ 9.0😀
8/3- Started compost tea last night, ingredients were; 5g de-clorinated 7.0ph water & 5tbsp unsulfured molasses, 4 cups worm castings, 1 cup alfalfa meal, 1 cup kelp meal, 2tbsp bat guano, 1 scoop Great White mycorrhiza and 3tbsp Neptunes Harvest seaweed extract which were added after the air was turned on and the 'bag' was in the bucket.
I fimmed the FastBuds Purple Lemonade #2 and Seedsman Gelato OG #1, LST'd the FastBuds Crystal Meth #1 & #2, and the Seedsman Zkittles #1. Whilst doing all that I noticed my old friends the fungus gnats so I immediately placed sticky traps in all pots....little bastards! I went online and ordered Nematoads who will have a field day with the gnats!
The girls all got watered in from the top and bottom with de-chlorinated straight water ph'd to 6.6 @ 76deg 225ppm, lights still @ 36" above the soil and running @ 400w each.😎
8/4- Gave the girls compost tea for breakfast. The tea had brewed for 38hrs., had 854ppm and ph'd @ 7.1...PERFECT! I split 4g of the tea between the eight ladies @ 1/2 gallon each. I also topped the FastBuds Crystal Meth #2 and Seedsman Gelato OG #2 and checked and adjusted LST on all. Temp's, RH, and VPD all on point with the girls are showing it!
8/5- Soil felt moist so skipping water today and will feed early AM. All the ladies have taken on a deeper shade of green and are really starting to take off since receiving the compost tea yesterday and they'll be going crazy by the end of this week going into week four. The FastBuds Crystal Meth #1 & #2 are both showing early flowering signs already and are starting to get some purple coloration in new growth which looks natural, not a deficiency. I topped the FastBuds Purple Lemonade #1 and Seedsman Zkittles #1 and checked/adjusted LST on all.
8/6- Gave a good watering this morning with 4g of de-chlorinated water ph'd to 6.8, went through, and tucked leaves on all the girls to keep exposing lower bud sites to the light so that we have a nice even canopy for flower! All the girls have either been topped, fimmed or LST'd at this point and all I'll be doing from here on out is tucking leaves and possibly some very minor defoliation if needed,
8/7- All the girls look very happy this morning and are starting to get ready for that stretch at the beginning of flower. The FastBuds Crystal Meth's are the shortest, along with the Seedsman Zkittles #1 and the CM's are already showing pistils but I'm not declaring that they're in 'flower' quite yet.
8/8- Gave all the ladies a good water in this morning with .5g each of de-chlorinated water ph'd to 6.9 @ 76deg. Went over all the girls and tucked shade leaves to expose bud sites, removed a couple of the ones that couldn't be tucked, and were blocking numerous bud sites. I also continued with LST on all bending branches outward to expose them to more of that HLG 650R goodness!

Likes
13
Share
@GrandmasBoy2021
Follow
Week 8,
Week 8 was a fairly easy one. The flowering spots are starting to fill in, and the leaves are starting to become frosty. I am watering her every three days with a teaspoon of nutrients and a tablespoon molasses. I think I have dialed in the grow tent and have a routine down.
Please let me know if you have any suggestions/ questions. Happy growing everyone
Likes
6
Share
@Cannabizoid_X
Follow
Everything I do has a purpose. I try not to be malace and always come with a open heart and mind. This was an incredibly fun grow went by very fast. Just like life seems to keep doing thanks to all the growmies and a big thanks to Khalifa genetics for putting up with me. Love you all!
Sincerely CannabazoidX
Likes
11
Share
@Lahuertade_Bototo
Follow
🌱🌱🌱Continuamos este cultivo, con esta hermosa cepa de FastBuds, Girl Scout Cookies Auto, de lleno en el periodo de Floración .🌱🌱🌱
👨🍳👨🌾🏻 Nutrición y Bitácora 👨🌾🏻👨🍳
-Día 43. Sigue aumentando el engorde de las flores y el aroma es cada vez mas intenso 👌.
-Día 44. Se riega con 3 litros de una solución nutritiva NPK de Plagron Alga Bloom (6 ml) Plagron Sugar Royal (1.5 ml) y Plagron Green Sensation (1.5 ml).
-Día 45. Los aromas se intensifican, ya seco el sustrato.
-Día 46. Se riega con 3 litros de una solución nutritiva NPK de Plagron Alga Bloom (6 ml) Plagron Sugar Royal (1.5 ml) y Plagron Green Sensation (1.5 ml).
-Día 47. Sigue todo excelente 🙌.
-Día 48. Ya seco el sustrato.
-Día 49. Se riega con 3 litros de una solución nutritiva NPK de Plagron Alga Bloom (6 ml) Plagron Sugar Royal (1.5 ml) y Plagron Green Sensation (1.5 ml).
🚀Equipamiento🚀
Indoor de 60x60x159 cm y una iluminación BlackCob F320, se activa solo 1 modulo (160w) a 45 cm del canopy por el resto del cultivo. Intractor de 135mm, extractor de 135mm, filtro de carbón, ventilador "oscilofan", ventilador "clip fan", este ultimo ventilador se ajusta en la parte baja de la carpa para mejorar la circulación de aire bajo el canopy, 2 termohigrometros y una malla SCROG de kanovi a 15 cm de la maceta.
Acompáñenme para ver los resultados de este hermoso desafío, un saludo cultivadores 🔥🔥🔥
Likes
33
Share
@Viridios
Follow
Very excited..plants are looking super healthy, streatching nicely. These genetics are sutch a pleasure to grow. The next couple weeks are gona be epic..😁😁.

Likes
17
Share
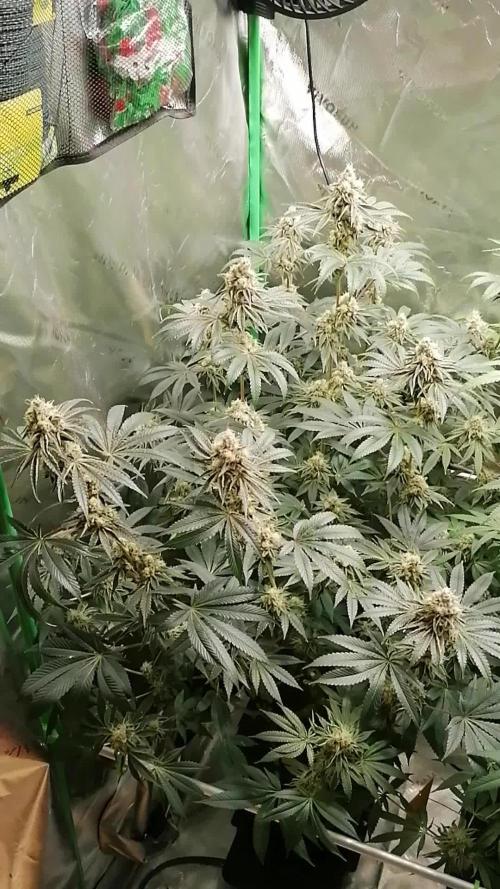
@ChopperMcOG
Follow
Buds r maturing nicely and loads of colas on her. Tips of leaves r showing nutrient burn so I halved the nutes and will see how it goes. Think that terpinator sent it over the edge with all the other biobizz nutes too. It better make the buds stink!!
Another couple weeks n she might be ready!