Lontra This is my first real grow. I tried once a few years ago, but with almost no equipment, so i consider that one as it never happened 😅
Now that I've updated my setup (and am still doing), what would be better then testing it in a fresh run.
The box is made of thin pressed wooden panels and has a size of about 50 x 50 x 100 cm.
It just took the seed about 3 days between two wet paper towels to germinate. After that it got directly planted to the final pot.
She saw the sunlight for the first time on June 5 and the light was set to 20/4 at about 40% power.
1 like
comments
Share
Used method
Paper Towel
Germination Method
1
Week 1. Vegetation
2y ago
1/7
4 cm
Height
20 hrs
Light Schedule
28 °C
Day Air Temp
6.5
pH
No Smell
Smell
60 %
Air Humidity
23 °C
Solution Temp
23 °C
Night Air Temp
13 liters
Pot Size
0.2 liters
Watering Volume
40 cm
Lamp Distance
Nutrients 4
Bio-Down
0.2 mll
Root-Juice
2 mll
Acti-Vera
1 mll
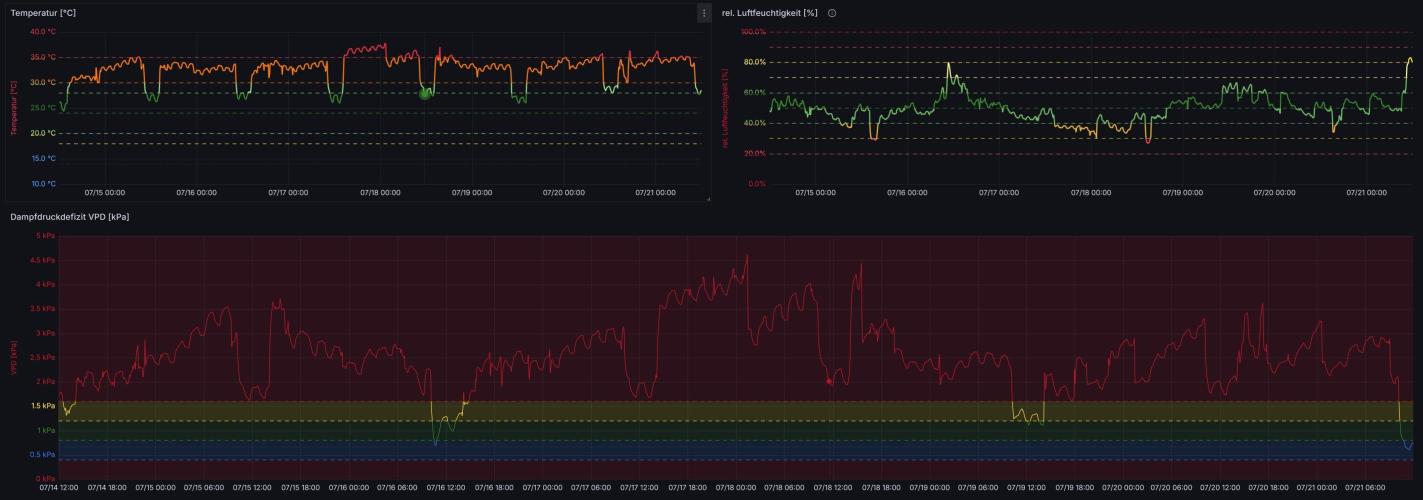
Lontra Overall it tends to be to warm and to dry inside my box, but until now, the little plant is doing great. During the first day's, I watered multiple times a day using a spray bottle only and tried to raise the humidity with a wet towel and a bowl of water.
1 like
comments
Share
2
Week 2. Vegetation
2y ago
1/9
8 cm
Height
20 hrs
Light Schedule
28 °C
Day Air Temp
6.5
pH
No Smell
Smell
50 %
Air Humidity
23 °C
Solution Temp
21 °C
Night Air Temp
13 liters
Pot Size
0.5 liters
Watering Volume
40 cm
Lamp Distance
Nutrients 6
Bio-Down
0.2 mll
Root-Juice
1 mll
Acti-Vera
1 mll
Lontra One of the targets for that grow is to keep the height of the plant as low as possible, because i only have about 80 cm from the bottom of the box to the LED lights as available space for the plant, so i thought i will a give that LST a try. Additionally i slowly started incresing the power of the LED to 60%.
By now (a few weeks later) I already know that i started the LST a little bit early, but the plant was reacting well and kept growing.
Furthermore I added a cheap webcam to my setup to create some timelapse videos. It's not a high res camera, but I still find it very interesting to watch that plant grow in timelapse 😁
1 like
comments
Share
Used techniques
LST
Technique
3
Week 3. Vegetation
2y ago
1/7
20 hrs
Light Schedule
-1 °C
Day Air Temp
6.5
pH
No Smell
Smell
50 %
Air Humidity
-4 °C
Solution Temp
-6 °C
Night Air Temp
13 liters
Pot Size
0.75 liters
Watering Volume
40 cm
Lamp Distance
Nutrients 5
Bio-Down
0.2 mll
Acti-Vera
1 mll
Bio-Heaven
1 mll
Lontra In week 3 I continued with the LST, but the plant showed more and more of its namesake genetics and grew into a kind of lettuce head. So towards the end of the week I started to remove a few leaves to improve aeration and light exposure. Additionally i slowly started incresing the power of the LED to about 75%.
1 like
2 comments
Share
Used techniques
LST
Technique
Defoliation
Technique
4
Week 4. Vegetation
2y ago
1/11
20 hrs
Light Schedule
30 °C
Day Air Temp
6.5
pH
No Smell
Smell
50 %
Air Humidity
21 °C
Solution Temp
23 °C
Night Air Temp
13 liters
Pot Size
1 liters
Watering Volume
40 cm
Lamp Distance
Nutrients 6
Bio-Down
0.2 mll
Acti-Vera
1 mll
Bio-Heaven
1 mll
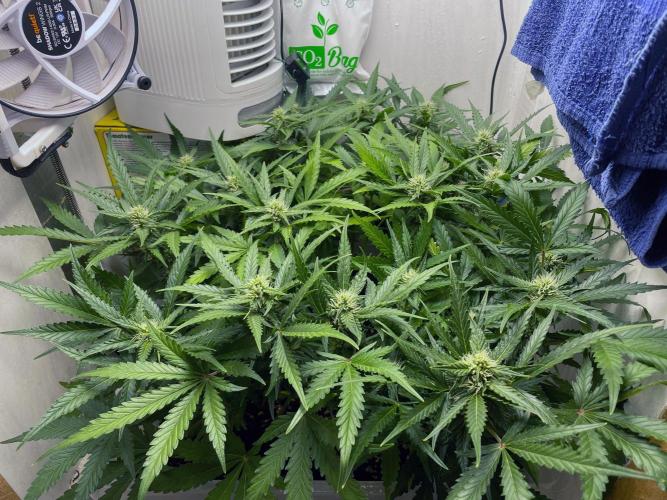
Lontra In week 4 the plant kept growing to a real dense bush so I continued the LST and did some little defoliation every 2-3 days like in week 3. Additionally I started giving some Alg-A-Mic to help the plant handling the high temperatures (up to 35-36°C) inside my box.
2 likes
comments
Share
Used techniques
LST
Technique
Defoliation
Technique
5
Week 5. Flowering
2y ago
1/11
15 cm
Height
20 hrs
Light Schedule
32 °C
Day Air Temp
6.5
pH
No Smell
Smell
55 %
Air Humidity
22 °C
Solution Temp
27 °C
Night Air Temp
13 liters
Pot Size
1 liters
Watering Volume
40 cm
Lamp Distance
Nutrients 7
Bio-Down
0.2 mll
Acti-Vera
1 mll
Bio-Heaven
1 mll
Lontra Just in time for the start of the 5th week, the first pistils appeared, so I started adding Bio-Grow to the fertilizer. The plant now takes up almost the entire surface area of the grow box, but fortunately it has stretched a little and gained some height. The LST was adjusted again and again and a few leaves were removed from time to time so that as many shoots as possible received enough light.
1 like
3 comments
Share
Used techniques
LST
Technique
Defoliation
Technique
6
Week 6. Flowering
2y ago
1/16
28 cm
Height
20 hrs
Light Schedule
34 °C
Day Air Temp
6.4
pH
Weak
Smell
55 %
Air Humidity
22 °C
Solution Temp
28 °C
Night Air Temp
13 liters
Pot Size
1 liters
Watering Volume
35 cm
Lamp Distance
Nutrients 8
Bio-Down
0.2 mll
Acti-Vera
1 mll
Bio-Heaven
1 mll
Lontra Week 5 finally brought some stretch. At the beginning of Week 6, I adjusted the LST and removed some smaller leafs deep down in that forest that started to turn yellow. Furthermore i started to add BioBizz - Top Max to the list of nutritions.
On day 42, I removed some leafs near the bottom (about 25) that already were or have started to turn yellow. Additionally I tried to water 1 day earlier than the times before. Furthermore i adjusted the LST a little bit, in hope for some smaller buds to catch up with the rest.
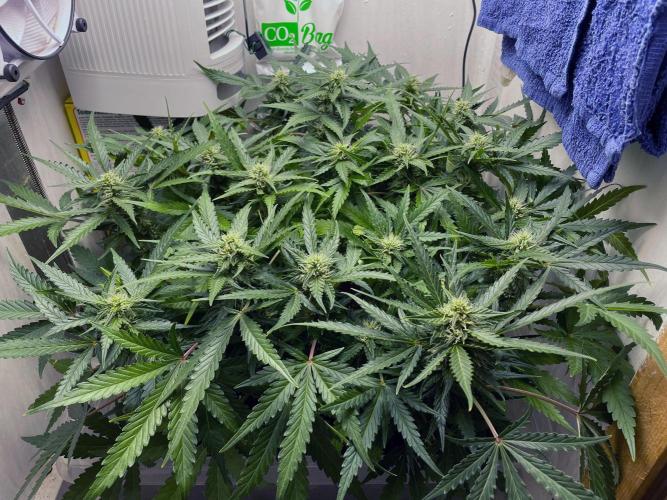
At the end of the 6th week, the lady still looks great and seems to be focusing on the buds. As it is getting warmer and warmer outside and therefore also in the box, I have also hung up a CO2 bag in the box. I hope it helps her to cope with the high temperatures. Even if I don't know if this really helps, I don't think it should do any harm.
1 like
2 comments
Share
Used techniques
LST
Technique
Defoliation
Technique
7
Week 7. Flowering
1y ago
1/19
27 cm
Height
20 hrs
Light Schedule
36 °C
Day Air Temp
6.2
pH
Weak
Smell
50 %
Air Humidity
23 °C
Solution Temp
26 °C
Night Air Temp
13 liters
Pot Size
1 liters
Watering Volume
38 cm
Lamp Distance
Nutrients 8
Bio-Down
0.2 mll
Acti-Vera
2.5 mll
Bio-Heaven
2.5 mll
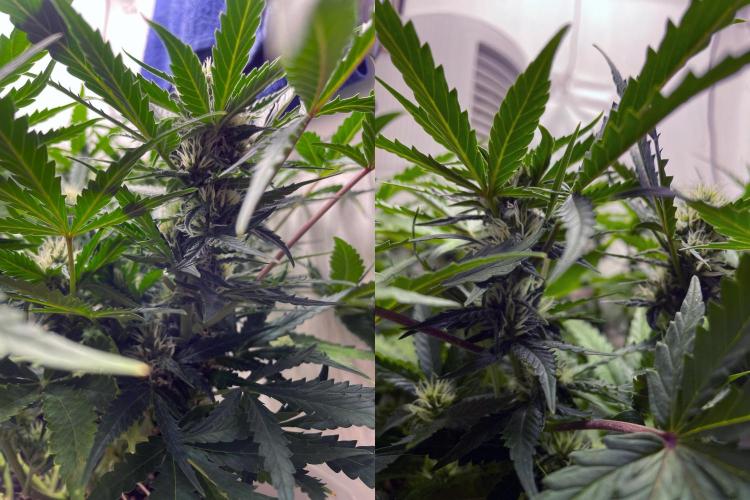
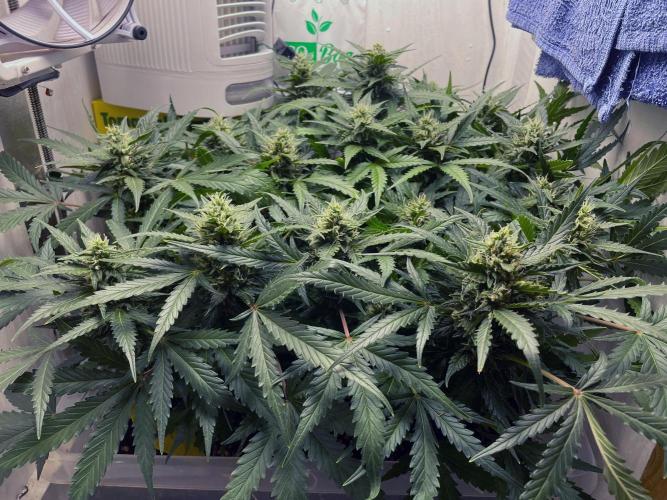
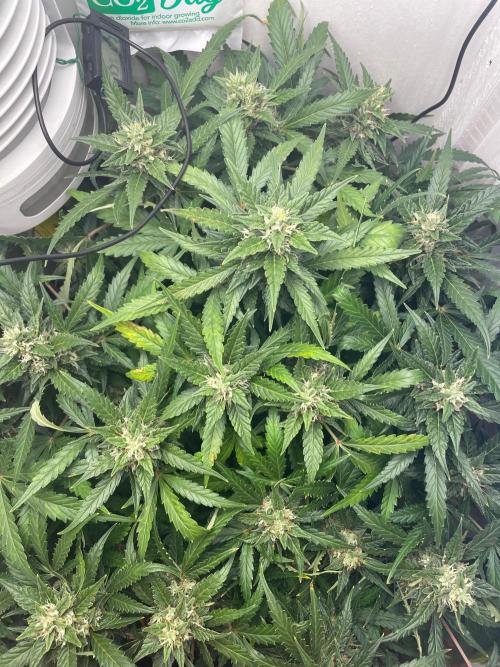
Lontra Week 7 has started and I'd say, overall she's looking good and healthy.
day 45:
It's time to give her some water and new "food". I took the opportunity to remove a few of the lower and inner leaves and arrange them a little more openly with some garden wire and string.
Regarding those lighter leafs in the top center (pictures under the LED make it really look worse) and the reddish/violet stems i won't do anything for now but observing.
day 46:
just visual checks and refreshing humidation.
day 47:
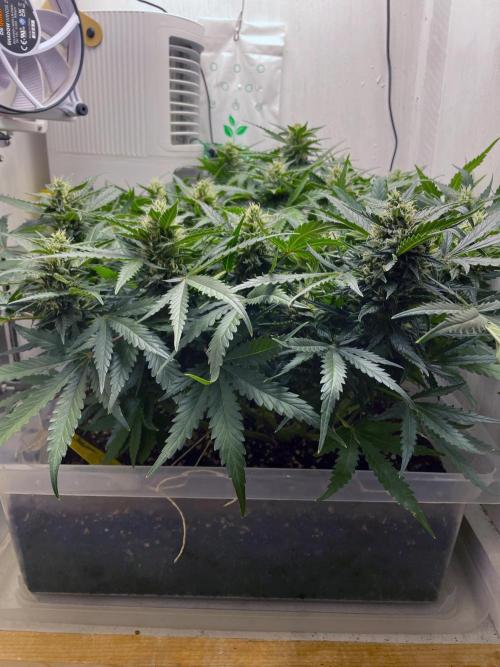
The soil was already dry again, i guess because of those high temperatures during the last days (up to 38°C inside the box). As she seemed to be doing quite well, I decided to carry out a slightly larger defoliation. Some might even call it “soft lollipopping”. But as a beginner, I want to try the experiment and I'm more afraid of mold than a slightly lower yield. So I removed about 1/3 of the leaves and small shoots in the lower area and also took out some fan leaves and leaves that were growing inwards or covering other shoots. I then used some string to give her a new shape to bring the individual shoots back to a more uniform height.
day 48:
just visual checks and refreshing humidation. I guess she isn't too sad about her new haircut. Additionally playing around with the smartphone microscope I recently bought.
day 49:
The first pistils are beginning to change color. No water needed today, but i guess for a fresh watering tomorrow.
Removed some leafes that wouldn't get much light
The weather should cool down again today and in the next few days, so I'm hoping for lower temperatures inside the grow box. Today I will leave the box open for a while and try to cool down the room in which it is standing.
day 50:
My guess was right, it's watering day. Felt like she needed a little more nutrients so i slightly adapted my plan.
3 likes
1 comment
Share
Used techniques
LST
Technique
Defoliation
Technique
8
Week 8. Flowering
1y ago
1/17
32 cm
Height
20 hrs
Light Schedule
34 °C
Day Air Temp
6.2
pH
Weak
Smell
50 %
Air Humidity
23 °C
Solution Temp
26 °C
Night Air Temp
13 liters
Pot Size
1 liters
Watering Volume
38 cm
Lamp Distance
Nutrients 8
Bio-Down
0.2 mll
Acti-Vera
2.5 mll
Bio-Heaven
3 mll
Lontra day 51:
I did some smaller repositioning and defoliation. It looks like she liked the more of nutrients i gave her yesterday. The buds are getting bigger, the pistils start to change their color and more trichomes are getting cloudy.
day 52:
Just visual check and filling up humidifier.
day 53:
Watering day. I increased the amount of Bio-Bloom, Top-Max and Bio-Heaven to 3ml/l. I'm now at about 6 liters of water every 3 days.
day 54:
Just visual check and filling up humidifier.
day 55:
Just visual check and filling up humidifier. The buds are getting bigger and more dense. From now I will have a close look at the pistils and the trichomes to decide when I will start to give her only plain (ph-regulated) water. I guess we have about 2-3 weeks to go from now. What are you thinking?
day 56:
Watering day. As most of the pistils are still white and most of the trichomes still clear, I gave her about 6 liters of water full of nutrients.
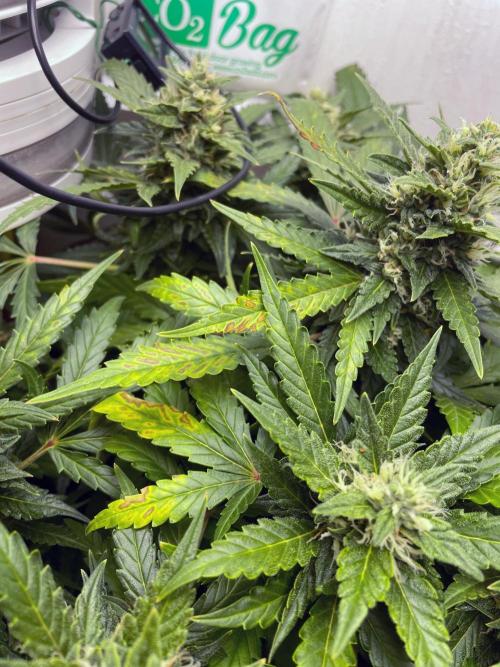
day 57:
While checking on her, I noticed some "burned" looking leaf tips. I guess that could've been a little too much nutrients last time. Overall she is looking happy.
3 likes
comments
Share
Used techniques
LST
Technique
Defoliation
Technique
9
Week 9. Flowering
1y ago
1/17
32 cm
Height
20 hrs
Light Schedule
34 °C
Day Air Temp
6.2
pH
Normal
Smell
50 %
Air Humidity
23 °C
Solution Temp
26 °C
Night Air Temp
13 liters
Pot Size
1 liters
Watering Volume
38 cm
Lamp Distance
Nutrients 1
Bio-Down
0.2 mll
Lontra day 58:
Just visual checks. Soil still felt a little moist. The "burned" leaf tips didn't get worse.
day 59:
Watering day. It may be a bit early, but I decided to give her only plain ph regulated water from now. I find it hard estimate the procentual distributation of light/cloudy/brown pistils/trichomes. From checking several buds I'd say about 20-25% of the pistils are brown and 20-30% of the trichomes are cloudy. Additionally removed some small popcorn buds that were freshly developing near the ground and a few inner leaves.
day 60:
Just visual checks and refreshing humidification.
day 61:
Just visual checks and refreshing humidification.
day 62:
Day of watering. Some buds are at about 40-50% brown pistils, while some others are still at about 10%. So I decided to give it at least some nutrients one last time and poured 3 liters of water with fertilizer and 3 liters with ph-down only. I think we are getting closer to the goal.
day 63:
Found some suspicious looking leafs in the center of the plant. By now I don't really now if it is because I lowered nutrients or some major problem. Let me hear what you think.
day 64:
Just visual checks. We're getting closer to the end.
2 likes
comments
Share
Used techniques
Defoliation
Technique
10
Week 10. Flowering
1y ago
1/20
32 cm
Height
20 hrs
Light Schedule
34 °C
Day Air Temp
6.2
pH
Normal
Smell
50 %
Air Humidity
23 °C
Solution Temp
26 °C
Night Air Temp
13 liters
Pot Size
2 liters
Watering Volume
38 cm
Lamp Distance
Nutrients 1
Bio-Down
0.25 mll
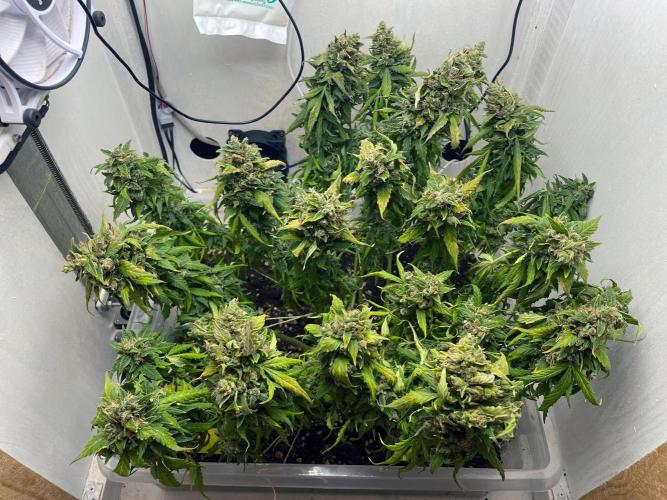
Lontra day 65:
Removed some leafs that were about to fall off by themselfes and gave her about 5.5 liters of water. I also noticed some more amber trichomes on some buds.
day 66:
just visual check. more trichomes turning amber. I guess it's time to chop her in a few days.
day 67:
just visual checks.
day 68:
Today I gave the plant another 6 liters of pH-regulated water without any additives and removed 2-3 dry leaves. While some buds already have quite a few brown trichomes and look as if I could harvest them in 3 days, other buds look as if they will need another 2 weeks, both in terms of the trichomes and the pistils. According to the current plan, the next watering day is Tuesday. Then I will reassess the situation.
day 69:
Just visual check and refreshing humidification. The "ugly" spots continue to spread, but I hope it's okay and that she will last until the harvest.
day 70:
Just visual check and refreshing humidification.
day 71:
Removed some dead leafs and gave her about 5 liters of water. I will give her an extra 1 or 2 liters tomorrow, so she will have enough water (hopefully) for the next few days that I'm gone.
4 likes
comments
Share
11
Week 11. Flowering
1y ago
1/28
38 cm
Height
20 hrs
Light Schedule
38 °C
Day Air Temp
6.2
pH
Normal
Smell
50 %
Air Humidity
28 °C
Solution Temp
26 °C
Night Air Temp
13 liters
Pot Size
2 liters
Watering Volume
30 cm
Lamp Distance
Nutrients 1
Bio-Down
0.25 mll
Lontra day 72:
After receiving some recommendations, I decided to let her live for another week. I gave her an extra 2 liters of water to help her get through the days I'm away.
day 76:
When I got home yesterday, I noticed that she was suffering a lot from heat and dryness on the days I was away. The majority of the pistils have now turned brown. However, when looking at the trichomes, I noticed that many of them still look rather clear to me, so I decided to try to keep her alive for a few more days. To do this, I removed most of the dried out leaves and gave her another 5 liters of water. I have also reduced the light intensity in the hope of being able to lower the temperature in the growbox a little.
day 77:
Now that she's has had about 24 hours to recover, I tried to remove most of the remaining dry and dead foliage today to minimize the risk of mold and bud rot. However, I think the next time the soil is dry it might be time to harvest. Let me know what you think in the comments.
day 78:
I'm really worried about her today. Many of the sugar leaves “dry out” very quickly and become almost crispy from their tip to stem. I hope this is just the consequence of putting the fertilizer down too early and the resulting nutrient deficiencies and the heat and dryness of the past few days. I'm just wondering whether I can leave her in the dark for another day so that a few last trichomes can develop without causing any major damage, or if I should harvest today...
The strain was definitely very easy to grow. It was able to cope well with the rather high temperatures and inconsistent humidity in my box over long distances. It grew very bushy and responded very well to LST and constant defoliation. The smell is rather limited and has a certain citrus note. I can't say anything about the taste yet.
Show more
Translate
Spent 79 days
Ger Veg Flo Har
437 g
Bud wet weight per plant
88 g
Bud dry weight per plant
1
Plants
0.28 m²
Grow Room size
Easy
Difficulty
Earthy, Flowery, Herbs
Taste
Sleepy
Energy
Indica
Hybrid
Sativa
Height
Day air temperature
Air humidity
PH
Light schedule
Solution temperature
Night air temperature
Pot size
Lamp distance
1/9
Lontra The sugar leaves, which were turning brown and drying out faster and faster, caused me so much concern that I decided to harvest yesterday to save what I could. I'm sure she would have benefited from a few more days, but I didn't want to take the risk. When I opened the buds, I found brownish gray spots in them. Fortunately, these were not yet very widespread, but I think this would have become a bigger problem (perhaps an emerging mold problem?). So I removed all these spots and then hung the individual branches in the grow box to dry.
For my first run, I'm definitely very happy with the result up to this point. The wet weight of the hung stems was 437g. I will provide the dry weight of the buds as soon as the drying process is complete.
@RavenCookiee, thank you. I have to admit, I'm a little surprised myself that my first run went so well overall so far 😅 Now I just hope she lasts a few more days
@Pjm70, It seems like the combination of biobizz light soil and the biobizz fertilizers is working good for me. She had that nice dark green color for most of the time till now 😉
I don't know why, but I can't save the week review inside the smoke review, so I'm commenting myself :D
Unfortunately, the drying process went a little too quickly as it was simply too warm and too dry here. After only 6 days, I did the final fine trimming and filled everything into jars (tentatively 1x Terploc Grove Bag). Even without long fermentation, the smoking experience is already very pleasant (no scratchiness, no “artificial” (fertilizer) taste). I am curious to see what flavor nuances will emerge with longer curing.
I am more than satisfied with the result of 88g dry weight from just one plant in my first run. If I hadn't had to remove some more due to the emerging mold, it might have been a few grams more.
Heyoo, sehr schöne Pflanzen.
Ich sehe du hattest eine Schimmelproblem, so eine *****. Du könntest die buds direkt trimmen vor dem trocknen, das verringert die Chance auf mehr davon. Die Blätter trocknen wesentlich langsamer als buds, sie enthalten einfach mehr Wasser. Ich krieg das leider auch öfter, in deutschen Sommern ist das nicht so einfach, aber im Winter wirds einfacher 👌
Beste Grüße amigo und Happy Growing🙏👽
@modmyplants, tatsächlich ist das nur eine Pflanze^^ Aber ja, auf den letzten Metern kam es anscheinend zu einem Schimmelproblem. Ich hab nach dem Ernten alles entfernt, was betroffen schien oder sonst irgendwie seltsam aussah. Bisher scheints sich während der Trocknung zum Glück nicht wieder auszubreiten.


 commentedweek 52y ago