
Likes
Comments
Share


@Ultraviolet
Follow
You don't become confident by shouting affirmations in the mirror, but by having a stack of undeniable proof that you are who you say you are, outwork your self-doubt.
Nitrogen fixation is a chemical process by which molecular nitrogen (N2), which has a strong triple covalent bond, is converted into ammonia (NH3) or related nitrogenous compounds, typically in soil or aquatic systems but also in industry. The nitrogen in air is molecular dinitrogen, a relatively nonreactive molecule that is metabolically useless to all but a few microorganisms. Biological nitrogen fixation or diazotrophy is an important microbe-mediated process that converts dinitrogen (N2) gas to ammonia (NH3) using the nitrogenase protein complex (Nif).[2][3]
Nitrogen fixation is essential to life because fixed inorganic nitrogen compounds are required for the biosynthesis of all nitrogen-containing organic compounds, such as amino acids and proteins, nucleoside triphosphates and nucleic acids. As part of the nitrogen cycle, it is essential for agriculture and the manufacture of fertilizer. It is also, indirectly, relevant to the manufacture of all nitrogen chemical compounds, which include some explosives, pharmaceuticals, and dyes.
Nitrogen fixation is carried out naturally in soil by microorganisms termed diazotrophs that include bacteria, such as Azotobacter, and archaea. Some nitrogen-fixing bacteria have symbiotic relationships with plant groups, especially legumes.[4] Looser non-symbiotic relationships between diazotrophs and plants are often referred to as associative, as seen in nitrogen fixation on rice roots. Nitrogen fixation occurs between some termites and fungi.[5] It occurs naturally in the air by means of NOx production by lightning.[6][7]
All biological reactions involving the process of nitrogen fixation are catalyzed by enzymes called nitrogenases.[8] These enzymes contain iron, often with a second metal, usually molybdenum but sometimes vanadium.
Green clover (Fixation)
White clover (Fixation)
Red Clover. (Fixation)
Yellow Clover. (Fixation, deeper roots)
Sweet Thai Basil. (Terpenes)
Italian Basil. (Terpenes)
Chamomile.(Oil production)
Borage.(Pest attraction taste)
Lavender.(Pest attraction smell)
Marigold(Pest attraction visual)
Mycorrhizae are beneficial associations between mycorrhizal fungi and a plant’s root system. Mycorrhizal fungi spores germinate in the soil, creating filaments (hyphae) that penetrate the root cells, thus establishing a symbiotic relationship. This collaboration leads to the development of both intra-radical and extra-radical networks of filaments, enabling efficient exploration of the soil for enhanced access to nutrients and water. Consequently, these vital resources are transferred to the plant, resulting in numerous benefits for crop cultivation.
Various mycorrhizal products are available in diverse formulations (powder, granular, and liquid), concentrations, and qualities. Ongoing advancements in products, technologies, and research are reshaping our understanding of mycorrhizae. Despite these positive developments, certain misconceptions persist. In the following discussion, we aim to clarify the truths and dispel the myths surrounding mycorrhizae products.
MYTH #1
A HIGHER NUMBER OF MYCORRHIZAE SPECIES MEANS BETTER RESULTS.
Contrary to common belief, having a higher number of mycorrhizae species in a product does not translate to better results; in fact, it often yields the opposite outcome. A plant can sustain only one association with a particular mycorrhizal fungi species. Introducing multiple species creates competition among them, which is not advantageous for the plant. The initial colonizer does not ensure the highest success; instead, it gains precedence. It is recommended to select a product with a concentrated presence of a single mycorrhizae species known for its effective performance, rather than opting for a product with multiple species at lower concentrations.
MYTH #2
ECTOMYCORRHIZAE ARE EFFECTIVE FOR CANNABIS PLANTS.
Although ectomycorrhizae can colonize five to ten percent of plant species, cannabis is not among them. Ectomycorrhizae do not penetrate the root cells; instead, they develop around the roots and on the exterior. For cannabis plants, it is essential to seek out endomycorrhizae. Endomycorrhizae are capable of colonizing 70% to 90% of plant species, including cannabis. Unlike ectomycorrhizae, endomycorrhizae penetrate the root cells, forming structures like arbuscules for the exchange of nutrients and water with the plant.
MYTH #3
WHOLE INOCULANT (PROPAGULES) PERFORM BETTER THAN ONLY VIABLE SPORES.
The propagule count specified on most mycorrhizae products indicates the presence of spores (viable and unviable), hyphae, and root fragments. However, it is crucial to note that only viable spores, those with the capacity to germinate, can successfully colonize a plant’s root system. Spores are to mycorrhizal fungi what seeds are to cannabis plants—a fundamental component enabling fungi reproduction. Consequently, even if a mycorrhizal product boasts millions of propagules, its effectiveness hinges on the presence of viable spores. Without viable spores, the product will not contribute to plant development. Therefore, the genuine value of a mycorrhizal inoculant lies in the quantity of viable spores it contains, as only viable spores can efficiently initiate symbiosis.
MYTH #4
ALL METHODS OF APPLICATION YIELD IDENTICAL RESULTS.
To establish the symbiosis, mycorrhizal fungi spores must be close to the plant roots. The optimal recommendation is to directly apply mycorrhizal inoculant to the roots, either in powder, granular or slurry form. This method ensures maximum proximity between the spores and the roots, facilitating a rapid establishment of symbiosis. Particularly with crops like cannabis, which have a short growing cycle, employing this technique is the most effective way to obtain optimal benefits. Alternatively, techniques such as blending the inoculant with the soil are effective, but there may be a delay in the establishment of symbiosis. This is because the roots need to grow and come into contact with the dispersed spores throughout the growing media.
MYTH #5
MYCORRHIZAE CAN ONLY BE GROWN ON LIVING PLANTS.
While the predominant method for commercially producing mycorrhizae involves growing them on the root systems of living plants (in vivo production), it is not the exclusive nor the optimal technique. In fact, this production approach has notable drawbacks that the “root organ culture” method just does not have (in vitro production). In vitro production occurs in meticulously controlled, aseptic laboratory conditions, allowing for the consistent generation of products that are viable, highly concentrated, species-specific, and free from pathogens. Achieving such precision and quality is impossible when relying on the cultivation of mycorrhizal fungi on plants exposed to external conditions.
In conclusion, it is crucial to take all these factors into consideration when choosing the appropriate product for your crop to fully harness the wide array of benefits provided by a high-quality mycorrhizal product.
STRONGER PLANT – Stress resistance.
FASTER GROWTH – Improve plant structure and shorter veg time.
INCREASE YIELD – Overall more biomass.
IMPROVED QUALITY – Increase cannabinoids and terpenes content.

Processing
Likes
113
Share


@Skunky
Follow
Well, today was the last day veging. I defoliated the lower 20%, switched on the red LEDs and set the timer to 12h. I activated the 2nd fan inside the box and also switched on the mini fan connected to the cooled hood. I'll leave it open until the stretch or the smell begins. As soon as there's any smell, I'll close the system by adding the glass shield. Also, I'll save the resulting temperature drop for the later weeks so... let's see...
Nutrients added: about nothing. I read somewhere you should flush the plants before the switch so I just feed a normal quantity of water with only a bit of nutrients. It's around a 1/20th of the recommended dose maybe.
Let the adventure begin!

Likes
29
Share


@GreenRN
Follow
Getting caught up, had shoulder surgery 2 weeks ago.
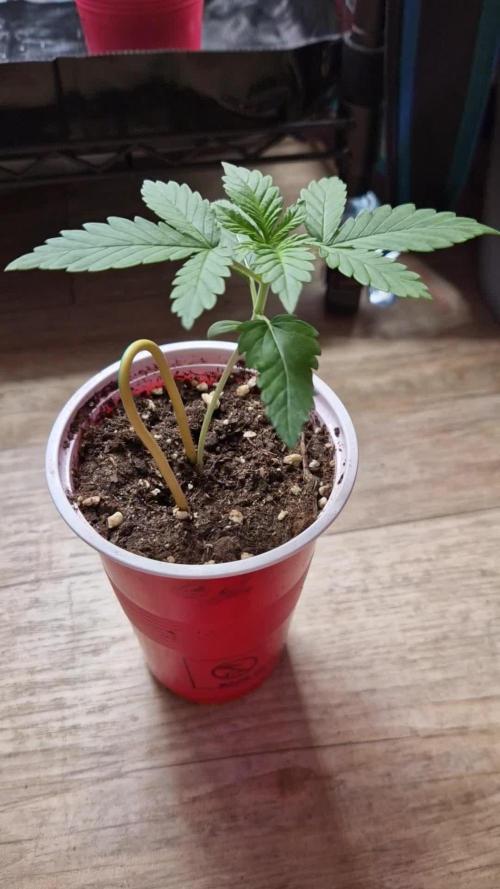
These girls are on week 7. Having to feed every other day, pots are light as a feather. So light, that I'm certain they are dead.
You can see I topped the auto baby plant the other day. From my experience, I've had zero issues topping, or other high stress training with autoflowers, at all. Knock on wood. That pic was taken 2 days after she was topped.
From my (limited) experience with autoflowers, I wait until the day I need to water my plants: do any HST, then water/feed. I really let my fabric pots completely dry out, so the plants seem to be so desperately hungry, they don't seem to notice that I topped or supercropped or broke a bud site, or.....anything, while they were eating! Apparently food and water distract' s them.
Pulled my light up a couple inches because, taco leaf. This Ceramic MH light is great.
Still under 24/0 light. No problems with temp or humidity. Keeping pH levels between 6.0-6.3 with Oregan's Only.
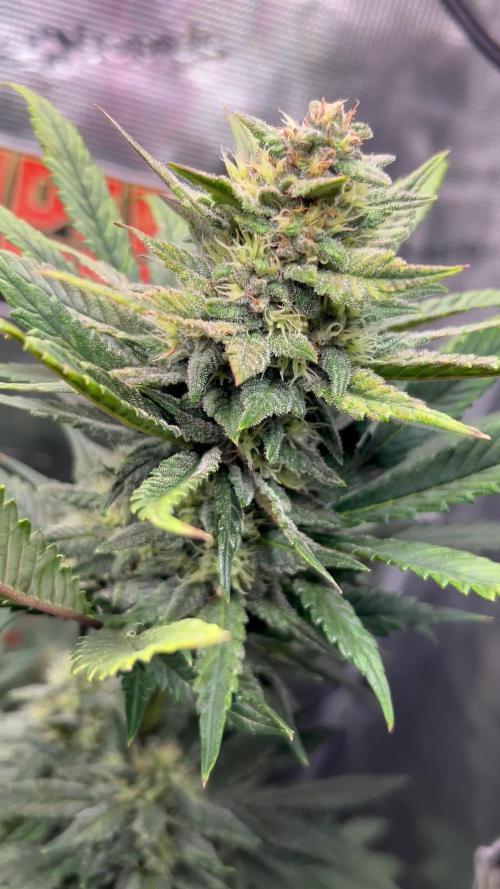
Colas fattening up! Approximately 8-9 inches around. So pretty!
Smell is not overwhelming. BUT no more crappy ipower carbon filter, it is crap. I'll get another brand for next grow. I live in a legal state, but don't want my house smelling like weed lol. I prefer to buy items that are Made in America. Any suggestions for carbon filters are welcome.
I hope everyone is having a good week growing!!

Likes
6
Share


Likes
190
Share


@Sparkles
Follow
Brought to u by Mars Hydro. Grow on Earth. Grow with Mars.
All pics are from day 42.
Damnit I got soil mites. I guess now the weather is getting warmer I’ll have to deal with pests. Was hesitant but decided to soil drench a couple of times with CannControl to try to keep their numbers down. Plant is looking fine so I’m not too worried.
Now time to ripen, lowering feeds, almost at the finish line.
My place smells so good when the tent is open. I love it.
Thanks for stopping by and for the support. Happy gardening 🌱🌱


Likes
13
Share

@NuclearPyro
Follow
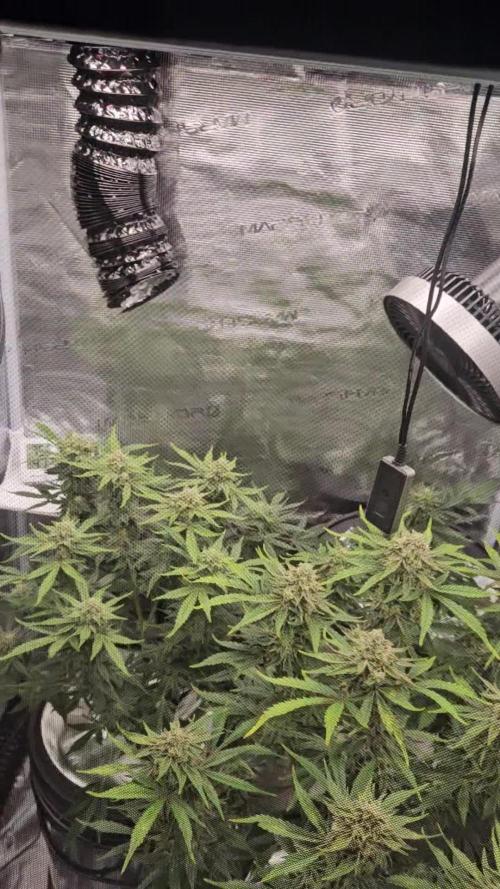
Struggling with RH, tent is too crowded bc I have lots of negative pressure, tent is bowing in hard. The best I can get down to is 50%RH, however I have tons of circulation. Look at video. I put a dehumidifier in the lung room. Rh drops if I open window, but its raining. Too wet outside rn. It went from blizzard (dry) to rain for 7 days now, maybe thats why Im struggling. Need circulation in lung room too. Vents open, still struggle, tent door open, im fine. And I use blackout curtains so no light penetrates the room. It maintain complete darkness 24/7. Plants sleep when i sleep, so never worried about it. My house was built in 1952 post WWll, so no insulation, just straight brick and a solid slab. That means it will hold moisture. Lung room at 35% RH. Rearranged set up. Trichomes...... 70% clear, 20-25%% cloudy, 5% amber
Likes
46
Share


@Capo420
Follow
Start of Week 3. Been an awesome first 2 weeks.😎
I have learned more than I thought possible. I want to thank everyone who has helped me.🙏
Gonna start LST later in the week. 💪
Will be updating throughout the week.
Happy Growing!
🤙💚💪🌱😎🌱💪💚🤙
Likes
77
Share


@deFharo
Follow
Bienvenidos amigos, he cumplido 20 semanas de vida, 12 de floración y dos como reina del jardín!! 😍... mi nombre creo que es Amnesia, soy algo olvidadiza 😵, mi apellido es Kush y desciendo de antiguos linajes Haze y Kush, soy fruto del mestizaje de plantas emigrantes y reúno en mis genes las mejores sativas de dos continentes...llámame AKU!! 😘 y si te acercas a mi... te regalaré aromas complejos e intensos, a incienso, madera y frutas ácidas que recuerdan a lima y pomelo.
Esta semana he bebido 2909ml de agua de riego, un 11% menos que la semana anterior.
Una semana de paz, mis flores continúan creciendo, mi masa foliar se mantiene casi intacta y saludable, me alimento principalmente de los nutrientes y minerales del sustrato, que mis amigos los microorganismos solubilizan y mineralizan... mientras siga creciendo mi cultivador no me cortará... no quiero hacerme mayor 🤸♀️🌾👸
01/05/21
Hace cuatro días que me hicieron el último riego, he tardado un día más de lo normal en consumirlo, porque ha hecho un poco de frío.
Hoy he tomado una mezcla suave de riego para que a mis flores no les falten nutrientes (PK): Hidrolizado potásico de leonardita (Humato) con fósforo (Húmicos, fúlvicos, PK) al 1%, aderezado con Microorganismos de Montaña Activados con minerales y nutrientes (MMA Plus) al 1,5% y endulzado con melaza. PH: 6.54, EC: 1.0. 1700ml.
05/05/21
Hoy mi cultivador ha decidido regarme, por ahora, con menos cantidad de agua, para poder regarme cada 3 días en vez de cada 4, de esta manera, el sustrato tendrá más cantidad de oxígeno y los microorganismos harán su trabajo en mejores condiciones aeróbicas.
Mis hojas se mantienen muy saludables, muy lentamente están amarilleando, mis flores mantienen pistilos blancos y no hay síntomas adversos, yo me encuentro muy bien y cuando necesito comer se lo pido a los Microorganismos que siempre tienen nutrientes y minerales a mi disposición.
Riego con inoculación de MM para acelerar el proceso de disolución y mineralización de nutrientes del sustrato: Agua de montaña con Microorganismos de Montaña Activados (MMA Basic) al 3% con Ormus al 0,5% y melaza. PH: 6.46, EC: 0.88. 1300ml.
..How the hell did I get here so soon
I don't wanna grow up...
Hasta la próxima semana amigos...
SALUDOS A VUESTRAS PLANTAS!! 👸🐅🌲
================================= 🙄☮️👇🙏👌🤛👍👉👉👉❤️💜❤️👈👈👈🤜👌🙏👇☮️🤩🖐️🏻 =================================


Likes
5
Share

@TrickzGrowz
Follow
Servus Moin!
Die Sun of a Peach ist sehr schnell groß geworden, doch der Stamm kam nicht hinterher. Dadurch musste ich sie eine weile stützen.


Likes
12
Share


@Microsemilla
Follow
Algo de la tierra de las que no germinaron, se reutilizó para rellenar el contenedor de esta #lebronhaze en donde nació, ya no sabemos exactamente qué.. pero solamente se puede tratar de una #lebronhaze o una #doublecookies.
.🌱Quizá el tiempo nos de alguna pista y nos ayude a revelar la verdadera identidad de esta #microstarplayer
ig: @micro.semilla

Likes
39
Share


@Dapper_Buds
Follow
The grow went amazing started off what was supposed to be a auto GSC strain but didn’t auto flower which is no issue at all so went ahead an let her veg out an get the lst done that i wanted done on her she was showing pistils by week 8 veg letting me know she wanted to flower but some areas had a bit of catching up to do which turned out amazing. Got almost all the branches the same size to produce equivalent bud sizes throughout the whole canopy. During flower stage 2 weeks in started giving her a Pk boost of incredible bulk 1/2tsb per gallon. An did the GSC so good for flower stage she bulk up nice an the trichomes came in heavy. Total wet weight came in at 2.5lb stump was 1.5in circumference. I will update with finish photos an how the smoke was after cure. GSC currently being cured with love 63% Rh at 70 degrees temp. Thank you viewing an happy growing everyone!

Likes
87
Share


@Roberts
Follow
Auto Banana Kush is growing great under the Medic Grow Mini Sun-2. She just got a defoliation and solution change to some fresh Athena blended line blooming nutrition. She is progressing more into flowering. She is looking good. Thank you Athena, Medic Grow, and Weed Seeds Express. 🤜🏻🤛🏻🌱🌱🌱
Thank you grow diaries community for the 👇likes👇, follows, comments, and subscriptions on my YouTube channel👇. ❄️🌱🍻
Happy Growing 🌱🌱🌱
https://youtube.com/channel/UCAhN7yRzWLpcaRHhMIQ7X4g

Likes
5
Share


@Buddo
Follow
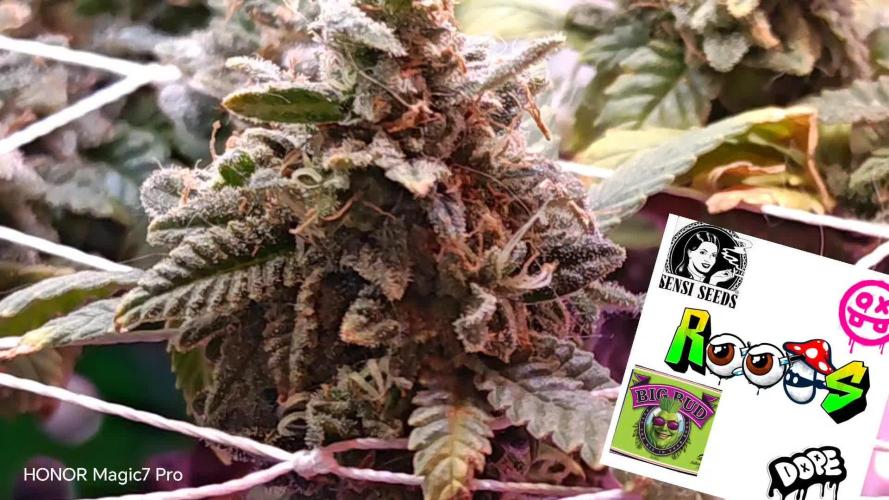
Starting to bud up ok. Tied the branches to open up the plant & removed quite a few leaves that were being eaten up . I really like the structure of the plant, not to bushy. Ran some Clearex to flush the salts from the Pro-Mix. The terpenes have a nice pepper/spices profile. Started Big bud this week.


Likes
8
Share


@Kitties_and_Colas
Follow
We decided on Pineapple Express (by Grower's Choice) as our summer strain this year, we veg anything going outside under 16hrs ..We only get 15hrs at peak light(Far North/East, Canadian border) and this prevents any pre-flowering and possible revegging downtime. We're going to flower 4 plants indoors ASAP (to ensure we don't run out )and bring 3 out to the field in about 2-2.5 months...

Likes
176
Share


@DevilsBud
Follow
Week 2 of flowering phase
Cookies Gelato by royal queen seeds
Hallo fellow growers here we go
Day 8 flowering phase
looking good amazing to see them developing up close day by day . Today no watering maybe some defoliation below the net but that it cool beans 😎
Day 9 Flowering phase
Didn't see the plant for 20hours and jebus they grew over night they went up 15cm . But they are looking healthy
Gave them almost 1.2L nutrients was getting dry that was it .
Day 10 flowering phase
Today adjust some things in the tent it didn't feel a right not to happy with tents quality 🤔 also it's very challenging to get to back corner plant. I need to fully open the tent. There are no peak holes ore other opening to get to the back . And it feels unstable
. Plants i only did some final defoliation and gave 0.5l normal water
Day 11 flowering phase
Plants looking okay to me. Didn't water them today want to let them dry out some . I think because of all the watering i am Struggling with the humidity in the tent . It is around 80% and that little dehumidifier don't do jack patetoe . Def need to think of a solution for later in the weeks
Day 12 Flowering phase
Gave nuts water and put a 2nd ScrOG up a little higher .
Today got my
3X 🧟♂️ haze seeds from Sumo Seeds
3x Taison Autoflower from VIP seeds
1x girls scout cookies from Zamnesia
Free with order 👌
Day 13 Flowering phase
Sunday relax day no watering . Everything looking good that budcandy and Big bud from advanced Nutrients are working like a charm . I have bin semi keeping to the recommend advanced Nutrients schedule and i think works for me . I have here and there play around a bit but they seem to not be having problems with that . Advanced Nutrients is getting 10/10 for me
Day 14 Flowering phase
Week 2 of flowering phase complete
It was a learning week for me . Got bit scared how they grow 15 cm in a day . But it's seems to be oké i got still some real estate left. I think that i am not giving them any water what so ever . I need to learn to let them dry out some . Also a bit struggling with humidity in the tent . I am trying to give them water right before light on ore right after light out . It's definitely a learning process that i don't mind learning 🤘🏻🤘🏻
Thanks for stopping by growmies i appreciate it a lot 😎.
And for the one's that read my stuff sorry for misspelled English


