
Likes
Comments
Share


@Medicrexcellence
Follow
there are very few amber trichomes, so it still needs a week. it sure looks great though. It's extremely greasy to the touch, and rank with bright fruit flavor.

Processing
Likes
12
Share


@NutsInGuts
Follow
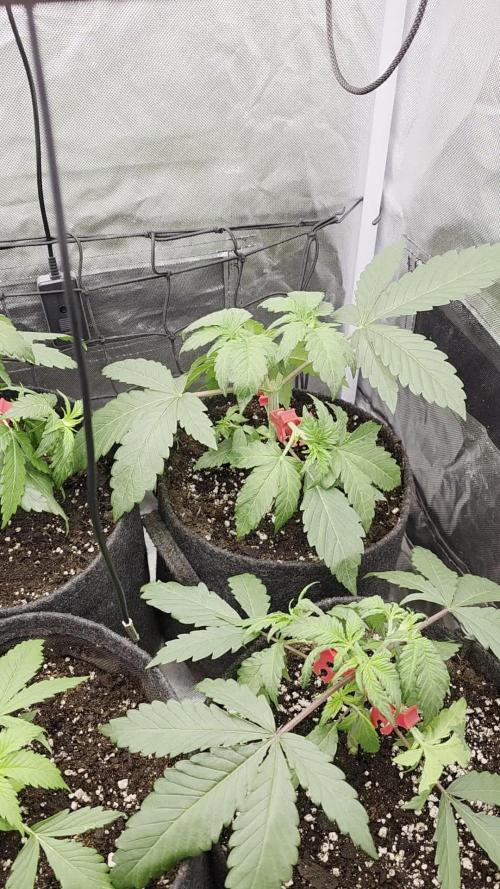
19.08.2020 - water with plain water
21.08.2020 - nutrient feeding.
23.08.2020 - started lst/nutrient feeding and recharge watering

Processing
Likes
5
Share


@Drtomb
Follow
I finally had a chance to try out the Skullcap solo cup that I grew out after finding it was female. This plant is very crystally and has a dark purple look from the leaves. Ill definitely need to maintain a 10*F temp swing from day to night temps.
Everything is moving along nicely on the screen and new sump pump is working great. Changing res everytime i go through a full add back of fresh water, which should be in the next 2-3days.


Processing
Likes
20
Share


@Easygrower
Follow
Hello growers day 36 with the gorilla glue auto growth is very slow she really doesn’t it on the balcony it’s starting to get abit cold at night now days are getting shorter and English weather is very unreliable there’s nearly room in the tent for her that should keep her warm at night she isn’t showing any signs of flowering yet but all is good so until next week be safe and happy ✌️


Likes
18
Share


@ButterfliesLittleFarm
Follow
Hello Diary.
The second week of vegetation and Green Gelato is progressing wonderfully. 👌 It reached a height of 16 cm and the plant looks happy and healthy. The temperature is slightly higher in the middle of the day when the outside temperature is also high. Sometimes it reaches 28 degrees 😎, but luckily summer is not in full swing so temperatures are acceptable. In my case, the outside temperature also affects the temperature in the box since I don’t use air conditioning for cooling. The box is located in a smaller room without windows, the temperature is not too high. I regulate the humidity with a humidifier, and it varies between 55-65%. 💪
The plant develops more in width than in height, which is the opposite of its roommates in the box, the Hulkberry.
Starting this week, I started adding Fish-Mix from BioBizz. So this week they will get Fish-Mix, Acti-Vera and Bio-Heaven, 2ml / lit each.
Let's take a look at the activities this week:
28/06/2020. Day 10.
Watering. As I wrote earlier, the food for this week is Fish-Mix, Acti-Vera and Bio-Heaven, 2ml / lit each. P. H. I regulate with Plagron’s Lemon Kick.
02/07/2020. Day 14.
Photographing, watering and measuring height. As for watering, the procedure is the same as 4 days earlier.
All in all, everything is going well for now, Green Gelato and Hulkberry have almost ideal conditions and I hope that I will continue to do so. See you next week.😀
Likes
47
Share


@terpproducer
Follow
Finally, I found the time to finish the report. Thanks for joining me!

Likes
4
Share

@CheeRz
Follow
🌿 VEG WEEK 3: Big Bang | Divine Seeds
🌱 VEGETATIVE PROGRESS
The Big Bang is showing incredible resilience and power this week. Since she settled so well into the 8L pots, I decided it was time for the first major structural intervention: Topping. ✂️ I’ve removed the main apical growth point to break the apical dominance and redirect that energy into the side branches.
Looking at the close-ups, she handled the surgery like a champ with zero recovery time. You can already see the two new main shoots taking over, and the lower branches are catching up rapidly. The leaf color is a perfect, healthy green, and the stem continues to thicken up. This is the foundation for the massive canopy we’re building for the Scrog net. 📈
💧 NUTRIENT FEEDING & WATERING
I’ve stepped up the feeding regimen this week to support the rapid development after topping. The addition of Bio-Heaven provides a massive boost for energy uptake and recovery.
Current Feeding Schedule (per Liter):
Bio-Heaven: 2.0 ml/l
Root-Juice: 2.0 ml/l
Acti-Vera: 1.0 ml/l
Calmag: 0.5 ml/l
Parameters:
pH: 6.5
Relative Humidity (RH): 60%
Temperature: 23 °C
VPD: 0.95 kPa
💭 GROWER'S NOTE
👀 Status Report: Topping was the right move at the right time! By keeping the VPD steady at 0.95 kPa, I’m ensuring the plant can process the increased nutrient intake from the Bio-Heaven without any transpiration issues. The symmetry of this Big Bang phenotype is outstanding. Now that we have multiple growth points, I’ll be starting the LST very soon to spread her out even further. The vigor of these Divine Seeds genetics is just next level! 💥 Stay tuned! 🚀

Likes
2
Share


@Northstar_cannabis
Follow
Gorilla cookies is a great beginner plant. I had my humidifier too close to GC early on causing rust spots. Week 6 there is no signs of rust spots and growth is consistent with the bigger plants in the tent. I was thinking this plant maybe behind given the rust spots, it caught right up, healthy hardy strain.
Likes
Comments
Share


@hinterhofgrower
Follow
🌱: topdressed her with Dolmite Lime on day 16
💧 : 4l
💡 : Dli: 35 mol/m²/d
🤔: Back from mountain biking on day 16, she survived my absence well, but looks a bit yellowish.
After my experience with the Amnesia Haze https://growdiaries.com/diaries/256489-fast-buds-amnesia-haze-auto-grow-journal-by-hinterhofgrower#weeks/1485085, I'm adding some Dolomite Lime to the soil as a preventative measure to avoid the CalMag problem.
I watered the dolomite lime into the soil with 2 liters of 2ml/liter Supermix, also to give the upper roots more NPK. What she can draw from the reservoir through capillary action doesn't seem to be enough yet.
As an Indica dominant, I didn't top her but removed the bottom two branches and try to keep the central branch under control by removing leaves. In total, I now have 5 main branches.
Likes
57
Share


@SmokieMcPot
Follow
Two girls one cup week 2..
thanks for stopping by and checking out my experiment :)
no need to rotate them.. they're doing it all on their own 🤣.
hit the girls a little hard with the light last week when i turned it up to warm things up in there. kinda blasted em with 22 DLI and the light may have caused the curling on the Godzilla Cookies. all is well, and theyre moving right along. light currently 18in up, and hitting them with 14 DLI. running the 1/2 strength GHE light feed week 2 since last sundays RES change. will prob keep this RES until this sunday. just top off and PH adjust 8am/8pm daily. kinda excited to see the explosion of growth throughout this week. 3rd true set popping out of both GC and WG, and started LST them their separate ways as early as possible. contemplating topping after 5th or 6th node. havent made up my mind as to when yet. we shall see. roots poking their way through the drainage holes in the bottom of the upper growing chamber. Will have to add a stone to the RES here in a few days time.
GHE light feed 1/2 strength week 2 (measurements are per 2gal on 500 scale):
Total nitrogen - 47.5 ppm
PPM range - 200-275 ppm
Spring Water/Tap mix - 220 ppm (calmag and hydroguard already added)
Micro 3.6mL - 144 ppm
Grow 3.4mL - 77 ppm
Bloom 2.6mL - 41 ppm
Total = 482 ppm
GHE is pretty damn accurate on that ppm range huh?
*so far they seem to be loving life.. sooner or later this light won't be able to keep up with their needs. Probably sooner with the rate they're going.
*figured I keep them on the 1/2 strength week 2 GHE Flora feed for now. They've been moving right along, and I don't want to over feed em. Next RES change will get bumped up for sure. Made a nozzle for the reptile fogger since the one it had was made for a 1" hose. MUCH better distribution of moisture now.
*Wedding Glue def showing signs of being under fed. Taking up more water than it needs to get those nutes. Causing droopy leaves. Hopefully she can wait until the start of week 3 for a bump up.
*Nute levels dropping every 12h as expected. Going to crunch numbers tonight to see how much on a 12hr basis to see if we're ready to get bumped up. If so RES changes will be weekly still, just on the week mark instead of Sunday.
*WG said fuck 5 leaves and went straight for 7! Crossing my fingers she gets 13 of em so I can break a personal record of 11. That is unless the ruderalis takes over and puts a stop to them multiplying every node.
*****anyone got some pointers on how to go about getting a sponsorship? Could use a little 300w artificial sun to brighten up a cloudy day. And to finish these girls right.
Likes
8
Share


@Cali_Rayy
Follow
Hope these flowers start to take off ; think I under did it on calmag and slowed things down but issue has been corrected. Hopefully things start to bounce back and builds up some monster 💐
Likes
44
Share


@GODSGIFT_2005_JM
Follow
For LIQUIDS & NUTES ******GREEN BUZZ NUTRIENTS***** organic.
Also i’m using their LIVING SOIL CULTURE in powder form!
MARSHYDRO ⛺️ has large openings on the sides which is useful for mid section groom room work. 🤩
☀️ MARSHYDRO FC 3000 LED 300W
💨MARSHYDRO 6” in-line EXTRACTOR with speed-variation knob, comes complete with ducting and carbon filter.
Likes
9
Share


@HUMO_Cultiva
Follow
We start week 3 of bloom!! Goofiez 2 amor compound genetics it’s the champions!!

Likes
55
Share


@Max1973
Follow
omg, another week has passed...... :)
Day 100 - and then there was 11 Buds ....... lol
Switched over to normal water on both ... smaller has been on water 1+ weeks .....
Endoscope arrives this week i hope..... harvested afew buds to fit it all in the tent and setup lights properly...
trimmed em, wired em abit to support the weight of the buds....
I'll see how the endoscope results show, as to harvest...... i think growth slowed abit over last week or 2,
because of poor light setup, not enough room in tent, and other grow 6400k led....
got a new tent on the way... 😎
Day 101 - Pics - edoscope, usb arrived... it's very good, but hard to stabalize / focus, i'll have to work out how to use it better......
the pics i posted were of a younger bud from the bottom..... i'm happy with the cloudy with amber, and harvesting.... 😎
Day 103 - vid of all trimmed and drying out upside down in tent.
Day 105 - pics vids of drying and into curing....
i'll list all the test buds and buds i trimmed in the final harvest report.....😎
Likes
16
Share


@Yoguibreeder
Follow
Al final se están recuperando de ese estiramiento en crecimiento! Espero que en 2 semanas más podamos ver ya fotos en condiciones de estas variedades de barneys

Likes
4
Share


@KannaGrowing
Follow
Ya estamos en plena floración y con las luminarias a max potencia... Evidentemente el aire acondicionado también está trabajando durante la fase de encendido.
Flowa-Bloom es la estrella de los nutrientes a incorporar, pero todos son importantes... Así que sigo la tabla de fertilización de JUJU Royal al pie de la letra.
Eso si, primero humedezco bien el sustrato con agua, para aprovechar bien la solución con los nutrientes y que no filtre por las macetas textiles.
Riego cada cuatro días.


Likes
26
Share


@Melloganja
Follow
The plantas get a little bit struck, I don't know what's going on, I will start a new phase off fertilizer from advanced nutrients.
Likes
14
Share


@Lushbloomz
Follow
She's done! Whew! I can say that this wasn't my easiest grow. She had some issues in the beginning, due to over fertilizing (see diary) but she managed to produce some beautiful crystallized nuggets. I flushed her for a week but she looked so ready, and she's so loud, I had to chop her down.
Stay tuned for the smoke report.