
Likes
Comments
Share


@CHILLING_RACOONS
Follow
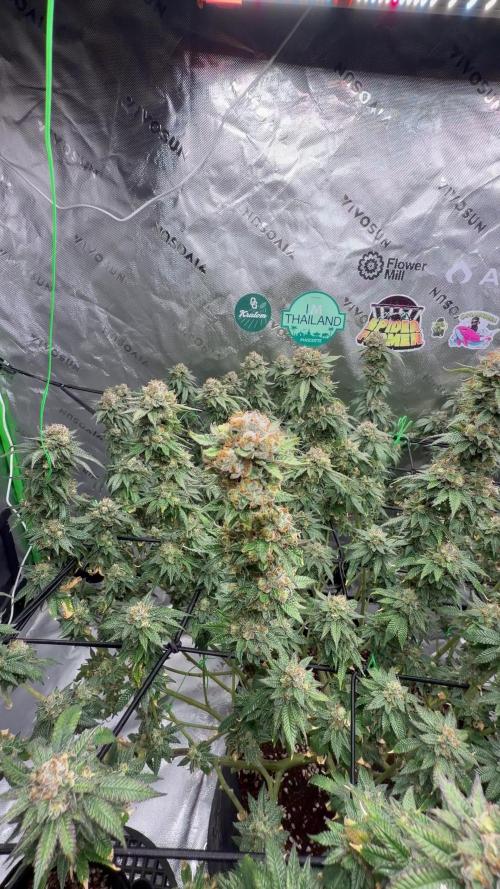
✅WEEK NOTES: 20/01 LIGHTS OFF! Some days in the dark and cold box are great to increase flavors and potency
✅ 🌱GERMINATION🌱 01/10/2023 SEED IN THE SOIL 03/10/2023
🔝 10th NOVEMBER 1st FLOWERING DAY🔝
🔝 10° FLOWERING WEEK🔝
📅20/01/2023 LIGHTS OFF 📅
💡💡💡Viparspectra xs2000 at 75% Power + QUANTUM BOARD AT 75% POWER💡💡💡
💉🔍Fertilization schedule:🔍💉
ONLY PLAIN WATER
🧐 🤓 Alien OG DATA SHEET 🧐 🤓
• THC%:Over 25%
• Flowering Time:8-10 Weeks
• Outdoor harvest:Early October
• Yield:400-500gr/m²
• Indica/Sativa:Indica Dominant
• Height:Medium: 100cm-180cm
• Difficulty:Medium
• Climate:Tropical, Sub Tropical, Warm
• Medical Conditions:Anxiety, Arthritis, Insomnia, Migraine, Pain, PTSD, Stress
• Seed Type:Feminized
• Genetics:Alien Kush x Tahoe OG Kush
• Effects:Calming, Relaxing, Uplifting
• Taste:Herbal, Peppery, Citrus
• Terpene:Limonene , Myrcene , Beta-Caryophyllene
💸💸💸💸💸 Buy ALIEN OG FEMINIZED BY MSNL: https://www.marijuana-seeds.nl/alien-og-feminized-seeds
_______________________________________________________________________
🔧💡OUR SET UP FOR THIS GROW CYCLE💡🔧
✔️ 💲💲💲VIPARSPECTRA 🚀🚀🚀🌕🌕
ViparSpectra®️ XS2000 240W Infrared Full Spectrum LED Grow Light:
Excellent ratio between wattage and ppfd, excellent light penetraton, perfect light spectrum (it also has IR 🤩) and it has the best build quality on the market. You can touch that quality. Materials are really strong, excellent driver and the best leds on the market. Heat dissipation is perfect, the lamp is never too hot and it has a passive dissipator so you will have zero noise. It also has IP65 certification. I like that this lamp is bigger than others, so the 240w of power are well distribuited on the space. Viparspectra has an awesome customer service, and shipping was incredibly fast!
This awesome brand also offers 3 years warranty.
This lamp has no rivals.
A special thanks Viparspectra ❤️❤️❤️❤️
HERE YOU CAN BUY THIS PROFESSIONAL LIGHT: https://www.viparspectra.com/products/xs-series-xs2000 or https://amzn.to/3dyUoJl
and here you can buy other awesome stuff: https://www.viparspectra.com
💣Quantum board - 480w - 4x120w Boards
Samsung LM301B 288 led/board 3000K 0dB noise
+24led/board led Osram 660nm
Efficiency 2.6 umol/J 220 lm/w
Driver: Meanwell HLG-480H-36B
-ESTRACTION FAN:
Blauberg 125 Turbo Pro Series
Maximum air flow: 430-560 m³ / h 50W 32-44 dBA
💊💉💊FEEDINGS
TOP CROP:
-DEEPER UNDERGROUND: to stimulate roots system
-TOP VEG: for an excellent growth in the vegetative phase
-GREEN EXPLOSION: to promote creation of bud sites and to allow a faster growth
-MICRO VITA: bacterias for equilibrate the soil and to make the plant healty
-BIG ONE: to stimulate bud sites and to stimulate resin production
-TOP BLOOM: to achieve excellent big and hard buds
-TOP CANDY: to feed the buds with molasses for a tastier smoke and to gain weight
-TOP BUD: to enlarge buds and to gain weight
PLAGRON: PK 13-14 to have big and hard buds and to feed plants with lower effort
ADVANCED NUTRIENTS: Sensi Cal-Mag Extra- for cal mag deficiency
GROTEK: CAL MAG for cal mag deficiency
HESI: PowerZyme to clean and balance the soil. It feeds the plant cleaning the soil.
GHE: - Final Part (ex Ripen) accelerate the final flowering phase, dissolves minerals in excess
- Flash Clean to flush the plant and to be sure that all excesses are out from plant and pot
These two products improve A LOT the smoke of our babies
-PURPINATOR to stimulate flavonoids and to have a better taste and smell.
-BIOBIZZ: CAL-MAG, great product to correct deficiencies without Nitrogen!
____________________________________________________________________________________________
🙏❤️ THANK YOU FOR BEING HERE ❤️🙏
Please leave a comment with your opinions, it is very important to us to have a comparison.
If you like our job, tap the weed button and follow us. It will be really appreciated.🙏
We want to thank again everyone that help us in our project. You support us to support our dream. ❤️
SPREAD THE LOVE OF THIS PLANT ALL AROUND THE WORLD
🌿Thank you again🌿
❤️Sweet hugs❤️
👨🌾CHILLING_RACOONS👩🌾


Likes
2
Share


@Leonwiz948
Follow
Buds are starting to put on a little weight now and from now on that’s all these plants will focus on scrofula seems to be perfect

Processing
Likes
8
Share


@Salgeezi
Follow
Found these seeds helping my boss trim his outdoor plants. He had clones and unsure of the 3 diff strains. All we know is there something to do with kush.
Anyways I decided to start up a few and hopefully be successful with at least 1 lady to fill my 2x2 tent.
I think I will try main-lining with the 1 lady. Never had the guts to try it on 4 plants so this is the perfect opportunity.
I am currently using a No name blurple light I had lying around. Going to build a bridgelux led custom light for it soon. Just need to order a driver and a few strips
EC is at 0.4 this week. Don't remember the numbers for amount of nutes used
Likes
17
Share


@ganzigunnu
Follow
its growing very well not much nutrients so far.
there is another thing that i couldnt mention last week. its not legal to grow in my country. there was a police operation that aims people who buy growing equipment. i was lucky but i decided to move my tent to somewhere else and everything related to it. found an old guy who gave me a spare room to grow and i visit him everyday. its going nice.


Likes
42
Share


@Ukfarmer420
Follow
Hi guys
Within 48 hours all 3 broke the soil, just waiting on the blackberry moonrock to make a appearance.
Not much to say at the moment but ill keep you updated on the blackberry moonrock from tastebud genetics.
Happy growing gang 💚💪👌
Hey guys so the blackberry moonrock from tastebuds has decided to pop out the soil today 😀 so 4 out of 4 the freebie was a late starter lol.
Its ment to be a 33% thc indica so hopefully i can hit the high 20z.
Happy growing guys 💚👌


Likes
7
Share


@Ninjabuds
Follow
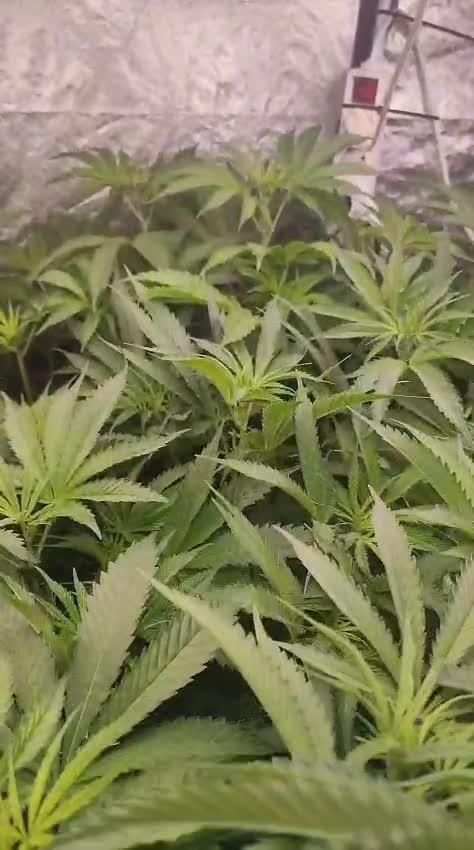
My Runtz plant is a sturdy one! It's got thick, strong branches and robust leaves, like it could handle anything. I bet this one would thrive outdoors. The leaves are a beautiful deep green, almost velvety. This plant just radiates health and vigor. I'm excited to see how it develops!
This past week has been a whirlwind of work, leaving little time for anything else. My phone's camera roll is sadly neglected, with only a few snapshots to show for it. But finally, I'm finding a moment to catch up on my grow diaries. It's been exciting to see the progress, even if it's just through photos. I'm looking forward to documenting the next stage!

Likes
29
Share


@Drgreenthumb627
Follow
so far its looking healthy and bushy! did some slight bending on branches in order to get more light thru to the bottom budsites. i can’t quite pin down her terpene profile yet, i’m getting pine, citrus and possibly fuel but its not strong

Likes
13
Share


@DaisyNabis
Follow
cada dia mas glotonas mis bellas, estoy aplicando riego casi día por medio, solo una vez a la semana las abono, el resto solo con agua. hice algunos amarres a los tutores ya que están en pleno crecimiento
Likes
27
Share


@Stealthman
Follow
The demo clips show how the nutrient and air supply are being delivered to the root zone. After the flooding of the root zone to the top of the container, the pump turns "off" and the nutrient solution simply drains back down the supply pipe and out of the pump intake, which in effect, has now has become the outlet :)
Likes
22
Share


@Rangaku
Follow
Good growth on the wedding glue , not quite ready to be tied down but she’s next on the list prolly at the end of the week . She was transplanted again into her forever home looking to double her size again the coming week . Life’s good .
Likes
9
Share

@Fyno_TH
Follow
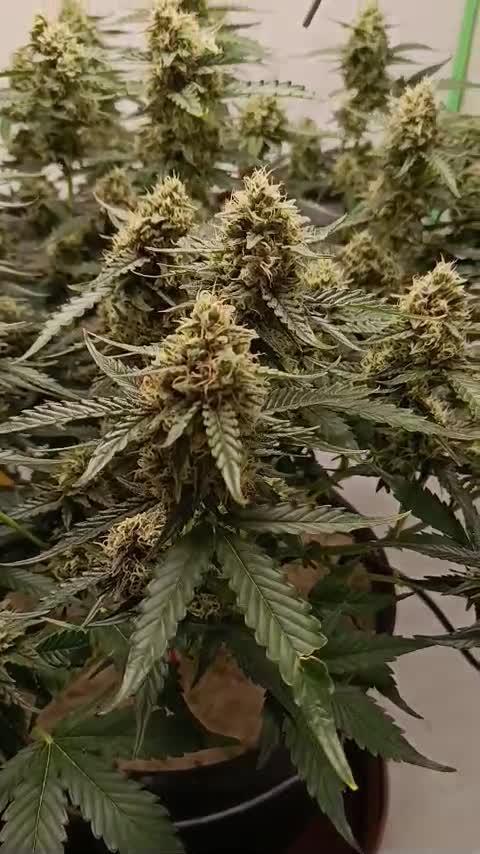
🌸 Flowering Week 7 — Frost Incoming! ❄️🔥
Short update this week — but the Queen is really starting to shine. Buds are swelling fast, stacking beautifully, and the first layer of frost is officially here. Trichomes are popping everywhere under the light ✨🌿
Aroma also kicked up a level… sweet, citrusy and loud every time I open the tent.
She’s drinking well, holding strong, and no signs of stress at all.
If she keeps building like this, the last few weeks are going to be crazy


Likes
4
Share


@Crusty_Juggler
Follow
60x60 cm tent in a 1920's peek-in-closet
Oversized vent for silence
High power DIY LED
True SoG 12/12 from seed with 15 plants in 2L pots
Watering all plants in bottom tray with 30% of total pot size (10L)
WEEK 1
DAY 1 - Germinated in paper towel
DAY 3 - Planted into pots + Lights ON at 125w
DAY 5 - All plants have broken soil
DAY 7 - Slight stretch - Light at 185w
WEEK 2
Two of the Iced Out are lagging behind, others are on point - I'm trying to push light and nutes to the max.
Extraction fan (AC infinity Cloudline T6) on level 2.
DAY 13 - First full watering (10L) with 20 ml Canna Terra Vega
DAY 14 - Circulation fan turned on (low) during lights on
WEEK 3
Good growth, two Iced Out still lagging
DAY 18 - Light at 225w, Extraction fan on level 3 during lights on
DAY 20 - 2nd watering, 8L with 30ml Vega + Light at 250w
DAY 21 - On point, mostly :) Could've pushed nutes a bit more from the go
WEEK 4
DAY 24 - So far this week I'm just kicking back and watching them do their thing. The two lagging Iced Outs are trying to catch up.
DAY 26 - Watering 10L with 50 ml Vega (one day too late...) + light on 300w (max)
DAY 28 - 4 weeks from popping the seeds, looking good except for the two Iced Outs, one of them is trying to get with the program, the other... Well, some plants are just pricks.
WEEK 5
I think this is the week we'll see them take off :)
DAY 29 - Plants are starting to show sex, removed 2 Urkle Mints males, the other two are females, the rest are fems so we're down to 13 female plants total with only a single weakling
DAY 29 - Watering 8L with 50ml Vega (shouldn't have been later than today!)
DAY 33 - plants exploded over the last 4 days and most are stretching and starting to flower
DAY 33 - Watering 10L with 60ml Vega (feeding Vega once or twice more then we switch to Flora)
DAY 35 - Just cruisin' 😎


Likes
5
Share

@DoenerToGo
Follow
Hello and welcome to another week of bulking of my Gorilla Cookies Auto by FastBuds.
Her buds are exploding with a fresh fruity and earthy aromas, and her buds ain't getting smaller. Every budsite has a bud that is almost as big as a ping pong ball, they are very compact and reek of resin.
This week i also added another layer of sand, because the fungus knats didn't seem to stop, but now with 1cm of sand it seems realtively peaceful now.
As she is nearing the end i want to give her a good 2-week-finish, by supporting it with finalpart. I prepared her by flushing her with FlashClean beforehand so the soil gets reset so finalpart can take full effect.
Also i lowered the light to give the lady more power. Tomorrow as of day 73 the Controller to my AW400 by Vivosun is arriving, and i will be using that for the last weeks of the Gorilla Cookies, and will be starting the next grow with the AW400 as the main light
There is nothing much to do, just watering her with her nutes, and waiting until she is done. Very good,
Thats it for this week, i hope you enjoyed it, this is going to be one of the last updates of her.
Likes
15
Share


@greenhousegrowgirl
Follow
Mar 7 (day 78): Start of week 12.
Mar 11 (day 82): Chopped plant.
Processing
Likes
3
Share


@kcartel
Follow
The first thing I have to say about this variety is amazing! Very healthy and powerful, it develops quickly and smells good, it surpasses my past cycles in its cultivar which were ultra haze and the current white bubba cycle. Two weeks have passed and I do not plan to fertilize for the properties and minerals contained in the soil, at the moment I think enough. Well, we are waiting for 3 weeks!
Likes
11
Share


@NuttyYeti
Follow
Still looking a little green, I would prefer the leaves to be more faded. I'm gonna give it another week and see how she looks then.

Processing
Likes
7
Share


@Cogollo_eu
Follow
**Encontrarás la traducción a español al final de la descripción**
From/Desde: 22/03/19 || To/Hasta: 28/03/19
From day/Desde día: 29 || To day/Hasta día: 35
You can find the Gorillas Diary here:
** Podéis encontrar el diario de las Gorilla aquí:**
https://growdiaries.com/diaries/25675-makingmoney-with-gorilla-mm-vs-gorilla
-----IMAGES & VIDEOS-----
Video 1:
Exactly the same video as 2 but accelerated +400% to fix it to 1 minute for instagram.
Video 2:
7 days (29~35) TimeLapse, 1 image each 60 secs @ 30 fps
Video 9:
An overview video not as awesome as the music 😂💪
Video 10:
Myself working on the babies, lowering tops, topping & training.
-----WEEK SUMMARY-----
Well, now i'm getting a bit scared as i adventured myself into Photoperiod, high training, full topping... in indoors at once. I feel that plants are going good, but i really don't know what am i doing, and if i'm doing well. Also i don't know how much time should i give them of vegetation stage, because i don't want to eternalize myself with this tent, so i'm planning to leave this upcoming 6th week and maybe the 7th of vegetation, but no more. Anyway they look pretty atm 😻.
-----WATERING CALENDAR-----
24/03/19 - 1.000 ml with all week nutrients @ 0.9 E.C. PH5.8
*****ESPAÑOL*****
-----IMÁGENES & VÍDEOS-----
Vídeo 1:
TimeLapse, exactamente el mismo vídeo que el 2 pero acelerado a un poco más del 300% para ajustarlo a 1 minuto para Instagram.
Vídeo 2:
7 días (29~35) TimeLapse, 1 imagen cada 60 segundos @ 30 fps.
Vídeo 9:
Un vídeo general no tan increíble como la música de fondo 😂💪.
Video 10:
Yo trabajando en las pequeñas, rebajando las alturas, haciendo topping y entrenando.
-----SUMARIO SEMANAL-----
Bueno, ahora estoy empezando a estar asustado. Me he aventurado a probar con fotodependientes, entrenamiento fuerte y super topping, todo a la vez. Siento que las plantas van bien, pero realmente no se lo que estoy haciendo ni si lo estoy haciendo bien. También tengo dudas sobre cuento tiempo más dejarlas en estado vegetativo ya que no me quiero eternizar con este armario. Por lo que estoy planeando dejar esta sexta semana de crecimiento y quizás una séptima, pero no más. Aun así y con todo, se ven preciosas 😻.
-----CALENDARIO DE RIEGO-----
24/03/19 - 1.000 ml con todos los nutrientes semanales @ 0.9 E.C. PH5.8
