
Likes
Comments
Share


@MistaOC
Follow
It's been more than ten years since my last grow. Back then it was still old school under 600W NDL. I'm curious what the difference is compared to LED. Have fun with my first report.
——————————————————————
02.02.2024: Germination in a paper towel with RO water and 0,75g/L BioEnhancer - Greenhouse Feeding
——————————————————————
03.02.2024: Unfortunately, I've already made a mistake. Only three out of four seeds germinated. I have now added the fifth seed. On the next grow I will germinate five directly and continue growing with the best four.
Three germinated seeds planted in 0.4L pots.
Biobizz Lightmix Soil
1L RO Water (026ppm)
0,75g Bio Enhancer
6,9 PH
Pot with Soil 110g
Pot with Soil and 60ml Water 160g
temperature: 21,6 *C- 24,7 *C
humidity: 72,6% - 80,1%
humidifier settings: 85%
Light intensity: 25%
——————————————————————
06.02.2024: Not much is happening at the moment. The plants are currently forming roots and growing slowly.
Today I planted the fifth seed in a 0.4L pot.
Let's see if there's anything else to come.
——————————————————————
08.02.2024: The plants are slowly getting bigger and they were watered for the first time after planting.
The pot only weighed 130g and I poured it back to 160g.
The fourth or fifth seed is now germinating!
Now things can continue as planned.
——————————————————————
09.02.2024: Day 6 - I think the plants look very healthy. From the looks of it, the latecomer is doing well too. Feel free to write feedback in the comments.
——————————————————————
10.02.2024: A week is over. The ladies looking great.
——————————————————————

Likes
8
Share

@Antarctic
Follow
24.07.2025 – 30.07.2025
🌸 Week 2 Flower — Stretch still going strong! 🌸
Plants are now in their second week of 12/12. Stretch is at full power 🚀 — some shoots almost doubled in size compared to last week. Bud sites are becoming more visible and small pistils are showing everywhere 🧡.
This week I slightly increased the nutrient strength (EC ~1.6–1.7 / 850–950 ppm), adding more bloom nutrients and boosters while keeping a bit of nitrogen for the last phase of vegetative growth.
🌡️ Environment stayed steady: 27°C day / 20°C night, 60–65% RH — exactly where I want it for VPD balance.
🌿 Aroma is starting to appear when I open the tent — a sweet/fruity smell, and trichomes are spreading onto the leaves ✨.
Mistake from last week (using IR too early) is now more obvious — plants stretched more than I wanted 😅. But it’s still manageable with training & airflow.
👉 From here on, I’ll slowly reduce the nitrogen and fully switch to bloom nutrition. Next week should be the true start of flower stacking.

Likes
22
Share


@DeepRootsGrowTrees
Follow
GSC BY KANNABIA
WEEK #18 March 15th-22nd
Week #8 Flower
This week she is looking good. Buds continue to gain weight with a tight bud structure that is covered with trichomes.

Likes
422
Share


@Crashoverite
Follow
Hi all🧑🌾
Welcome to my final 🍌💜👊 week update.
First of all. I would like to thank you all for such an amazing support on this bananas journey. I am amazed of the amount of love received from community here. Thank you Grow Diaries and Fastbuds for opportuniy to share and grow this amazing genetics. Love you all❤️💜💚
Was looking for strong indica dominant strain and after reading and hearing so much about this one. Just couldn't resist to not give a go. Was a bit worried before planting seeds that my final yield outcome may not be satisactionary as only have 0.26msq and Fastbuds advertising this strain as 450-550g msq but thankfuly my result was way above this scale.
My 2 beautiful ladies
Athena - right corner lady. She was slighlthly more dominant over entire grow cycle. She got more space on scrog earlier and that's why she developed the most.
Xena - left corner lady, I belive that she could outgrew her sister if she just have more space and another week of time. Did not expect her to turn so well on the end.
Both girls were put in darkness for 48h before chop. Wet trimmed and hang for a week. Daily jars burbing for 10 days and every 2-4 days now.
Weights
Wet trimmed
Athena 870g
Xena 632g
Total 1502g
Dry trimmed
Athena 172g
Xena 147g
Total dry 319g
Bubble hash 6g (37g of trims)
I am very happy with this result.
In my opinion Banana Purple Punch Auto its a masterpiece.
Thank you so much for all the support, likes, follows and comments 🙏❤️💜❤️
Peace and love brother and sisters ✌️💚🧑🌾
Smoke review coming in shortly
Links
https://2fast4buds.com/seeds/banana-purple-punch-auto
https://plagron.com
https://www.biobizz.com/
https://fishheadfarms.com/

Likes
Comments
Share


@eldruida_lamota
Follow
Vamos familia, actualizamos la octava semana de floración de esta Amaretto Tarmac de Seedstockers.
Empezamos abonando ya con varios productos de la gama Agrobeta para la floración.
Temperatura y humedad dentro de los rangos correctos, 12 horas luz, 12 oscuridad.
Una lástima que de todas solo aguanto una, y en concreto tiene un color espectacular aún así seguiremos con el diario hasta el final.
Agrobeta:
https://www.agrobeta.com/agrobetatiendaonline/36-abonos-canamo
Hasta aquí todo, Buenos humos 💨💨💨

Likes
14
Share


@GRow_M8s
Follow
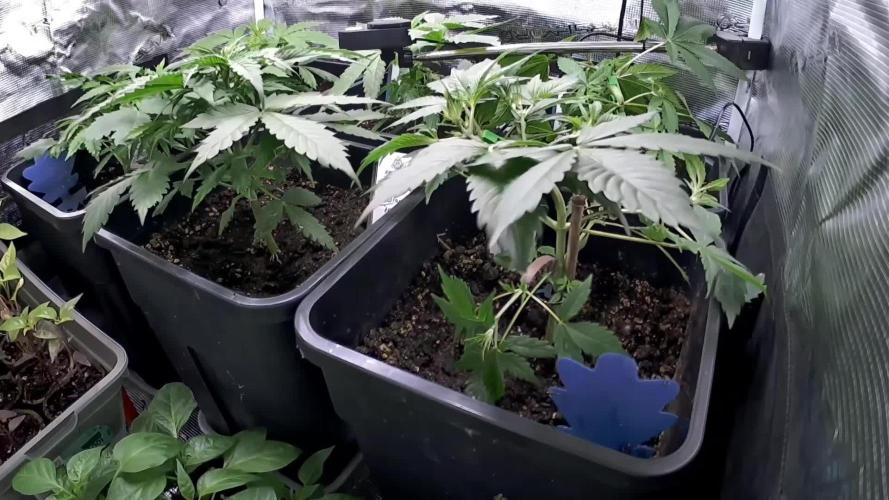
The tent is now set. All plants are transplanted into 11L plastic pots with 75-25% biobizz light and heavy mix, bat guano and mycorrhiza. We added co2 boost ( Boost buddy bag) and carbon filter on the vent system.
We will try to provide more details regarding the ventilation system inside the tent within the next weeks.

Likes
25
Share


@Chubbs
Follow
This beautiful girl got the chop. All I can say is Wow. It went full on beastmode in the Cannpot system which is a self watering pot through a wicker system. The pungent sweet and sour smell, followed by dense colorful flowers it's a growers dream. The total wet weight came to a whopping 1014g. Over all was fun to grow especially watching the flowers swell in the final weeks before harvest. Did very little besides a defoliation and lollipop and started feeding Athena Blended line around week 2. Happy Growing.


Likes
5
Share


@Andres
Follow
..We will see what she offers outdoor ... starting the fall ... with previous crops in the fall winter ... they are not very productive harvests ... so I will help them grow. If it were summer ... thanks royal queen ....

Likes
36
Share


@Ganjagrandaddy
Follow
Welcome to my Fast Buds sponsored shootout and living organic soil v coco side by side. I also plan to use this grow to my full advantage regarding a few age old nagging questions about methods.
I have had a keen interest in L.O.S ( supersoil) since reading a few threads a while back on how amazing and productive it can be. After too much research and procrastinating I had to give it a go. I have been a decades coco/nft grower and recently threw my hat in the rdwc ring too. I have avoided soil due to the overwatering worry ( heavy handed chimp brain !) and the best potting soil/feeds. Catching up on the advances in indoor soil gardening and organics led me too subcools supersoil recipes to name a few but being a town dweller with farms everywhere around me still drew blanks on a lot of the ingredients needed and where the hell I could even begin to get them from. Thankfully , commercial savvy has now made buying it in ready to use and with a full range of beneficial bacteria ect available in amendments from a grow shop here in the uk. ecothrive have realised the potential for us to dive into this medium with all the mixing , measuring and resourcing. I bit the bullet and £150 later I now have 4 x37Litre pots that will be used for as long as I want to feed the soil for without EVER needing nutrients again potentially. The coco has also had charge mixed in to encourage the bennies to colonize there too. I will be using the shogun nutes that I know do the business with coco to compare with for yield , growth and taste.
I have 3 seeds each of 4 Fast Buds Strains to use as a control for the grow and am journaling each strain in their own diaries. This statement will be used to start each one as the information is identical at this point but following this I will do them individually.
I am now starting their second week since opening the seed packets , straight into soaked and shook root riot cubes and into the heated propagator. They had all showed their heads by end of day 3 and a couple needed helmet surgery to open up without being hindered . I have has them in the prop for a few days but they needed to get settled as they were popping roots out all over the cubes. They have now been in their final pots for 2 days complete and starting their 3rd today at day 8 since planting in cubes. I am impressed with the speed and success of these girls already (12 of 13 germinated) . Well done fast buds.
So here we go folks , any comments , ideas ,questions , advice are always welcome and I hope we can have some fun experimenting with defol v non defol , topping v fimming v bending and any other curiosities along the way. I plan on using a quadline for them all to keep a control for the comparisons too.
Be green folks
Welcome aboard and a huge thank you to Fast Buds for the opportunity to try autos.


Likes
48
Share


@TheCannaProphet
Follow
~ WEDDING CHEESECAKE FAST FLOWER by FastBuds ~
Well fam, here we go again with another epic strain from FastBuds Fast Flowering stable. After having such tremendous success growing their Gorilla Cookies Fast Flower outdoors last year, I've decided to run another of their fast flowering strains outdoors this year... Wedding Cheesecake Fast Flower!
The best description of this awesome cultivar comes directly from my friends at FastBuds which is as follows:
"A delight for the mind and body: Wedding Cheesecake FF (Fast-Flowering) is a delicious strain that offers XXL yields in a 7-8 weeks flowering cycle. This terpene powerhouse produces loads and loads of mouth-watering vanilla-creamy-cookie-scented terps with hints of citrus and cinnamon. In addition to its delicious aromas, this variety grows very well in both indoor and outdoor setups, yielding up to 650 g/m2 without extra maintenance, making it the ideal strain for beginners as it allows you to maximize yields while minimizing work. This super-fast feminized photoperiod version offers upbeat and energetic yet deeply relaxing effects that are perfect for consumers looking for a heavily focused, motivating, and creative high. It’s the ideal strain for those needing that extra energy boost to start a busy day on the right foot.
Wedding Cheesecake FF boasts chunky, large-sized buds with a thick layer of silvery-white resin and bright orange hairs scattered all over: that just screams ‘quality’. The lime-green flowers sparkle with an array of hues ranging from dark to light green, to magenta and purple, and reek of a delicious aroma that’ll remind you of fresh store-bought cheesecake.
This is an XXL hybrid that grows extremely tall in height, reaching up to 3m with one huge main cola and multiple long side branches that can withstand enormous yields of up to 650 g/m2 with ease. Wedding Cheesecake FF is extremely resilient to the elements and can be grown in almost every climate as long as you’ve got the space and basics covered, making her an excellent choice for those looking for large-scale harvests with a quick turnaround time without much effort."
________________________________________________________________________________________________________________________________________________________________________________________________________________________________________________________________________________________________________________________
The Setup:
This is going to be an outdoor grow, but I have started the Wedding Cheesecake FF indoors as our weather is still too cold to put her outside (nighttime temp's dipping regularly into the 30's℉).
The plan is simple... let her grow inside under a 19/5 light schedule until the nighttime temperatures stay above the mid 40's℉, at which point she'll be moved outside and transplanted into the soil which I have already setup and inoculated with beneficial microbes, and then let the fun begin!🤪💚
________________________________________________________________________________________________________________________________________________________________________________________________________________________________________________________________________________________________________________________
Weekly Updates:
9/14- Here we go into the sixth week of flower for the Wedding Cheesecake Fast Flower by FastBuds and she's on a mission! The Wedding Cheesecake FF is going strong and is continuing to stack her frosty flowers. She also now has a very pronounced 'cheesy' aroma coming off of her!
9/16- My daily routine of watering, removing dead foliage and checking over the flowers continues.
9/18- I'm checking the trichomes on the Wedding Cheesecake FF every other day now to try and dial in the harvest time for this beast.
9/20- I checked the Wedding Cheesecake Fast Flower's trichomes today and they are getting super close to ideal so I will be keeping a close eye on them and anticipate her being ready to harvest within a week!
Week 6 is on the books and the Wedding Cheesecake FF is just about finished up. Next week is looking to be 'the one' for this incredible cultivar from FastBuds, I hope to see you there!
Thank you for checking out my diary, your positive comments and support make it all worthwhile! 💚Growers Love!💚😎🙏
Likes
34
Share


@Dunk_Junk
Follow
Day 105- her last day on earth. I thank her for what she is about to give us. I saw scattered amber trichomes so decided it was time.
I am very excited about this harvest. I think she is going to be top quality. Her flowers are dense, heavy and large 😍
What a pleasure she has been this far. Give her plenty of light, a big pot, don't overdo it on the nutrients and this is what she gives me. I didn't even train her at all! The wires are to support her branches before they snapped off due to weight.

Likes
12
Share


@mandragore
Follow
Hi guys!
I have grown strains from Zamnesia quite a lot time, but this one was the highest yielder from them.
literally I have no words for this yield. The tent was 1 square meter and she was alone.
Did not smoke a lot from them becouse I want to give a long cure, but what I have tried was amazing.
I did the harvest in 2 parts. During the grow I had Mold attack becouse of the size of the buds and the humidity of the grow room. And the loss was almost 50g :((
First: 370g
Second: 100g
Likes
25
Share


@Doubleb84
Follow
Fantastic week! Frosting up and packing on some weight!! She’s so pretty 😍
Likes
10
Share


@GrowLowAuto
Follow
Continuing to water every other day/when dry. Watered with Real Growers Recharge on 5/12/22. New 200w led grow light came in and is looking great!
Likes
6
Share


@DRO420
Follow
Doing good after the transfer to a bigger medium. No nutrients for 2 weeks since the soil is very rich in nutrients.


Likes
16
Share


@Bigbankbossshit
Follow
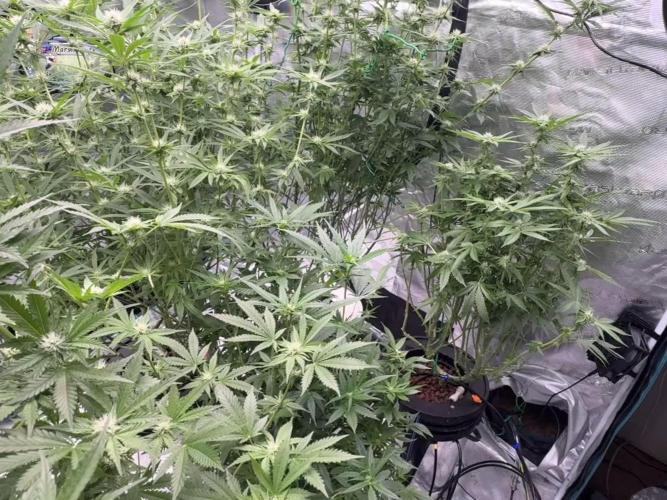
I’m very satisfied with my grow. Next week will be my final week of veg then I will be flipping to 12-12 very excited and I will also start setting up my trellis net. These girl are about to take off 🚀🚀🚀


Likes
8
Share

@Webacca
Follow
Langsam sieht das aus, wie ein Canna Anbau. Sehr fein
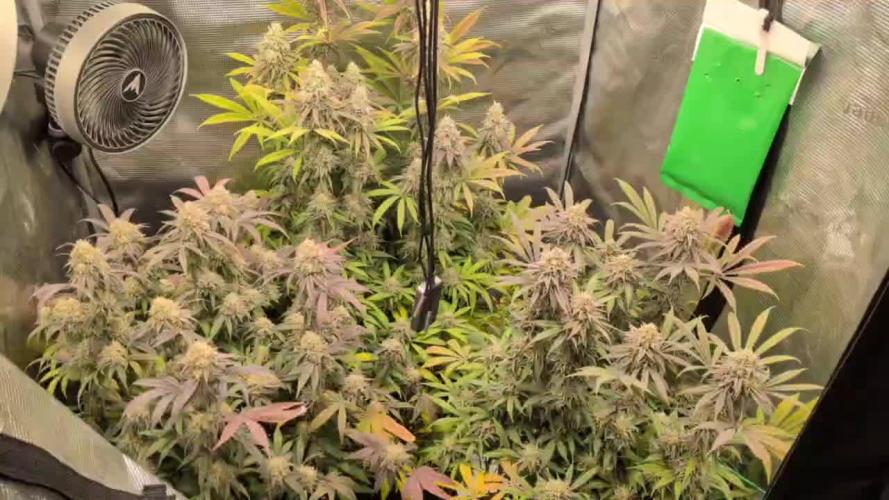
Alle Damen wachsen gut, die ersten Anzeichen einer Blütenphase zeigen sich. Recht schöne Farben in den Blättern... Alles gut.
Uuuund es beginnt zu duften.
Darf mMn gern so bleiben
Zeitraffer der letzten Woche, heute mit Rucklern, am Ende der Bildreihe. Liegt am Arbeiten im Zelt, wo ich an die Kamera gestoßen bin und das Bild sich verstellt hat.
