The Grow Awards 2026 🏆 


Likes
Comments
Share
@Wicket
Follow
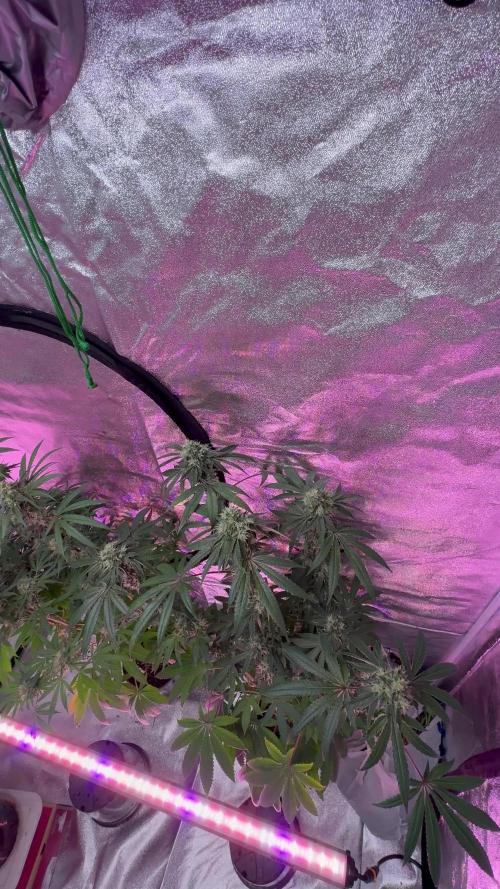
RG #1: 51,11 Grams
RG #2: 61,82 Grams
RG #3: 42,96 Grams
155,89g and 300 Watt used in total. I also had the SQ #1 in my tent, with that one it's 196,87g total and i smoked some already while it was drying like i think maybe 20g, so keep that in mind.
I hope the harvest will hold up until my next run and that i can top the results with my next run by a lot, i really want to get closer to 300g total.
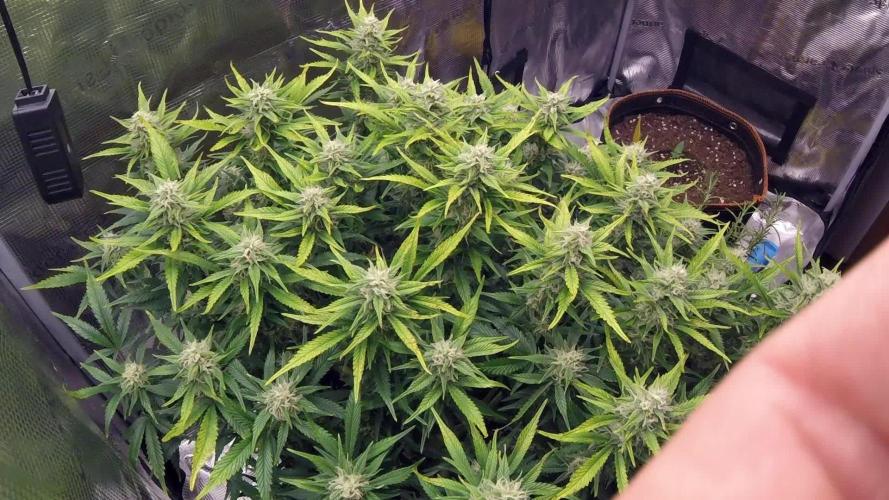
It has been pretty much exact 4 Months from germination to putting everything into the jars.
I know it has been my first grow and i did some mistakes, but still im not very happy with the results after all that invested time and effort.
Not enough yield, i expected to get more out of it with 300 Watts and even if it the weed me really high, the strain has many problems in my opinion.
Sadly i let it dry for too long. Everyday i checked the stems and if they will break of still bend and sadly it seems like this method isn't really useful. I should have started way earlier to cut everything down and put it into jars. So its still ok but too dry,
Without Boveda Packs i get like 45-50% Humidity in the jars, the Boveda Packs raise it up slowly to like 60% but i think this will hurt the end result when it comes to taste and smell, curing will be not happening or be very slow because of my mistake.
When it comes to seeds, i did found like 30 more in total, most on sq1 and rq2 but it seems like sadly all got some. Its really not much more left of them and i think it was just one pollen sac which opened somewhere. Haven't found it even after cutting all down.
This was my first trim job and i did it all on my own, i did like 1 1/2 plants on one day, like 12 hours with some smoke breaks in between. It was hell.
Besides the weed i also got 4 packs of trim which i will use to make some butter and some dry sift from my trim tray.

Likes
4
Share
@Ninjabuds
Follow
My new grow pros solutions under canopy lights are really making the colors pop
Black Cherry Gushers is a strain that's sure to turn heads. The buds are round and dense, like little nuggets of pure fire. And the trichome coverage? Absolutely insane! This plant is a frosty wonderland, begging to be admired. It's a testament to the grower's skill and the plant's incredible genetics.


Likes
96
Share
@Tonino
Follow
What can I say about this one she’s my pride and joy she’s got so much buds growing on her it’s amazing I just hope that in the next couple of weeks they will swell and fatten up besides that I couldn’t be happier she’s got a beautiful fruity smell and an amazing frosting I’m planning to feed her for another two weeks And then will start flushing
Description
Candida (CD-1) has the highest CBD and lowest THC content of any strain currently available on the seed market. It was named after the founder of Medical Marijuana Genetics’ late mother and means ‘bright light’ in Latin.
Our Laboratory results show CBD levels of between 20.6% and 10.9% CBD with THC levels rising with higher CBD levels - but never passing 1% THC. The balance between CBD and THC remains more consistent than any similar strain.
With these ratios of CBD to THC, the anti-psychotic capabilities of the higher levels of CBD outweigh the relatively small amounts of THC, and effectively remove the "high", psychological effect, ensuring a non-psychoactive cannabis plant.
Candida can be grown both indoors and outdoors. It is recommended for all environments and grow-media and has a unique lemon flavour and aroma that compliments its medicinal properties. CD-1 will flourish in any climate. It has impressed many with its highly vigorous early growth
Candida will noticeably produce two different phenotypes; a sativa and an indica. Initial research has suggested that the sativa phenotype will produce lower, whispier yields often associated with sativa strains. We have noticed to date that the sativa pheno produces higher CBD counts. In comparison, the indica pheno will produce bigger, denser yields with lower CBD levels but still with significant CBD content. It is recommended to give good care to the sativa phenos as these can be harder to manage and will have larger distances between the internodes making the plants more vulnerable.
Generally, the sativa pheno is better suited to making extractions than to smoking and vaping, whilst the indica pheno is suitable for all.
Characteristics
BREEDER/BRAND Medical Marijuana Genetics
GENETICS ACDC x Harlequin
VARIETY Indica / Sativa
FLOWERING TYPE Photoperiod
SEX Feminised
THC CONTENT 0.3%-0.9%
CBD CONTENT 10.6%-20.6%
YIELD 400 gr/m2
GROWS Greenhouse, Indoors, Outdoors
FLOWERING TIME 9 weeks
MEDICAL CONDITIONS ADD/ADHD, Anorexia, Anxiety, Autism, Depression, Epilepsy, Inflammation, Seizures, Stress
MEDICINAL PROPERTIES Depression, ADHD, Anorexia, Epilepsy, Autism, Anxiety, Inflammation, Seizures, Stress.
AWARDS 2nd place CBD category. Spannabis Champions Cup Madrid 2017

Likes
16
Share
@Roundhouse
Follow
Very strong weed
I am curing right now so when I tried it the taste was not good
But the smell is exactly as advertised And it’s very strong 💪
First time I try Barney’s farm and they were great no complaints I would grow orange sherbet again.
I will update in a month about taste I’m sure it will be killer
Thanks for stopping in.

Likes
10
Share
@HideAndFly420
Follow
Day 64 my baby is going really well by now, she s been running fast until now and I think that’s enough with fertiliser. From today o start my flush, I will give today my last dose of regulator and from next irrigation just on controlled water until the end of maturation, I want this baby to eat everything .
day 65 started flushing. ph controlled water at 6.0 i think 20 more days at max before m
Day 68 First check with micro today. The baby looks already milky and amber on the top buds but the rest of the plant is still transparent. I’ll wait at least until this weekend for a re check maybe I’ll cut her in two rounds. As I be been watching a lot with micro I noticed so many dust and other stuff on the buds so I think I’ll wash her in water.
Today watered ph 6.
Let’s see!
🌱🔥🌱🔥🌱🔥🔥
Likes
93
Share
@DreamIT
Follow
Purple Berry Kush by Spliff Seeds
🏜️4.7 Days off
🏜️5.7 🤘🦄
🏜️6.7 excellent recovery, really excellent. @weed__mee what do you think? 😁🤘🦄
🏜️7.7 Cutting done according to manual, contrary to how I act initially. patched up to the third node above and below, I await developments, today irrigated 🤘
🏜️8.7 🤘
🏜️9.7 🦄
🏜️10.7 Why do I always start so late? damn me! i'm really off with the timelines i wanted to adopt. never mind, I'll make up on the next plants worthily 🤘
__________________________________________
❓ Are you new to the world of the cultivation and don't know where to safely buy your seeds?
🦄Fast and anonymous shipping. Take a look at their very nice graphics
✅https://www.spliffseeds.nl
______________________________________________
👀 Are you looking for a good lamp to start with? 👀
🌞Viparspectra has something more than the others, take a look at their site.
⏩ Use "GDVIP" for an extra discount or "ViparDreamIT" for an extra 5 %% discount
👀 Search for it on Amazon
✅Amazon US: https://amzn.to/30xSTVq
✅Amazon Canada: https://amzn.to/38udUVe
✅Viparspectra UE: bit.ly/ViparspectraUE
👀 Watch my ViparSpectra XS1000 unboxing on YouTube, leave a like and write to the channel 🦄
✅http://bit.ly/UnboxingViparSpectraDreamIT
______________________________________________
📷🥇 Follow the best photos on Instagram 🥇📷
https://www.instagram.com/dreamit420/
🔻🔻Leave a comment with your opinion if you pass by here🔻🔻
🤟🦄💚 Thank you and enjoy the growth 💚🦄🤟

Likes
4
Share
@Sowers_Autoflowers
Follow
Even the leaves are black god these purple plants are beautiful


Likes
6
Share
@MxGrow
Follow
<Frisian Duck🦆>
Se inicia germinacion de 3 semillas.
▪️︎El día 7 de Nov 22 en un recipiente con agua purificada..
▪️︎El día 8 de Nov se colocan en toallas húmedas.
▪️︎ El día 10 de Nov 22 se coloca 1 semilla que germino en sustrato.
▪️︎ El día 12 Nov 22 ya creciendo.

Likes
5
Share
@Misterindoor
Follow
Esta semana pasa a floracion y continua la estimulacion con delta 9 y mañana cambia el fotoperiodo a 12 /12


Likes
35
Share
@Pot_Portraits
Follow
Week 6, quick root flash. All going very well the nutrients are at 2.5ml/l now, vita race weekly, bacillus mix.
Plant started to flower properly and the stretch is on its way.
Water at ph 6-6.5.
I always try to keep the bottom clean so I do multiple clean ups of lower leaves and braches every week.
Also doing this focuses the energy of the plant to the top and she doesn't waste time making popcorn buds.
Likes
58
Share
@Mosquito_Haarlem
Follow
Week 7 is begonnen en ze wordt heerlijk verwend.
Ze groeit lekker door, de toppen worden groter en ze ruikt nu al zeer sterk.
Helaas heeft ze wat gele bladpunten gekregen, ik denk dat ik haar overvoed heb en de aptus voeding iets te veel van het goede was, dus vanaf nu geef ik haar alleen nog plagron zoals gewoonlijk.
Ik ben zeer tevreden over de spiderfarmer sf-1000, geen geluid, laag energieverbruik, weinig warmte en intense zonnestralen. Topnotch.
Laten we zien hoe ze zich in week 7 verder weet te ontwikkelen.🧐
Ik zal gedurende de week nog verse foto's updaten. 📷
✌️🏼


Likes
Comments
Share
@Hashcakee
Follow
Going to update a smoke report after drying. Going to do a 3 stage sampling on the cure to find the best time. Small bowl with no cure, small bowl after 1 week cure. If needed, one more test on the 2nd week of curing. Got smaller buds on this one but that is ok. Moreso excited on profile. Going to update the yield tonight
Likes
57
Share
@ClubRiot
Follow
Start week 8 , Bio Bloom 4 ml/L + Sensi Cal-Mag Xtra 2 ml/L + CarboLoad 2 ml/L + Top Max 4 ml/L (Ph 6.7).
Likes
Comments
Share


Likes
3
Share


