The Grow Awards 2026 🏆 


Likes
Comments
Share
@RDWCGrowing
Follow
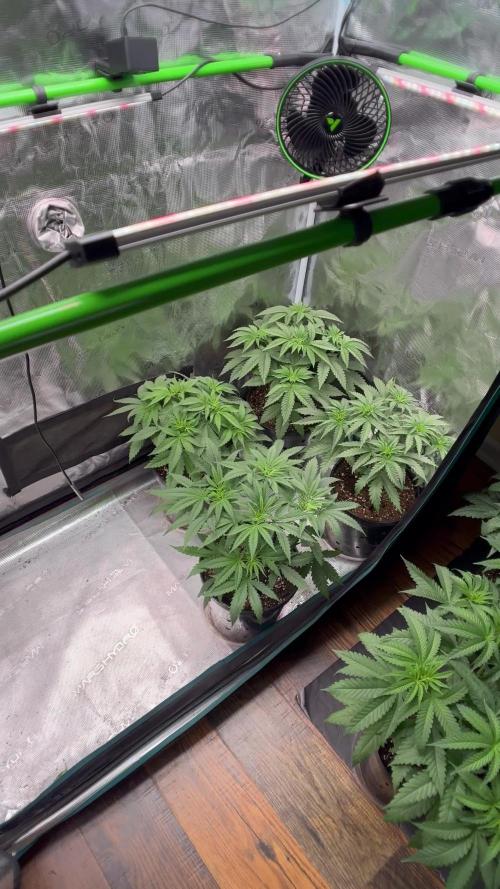
2/17/2024 - Vegetation Week 1 Day 1- I removed some of the water to see where the roots were only one had roots in the water. However I want to go ahead and get them on Week one Nutes So I am over 50 gallons of water in the system so I mixed the Trio at a 1.0mil per Gallon but restricted it to a top of 50 gallons period. I top fed the other two to keep encouraging root growth. I also finished my drying and curing from my last run and wanted to show what it looks like all bagged up and in the cannatrol.
I added the following Nutes:
Silica = .5Mil/Gal= 25Mil
CalMag= .75Mil/Gal= 37.5Mil
FloraMicro = 1Mil/Gal= 50Mil
FloraGro= 1Mil/Gal= 50Mil
FLoraBloom= 1Mil/Gal= 50Mil
ORCA = .5Mil/Gal= 25Mil
EPSOM- 1 big pinch
2/18/2024 - Vegetation Week 1 Day 2- I top fed #1 and #3 since they still don't have roots in the water, I will continue one top feed a day until roots hit water.
2/19/2024 - Vegetation Week 1 Day 3- #3 now has root in the water.. Yay!! I now have #2 and #3 with roots in the water so no top feed for them. I only had to top feed #1 and the only reason I didn't just go ahead and cull her today was I am responsible for breaking her tap root and stunting her, I wasn't careful enough and she was the first to show a good root. In that vain I will carry her a few more day's top feeding but if not root by the end of the week she is getting culled.
2/20/2024 - Vegetation Week 1 Day 4- Today I Ensured the PH is in range, I refilled the Humidifiers, I top fed #1 since the roots are still not in the water. I also removed the humidity shields from #2 and #3 today the ladies were touching the sides so they are done with the extra shields..
2/21/2024 - Vegetation Week 1 Day 5- Today Morning: I Ensured the PH is in range, I refilled the Humidifiers, I top fed #1 since the roots are still not in the water,
Evening: I decided that the roots of the two are looking great so I am going to drain and bump the Nutes to a full Week 1/ Week 2 Nute base.
I added 36 Gallons
I added the following Nutes:
Silica = .5Mil/Gal= 18Mil
CalMag= .75Mil/Gal= 27Mil
FloraMicro = 3Mil/Gal= 108Mil
FloraGro= 2Mil/Gal= 72Mil
FLoraBloom= 2Mil/Gal= 72Mil
ORCA = .5Mil/Gal= 18Mil
2/22/2024 - Vegetation Week 1 Day 6- Today I Ensured the PH was not too high as the system continues to cycle the water and adjust, I refilled the Humidifiers, I top fed #1 since the roots are still not in the water,
2/23/2024 - Vegetation Week 1 Day 7- Still have to Top Feed #1 no roots in the water, however she is still progressing nicely slower than her sisters with roots in the water but still going strong.
Likes
4
Share
@Strife957
Follow
This week was hottt
Record breaking temps wer cooking my girls sooo
I let them out.
I took out their light also (saturday)
I also put green celophane on all the house windows (that dont have blinds) because i dont want the house lights to disrupt their sleep. ( i dont know how sensitive they r )
Next week will be their first full week of flower

Likes
59
Share
@Neo09
Follow
🌌🛸 hey hou,
just putting in all pics from begging till now, cos im really low with the time,.. behind this project is biggest story of my life, not only grow story, its much more behind.. i wish nobody to get such a grow in way as i do,. actually is nothing possitive there and this project i started, cos i lost everthing what in life importnt is. with this project, once, i wanted to give back just a litle bit of that what i got,.. and it still not eneough,. some things you cant buy, you cant pay,.. and you can get back... peace and stay hard, thing about what you decide, think about twice..
Likes
42
Share
@GanjaReaper
Follow
This week I bought some other plants to make sure my neighbourhood doesn't smell like weed when people walk by LOL.
I would really recommend to buy plants like these.
When I open the door to my balcony it now smells different, i don't know for how long since they are not in flowering stage yet, we shall see.
Did some LST and defoliation like I do every week.
Changed plant spots.
This time I had to add more water to my feeding since it is getting hotter outside and my plants take up more because of having more roots and needs.


Likes
30
Share
@dataTwiiix
Follow
Assez fier la bud principales pèse 90g humide :D et l'odeur est lourde dans 10j un smoke report éclairera tout ça !

Likes
16
Share
@Mrg7667
Follow
Fun week! Got to transplant all the babies and i started lst on them to get some more lateral growth and better yeilds!
No problems when transplanting roots looked good, you could tell that some had way more roots then others not sure if thats due to light positions or if its just genetics
Its interesting because as far as general growth the Chocolate Marshmallow has was more internodal growth and branching, shorter plants but also trained very easily. As in stems where not too stiff but stiff enough that after the first trainung they pretty much stayed in place with minor adjustments needed the Double Ds on the other hand grew very tall with little to no horizontal growth and very large internodal spacing! And as far as training goes these stems where stiff and rock hard had a couple LST turn into HST or slight super cropping because i was a little too aggressive too quick!
One DD had a top half snap practically all the way off but i just taped it up and lst the plant to lean into the break and it is doing just fine!

Likes
10
Share
@eldruida_lamota
Follow
Que pasa familia, volvemos actualizar , va, última semana de crecimiento que las pasaré a floración esta próxima semana, han recuperado genial de la carencia de nitrógeno y el trasplante, parecía que no querían tirar pero vaya estirón han dado esta semana.
Subí un poco los nutrientes , seguimos aportando lo básico de advanced nutrients, me encantaría volver a cultivar con Agrobeta que dan unos resultados increíbles también pero es lo que hay.
Practique una poda de bajos, también me parece importante para fomentar en la floración las flores arriba y no abajo que las flores bajeras no nos dan mucho.
Hasta ahora es todo espero que no surjan más imprevistos como el trasplante o las carencias. Buenos humos familia 💨💨
Likes
55
Share
@Mr_und_Ms_Lue_Roots
Follow
Hallo und herzlich willkommen am Anfang der 2ten Blütenwoche
Einiges viel zum Wochenende an. Darunter viel, dass wir eine große Population an Trauermücken durch eine Nematoden- Kur und Gelb wie auch Blautafeln in den Griff bekommen mussten. Bisher obwohl wir es auch schon mal erwähnten, haben wir bis hierher von dem Neemöl- Extrakt noch nichts verwendet, da die Pflanzen ohnehin schon zu dem Zeitpunkt arg angeschlagen waren. Dahingehend haben sie sich alle gut erholt.
Da unsere Liter Vorräte an Dünger nun doch kurz vor Ende nicht mehr alle samt top waren, sind wir jetzt auf das JU JU Royal Programm von Biobizz umgestiegen.
Was soll man sagen, wenn man wem Vertrauen kann auf dieser Ebene, dann sicher Julian Marley 😇
Gestern Abend dann haben wir das Lollipopping unter der Voraussetzung Sauberes bzw. Desinfiziertes Arbeitswerkzeug wie natürlich auch Handschuhe vollzogen.
Es war jetzt das insgesamt 3te mal das wir sie entlaubt/ gestresst haben. Was aber auch wichtig ist, es tut ihr ja gut und daher verwöhnt man sie auch wieder rum^^
Wir haben ca. 20 % entfernt, alles was Licht abbekommt und Sonnensegel blieben stehen. So ist bewerkstelligt, dass ausreichend Photosynthese betrieben werden kann.
Sie waren alle schon sehr dicht gewachsen und schöner wäre letzte Woche gewesen zu Entlauben um so besser, für Luftzirkulation zu Sorgen und auch die Raumfeuchte runter zubekommen. Dennoch haben wir uns dafür entschieden, den Beschnitt genau zum Übergang in die 2te Blütewoche umzusetzen. Grund dafür auch, den Streck abzuwarten. Jetzt Anfang der 2ten Blütewoche ist die Bildung von Blütenansetzen voll im Gange und schon gut ausgeprägt. Demnach auch der Streck bald Stagnieren.
Gießverhalten, sehr unberechenbar... man kann in die Pötte geben und nächsten Tag sind die Nährstoffe bis auf ein geringes quasi verpufft. In der Regel versuchen wir alle 2 Tage Nährstoffe zu verabreichen, ansonsten Wasser in auch PH angepassten Wasser. Ab der Blütephase fahren wir mit mind. einem PH von 6.5 bis höchstens 6,8
Da wie eben genannt nichts in die Pötte zu bekommen war, haben wir gestern auch mit 1 ml/ L ne leichte Blattdüngung mit Green Mystic vorgenommen. Nur erreichbare Sonnensegel bzw. Blätter wurden besprüht. Andere Blätter darunter bzw. daneben wurde versucht so gut wie möglich abzudecken (Küchentuch).
Ja soweit wäre es jetzt erstmal. Wie immer, hinterher fällt einem immer wieder noch was ein was man sicher Schreiben wollte ;-) Aja Gesternhatten wir dann auch auf 720 Watt umgestellt.
Wir freuen uns auf die kommende Woche und wünsch somit allen Growmies einen tollen Start in die neue Woche!
Vielen Dank auch an alle die vorbeischauen, kommentieren und oder Liken!
VG 👋

Likes
18
Share
@TheGreenLeopard
Follow
Starting to take shape and smell😂 was able to take a fastbuds down this week to help the ramp into harvest. 😂😂 gréât strains - spring is here - on Twitter now @greenleopard420 - all good. Variation if feeding in the tent. Those little fleas still there , nematodes didn’t work so disappointed there.

Likes
24
Share
@DogDoctorOfficial
Follow
🌱 Divine Seeds Week Three Veg Report 🌱
Hey, fellow growers! 🌿✨
Welcome back to our weekly update on the Divine Seeds journey. We’re now into Week Three of the vegetative stage, and our plants are loving their new environment. The Moon Rock, Opium, and Big Demon are thriving after the transplant, and we’re excited to share the latest developments.
🌟 Week Three Highlights 🌟
This week, we plugged in the Autopots and turned them on, letting gravity do its magic. From now on, we’ll rely on the Regulator and CaMg-Boost in the reservoir. Our soil is rich in organic matter and nutrients, so we’re testing if just the organic inputs in the soil, plus CaMg and Regulator, can sustain the entire run. Let’s dive into the details:
1. Moon Rock 🚀
• Growth: Vigorous vertical and lateral growth, with lush, broad leaves.
• Health: The transplant has boosted its vigor, and the plant looks healthier than ever.
• Notes: Moon Rock is showing exceptional adaptability and strength.
2. Opium 🌸
• Growth: Steady and balanced growth with symmetrical leaf development.
• Health: Opium is thriving, with no signs of stress or deficiencies.
• Notes: This plant continues to flourish with grace and beauty.
3. Big Demon 💪
• Growth: Robust and vigorous, with thick stems and expansive leaf growth.
• Health: The transplant has enhanced its already impressive growth.
• Notes: Big Demon remains a powerhouse in our garden.
🌟 Nutrient Strategy 🌟
Our feeding regimen this week focuses on:
• Regulator (0.15ml/L): Helps reduce stress and improves overall plant health by regulating plant processes and enhancing nutrient uptake.
• CaMg-Boost (0.25ml/L): Provides essential calcium and magnesium, preventing deficiencies and supporting strong cell wall development and photosynthesis.
Our rich organic soil is packed with biolife and nutrients, so this experiment will test if these organic inputs, combined with CaMg and Regulator, can sustain the plants through their entire growth cycle.
🌟 LED Lighting and Control System 🌟
To support our plants’ growth, we’re using the Lumatek Zeus 465 Compact Pro LED. Here’s why it’s amazing:
• Efficiency: Provides high light output with low energy consumption, ensuring optimal growth while being energy-efficient.
• Full Spectrum: Delivers a balanced spectrum of light, mimicking natural sunlight to support all stages of plant growth.
• Coverage: The compact design ensures even light distribution across the entire canopy, promoting uniform growth.
We’re also using the TrolMaster Hydro X controller with its impressive 3-in-1 sensor for temperature, humidity, and light detection. This controller allows us to:
• Monitor and Control: Keep precise control over the grow environment, ensuring optimal conditions for our plants.
• Automation: Automate various aspects of the grow room, reducing manual work and improving efficiency.
• Data Insights: Gain valuable insights into environmental conditions, helping us make informed decisions.
🌟 Key Observations 🌟
• Plant Response: The plants have responded exceptionally well to the transplant and nutrient strategy.
• Growth Rate: Significant increase in growth rate, thanks to the balanced environment and nutrient-rich soil.
• Health and Vigor: The plants are healthy, with vibrant foliage and strong structures.
🌱 Next Steps 🌱
As we move into Week Four, our focus will be on:
• Monitoring the Autopots: Ensuring the system runs smoothly and the plants receive consistent moisture.
• Observing Plant Responses: Keeping a close eye on how the plants respond to the nutrient strategy.
• Maintaining Optimal Conditions: Using the Lumatek LED and TrolMaster controller to maintain perfect growing conditions.
Stay tuned for more updates as our Divine Seeds continue to flourish. We’re excited to see the results of this nutrient strategy and share every milestone with you on this incredible journey!
Happy growing, and may your gardens be ever green! 🌿💚
#DivineSeeds #WeekThreeVegReport #AptusHolland #MoonRock #Opium #BigDemon #GrowDiaries #PlantMagic #GreenThumb #Inspiration #LumatekZeus #TrolMasterHydroX
Germination method 🌱 @thecannakan
Genetics
@divine.seeds
Nutrition
@aptusholland 🌿
@aptus_world 🌎
@aptus_es 🌍
@aptusbrasil 🌱
@aptus_thailand 🌿
@aptus_portugal 🌳
@aptususa_officiala 🍀
@aptusplanttechnz 🌺
@aptusplanttechaus 🍃
Ambient controls🎮
@trolmaster.eu @trolmaster.eu.support @trolmaster.support @trolmaster.agro
Soil @promix_growers_eur @promix_cannabis
LED - @lumatekeu
Watering- @autopot_usa @autopot_global
Love and attention- @dogdoctorofficial
#aptus #aptusplanttech #aptusgang #aptusfamily #aptustrueplantscience #inbalancewithnature #trolmaster #trolmastereurope #trolmastersecrets #Autopots
#GreenJoy
As always thank you all for stopping by, for the love and for it all , this journey of mine wold just not be the same without you guys, the love and support is very much appreciated and i fell honored and so joyful with you all in my life 🙏
With true love comes happiness 💚🙏 Always believe in your self and always do things expecting nothing and with an open heart , be a giver and the universe will give back to you in ways you could not even imagine so 💚
More info and complete updates from all my adventures can be found ⬆️link in the profile description ⬆️
Friendly reminder all you see here is pure research and for educational purposes only
💚Growers Love To you All 💚


Likes
3
Share
@Ninjabuds
Follow
My white Runtz plant is definitely the fastest growing plant in the tent. Usually when a plant grows this fast they grow really large and sturdy this plant will most likely be strong enough to be an outdoor plant
It’s day 41 from seed and all of the plants are really thriving

Likes
48
Share
@AsNoriu
Follow
Day 118. Trim jail and heavy upload session for 48 hours at least. Don't like to keep photos, so ill upload each plant separately and will delete them. Phone camera is still cracked and off-focus, but they are all nice !
Day 118. Late night, all girls trimmed !!! Drying starts now ! ;)
Day 121. Everything looks beautifull, took small sample from Runtz .... ---> My morning is waisted, big mistake ;)))
Day 128. #1 88, #2 98, #3 144 of most airy bud i ever grew indoors, for UK outdoors it would be good, here was saddened by end result ... will update everything after good rethought what has happend ...
Happy Growing !!!

Likes
Comments
Share
@Tony2jewerlyseeds
Follow
Las lluvias diarias están empezando a atrofiar mi cultivo en especial las plantas grandes que se les encontró un poco de oidio está semana les pondré un ventilador para controlar o disminuir la humedad igual limpiare toda la área afectada


Likes
11
Share
@Njustice4all87
Follow
Placed directly in soil of fabric pots and hose watered from our well. The water is mineral heavy and alkaline AF may be an issue later?
Likes
16
Share
@eldruida_lamota
Follow
Vamos familia, actualizamos la primera semana de floración de estas Panty Punch de Seedstockers, salieron 3, que van creciendo a buen ritmo y tienen un color espectacular, veremos cómo progresan.
Empezamos añadiendo varios productos de la gama de Agrobeta para la
Floración.
Temperatura y humedad dentro de los rangos correctos.
Ya realizaré el trasplante correspondiente a 7 litros.
Vamos viendo cómo avanzan estas próximas semanas.
Agrobeta:
https://www.agrobeta.com/agrobetatiendaonline/36-abonos-canamo
Hasta aquí todo, Buenos humos 💨💨💨
Likes
3
Share
@PoshGrow
Follow
Welcome to GhostGrow Chapter One by PoshGrow!
🌳 Week #7
4th week of flowering. Somehow didnt documented alot of this week and last one in vids or pics... Need to smoke less i guess 🤦♂️😆
Scrog works perfect, plants are looking amazing and healthy, tought, fast growing.
If you wonder about my home made scrog net, its made from 18mm hot water pvc tube, some screws and rope 😅
Watering when needed, every other watering I used Fox Farm Big Bloom, Grow Big & Tiger Bloom

Likes
Comments
Share
@Chamed33
Follow
Just feed her ph water for the last couples of days I’ll be chopping her down this week due to heat wave in my area ..
wish I could let her go few more days
At this stage she’s releasing nitrogen still

Likes
18
Share
@Pokan187
Follow
This week went by well, I will start checking the trichomes on the Runtz at the end of this week. It should be ready for harvest in the next 2 to 3 weeks
The G13 is still smelling like magic, looking majestic.
The GDP buds are starting to put on weight
