The Grow Awards 2026 🏆 


Likes
10
Share
@sch28
Follow
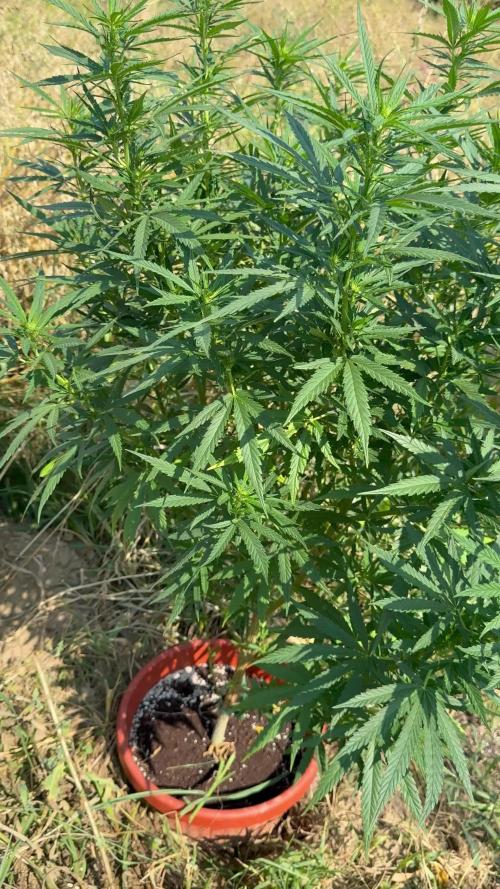
It is slowly coming together for a flower flip 🙏. This is my first photo period grow and I feel that I have learned so much during this grow when it comes to topping, lst, lollipopping and defoliation. Thank you Youtube for that. I am so happy with my 10 main colas now. I will flip to flower (12/12) the 29 th of December.

Likes
10
Share

Likes
44
Share
@Chedderbob112
Follow
Lights are bak on tents 🏕️ bak in action so am Goni need tae hope a don’t get visit dae land lord or coppers so al need tae behave av got a big mouth n always thot send it on now a feel as if a can do without the bad vibes n jealousy that festers amongst so called pals this is ma ting now am just Goni keep smashing the grows until hopefully av got a couple a people a can show the ropes n fire a tent up or we’ve spoke bout doin a full room but need safe place no regrets no. Remorse a believe that growing n smoking cannabis really helps my mental health’ so a don’t believe am doing wrong 😑 n can’t stop won’t stop fuck yer system free the weed peace ✌️ chedderbob112 s2340420 🏴


Likes
12
Share
@GrowGuy97
Follow
Day 35 - Ladies are way taller than I could have ever imagined & starting to get extremely dark pruple😍 make sure to check back for daily updates & happy growing friends✌️🏼🌱

Processing
Likes
42
Share
@Teamdirtbag3
Follow
Blasted a small amount just to see ...💎
Started to chop at 8 weeks
I'm on plant 9 of 19....
🍊🍊🍊🍊🍊🍊🍊🍊🍊 😈
Likes
7
Share
@Radagast_
Follow
07.08.
Blue Sunset Sherbet
Day 100#
The plant was at the end of its fourteenth week two days ago... the crowns started to develop nicely yesterday, and I reckon that it has already entered early flowering, but from the next update I count it as flowering... the plant has not grown since the last update, probably because it focused on the formation of flowers, and I expect it to stretch out in the next 2 to 3 weeks, I hope not too much (it received half a dose of boost, so it shouldn't)
Last night she got her first dose of bloom and boost
Pictures and video are from yesterday
Stay High and Keep Growing!!!

Likes
11
Share
@GoodTimesOrganics
Follow
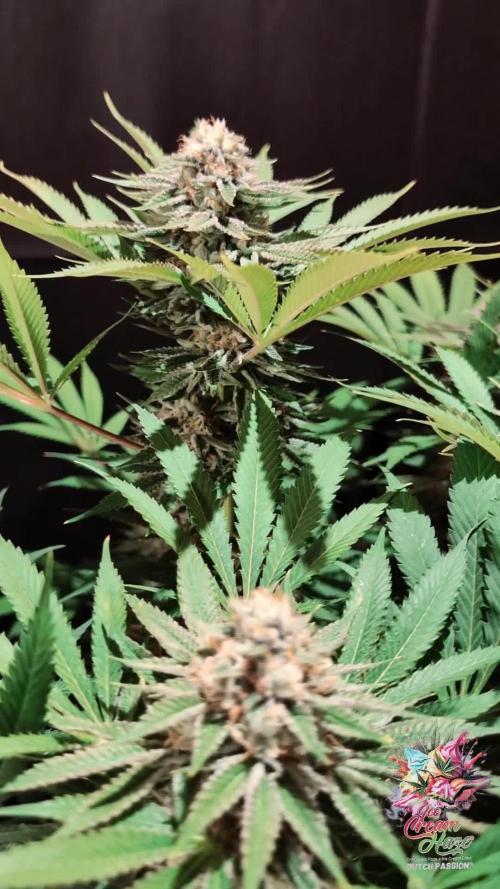
Hi liebe Community! 💚 Nach der sechsten Blütewoche beginnt nun das ausreifen der Pflanze!
Ein Dichter Tepich aus Stigmen überzieht die Blütenansätze und allmählich bekommen die Trichome schon eine milchige Einfärbung.
Es sind bereits auch vereinzelt Bärenstein farbene Trichhomköofe zu sehen. Aber immer mit der Ruhe.
Ich werde die Pflanze nun alle 3 Tage Mal kontrollieren.
Ich möchte auch schauen, dass ich einen großen Anteil an Bärenstein farbigen Trichome raus zuholen um einen etwas gechillteren Effekt zu erzielen.
Die Ice Cream Haze ist eine richtige fast gainerin. Sie scheint insgesamt (auch bei der regulären Version war es so.) sehr schnell fertig zu werden.
Hierzu muss auch gesagt werden dass sich die Blüten sehr rasant entwickeln.
Die Buddichte beträgt nun ca 8 bis 9 cm an der dicksten Stelle.
Insgesamt ist die Pflanze sehr Vital und hat eine sehr schöne und geradlinige Blütenstruktur😉
Sie liefert eine sehr gute Performance ab
Die Wachstumsbedingungen im Growzelt sind weiterhin am Optimum und Stabil:
———————
🌞 Temp: 24,3°C
🌚 Temp: 20 °C
💨 RH: 58%
VPD: 1,21 kPa
😎PPFD: 830 mqm
———————
Stay Tuned! 💚

Likes
49
Share
@masterofsmeagol
Follow
6/23 Due To The Two 8 Day weeks this week will only consist of five days to get me back on track. SEE LAST WEEK FOR DETAILS. I DID ANOTHER EIGHT DAY WEEK. I'LL DO THIS WEEK AS SIX DAYS. THAT WAY IM BACK ON SCHEDULE. WATERED 6/22. WENT BACK AT NIGHTCAND WATERED ANOTHER GALLON WITH 1/3 TSP Armor Si. I mixed the solution with kelp you kelp me but I dumped it out. I've mixed silica with other nutes before but I had read something earlier about bioavailability issues and I didn't want to risk it. My plants are the healthiest I've ever grown. I'm considering transplanting the large 10th planet that I'm light depping. I also need to develop my ipm and my nute schedule. Still gonna have to keep an eye onvthe water situation. Luckily I have a buddy in my corner that's co tinualkt Bern a great help.
WENT BACK OVER AROUND NOON. BEAUTIFUL OUTSIDE AND THE PLANTS WERE LOVING THIS SUN. I DEFOLIATED SOME BURNED LEAVES AND MIXED A SOLUTION IF KELP ME KELP YOU THAT I PLAN TO FEED TO THE GARDEN TODAY. IM HAPPY WITH HOW THINGS ARE GOING. WE HAVE SOME RAIN AND THINDERSTORMS COMING. I NEED TO GET MY IPM UP AND RUNNING AND THE NUTES ONLINE. I ALSO NEED TO DECIDE IF IM GOING TO TRANSPLANT THE LIGHT DEP 10th PLANET. Went back over to put the girls to bed at six and if was still 90 degrees. The water from yesterday had dissipated. The tops were dust dry. I mixed two gallons of kelp you kelp me and fed it to the garden. Afterwards I pointed qbd found a couple plants that were more open to the wind were a little lighter. I know tomorrow will be very hot. Maybe quarter inch of rain. However after that it will rain (showers) off and on for days. I wanted to make sure the girls had what the needed to make it through tjis heat wave until they get that rain. I had another gallon mixed up and I'm thinking I should've given it to them. Oh well. I'd rather underwater than overwater any day. I did notice a burnt top on the plant furthest from the tarp that the sun JUST BARELY TOUCHES when the rest are in shade. I'll just raise the tarp a little. These are tiny problems. Can't upload video until tomorrow.
6/24 Good thing u gave the plants that water. I know it wasn't much but we didn't get any rain. Suppised to get a qtr in today and another qtr in tomorrow. Then rain a couple more days. It's working our really good for my watering schedule lol. Yesterday the girls got there first dose of a bottled nute. They got two gallons of kelp me kelp you (1/3 tsp per gallon) and another gallon of just phed water. I was going to do another gallon but held off due to the threat of syring rain. Didn't get it bur it looks like the plants loved the kelp. It had reached 90 yesterday. They look better today. It's 70 at 9 today. I LST the 10th planet in the 3 gallon. It's getting huge. I should start a separate diary for those three light dep plants. Its cool as hell watching this. One of the purple punches is flowering pretty good. I probably should start another diary for them. I'll be starting to feed my plants soon. Wondering if I should pinch plants again. TUCKED THE LITTLE GIRLS IN AT SIX AND SHOT A VIDEO AND TOOK SOME PUCTURES. PLANTS LOOKED PHENOMINAL! GOT HOME AND AROUND SEVEN IT JUST STARTED RORREBTIAL DOWNPOURS! THE TYPE OF RAIN THAT BREAKS STEMS. I SHOULDVE PUT MY OTHET TARP UP BUT I DIDNT. I WISH I HAD. IM A LITTLE NERVOUS. I KNOW THESE GIRLS ARE STRONG THOUGH! TOMORROW. ILL ROLL THE RARP UP AND SECURE THE BOTTOM FOR FAST ACCESS. IM ALSO GOING TO KOOK INTO FINDING A TOP FOR MY CAGE I CAN USE IN INCLIMENT WEATHER.
6/25 That little qtr in of rain we were supposed to get turned into torrential downpours and high winds. Luckily no REAL damage. If you watch the video you'll see what I mean. I'm going to havecto be cognizant moving forward. Noticed a few chunks from leaves butvplants are still healthy. I'm surprised how well these girls withstood this storm. They are certainly resilient. The 2 purple punch 1 10th planet that I'm light depping are flowering nicely now. They missed all the commotion from the storm as they were inside. It's smelling good. I'm happy.
6/26 It's what a friend would say is "maineing") out. That mistcthe plants love. I'm surprised the plants are doing as good as they have been considering the wind. Will be adding nutes soon. Need to add extra supports too. Light dep
6/27 Brief periods or torrential downpours. Light depped 3 gallon 0lants are under an overhanfcwhete the hatsxrain can't hurt them but they still get sun. They are really starting to flower now! I'm going to begin feeding with a base nute and a flower nute I think. I'm thinking about giving the light dep some open sesame or something similar. I need to set up a nute program soon but the plants ALL look so healthy! And it's been raining! I've only watered like once or twice since they've been in the big pots. I've seen zero pests aside from a chunk missing from a grasshopper. Usually by now I'd have battled half a dozen things and be battling another half dozen. However I was posing from clones. These are seeds and boy don't I see the difference!

Processing
Likes
2
Share

Likes
21
Share
@Budhunter
Follow
As I did the flushing in day 70 I was watching the trichomes and on day 87 I could see 25-35% amber so I decided to cut it. I cut the whole plant on the base and hang the whole plant to dry. For this reason I will update my findings later when it gets dry and trimmed about yield and numbers. So far really happy with the results. It will probably be the champs of this run yielding nicely 👍🏼.
Likes
1
Share
@psychonaut420
Follow
first 2 plants are lemon cherry cookies auto and last one is frozen face auto the white stigmas and streaching side branches are streaching outwards I’ve done more lst and defoleation for light penetration to each bud site

Likes
8
Share
@dreamLife
Follow
Finalmente el día de cosecha, la producción no fue de las más abundantes pero suficiente para mi consumo personal, bastante entretenido el cultivo en DWC, lo repetiré en mi siguiente cultivo pero con una semilla automática.
Likes
9
Share
@StoneyMelony
Follow
Overview of my grow:
Tent: Secret Jardin DS120 4 x 4 (120 cm by 120 cm)
Lights: 2 x 120 Watt CTlite c4 clusterled
Climat: Trotec Dehumidifyer 240 watt- 10L/24h
Filter: Prima Klima carbon filter PK2600
fan: 2 x Secret Jardin 20watt osc. fan
Pots: Gronest 4 x 11 liter airpots
Water : automated water system
PH: bluelab
Nutrients: Plagron cocos A + B
Plagron PK 13/14
ATA cal/mag
Epsom salt
no rights to music in the videos
Week 6 She is doing great, She has grown another 21 cm in height. She is still the biggest plant in the room. I did some LST and defoliation again. She is stacking up nicely, i'm very curious about this gorilla no smells maybe next week ! Thanks for checking and stay safe all 😋

Likes
2
Share
@Saintvicious
Follow
Not much to do with Autos. I take a handful of leaves everytime I'm in the tent. Veg thru 2-3 weeks of flower.
Likes
18
Share
@rockbo47
Follow
SUMMARY: Started late bloom nutes this week on day 69. Still no issues with her and she's taking 1.8-2L per day and giving around 30% runoff on average. Just hoping all the buds fatten up as there aren't many.
DAY 65
-----------
Sunday 7th March 10:45
I made 5L of mid bloom nutes with tap water and molasses at a pH of 5.8. I made 5L of late bloom nutes with tap water and molasses at a pH of 5.7.
Sunday 7th March 18:00
I fed the NL 1.8L of mid bloom nutes which produced 300ml runoff (17%). [27°C/49%]
DAY 66
-----------
Monday 8th March 18:00
I fed the NL 2L of mid bloom nutes which produced 710ml runoff (36%). [25°C/47%]
DAY 67
-----------
Tuesday 9th March 10:45
I made 5L of mid bloom nutes with tap water and molasses at a pH of 5.8. I made 5L of late bloom nutes with tap water and molasses at a pH of 5.8.
Tuesday 9th March 18:00
I fed the NL 1.8L of mid bloom nutes which produced 700ml runoff (39%). [25°C/51%]
DAY 68
-----------
Wednesday 10th March 18:00
I fed the NL 2L of mid bloom nutes which produced 600ml runoff (30%). [27°C/54%]
DAY 69
-----------
Thursday 11th March 11:00
I made 20L of late bloom nutes with rain water and molasses. 5L at 5.7, 5L at 5.8, 5L at 5.9, and 5L at 6.2.
Thursday 11th March 18:00
I fed the NL 2L of late bloom nutes which produced 700ml runoff (35%). [26°C/47%]
DAY 70
-----------
Friday 12th March 18:00
I fed the NL 1.8L of late bloom nutes which produced 250ml runoff (14%). [26°C/48%]
DAY 71
-----------
Saturday 13th March 19:00
I fed the NL 2L of late bloom nutes which produced 350ml runoff (18%). [26°C/48%]
Likes
13
Share
@Robeeriegenetics
Follow
Everything is going ok no roots yet on the clones but we got a week b4 we need to worry
Temps steady humidity steady will be topping of res with more nutes todau
Processing
Likes
1
Share


Likes
17
Share
@herbalistssword
Follow
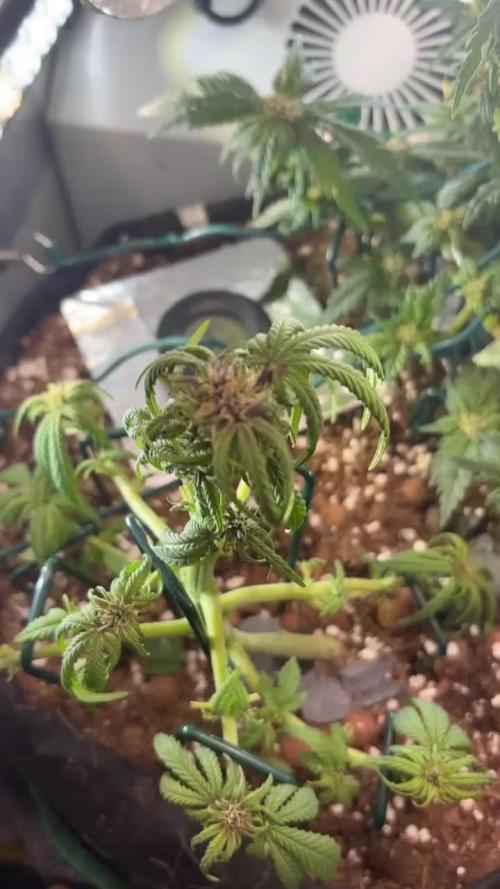
The 3 plants were trained in different ways on day 63 and as you can see from they pictures they all took the training very well, can't see an obvious difference between them.
Plant 1: Schwazzing
Plant 2: Light Defoliation
Plant 3: Lollipopping
Switched the lights to 13/11 on/off on day 62 and to 12/12 on day 63 this is day 70 (actually posting this couple weeks late) after a whole week of flowering schedule.
Made some aerated compost tea today and watered the girls with it yesterday Tuesday.
Each pot got 2L of watered down aerated compost tea and 2L of water with aloe vera powder and malt barley.
Likes
17
Share
@Todzilla
Follow
Outdoor coco 15g pots
Progress:
Lava cake is about week 6.5. Starting to ripen and get heavy. Buds are getting fat. Strong sweet cookie/ ice cream smell. Buds are getting more frosty. Buds are getting so heavy I installed a net on 3 of 4 and doing #4 soon. On my most mature plant - About 25-30% of pistils have turned color. Some trichomes are milky, none amber. Looks like plants are a few days apart.
Marathon OG week 5 1/2. Still stacking and getting fat. Smells dank. Trichomes are showing up. The 20 gallon OG is growing into a monster. I’m still waiting for the heavy bud stacks….
Nutes:
Bumping up ppm, the dry koolbloom and molasses, stopping regular koolbloom and grow. Looking to starting flushing the lava cake in a week or so. Feeding 2x a day; 3x on hot days.
Weather:
Had a good week of cooler temps until yesterday, when it was 97. Looking at hugs in the 80s this week, perfect.
Pests:
The moths and caterpillars are in full swing so I’m applying BT every morning. I’m working hard to reduce caterpillar 🐛 losses. We lost all of the top colas on a plant in another location 💔 . I’m only losing one bud at a time and not the entire colas so far.
Wishing fat buds and monster harvests to all.
Likes
18
Share
@Scottydarkmoonbuds
Follow
These ladies are doing great! 2nd week of flowering and the lemon cherry cookies are showing purple already ⛄🎄❤️ very excited to see how these turn out!