
Likes
Comments
Share


@Verlido
Follow
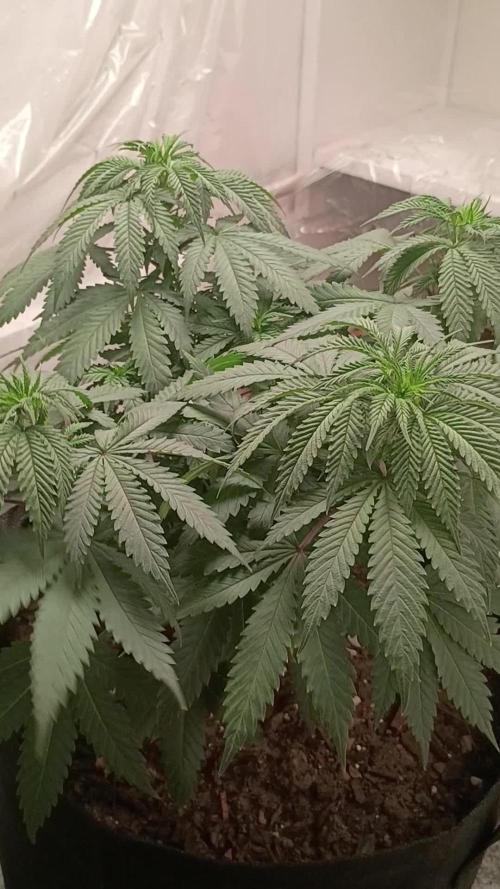
Week 11 - Day 1 : Pinched branches from subject 1 and 2. As seen in the videos uploaded.
Week 11 - Day 2 : Changed water schedule to water-water-feed, watering my plants with 4 Liters per plant every 3th day. Pinched branches recovered successfully.
Week 11 - Day 3 : Pinched lower branches of subject 1, take a good look and tell me what you think!
Week 11 - Day 4 : Pinches branches of subjects 2 and 3, take a good look and tell me what you think!
Week 11 - Day 5 : Pinches branches of subject 1, take a good look and tell me what you think, had my first harvest of ladybugs in the garden and released them on my plants, noticed that I have very little spider mites on my plants. Posted week 1 to 9 on my diary.
Week 11 - Day 6 : Woke up to subject 5 being damaged, What could have caused this? Too heavy branches? Maybe an animal that accidentally broke the branch and took off.
Week 11 - Day 7 : Pinches branches of subject 3, take a good look and tell me what you think!


Likes
3
Share


@yungdanktwanog
Follow
Looking great I think pheno one will end up finishing a week early, maybe soon I will start the flush for pheno 1, as far as pheno 1 and 2 I will keep them going until I see more development

Likes
8
Share

@CannabisDemon
Follow
I really enjoy this variety I love how the stems are already turning dark purple the plant has grown great so far did a major defoliation I would like to get them into flower in the next week or two but I'm not 100% sure what I'm going to do yet. I would like them to be just a little bit bigger.
Likes
15
Share


@Bluemels
Follow
An Tag 39 zeigt die Triple G eine winzige Vorblüte 😜
An Tag 40 habe ich die Triple G an 4 Zweigen getoppt.


Likes
76
Share


@Deranged420
Follow
Day 57 - Gave 17oz of water, rotated but not liking the leaves. Spritzed leaves with water...
Day 58 - Moved light to 22" cause I am not liking the leaves...
Day 59 - No amber tricomes yet that i can see, raising light may have helped. She looks better after removing much of the brown leaves as suggested, Thank you!! Going to try the Molasses treatment for 2 days then just let go. 18oz of Molasses solution @ 1 tsp per 36oz... Rotated and Spritzed leaves with water...
Day 60 - 17oz of water, Rotated and spritzed leaves with water.
Day 61 - Rotated and spritzed leaves with water. (Sorry no pics)
Day 62 - 17oz of water @ rotated
Day 63 - 34oz of water @ rotated

Likes
49
Share


@AsNoriu
Follow
Day 106. Girls starting to finish. Smellish, crystally, but buds are small and airy.
If no thirps or molasses issues my heart would be singing now, but it is as it is. 2 skunks are really great, think 3 cheeses are okeish, but far from my targets and plans ....
Anyway, final weight will cheer me up or totally crush ... ;)))
Two more weeks left, at least 10 days till chop.
No nutes , all feeding was finished last week.
Happy Growing !!

Processing
Likes
5
Share


@blacknpearl
Follow
oct 5. water ph'ed at 6.3
No nutrients at this point. Maybe next week.
Likes
3
Share


@Hydroponicfarm7
Follow
Todo esta semana salió mal, primero se me descalibró el medidor de ec, el tanque de agua estaba a más de 3 ec, lo bueno es que me di cuenta rápido y apenas se mostró excesos en la planta. Hoy se me callo el foco lec encima de esta dañando 2 ramas. No fue mucho pero si que lo notara y espero que el lec esté nuevo . Demasiado bien iba este cultivo jj

Likes
11
Share


@Sechlaw
Follow
Everything is good the smell is starting to getting so sweet ! Critical Mass is getting fluffy, frosty and soooo sticky !! Chocolate Haze is packing big long buds, can't wait !!!
Ps : Sorry for the mess in the order of the pics ! 😅

Likes
19
Share


@buddhi_coop
Follow
This week was tricky. A lot of stress for both me & the plants. They were droopy & not drinking water. I had them in too small of containers so I transplanted them thinking that was the problem. They’re in 5 gallon grass root pots now. I topped them with craft blend & diatomaceous earth, rice hills as well. They’re in Build A Soil 3.0 now. I just fed them compost tea too. They seem to be doing better besides the short one in the back left.
Likes
12
Share


@OilyEliteOrganics
Follow
Growing full of buds .
Going to be a stench plant i can already smell the oils .
Getting too tall might have to backbud it.
Great posture of a plant.

Likes
92
Share


@DogDoctorOfficial
Follow
Week 8 Veg – Go Big or Go Home! 🌱💪
Hey, Grow Fam! 🌿 What an intense week it’s been in the grow room! This was one of those “go big or go home” moments, and I decided to take it to the extreme. I’m holding off on flipping to flower for just one more week because the plants are filling up the space beautifully—I can’t help but push things to their limits and see just how much these ladies can give! 😎✨
This week was all about maximizing growth and creating the best canopy I can. I did a light defoliation, just here and there to open things up a bit, and then came the bending—LOTS of bending. 🌱 I’m working hard to create an even canopy, though with all these different genetics, we’ll see how close I get! 🤞 Regardless, I’m giving it my all, and I’m super pumped to see how everything will respond in the next stage. The final touch this week? I ended it with a bold 36 hours of darkness to prepare for the big flip next week—flower mode, here we come! 🌸
What Went Down This Week:
1. Canopy Work – Bending and training all over the place to try and keep things even. It’s a real challenge with different genetics, but the payoff is going to be worth it!
2. Defoliation – Just a little bit of leaf removal here and there to help with airflow and light penetration, prepping them for that final veg stretch.
3. 36 Hours of Darkness – Closed out the week with a full day and a half of darkness. The 36 hours of darkness is a technique I like to use to help signal to the plants that it’s time to transition from veg to flower. 🌒 By giving them an extended dark period, I’m mimicking the natural shift from summer to fall, when daylight hours start to shorten. This kick-starts the plants’ flowering hormones (phytochrome), helping them shift into flower mode more smoothly and quickly.
In my experience, this method helps speed up the flip, reduces early flowering stress, and often leads to a more uniform bloom across the canopy. It’s like giving the plants a little nudge to let them know, “Hey, it’s time to bloom!” 🌸
This technique is especially useful for growers like me who want to maximize the efficiency and performance of their plants. 😊
4. TrolMaster + App Love – As always, the TrolMaster app continues to blow me away. We’re going to dive deep into it below, but trust me, this app makes managing everything a breeze! 👇
Next week, we’re flipping to flower! I’m beyond excited for what’s to come, and I can already tell these plants are ready to explode with growth in flower mode. Stay tuned, because we’re about to see some serious action in the grow room! 🌸🔥
Thank you all for the continued support! 🙏 Don’t forget to check out my social media accounts for real-time updates, behind-the-scenes magic, and all the details on how this journey unfolds. Whether you’re new or have been here from the start, I appreciate every one of you. Let’s keep pushing the limits of indoor horticulture together!
🌱💚 Growers Love 💚🌱
#TrolMasterChronicles #ThinkGrowLED #SeedToHarvest #DogDoctorOfficial #AptusPlantTech #Autopots #IndoorHorticulture #ControlledEnvironment #GrowTech #PositiveVibesOnly
DogDoctorOfficial
P.S. – Let’s Talk TrolMaster + App
If you haven’t explored the TrolMaster App yet, you’re missing out! This app gives me complete control and real-time feedback on my entire setup, from the environment to CO2 levels, humidity, light, and beyond. Every parameter is at my fingertips, and it’s all synced with the controllers. I love how easy it is to dial in the details, especially during these crucial stages.
But what really gets me is the precision. 🌡️📲 With the app, I can track trends, get alerts if anything is off, and make changes on the fly—whether I’m in the room or halfway across the world. This kind of power and convenience has totally transformed how I manage my grow. Whether you’re a beginner or an expert, having this level of control is a game-changer. And as I dive deeper into flower, it’s going to be my best friend in keeping everything dialed in.
Discount Codes so you can save big on your next check out 💚💚💚
Kannabia - DOGDOCTOR 30% off
SeedsmanSeeds - DOGDOCTOR 10% off
CannaKan- DOGDOCTOR 15% off
terpyz.eu - DOCTOR 15% off
The Neutralizer - PORKIT5-DOG 15% off
As always thank you all for stopping by, for the love and for it all , this journey of mine wold just not be the same without you guys, the love and support is very much appreciated and i fell honored and so joyful with you all in my life 🙏
With true love comes happiness 💚🙏 Always believe in your self and always do things expecting nothing and with an open heart , be a giver and the universe will give back to you in ways you could not even imagine so 💚
Friendly reminder all you see here is pure research and for educational purposes only
Growers Love to you all 💚💚💚


Likes
8
Share


@valiotoro
Follow
Hello everyone 😎
Week 8 of flower for the Orange Sherbet auto from Fast Buds 💥🍊
For the nutrient 4ml/L terra bloom & 1ml/L power buds from Plagron
Weight is coming 💥
Spider Farmer SE-7000 80%
Have a nice day 😋
Processing
Likes
27
Share


@BorisGroen
Follow
the second week off 12/12
plants are totally bond down with copper wire for the lst method
there growing fine thanks to team Plagron
the seeds are good stabile seeds thanks to team Zamnesia
i build my own lightmodule 450 watt dob chips 4 x 3500K 4x 6000K 1x full spec
the plants are looking healthy en happy with their new sun shining
up to a fantastic harvest
greetz from me Dr.Greenthumbz420 a.k.a Boris Groen


Likes
8
Share


@ButterfliesLittleFarm
Follow
Hello Diary,
The Milky Way F1 is ready to harvest soon, although the Titan F1 ripened first and is already ready, the Milky Way F1 and Apollo F1 will have to wait another week in my estimation.
The Milky Way F1, as seen in the photos, is truly a sight for the eyes.
The flowers started to get more and more brown pistils, but looking under the microscope, the trichomes are not all milky yet.
So I'll leave her for another day.
Otherwise, the flowers are full of trichomes, from which a strong fragrance spreads.
Here and there a yellowish leaf appears, which I immediately remove.
Watering is a little more frequent due to the high temperatures, but I stopped adding any nutrients.
Here's a quick recap of the week.
26/06/2023 - Day 58.
Watering.
Only two days later, the plants drank all the water, so I watered them with two liters for each individual plant.
29/06/2023 - Day 61.
Watering. I repeated the procedure as I did three days earlier.
01/07/2023. - Day 63.
Photographing plants.
That's all for this week, see you soon.
Likes
19
Share


@Chubbs
Follow
420Fastbuds
FBT2306 Week 9
What up everyone. Weekly update on these two show stoppers and all I can say is 👌. They both are showing some really crazy colors and buds are nice and dense covered in trichs. I checked them under magnification and trichs are still clear and cloudy and I'm shooting for an 80/20 split of cloudy to amber. No major issues besides some fading in the leafs but that's expected at this point in flower. Guessing maybe another week or two before the chop. All in all Happy Growing.
Likes
14
Share


@Bluntblazer66
Follow
Nice buds, coated with frost. Lived through root wrought, so I will give this plant a good grade for disease resistance.
I will continue filling in as harvest / curing completes.
Likes
2
Share


@JoExotic
Follow
Week 9 - Lemon Cherry Cookies Auto wow the Smell on these is Pure Lemons and the buds are extremely sticky for this being an auto 420 Fast Buds knows exactly what there doing Huge shout out to everyone over there your hard work is very appreciated !!!