
Processing
Likes
Comments
Share


@GrimbolTheDruid
Follow
*If anyone read through my GDP diary, this is going to be mostly the same stuff.
So, sad day friends. I got spider mites and had to throw all my plants out. This is what I think happened:
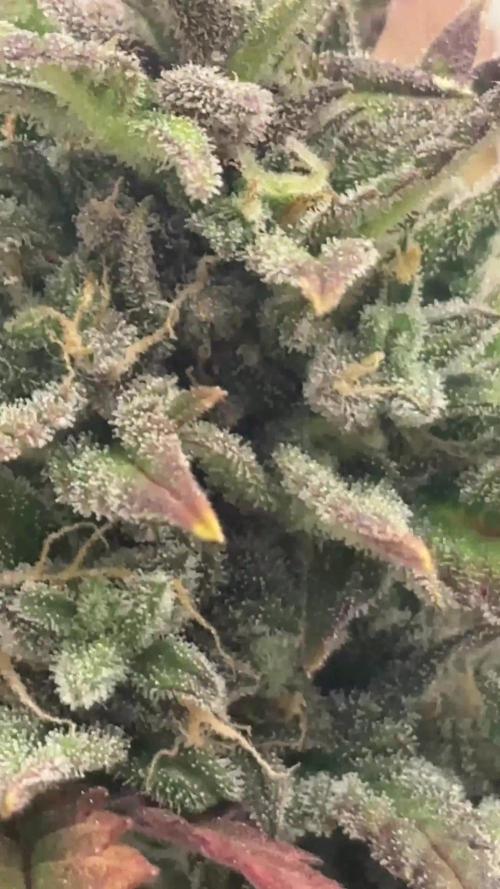
About 2-3 weeks ago I noticed some freckling on the lower leaves. I looked at it and thought it might be a cal/mag issue so I added cal/mag that week and went about my business. I saw it about a week later and it wasn't getting any better so I added more cal/mag. This continued for about 2-3 weeks until I finally took off a leaf and examined it under my microscope. I saw little bugs crawling everywhere and my stomach just dropped. My fiance did some quick research while I was panic ripping leaves off (see pictures) and she correctly diagnosed it as spider mites.
I debated with myself and my close friend and ultimately I decided to throw all the plants in my tent away. I know that there are a lot of people who will say that there are things I could have done to make it to harvest but what it came down to is the people I take care of and personal pride. I consider myself a caregiver and I give away product for free that I am not going to use to my family and close friends. I thought to myself "Would you smoke this?" and when my answer was "ehhh, I don't know", I thought about how it would feel giving it away and immediately made the decision to destroy them. I take an immense amount of pride in my product and this hobby and if I am not going to stand behind it I would rather just start over. I grow from my heart (shout out to the Grow From Your Heart Podcast!) to help people and make sure my family is not getting unsafe product from sketchy people. To spray pesticides in flower that may hurt people and have little bug carcasses in there just goes against that in every way and is just wrong in my opinion if you are giving it away to others. If you are the only one smoking it then it is one thing to take that risk but not with your patients. I want my medicine to help people, not create or exacerbate health issues.
It is also important to note that the mites had moved from my flower tent into my veg space and took over my auto berry as well. Damn things are crafty and fast.
So that is why I made the decision to destroy them all after 3+ months of res changes, pruning, and manifolding on a slow vegging strain. Feel free to chime in with your opinion but I do not regret my decision. I threw out my new clones, mother plant, and auto berry I had on my veg side as well. Shout out to all the other growers out there that do the right thing by their patients. Caregivers > Cash croppers.
For anyone curious, I removed everything from my tent and scrubbed it all with a 20% bleach/water solution. All equipment has been wiped down and stored in the garage away from any organic materials. I will give them until tomorrow (2 days) to air out and dry and then I will wipe it down again with bleach and wait another 2 days. Hopefully that will make sure everything is dead and will not come back next grow. That next grow should start in about a week.
It sucks but sometimes it happens and you gotta be ready for it. Lesson learned. Never bring outdoor plants into your indoor garden even if it is after just a day or two. A bunch of people on here and Reddit warned me and I did not listen. Now I have learned the hard way and it feels like when your parents "told you so" haha.
Thanks to everyone who stopped by along the way. Stay tuned for a new grow coming soon. It is going to be some cool new limited edition Mephisto Illuminautos. I am pretty excited.
Good luck out there and always grow from your heart folks.
-Grim

Likes
5
Share


@Mr_Puff_N_Stuff
Follow
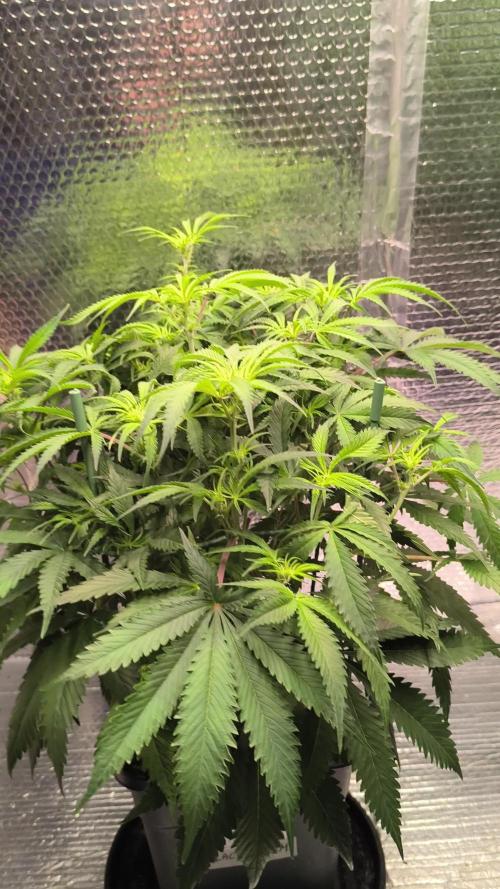
Starting the week off very healthy. Only change is the adjustment of light height and the removal of Mass Pro.
I’m seeing very rapid growth both vertically and horizontally.
Plants are showing signs of pre-FLOWER, light intensity was moved up to 80% with a max 700 PPFD.
So far so good. All plants are happy and healthy…

Likes
4
Share


@Mrgreenthump68
Follow
Scrog baby
Test läuft gut.
Die Marshydro hat 10 Watt mehr deshalb wird sie aber nicht gedimmt.
Da die SANlight bessere Ausleuchtungen haben für die Pflanzen.
Likes
5
Share


@Chubbs
Follow
These girls are progressing absolutely beautifully. I'm excited to see as it looks like there might be a purple pheno as I've never had that one grow before. No issues and the flowers are getting bigger daily. I did a defoliation and lollipopped up to maybe the 2nd-3rd node. All in all Happy Growing.


Processing
Likes
28
Share


@DaddyGimmy
Follow
Day 30 - We are officially in flower now! So I'm upping the Bio-Bloom and Top-Max while making sure not to burn her.
Day 32 - Stretching out nicely now. Buds site are starting to form and you can see a little bit of the purple color coming through, very exciting stuff. Leaves are perfect, she is happy and loving life.

Likes
4
Share


@RoyColt
Follow
Day50 26/05 Changed new reservoir 8L total 2,20 ms.Continue Def. and Lst.
Day51 27/05 add 2L ro water with 4ml cal mag. Continue Def. and Lst.
Day52 28/05 add 2L (1L only ro water and 1L with nutrients.). Continue Def. and Lst.
Day53 29/05 add 1L only ro water.
Day54 30/05 add 2L ro water with nutrients.. Continue Def. and Lst.
Day55 31/05 add 2L ro water with 4ml cal mag.
Likes
148
Share


@CrazyHorse
Follow
Welcome, If you are already here and reading this, you do it at your own risk !! 😃😇😎
Another week of flowering, the girl smells so intensely that the carbon filter does not cope with effective filtration. There is a real orange scent in the tent, a blend of fresh oranges and skunk scents. The buds take on size, the resin production is amazing and creates beautiful sparkling crystals on them. There are still 2/3 weeks to go, but these are the most exciting ones. In this week I added cal-mag to fertilizers, it is a preventive measure because I increased the amount of PK 13-14, so cal-mag supplementation will not harm the plant at this stage of flowering.
Update: Day 87
I lowered the height of the lamp to 17 cm, I just need to put on my helmet, fasten seat belts and hold tightly to my chair :P
Update: Day 88
I had to use wire-mode because the side branches were starting to bend more and more under their weight. It makes me very happy because the harvest will be in 2/3 weeks 🙏
I wish you all a fantastic evening, You Lovely Girls Growers 💪💪💪

Likes
2
Share


@Enki_Weed
Follow
In the third week of the cannabis flowering stage, I have been working to reduce deficiencies. I used PK 13-14 for the first time at a very low dose. Humidity is consistently at 55%, temperature is maintained between 23-24 degrees Celsius, and I am following a 12-hour light/dark cycle. 🔄 I welcome any tips!

Likes
44
Share


@RakonGrow
Follow
Note :
+ jegliches Zubehör wird in der GermniationsWoche aufgelistet . Zeitraffer Videos folgen immer nachträglich.
+ videos werden so geschnitten das nur ein geschlossenes Zelt erscheint , ergo Fehlen paar reale Minuten (ca 1 Std) .
Day 64:
Die Nacht war kalt und die Ventilatoren an . Ergebnis , der Hauptrieb der viel ventilation abbekommt ist wunderschön dunkel geworden.
Bilder hinzugefühgt um mal den Vergleich zu haben , beide haben die gleiche Bedingung , sowohl Dünger als auch Licht . Nur das Zoe mehr Wind abbekommt und damit halt eine kältere Nacht erhalten hat .
Wir sehen das es wohl keine wirklichen defiziete. Es ist ein verhalten auf die Kälte.
Day 65:
+ 1.75 Liter Flaschenwasser
+ + Dünger für Blühte
+ + + Canna Terrar Flores (Achtung wirkt wie PH-)
+ + + Canna Boost
+ + + Cannazym
+ + + Canna Rhizotonic
+ + + Canna PH+
+ + PH 5.91
Day 66:
Das viele Licht zeigt wie es aus allen Seiten der Buds wächst . Das ist nicht gerade ein Qualitätsmerkmal , eher ein Quantitätsmerkmal . Aber ich möchte auch wissen wie stark sich das auf die Qualität auswirkt .
Die Schwester hinkt zwar kräftig hinterher wegen ihrem Wasserschaden, aber zum Rauchen allemal gut .
Leichte Cal-Mag Probleme werden sichtbar .
Day 67:
+ 2 Liter Flaschenwasser
+ + Spülung
+ + + Canna Boost
+ + + Cannazym
+ + + Plagron PH-
+ + PH 6.0
Day 68:
keine besonderen Anzeichen , die Luftfeuchtigkeit ist so zwischen 60% bis 64% . Geht gerade nicht anders . Ist jetzt aber zum abreifen auch nicht Schlimm . Dafür sind die Temperaturen bei konstanten 26°C
Day 69:
Alles läuft nach Plan. Kein defizit, ergo , es wird nur rest Dünger in der Erde abgebaut.
Day 70:
+ 2 Liter Flaschenwasser
+ + Dünger für Blühte Generative Phase III
+ + + Canna Terrar Flores (Achtung wirkt wie PH-)
+ + + Canna Boost
+ + + Cannazym
+ + + Canna Rhizotonic
+ + + Canna PH+
+ + PH 5.91

Likes
16
Share


@goodcall
Follow
First things first, the smell coming from the lemon is absolutely delicious! Super super, almost like candy with a super sour hint to it. I am so keen to taste her!
LSD-25;
Fattening and fattening, she's starting to stack on the weight now, I'm hoping for another 3 weeks before chop.
Lemon OG Haze;
The buds are really starting to form now, I'm hoping to have some nice looking colas come next Friday. Imma giver her probably 5 weeks at this stage, but she is a bit of a slow grower so we'll see.

Likes
4
Share


@QixxGrows
Follow
Day36, 37, 38: Seems to be growing a set of leaves per day now. Super growth! Stretching to the top.
Day39: I had a hiccup with the camera. For some reason it stopped responding at 04:30 in the morning. I only realized it much later. I still don't really know why, but reseating the data ribbon fixed the issue.
Day40: After fixing the camera, I decided to take this view again. The Lady is starting to show some nice growth and this view will show it best. If you look carefully, you'll see that her branches are not green, but rather reddish. Definitely related to genetics :) Everything else is within limits. Plus, the leaves look super healthy.
Day41: Here you can see the stem colour better.

Likes
1
Share

@psychonaut420
Follow
Lemon cherry cookies auto first 2 in video and last one is frozen face auto they iall in 2nd week of flushing and they thickening up and has pretty much stoped stretching and just been focusing her energy on thrichome production and filling out the buds

Likes
11
Share


@Ninjabuds
Follow
The Blackberry Moon Rocks are looking promising. One of them is growing into this beautiful little bush, and I think it's almost ready to harvest. The other plant is stacking up buds, but I'm thinking it's still a couple of weeks away.
The past few weeks have been so beautiful, watching the plants grow and change. It's amazing how something so small and fragile can turn into something so strong and vibrant. Now that they're getting ready to bloom, it feels a little bittersweet. I'm so excited to see the finished product, but I'll definitely miss having them around while they're growing.


Likes
4
Share


@Big0zGrower420
Follow
Day 42
Just trying to pull through till harvest. Got a couple more weeks to go.

Likes
6
Share

@pHilosophy420
Follow
Day 49, She will be very large plant, did some heavy defoliation and trim some bottom steams as she was too bushy.


Likes
17
Share


@Hawkbo
Follow
The autos are doing better than they were I got a new bottle of calmag cuz the older one was old. I still could use some warmer temps. I've been turning the exhaust fan down to the lowest level but the RH goes way up. I might move them into the tent with the HPS soon which settles around 82°f but that light makes the RH go way down so this whole thing is just a pain in the nuts.


Processing
Likes
20
Share


@PureMedicin
Follow
Went from 250 watt to 400 watt as i felt there was not enough light coverage. This seemed to be have a really nice effect combined with temperatures at 28 - 30 degrees celcius and a high humidity around 50-70%. Air circulation have helped the plants get fat stems from an early stage. Cookies kush and orange sherbert had the most rapid growth this week.
I was watering every second day at this stage with around 200 ml water mixed with nutes