The Grow Awards 2026 🏆 


Likes
Comments
Share
@HIAZ_urbanbudfarmer
Follow
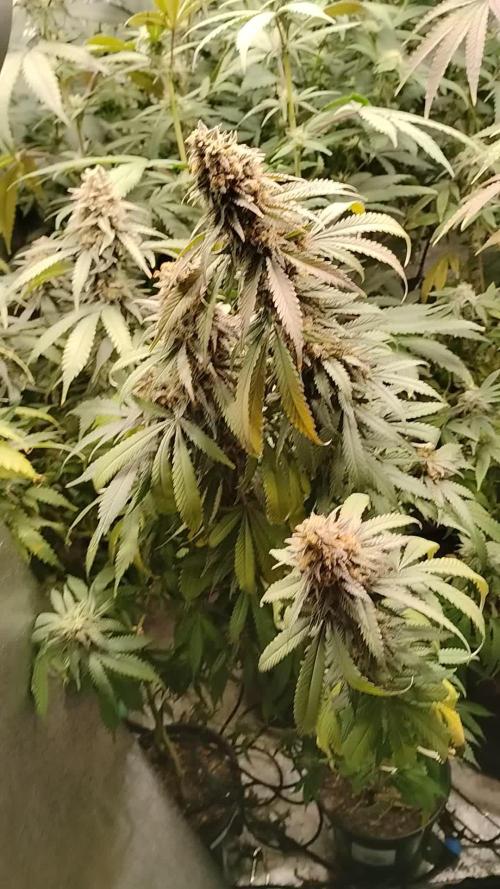
Plant at the front #3 has had slowed growth but buds are filling out pretty well now, pretty sure she is a Orange sherbet. Back 2 are on week 3 day 17!!! & Are going Awesome, buds stacking up & down every branch! Going to get some really good Cola's of them! They are loving the 730watts!’ of light, back left plant looks like a Tropicana Cookies, going to do some defoliation on her & tie branches down a bit to open up middle of plant to allow more light & air to lower bud sites.

Likes
16
Share
@AestheticGenetix
Follow
Since this will probably be her last week. I may upload the end of the week as well into this. As of today 10/16 she is day 56 or 8 weeks of flowering total

Likes
10
Share
@Gutismoke102
Follow
She has grown to be a beast. She’s been very easy to grow medium feeder ever other day I keep ppm 400-600 so I’m able to feed more frequently. She loves it stay tuned she just warming up

Likes
38
Share
@Hellhazard
Follow
Day42 of flowering Girl #1 seems to have tighter buds and is still smaller, but looks like she will finish later (although she popped first by a few days)
Girl#2 is much heavier and has sucked the green from her lowest fan leaves even though she is fed well. She also smells soooo good, over ripe cantaloupe/melons.
I am really happy with these plants, which I did not top and let colas grow. I am thinking of removing the cola fan leaves to let light blast the other tops.
Day 45, Removed almost all fan leaves to expose as much bud as possible to lighting. Scent is very strong and sweet. Very resinous leaf


Likes
7
Share
@DIY95
Follow
Blütewoche 6: Die Woche begann okay. Das Vergilben ist nicht gravierend schlimmer geworden.. 🙏 Also sollte es hoffentlich doch bis zur Ernte reichen 😁
.... Ich hatte jedoch das Gefühl, dass es irgendwie nicht so wirklich weitergeht.. Die Buds wurden nicht sonderlich dicker, bei 3 von 4 Pflanzen blieb der Stretch fast völlig aus.. Also nochmal jemanden fragen der Ahnung hat.
Einen Tag darauf bekam ich Besuch von meinem Kollegen, welcher den Grow das erste mal sah. Er schaute sich die Pflanzen etwas gründlicher an... und sagte, dass dort eine Stelle verdächtig aussieht...
Nach weiterer Begutachtung stand fest. Es sind 2 sichtbare Pollensäcke versteckt an der hinteren linken Pflanze...
Er beruhigte mich und sagte ich solle nicht durchdrehen.. wir schauen uns es morgen früh im hellen an und entfernen die Säcke vorsichtig..
Das Problem mit dem ruhig bleiben ist nur ... dass es mir nicht so liegt, wenn ich meine gesamte Arbeit schlagartig als gefärdet sehe... 😓😐😶
Am nächsten Tag stellte sich heraus, meine Panik war nicht unbegründet ... kurzgesagt ich habs leider trotz aller Mühen verkackt 😓😓😓
Alles ist voller Samen.. jede Pflanze wurde von der kleinen Skywalker bestäubt. Von unten bis in die Headbuds...
Aber Hey bleib locker, kann passieren, lernste draus und gut ist ... Das ist was man in solchen Momenten gerne hört 😡
Das Fazit ist jedoch... Genauso ist es. Es kann passieren. Man kann nicht alles von vornherein wissen. Man kann nicht alles perfekt machen ohne es einmal geübt oder fehler gemacht zu haben... Es ist einfach zu viel, dass man einfach wissen müsste.
Ich bin Perfektionist durch und durch .. Aber diesmal war es gaaanz weit entfernt von perfekt 😩
Die ganze Zeit, Nerven, Mühe, Vorfreude und vorallem das Geld .. alles erstmal futsch..
Aber eine Menge dazugelernt habe ich... Hoffentlich kann ich das nächste mal mehr davon richtig anwenden 🙏
Für mich ist der Grow hiermit Emotional und aus wirtschaftlicher Sicht als gescheitert zu betrachten. 💤
Alle Pflanzen werden nun wieder gemeinsam in die erste Growbox unter 200W gestellt um ihre letzten Wochen hoffentlich ganz schnell hinter sich zu bringen.. damit sie mir aus den Augen verschwinden 😕
Die neuen Samen sind bereits eingesetzt und werden mir hoffentlich etwas mehr Glück bringen! 🙏
Vielen Dank fürs Lesen. Ich hoffe bei Euch läuft alles super 😉🙏
Melde mich wieder zur " Ernte " ... Ciao Ciao 👋


Likes
68
Share
@Ferenc
Follow
Day 44, 30th of October 2020:
Here we go I am back from holiday this girl grew a lot. The first 6 pictures before LST and the rest is after picture.
I switches the light to 12/12 from tomorrow and leave her in darkness for one day from now.
She has got already some smell also... ;)
I have ordered and extraction fan kit so with filter it will be used soon.
Next week starts more intensive fertilization as well :)
Let's start to flower hahaha :)
Happy Smokes ;)

Likes
54
Share
@RastaGrow
Follow
Произашла проблема , иза карантина небыла вазможнасти следить за кустом :( PH поднялся на 9.3 сам куст успел спасти а вот корни не получилась сохранить прешло ампутировать и терять кшё 7 дней , FloraKleen спасло цветок . Девочка спит после замены раствора

Likes
46
Share
@PEAKYPLANTERS
Follow
good morning everyone, fellow cultivators and welcome to Queen Peaky's gardens
this genetics really has something amazing ... frosty and succulent solid buds
her feeding cycle was also very regular unlike her cousins in the tent that some went over
I had already tested this genetics and I really think that even this time it will not disappoint me!👽

Likes
6
Share

Likes
20
Share
@RastaMouse
Follow
Ok my first grow on my new rdwc system made by urban Culture very exited to move to this I have done a lot of research and I know I will make mistakes but hopefully non too big. This is a step up from my Wilma 4 pot. I can get more in the system water wise and Easyer to clean out. Any advice or tips with rdwc feel free to comment 😎😊


Likes
16
Share
@GrowerGaz
Follow
Just water as they are very small , light is a 100w Samsung led light for the first week then I will switch to the Zeus 465w Compact pro.
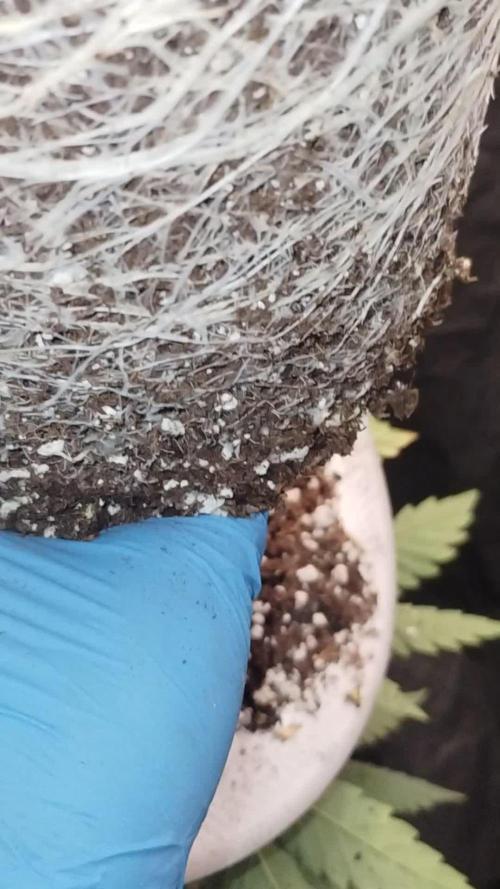
I have repotted the plants now the seeds have popped, they are in 2 litre pots now. As soon as the toots hot the bottom of the pots I will put them in my autopots system.
I have tried adding a layer of perlite on top of the bAc soil. To try and stop any bugs getting into my soil and also reflect the light back.


Likes
9
Share
@Alejangrow
Follow
They look great for free beans 😉🌿
Just topped these girls at going into week 5🔝

Likes
16
Share
@RFarm21
Follow
Olá growmies.
Esta gorilla está a demorar muito mais tempo comparando com o meu primeiro grow. Penso que o problema tenha sido as doses baixas de nitrogenio que dei durante a floração e as temperaturas no máximo chegaram aos 23 graus.. no próximo correrá melhor. Vivendo e aprendendo 👍
15 janeiro: continuação do flush - regada só com água, 2l.
Vou esperar mais uma semana no máximo para cortar. Na esperança que alguns tricomas comecem a ficar âmbares.
18 Janeiro - harvest day! Ja está a secar! Atualização em breve!
Likes
62
Share
@ButterfliesLittleFarm
Follow
Hello Diary.
Medusa F1 is definitely a record holder, in less than 70 days from the time it sprouted, it matured and was harvested.
The second Medusa will wait a few more days, she is not yet completely ready.
But incredibly, 12/01/2023 was planted and 21/03/2023 was harvested. 68 days from the day it sprouted, incredibly fast.
I've always thought that if the plant grows so fast, the result won't be great, but with Medusa, that's not the case. The plant is full of hard fragrant flowers.
As you can see in the photos, the leaves were completely yellowed so I removed them before cutting the branches and putting them in a box to dry.
Since the second plant still needs light, I put the first plant to dry in a box to protect it from light.
This week watering was usual, every three days.
The conditions are great, the humidity is very low, below 40%, which is great because of the drying, and the temperature is around 26 degrees.
Here's what it looked like last week.
15/03/2023 - Day 50.
Watering. I prepared 7 liters of water, lowered the pH. to 6.0 and watered both plants evenly with that amount.
18/03/2023 - Day 53.
Watering. The same procedure as three days earlier.
21/03/2023 - Day 56.
Photographing and harvesting the first Medusa F1.
I'm just really pleased with how things went from start to finish.
Now it remains to harvest the second plant and wait for them to dry to see what kind of fruits I got.
This is all from me regarding the Medusa F1, if anyone has any questions, feel free to write. It was a quick but great trip.
See you soon with the final report.
Likes
12
Share
@RookieGrowerTH
Follow
Week 3 from seed, 1st week of Veg. Transplant to a 5-gallon fabric pot, they will grow in living soil and set up auto drip irrigation by using Netafim Netbow.

Likes
7
Share
@Squaregrouper
Follow
Beautiful plant mold resistant keeps on stretching will have nice long colas😋
Likes
34
Share
@The_Bearded_Grower
Follow
So there were a couple little things I did to the tenth I removed some of the very low but that we're definitely not getting anywhere close to the canopy in fact they're only sticking up about three and a half for in above the trellis net so got rid of those guys and I moved the air conditioner Inlet to the top of the tent other than that the girls are doing really well
