
Likes
Comments
Share


@Fonzi
Follow
Es läuft ganz gut aber die pflanzen werden bisschen blass, muss ihnen in der folgende woche vielleicht bisschen bitetrsalz geben.


Likes
17
Share


@420DeepGrow
Follow
Gracias al equipo de Seedsman Marshydro XpertNutrients y Trolmaster sin ellos esto no sería posible.
💐🍁 Tangerine Snow F1 Fast:
Esta gran cepa es un cruce de cuatro vías 75% sativa de (Boost x Tangelo) con (Lavender x Power Plant). Este híbrido Fast F1 proviene de la genética Cali y cuenta con excelentes terpenos cítricos, alta producción de resina para extractos, altos niveles de THC, muy buenos rendimientos y excelente resistencia al moho. Tangerine Snow F1 Fast se puede cultivar tanto en interior como en exterior. Los tiempos de floración en interiores son de entre 8 y 10 semanas, mientras que el tiempo de cosecha en las latitudes del norte es en septiembre, mientras que en el hemisferio sur los productores cosecharán durante marzo. Las regiones climáticas recomendadas son cálidas, secas, húmedas y cálidas. Se trata de plantas altas, semiramificadas, que superan los 200cm y que presentan un alto vigor con muy buena uniformidad. Al igual que muchas otras variedades con fuerte dominancia sativa, Tangerine Snow F1 Fast ofrece una excelente resistencia al moho, así como a las plagas y enfermedades de las plantas. La combinación de terpenos cítricos y mucha resina la convierten en una cepa de muy buen extracto, cuyo método de "lavado" produce muy buenos rendimientos de hachís. El perfil de terpenos cítricos recuerda a las mandarinas y mandarinas y también tiene notas dulces. La producción de THC ha sido verificada en laboratorio en un fuerte 24%, mientras que el CBD es bajo. El efecto es edificante y energizante, perfecto para usar durante el día y las primeras horas de la noche.
🌻🚀 Consigue aqui tus semillas:
💡TS-3000 + TS-1000: se usaran dos de las lámparas de la serie TS de Marshydro, para cubrir todas las necesidades de las plantas durante el ciclo de cultivo, uso las dos lámparas en floracion para llegar a toda la carpa de 1.50 x 1.50 x 1.80.
https://marshydro.eu/products/mars-hydro-ts-3000-led-grow-light/
🏠 : Marshydro 1.50 x 1.50 x 1.80, carpa 100% estanca con ventanas laterales para llegar a todos los lugares durante el grow
https://marshydro.eu/products/diy-150x150x200cm-grow-tent-kit
🌬️💨 Marshydro 6inch + filtro carbon para evitar olores indeseables.
https://marshydro.eu/products/ifresh-smart-6inch-filter-kits/
💻 Trolmaster Tent-X TCS-1 como controlador de luz, optimiza tu cultivo con la última tecnología del mercado, desde donde puedes controlar todos los parametros.
https://www.trolmaster.com/Products/Details/TCS-1
🍣🍦🌴 Xpert Nutrients es una empresa especializada en la producción y comercialización de fertilizantes líquidos y tierras, que garantizan excelentes cosechas y un crecimiento activo para sus plantas durante todas las fases de cultivo.
Consigue aqui tus Nutrientes:
https://xpertnutrients.com/es/shop/
📆 Semana 13:
Ella continua floreciendo y llenándose de resina, ha entrado muy pronto en floracion y no se ha podido desarrollar como me hubiera gustado, debe de ser por el gen auto.
Continuo con las dosis de nutrientes recomendada por el fabricante.

Likes
101
Share


@Ferenc
Follow
Day 65, 17th of November 2020:
Welcome back at the beggining of the 3rd week of flowering. They seem to be stopped streching and now concentrating on buds.
All of them are gorgeous.....
The 2 Zamnesia genetics Gelato and Kalini Asia are pretty and buds are forming nicely. Kalini Asia might strech a bit more but not long.
The Sweet Seed ones are really nice and I am so happy because Red Hot Cookies is already getting red.... pistils and around the leaves.. I hope the same happens to the Red Mandarine and Tropicanna Poison also. They are so gorgeous. They calmed down I don't expect more strech.
Fertilization still the same every 2nd day with the ratio and mix above.
Some lollipopping (Defoliation) is also done.
I removed all the LST the plant remains in the same shape from now.
The lamp is on 11.30 min and off 12.30 min.
Last week was 15 min longer light cycle....
So every week 15 min shorter light cycle until the 5th week. So far -30 min. It switches on at 6 am and off at 17.30 pm.


Likes
9
Share


@DoctorCannas
Follow
Miei cari amici,
L'estate incalza e finalmente il tempoi permette di trasformare ad hoc. Secondo i gusti il giardino, la terrazza e i due balconi.
Un lavoro duro e intenso con i 25/30 gradi che il NW in questa settima sta proponendo e che spero vivamente durino tanto.
Travaso storico e professionale.
Vediamo ciò che l'armadio dice.
Questo travaso probabilmente ritardera di due o tre settimane il raccolto, ma andava fatto e ne varrà sicuramente la pena.
28/06
My dearest friends, comrades and farm partners.
Doc. Cannas is extremely happy to introduce you to the 5 wonders of Expert Seeds.
Still my most heartfelt congratulations for their genetics,
between photos and videos you have seen what a wonder these little girls are growing.
Today they have been introduced to LST, an art halfway between Astana yoga and BSDM.
Being their first time there was a need for love and passion.
So it was.
At the next update farmers

Likes
2
Share

@PurpleBeen
Follow
Week 1 / Flo
The little babies are strong vegetative development so ready to 12/12 this week, meanwhile i put the 1st scrog and the 2nd if necessary in flowering
Repotting : 23/04/2026
12/12 swtich:15/04/2026
Background : Strawberry Lemonade ≈ 15l-20l x2
Middle : Amensia Lemon 11l x2
Front : Cherry Mc Muffin / Oreoz : 7l / 11l
Topping : 01/05/2026
Light : 60cm-75cm /50-75% dimmer
25-26 degrees / 40 % hygro
23-24 degrees
Watering is light at this stage — around 1l;1,5;2l depend pot size ( 1 watering humic ; 1 with only water and 1 with fertilizers flower ) 600-750 ppm


Likes
Comments
Share

@Growboy89
Follow
Die Blätter haben durch die Blattläuse gut gelitten. Jedoch wachsen die Blüten gut weiter und sehen auch sehr schön aus und die neuen kleinen Blätter haben wieder ein sattes Grün. Die Blattläuse waren weg, danach wieder da weil sie wohl doch nicht ganz weg waren. Florfliegenlarven sind morgen da. Ab jetzt noch ca. 5 Wochen zur Ernte.

Likes
5
Share


@encrypted33
Follow
Starting week 3, the ladies look good as far as I can tell 😉 The slight problems in week 2 turned out to be a Cal Mag problem. I have a value of 5.25 to 1 in the irrigation water, I have this value with bitter salt balanced out that a 3 to 1 value is created and also foliar fertilization was carried out, this seems to be good for the ladies. As an information, the Cherry Cola Auto already has a very strong smell so it is not recommended without an activated carbon filter. I hope the aroma becomes even more intense when it blooms 😋
Week 3 Day 6 it appears the Cherry Cola Auto is now in pre-flowering I will adjust the fertilizer next week for pre-flowering. The Gorilla Cookies Auto shows no signs of pre-flowering yet.
Likes
13
Share


@cookingwithninja
Follow
Pretty happy with this grow. Going to either reveg 1 and pop s2 for next or do all s2. Absolute 0 herm through all flower and all plants.
Chopped them. Will try to reveg 2
I am very baked


Likes
10
Share


@BasedBuds_89
Follow
Had a really good week, these babies are thriving. Autoseeds.com has some good genetics I would recommend to any beginner grower. Can't wait to see what they yield.
Likes
9
Share


@Colo420
Follow
Atrasados con el seguimiento debido a las vacaciones pero aquí regresamos!!
Proximamente 6 comienzan su flora en exterior y 2 en interior


Likes
42
Share


@Ginger_gnome
Follow
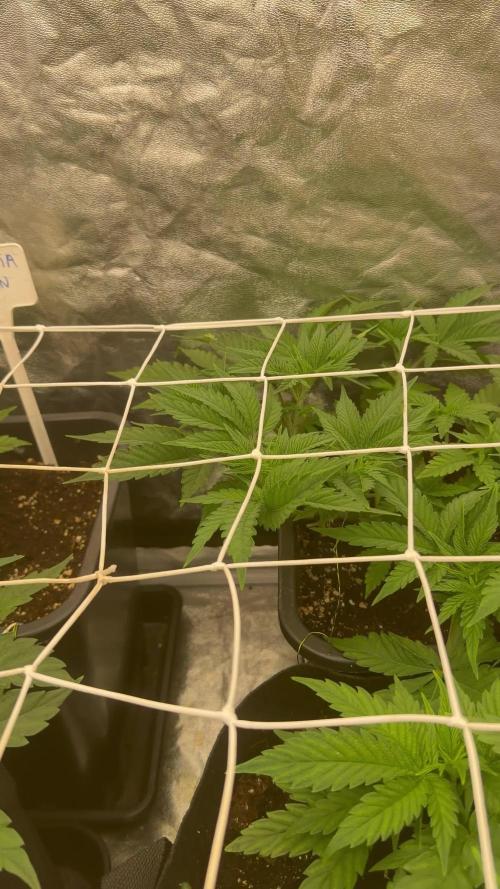
So got the net in place this week and started doing my ScrOG. Also did a bit of FIMing and some LST to help speed things up a bit. So far the weaving hasn't been as easy as I was told it be some ive been using some soft twist ties to help keep them in place. Going to veg and weave for another week or so before I switch it to flower. I was told you have to continue weaving for 2-3 weeks into flower but im worried that'll stress the plant out so if anyone that reads this knows other wise, comment below.
Increased the feed from 1 liter to 2 liters because I wasn't getting any run off. Now I'm getting 10% run off every watering and I've been able to keep my run off ppm to less then 100 ppm above feed. So far I'm really like working with coco and don't see myself going back to soil unless it's outside plants.
The environment has been fairly stable the last week with outside temperature droping. Had a spike in humidity yesterday because it got up to 75% humidity outside where I live. Luckly when that happened my tent only went up to roughly 67% but it's slowly dropped down and then stopped at 62%. There calling for another heat wave this week with it reaching up to almost 40c again for a couple days.... can not wait for summer to be over. I'm a ginger so I'm more of a autumn and spring kind of guy and plus this heat is making it difficult not only for this plant but also the ones I started seeding a few weeks back. Got so hot that they stopped growing for 3 days, 2 died and 3 got burned a bit.
So far this 300w SE-3000 Spider-Farmer light is really rocking it. Great coverage, adjustable and detachable ballast have made this a easy grow even with the mad heat. Definitely going to look at the SE-5000 light that runs at 450w or the SE-7000 light that runs at 650w for my next light in the 4x4 tent. Next go around I'm going to try this light in a 2x2 tent I have that I use for germinating.
Well that's all for now so happy growing everyone.

Likes
4
Share


@Dmars
Follow
11/22 Day 31 from flip. Today is the first day that I took a tape measure from the lights to the topmost part of the canopy and I haven’t seen a change. I’ll check again tomorrow but I’m really hoping the stretch is finally done. I still have about 10 inches of space between the lights and canopy so I think I’ll be ok with that. I took the chance to do what is hopefully a near final defoliation of a few leaves and some smaller sucker branches that won’t amount to much. Everything still looks super healthy, no red anywhere on any stems and no discoloration on the leaves. Everything is spot on. Light adjusted to 840 PAR / 36.3 DLI.
11/25 Day 34 from flip. I made some adjustments to my nute mix to be more firmly at 1.3 EC, which means I’ve added some additional nutes into the mix. I also tested runoff EC and discovered things were spiking a bit more than I’d like. So I mixed up a few batches of my new mix and I’ve been feeding every few hours to flush things out a little bit. I’ve brought it down from 1.9 to 1.5 so far after this. I may finally need to break down and set up some timers to feed multiple times throughout the day. Obviously once a day is not getting done right now.
11/26 Day 35 from flip. I finally got the timer hooked up to my pump to begin automatic watering. For now, I have it set to water at noon for a minute when the lights come on, a 2 minute pause to let that settle, and then 30 seconds more to make sure both are fully saturated. The second fertigation event will be at 6:00 for 45 seconds, and then right before lights off another 45 seconds. I’ll have to keep an eye on it to see if I need to adjust any more for now. I haven’t adjusted the lights since last time, but the latest reading is 885 PAR / 38.2 DLI at the highest point of the canopy. It’ll stay there for now.

Processing
Likes
10
Share


@Barcelona_Farmers710
Follow
Bueno entramos en semana 3 de flora... pasaremos usar pl booster y esperemos poder pasar led antes que acabe esté cultivo. El calor lo hace insoportable para las plantas están bastante resentidas a ver que tal sale! Salut y força al canut farmers!🔥

Likes
6
Share


@Pjm70
Follow
9/16 88 days old. Beginning of the third week. She has been grown organically up to this point.
Today I added some fox farm nuits for early bloom. I have it so I might as well use it. Only going to use for a few weeks.
9/21 did some defoliation and tried to spread her out. She doesn’t have a ton of leaves even though it may look it. She has a lot of branches. I took off a lot of branches before the flip and probably could have taken a lot more.
Also fed her Fox Farm Open Seasme. She is growing in living soil and has been organic. However I have the Fox Farm and might as well use it. She is starting to put on some weight.
Likes
46
Share


@MrJones
Follow
OSS Sherbet Moonrocks
🔹⊱╮🔹╰⊰🔹 GROW Started 03.10.24 INFORMATION 🔹╰⊰´🔹⊱╮🔹
🌞Environment - Maintaining 80F and 65%Humidity
🌾Training - The girls are recovering from last week's Pruning and Defoliation,
⚱️2-Gallon 📊6.2 PH
💧 Feeding - Using Horti Bloom and Horti Cal 12-0-0
🌞Medic Grow Smart 8 760 Watts
🕷️ IPM - CannControl from Mammoth and Mosquito Bits as needed
🔹⊱╮🔹╰⊰🔹 PLANT UPDATES 🔹╰⊰´🔹⊱╮🔹
📝 Notes - I am still not getting the vertical growth that I want before I flip, so I changed my light cycle to 18/6 and will be doing another defoliation and pruning of a few side branching - remember, I am looking for tall plants with little horizontal growth.
Fertigation injects fertilizers into an irrigation system to supply dissolved nutrients to crops.
🗓️04.20.24 Today, I flipped the ladies into flower. I Have let them veg out as much as I feel the grow space can handle. I am sure there will be a bit of pruning and super cropping in the near future. These girls will grow untouched other than the 2x daily fertilization, but I am switching out the Horti-Grow with the Horti-Bloom, feeding at Hort-Bloom @ 2.7 GRMS Per Gal and Horti-Cal @ 2.5 GRMS Per Gal.
🗓️04.21.24 Today fed with Hort-Bloom @ 2.7 GRMS Per Gal, and Horti-Cal @ 2.5 GRMS Per Gal.
🗓️04.22.24 Today fed with Hort-Bloom @ 2.7 GRMS Per Gal, and Horti-Cal @ 2.5 GRMS Per Gal.
🗓️04.23.24 Today fed with Hort-Bloom @ 2.7 GRMS Per Gal, and Horti-Cal @ 2.5 GRMS Per Gal.
🗓️04.24.24 Today fed with Hort-Bloom @ 2.7 GRMS Per Gal, and Horti-Cal @ 2.5 GRMS Per Gal.
🗓️04.25.24 Today fed with Hort-Bloom @ 2.7 GRMS Per Gal, and Horti-Cal @ 2.5 GRMS Per Gal.
🗓️04.26.24 Today fed with Hort-Bloom @ 2.7 GRMS Per Gal, and Horti-Cal @ 2.5 GRMS Per Gal.
╰⊰🔹╰⊰´🔹⊱╮🔹╰⊰🔹╰⊰🔹STRAIN INFORMATION🔹⊱╮🔹╰⊰🔹╰⊰🔹╰⊰🔹⊱╮
Introducing our latest powerhouse, Sherbet Moonrocks, one of our strongest weed strains to date, setting a new bar for potency and effect. A combination of US genetics, Sherbet Cake, and Purple Moonbow create this potent sedative with THC levels above 30% that will take you to celestial bliss.
An exquisite terpene profile offers a tempting treat of sensational fruity tastes, flavors, and aromas that will seduce your mind and body and take you to a serene place of pure tranquility. Ocimene, Caryophyllene, and Limonene are the predominant terpenes; they produce an incredible array of sugary berry fruit flavors with floral hints and spicy undertones.
Growing these feminized seeds is effortless and straightforward regardless of your growing skills, and at harvest time, you will be generously rewarded. Plants will mature to a manageable height with a flowering period of 65 - 70 days and will develop thick, dense buds glossed in thick layers of THC resin crystals packed with indica power that will lure into a deep relaxation. Expect an indoor yield of 600 - 700 gr m2 and outdoor production of over 1 kilo per plant.

Likes
33
Share


@valiotoro
Follow
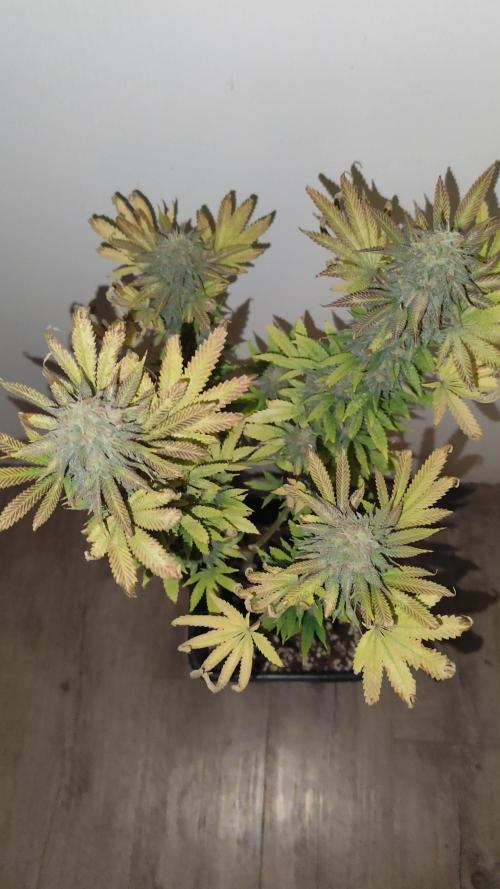
Always rock hard buds💥
Sticky glue👀
The smell is divine & refreshing :
imagine a walk in a pine Forest in Summer with hint of lemon🤤🍋🌲
Moon safari effect

Likes
7
Share


Likes
11
Share


@TheThiccBud
Follow
So i dont think i need to explane much XD you can see it all in the Videos 😍
Likes
8
Share


@Lazuli
Follow
I will start feeding her ripen from here on and let her finish about 10 days
Processing
Likes
26
Share


@BARNAMONKEYMAN
Follow
Hi Sisters & Broos.
It's Just a spoiler from a final movie.
Enjoy it. Its the time to curate. I use jam pots of glass. I'll open 1h every day during the next 20 days.
Bye


