The Grow Awards 2026 🏆 


Likes
Comments
Share
@RDWCGrowing
Follow
4/6/2024 - Vegetation Week 8 Day 1- Last week in VEG, They are all looking amazing and no worry about stretch when I flip Next Saturday they are indica and I have more than 50% of distance from the top of the plant to the lights with a little more I can raise the lights if necessary. So going to really just enjoy this last week of VEG, and get my Cloning equipment ready. I will be taking 2 cuts for each this is also a PHENO hunt for HWG and he not only has the prize for the winner but he also has an additional bounty on a cut of the winner. I did have to take some from around the edges to keep them from touching.
4/7/2024 - Vegetation Week 8 Day 2- Didn't do anything today but watch them grow.. They will be getting a really good flip trim and clean up for clone material on Friday/ Saturday.
4/8/2024 - Vegetation Week 8 Day 3- Couldn't even get a picture of the #1 at first too much Foliage throughout.. So I had to clean that up and make sure they all still have some separation before flip.
4/9/2024 - Vegetation Week 8 Day 4- Huston we almost had an issue.. I looked at my Res and she was in desperate need of 10 gallons to get her through until next water change on Saturday. So I added 10 gallons and the Nutes.
I added 10 Gallons of Water
I added the following Nutes:
CalMag= 1.00Mil/Gal= 10Mil
FloraMicro = 5.4Mil/Gal= 54Mil
FloraGro= 4.2Mil/Gal= 42Mil
FLoraBloom= 4.6Mil/Gal= 46Mil
4/10/2024 - Vegetation Week 8 Day 5- Had to giver them a huge clean up today I couldn't even see the numbers in the first pic. I am also worried that #1 and #3 really, really are getting huge over the last few days.. starting to think I should have flipped them this past Saturday.. The interesting things is even though this is an Indica Strain, I might have to super crop just to keep them off the lights.
The joys and sorrows of RDWC and timing.
4/11/2024 - Vegetation Week 8 Day 6- Even though Flipping in Two days almost wish I would have gone at Week 7. I am really worried about #3, #1 and #2 are huge and when I put them in flower they are going to stretch out
4/12/2024 - Vegetation Week 8 Day 7- Day of Work.. Lots of Work.. I gave all three a Cloning/Flower cleaning.. all three got cleaned up top Inside and bottom, I took 2 cuts of each to see which one come out on top then I will kill off the other cuts once I have a winner in flower. I clean up this thoroughly before I flip because it reduces the work load on the next major clean up I do on Week 4 of Flower.and they are so much taller that it is going to be a pain in the ass to maintain canopy space for #3, we will see how it goes and adjust as necessary..
Likes
43
Share
@Pearl
Follow
She's steadied out on the stretch for now
She has taken her own weight throughout, a nice feed of silicon gave her the boost she needed.

Likes
19
Share
@Xpie77
Follow
Really nice that u check this page, its very much appreciated, thanks! If you leave a comment ill comment back and if u like my page ill like yours back
This week all is in flowering and the flowers now quickly getting fat!
Ive started with nutrition:
Sea weed 15ml/10L
P 8ml/10L
Bloom 30ml/10L
Molasse 20ml/10L
Silicium 10ml/10L
--------------Amnesia Haze------------
Amnesia Haze is a strain that is perfect for starting the day with a smile, thanks to its invigorating and stimulating effect and a feeling of physical and mental clarity. With genetics that go back to the indigenous breeds of South Asia and Jamaica. His rise is rapid and powerful. A revitalizing experience with earthy flavors and hints of lemon and citrus.
Amnesia Haze cannabis seeds can be used for indoor and outdoor cultivation. These plants produce nice sturdy buds with a high THC percentage. Also suitable for medicinal use.
Properties of Amnesia Haze cannabis seeds
– Has a nice lemon and citrus flavor when smoked
– These cannabis seeds are suitable for indoor and outdoor cultivation
– Very good as medicinal cannabis
– This is a strain with a high THC content
– Gives you a powerful and high feeling
Information Amnesia Haze cannabis seeds
Flowering time: 10 weeks
Genetics: Amnesia Haze
80% sativa, 20% indica
Plant height outdoors: 150 – 200 cm
Harvest month outdoors: from July to October
Yield indoors: 550 – 650 gr / m²
Yield outdoors: 200 – 900 gr / plant
THC: 22%
Link to the shop:
https://seedsgenetics.nl/product/amnesia-haze-gefeminiseerd/

Likes
14
Share
@SamDo
Follow
🇺🇸 Week 7 - Grow Journal of Mother Gorilla (Royal Queen Seeds) 🇺🇸
On the Way Back to Full Strength!
After two tough weeks with overfeeding and water stress, I’m finally happy to see my plant bouncing back. The roots had taken a hit, and last week, I noticed my filter was way more clogged than usual. I believe the dead roots were broken down and flushed out, most likely thanks to Cannazym. I added it specifically to help decompose the damaged roots, and it seems to have done its job.
Today, I checked the roots and saw that they have stopped browning and are beginning to return to a more normal color. They were previously quite dark, but now they’re showing signs of improvement. The root mass hasn’t regained volume yet, but I think it’s still eliminating waste. It’ll be interesting to see if more debris accumulates in the filter or if it remains clean from now on.
Another great sign: my nutrient solution level has dropped, meaning the plant is feeding properly again. At the same time, my EC has decreased, confirming that it’s actively absorbing nutrients. This recovery is also visible in the canopy: it has become denser, allowing me to slightly top some central shoots that were growing past the screen and to continue working on the SCROG.
The only minor issue this week was pH fluctuation. Over the weekend, it rose to 6.6, but I recalibrated it to 5.9 today. I suspect this is due to the plant still shedding dead roots, which could be affecting its balance. Either way, I’ll be changing the nutrient solution soon, which should stabilize things further.
Current Grow Parameters:
• Strain: Mother Gorilla (Royal Queen Seeds)
• Light Cycle: 18 hours
• Humidity: 70%
• pH: Adjusted back to 5.9 after peaking at 6.6
• EC: Down to 1.1 after briefly reaching 1.3 - 1.4
• Training: Light topping in the center + SCROG work + selective defoliation for better light penetration
Final Thoughts:
Things are improving, but we’re not fully there yet. The plant is regaining strength, the roots are clearing up, and it’s feeding well again. I’ll keep a close eye on its next developments, especially root mass expansion. Excited to see how things evolve next week!
See you next time for another update!
⸻
🇫🇷 Semaine 7 - Journal de Culture de Mother Gorilla (Royal Queen Seeds) 🇫🇷
On est en train de revenir à la pleine forme !
Après deux semaines compliquées marquées par une surnutrition et un stress hydrique, je suis heureux de voir que la plante repart dans le bon sens. Les racines avaient bien souffert, et en observant mon filtre la semaine dernière, j’ai remarqué qu’il était bien plus encrassé que d’habitude. J’en conclus que les racines mortes ont été détruites et évacuées, sûrement grâce au Cannazym. J’avais ajouté ce produit pour faciliter la décomposition des racines abîmées, et cela semble avoir bien fonctionné.
Aujourd’hui, en observant les racines, j’ai constaté qu’elles ont arrêté de brunir et qu’elles commencent à retrouver une couleur normale. Elles étaient auparavant bien sombres, mais leur état s’améliore nettement. Pour l’instant, la masse racinaire n’a pas encore repris en volume, mais je pense qu’elle élimine encore des déchets. Ce sera intéressant de voir si mon filtre continue à accumuler du dépôt ou si tout est désormais propre.
Autre signe encourageant : le niveau de ma solution nutritive a bien baissé, ce qui indique que la plante se réalimente correctement. En parallèle, mon EC a également diminué, preuve qu’elle absorbe bien les nutriments. Cette reprise se reflète aussi visuellement : la canopée s’est densifiée, ce qui m’a permis de légèrement étêter certaines têtes centrales qui dépassaient du grillage et de continuer mon travail sur le SCROG.
Le seul petit point de vigilance concerne le pH, qui a fluctué. Ce week-end, il est monté jusqu’à 6,6, mais je l’ai recalibré aujourd’hui à 5,9. Je pense que ces variations sont dues au fait qu’elle se débarrasse encore de ses racines mortes et qu’elle n’a pas encore retrouvé un équilibre complet. De toute façon, je vais bientôt renouveler la solution nutritive, ce qui permettra de repartir sur une base stable.
Paramètres de culture actuels :
• Variété : Mother Gorilla (Royal Queen Seeds)
• Photopériode : 18 heures de lumière
• Humidité : 70 %
• pH : ajusté à 5,9 après une fluctuation jusqu’à 6,6
• EC : descendu à 1,1 après être monté à 1,3 - 1,4
• Taille & palissage : léger topping central + travail sur le SCROG + retrait de quelques feuilles pour une meilleure pénétration lumineuse
En conclusion :
Les choses s’améliorent, mais ce n’est pas encore complètement gagné. La plante reprend de la vigueur, les racines s’éclaircissent et elle recommence à bien se nourrir. Je reste attentif aux prochaines évolutions, notamment sur la masse racinaire. Hâte de voir comment ça progresse la semaine prochaine !
À la semaine prochaine pour un nouveau point !
🤘😎

Likes
17
Share
@Todzilla
Follow
2 Black Cherry Gelato 🍒 Clones from my clone guy-
1000w LED, 4G Autopots,, coco/perlite 65/35, Jacks RO + dry koolblom and humic acid , RO water, AC pro Controller and T8, 5x5 GG Tent with extension. Garage grow SoCal.
Another hot week in the garage averaging 88°. The girls are starting to develop and gain weight. Trichomes are coming along.
We’re running just under 1000ppm with no issues. We switched nutes and reservoir funk is gone.
This weeks accomplishments:
Switch from GH to Jacks RO
Install separate reservoirs for black cherry gelato and purple push pops
Clean all autopots and reservoir lines.
Install separate lines for black cherry gelato
This weeks issues:
Spider mites. Found them in the outside grow and found a few leaves with them inside. Big time nightmare. Primarily on the gelatos inside. Doing manual scouting and removal every day.
Long term issues
It’s hot. High 80s low 90s all week. So the same - Cooling and VPD targets during heat waves
Preventing the spread of mites and mold issues during high humidity conditions
Managing girlfriend expectations through harvest.
I hope you all are having as much fun as I am.
Best of luck gromies.
Check out my purple push pop grow side by side with my indoor grow- same clone batch.
Check out my outdoor light deprivation grow side by side with my indoor grow. This should be a great comparison of indoor versus outdoor grows. 👍
Likes
22
Share
@medicalhydro
Follow
Ripennig week
Day 63
600 par
Uv+IR+FR
16/8
Single Hydroponic
120*120*200
Light W= 240

Likes
11
Share
@Magich
Follow
Ok, so day 46, i see a lot of “hairs” turning dark/brown/yellow, so i gave it fresh water no nutes. But it is only the top buds, so maybe i will feed 1-2 times more before flushing. Thats for lsd-25. blueberries, on the other hand needs more time. Day 47: very beautiful colours, and the sweetest smell ❤️

Likes
7
Share
@ILikeCheezzz
Follow
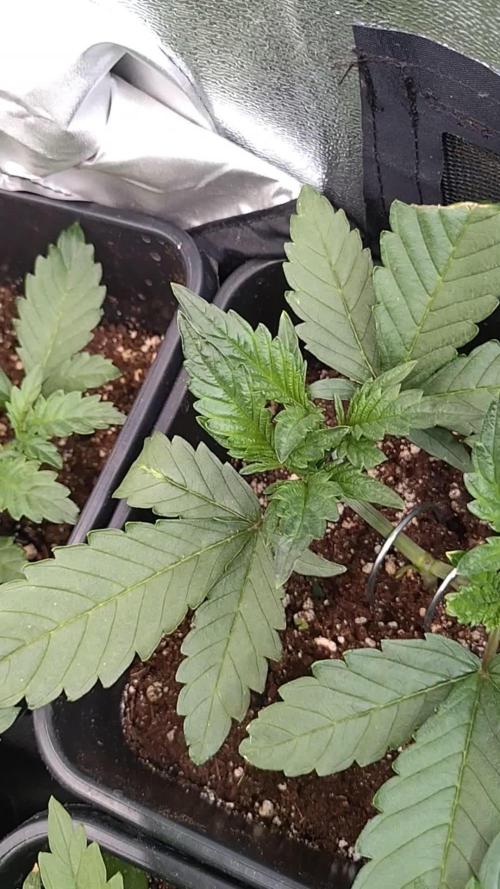
Good growth this week. Thinking i could top end of this week was obviously too optimistic, but i will be able to this week.
The plant with the stronger stem is still the most vigorous one, definitely keeping her. The others are doing fantastic too tho, I can see the beginnings of the 4th node already.
The white clover is coming through, it will have about a month time to grow till i’ll chop most of it. I’ll leave some near the edges of the plots.
Added some old pics of the bamboo I’ll be using to support the plants outdoors. Should be plenty long haha.
Excited for the coming week! Growth is speeding up and they’ll soon get their first training.

Likes
4
Share
@Forrbiddenterpz
Follow
I gave the girls an organic compost tea for nutrients(1 tsp Blk molasses,1cup worm cast,2 tablespoon kelp,2 tablespoon alfalfa meal,1tablespoon bat guano) and lsted again to get more bushier autos. I also moved my smallest autoflower to my 4x4 tent which is on a 12/12 schedule on 3/18/23


Likes
17
Share
@Pochogrower
Follow
On day ten I did my first feeding at half dosage and lowered the lights from 21inches to 18, ladies responded really well. Notice growth by the next morning. On day day twelve I did second feed which went well. Did my third feed on day thirteen, which did not go well, 5 hours after feeding I notice leafs were cured up, I brought the lights up to 21 inches and fixed the problem. Light burn. Day fifteen I tried LST which did not go well since this was my first time doing this. Day 16 ladies where back to normal so I did Fimming and see how that works out for me. Wish me luck.

Likes
10
Share
@WorldPeas
Follow
Gave her a haircut at the beginning of the week, buds are fattening up quick. Im seeing noticeable changes daily. Increased light on time by 3 hours to 23 hours on. Feed has changed with the addition of Cycos swell (2.5ml/L) and Supa Stiky (2ml/L) and removal of potash plus. All to aid in the development of the phattest buds possible 😁
End of Week: Noticed rust spots on some fan leaves ref grow question. Gave her a flush of PH'D water and Kleanse as it was time to anyway dialed the Bloom A + B back a little to 2ml/L. Let's see how she picks up. Just starting to notice frosting on some of the sugar leaves.

Processing
Likes
6
Share
@Makevelius
Follow
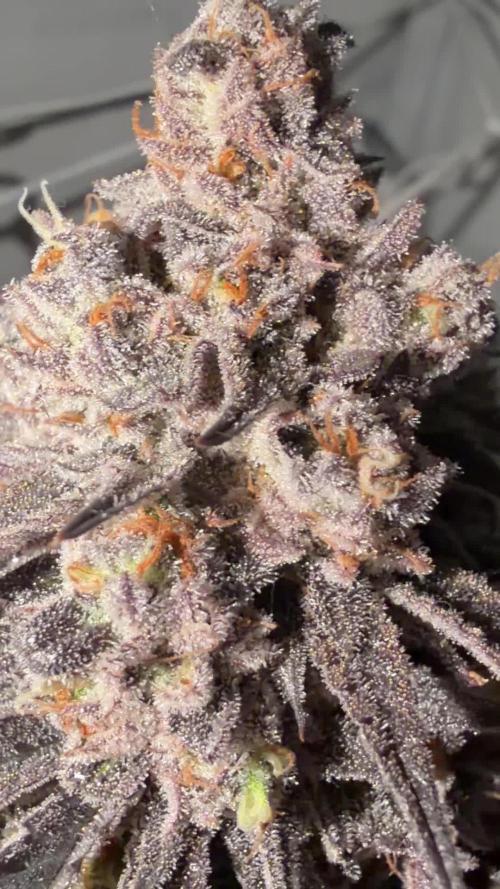
I could smell her at this stage and she smelt of a citrus berry smell.
It’s just tantalising need now..
I had a solid ten days of sun and she loved it.
She is growing quickly too I assume that is the nutrients taking full effect and the perfect weather.

Processing
Likes
49
Share
@hawkeye_diesel66
Follow
She is going great. She was a little close to the light so on day 47, I gently pinched her and broght her main down and she is loving it. I was able to move the light lower now and she has responded well to it. This is the biggest autoflower plant I've ever grown.
Day 49; wow this plant is a beauty and a lovely one to grow. Those buds are looking good and it becoming pretty pungent in there when the fans are off.


Likes
4
Share


Likes
14
Share
@MrWigglyJiggly
Follow
This girl is currently in the darkness to speed up the process a bit. She's been flowering for over 63days already and white pistils dont seem to stop coming out. I think this is before of her strong sativa strain. Anyway, next week will be about her being harvested. I hope to get at least 8oz out of this girl. Let's see if i can do it.

Likes
12
Share
@AtomicOrgy
Follow
Had to harvest because the mold was spreading. All top buds that were dense had mold inside. It was in the early stages.
Lots of undeveloped and airy buds on the lower sites.
I fell she could have gone big in the next 10 days.
The umidity of the air was between 40 e 50 percent.
272 grams of wet buds hanging to dry.
95 grams of trim that went to the fridge.
Overall it was nice and to grow it, although it delayed A LOT. 15 weeks and the buds weren't developed, this is not OK. I'll wait for it to dry and I'll update you guys.
Update:
After 7 days I had 55g of flowers. A lot of airy undeveloped buds, but the smell is incredible, the taste is great! I loved it. I'm growing it again!
The effect is cerebral, but quite relaxing.
Likes
4
Share
@BombBuds
Follow
Das war’s!
Außer den vereinzelten Samen die ich in der seifuku gefunden habe bin ich sehr zufrieden wie alles gelaufen ist!


Likes
3
Share
@PhinolaGreen
Follow
4. Woche
Alle Ladys wurden 3x getoppt, jetzt mache ich eigentlich nicht mehr viel, nur noch bisschen in Form bringen und dann dürfen die Ladys wachsen, wie sie wollen 😁
Likes
14
Share
@Inhaledmonkfish
Follow
Day 1 of week 3 flower loads of small buds everywhere will be finishing flower burst feed end of this week then starting the pk9-18 should start seeing some big buds on there soon.
Starting to smell decent and seeing loads of growth on the buds everyday!

Likes
14
Share
@Erik99
Follow
Muy contento en esta tercera semana de flora, se le hizo la ultima limpieza de bajos y un poco de defoliación.
Ya se pueden apreciar perfectamente las preflores y sus distintas coloraciones, ya que al ser de semilla aunque todas sean la misma variedad cada planta muestra sus fenotipos dominantes.
