


Likes
28
Share


@Hawkbo
Follow
Day late on the update, pics/vids were taken on time tho just been a crazy week of harvests and trimming and keeping up with these. I linked up with Rain Science Grow Bags on Instagram and got them to offer all my followers and friends a discount of 10% off entire order from their site with the code ' bangdang ' so if anyone is in the market for a pot upgrade use that code. I got them in the mail 3 days after I ordered. Reason I went with Rain Science is because they offer identical air flow for rapid growth as the radicle bags, just using a different material and a tighter knit so water doesnt flood out the sides during feeds and when you pick these up when the coco is dry, it wont fly all over the tent like with the radicles. They're the optimal bag for autoflowers especially. These are all doin aight, I think the ph might be a little off by the twisted growth maybe cuz of the soil it might be too low. The dry out mad quick.


Likes
1
Share


@WeedSherpa_420
Follow
Blacked out all windows in the shed and moved Moby Dick plants here from greenhouse to ensure flowering as they are now in darkness for 13 hours uninterrupted. Growing very well for 7 week old. Ran into some nitrogen deficiency problems as these Phenos are very nutrient demanding but still no problems. Will keep in flower for 4 weeks and bobs your uncle

Likes
26
Share


@MG2009
Follow
05/19/2021
Week #7 flower.
Gave her a good rinse today she was covered with pollen from nearby trees, drinking more water took 2 full two liter bottles before any runoff, soaking it up like a sponge.
Couple hours later fed her some (1-3-3-1.5)
N-P-K-calcium
I anticipate two more weeks till harvest but we will see. Just got to keep her hydrated for next couple weeks.
Apparently she is perking up! after taking a rest for a week or so. And putting on new flowers, and Tangie parentage is very identifiable in her SMELL! WOW
Enjoy the videos.🙏
Ps.
I decided to fix floppy stem, hopefully it will now put more effort into finishing flower!
Will she swell in last weeks??
Likes
49
Share


@masterofsmeagol
Follow
MAY 17th I'll water the 10th planet again tomorrow. Things are going amazing! I topped one of the blueberry cheeses and fimmed another. I'm not seeing any stress. If they seem good I'll hst some of the others. This doing ONE thing at a time helps figure out problems. It's 75 right now but it was 39 this morning.
UPDATE: IT STARTED FUCKING SNOWING TODAY. Forecast looks good and others are putting plants out. I'll hold off. They'll go to the garage soon for hardening off. Looking at other diaries I had much bigger "clones" but they always come full of problems (see last year). These plants are the healthiest ivecever grown. I'd rather have a healthy plant half the size than a clone with a bunch of issues. Tomorrow I'm planning to wash my stakes and grow bags. I'll get the palletts in position and move my cage. I also am considering either putting a small pvc cover on my cage or finding a way to attack something to the trellis system for heavy rains. If anybody has ideas I'm all ears.
5/18 DIDN'T WATER TODAY. Soil was dry but the pots were heavy. I could feel some moisture through the drain holes. I think it would've been alright either way but I'm erring on the side of caution. I'll check again later in the day. I topped one and fimmed anotger of the blueberry cheese. The purple punch is quickly catching g up to her sisters. I HAD to add a small ring around one of the purple pounce plants as it was WAAAAY lighter than the others. It's possible it could've gotten less water than the others last time due to its positioning. I'm also considering adding silica next feeding. So much left to do before they go outside. Oh and it was fucking snowing here yesterday! May 17 and it was snowing middle of the day. Morning temp wad 31 this morning so I'm staying cautious and making sure I have all my ducks I'm a row before I go outside. I'm also weighing options to either add a pvc hoop on top of my cage or look into protecting plants individually come late fall with our horrible weather. I'm leaning towards the pvc top. I think that would greatly help things.
UPDATE: Went back over at four and everything's looked great. Leaves praying to the sun. Topsoil is dry as fuck but I can still feel a little bit of moisture through the drain holes plus they have a little heft left to them. I plan on watering tomorrow and see how that goes. I wanted to add silica but I'm afraid of changing to much or raising the ph of the soil.
5/19 Found out that my scale will actually weigh the three gallon pots! I don't have an empty one to fill with dry soil to compare though. WATERED everything today. Topsoil was totally dry. Some plants had some heft to them. However I last watered on the 15th so I decided to cut back on the amount of water and see how that goes. Instead of the full 28oz powerade bottle I gave them a little over half. I tried for approx 16fl Oz per plant. Everything is looking great. Other than the little runt. I don't know whatcthecdeal is with that one bit it may get given away or culled. I also FIMed a purple punch.
UPDATE: Went back over around 11 and boy weren't the plants looking good. I'm moving my cage and sanitizing my pallets tomorrow. I sanitized my grow bags. I vleaned them with the baking soda and water and a scrub brush but since I had that problem with fusarium last year I then soaked them in a h2o2 solution for 20 mins before rinsing them off and letting them dry. I am so stoked for this season. Wondering about the pvc top and whether it's necessary 🤔. I have TONS of heavy equipment (well dad does) but the smallest thing we have is a backhoe and a bulldozer neither which I'm to inclined to use to move big plants. I thought that since the door to that garage is large enough to drive a front end loader in than if I could find a way to make my pallets mobile I could bring them in if storms are coming. I worry to much. I also got rid of anything that could gave spires on it. Ilk need to wash my plastic trellis netting and the bamboo as well but better safe than sorry.
5/20 Plants are still growing like weeds and are the ones I HST are recovering nicely. Soon they'll go out to the garage and spend their days outside in the sunshine and their nights inside the garage while I harden them off. Having trouble uploading stuff right now.
5/21 Topped two blueberry cheese and one purple punch. Plants are still doing great. We are getting close to go8ng outside in tye forever homes in smart pots ranging from 10gal to 50 gals. I still need to sanitize the pallets but this week I plan on hardening these girls off fully.
5/22 I weighed a couple of the plants and they were different. I think I got a couple 7lbs one that was 6 something and a heavier one that was 8. Looks like I've found the right amount. I plan to water tomorrow. They'll be moved in the next couple days to the garage and I'll let them fill the 3's before they go in their final homes. Plants are recovering from HST great. Still getting cold nights here. Honestly if I didn't have a major life event happen they'd be outside hardening off now
5/23 Watered everything with approximately 18oz of water. I am either going to move plants outside today to indirect sun (even though they've handled full sunlight from an open window) in the garage and keep the light going for a little longer. They need to fill their pots before they go in their forever homes. I've got some work to do but it will pay off.
EDIT: Cage has been moved to its new home. A huge pallet takes up most of it but I have littler ones that will fit in. I just haven't had a chance to disinfect these. I'm probably going overboard but I'm not fucking around with that fusarium or other any pathogens this year. I'm going to use the systemic organocide once I go outside. It's going to rain tomorrow amd might be cold but I still move the plants to the garage in the morning.


Likes
8
Share

@DogDoctorOfficial
Follow
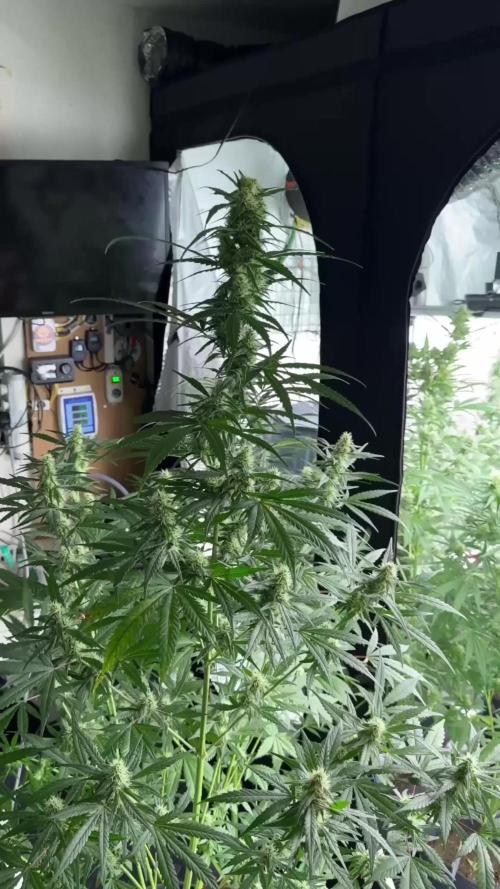
🌸 Week 5 Flower – Gelonade Journey
What a week! The Gelonade girls are now stepping fully into their flower form, and it’s breathtaking to witness. The evolution is clear: their structure is leaning beautifully toward the sativa side, with long, elegant branches reaching outward and bud formations stretching gracefully. Even though Gelonade carries a 60% sativa / 40% indica balance, the girls are clearly showcasing their sativa influence, airy yet strong, expressive, and absolutely stunning.
✨ Sativa Stretch & Structure
The branching is art in motion, every node working like a painter’s brushstroke on a living canvas. The main colas are elongating, and even the funky pheno is showing its own charm in how the leaves and flowers express themselves. It’s one of those weeks where you just stand back and admire.
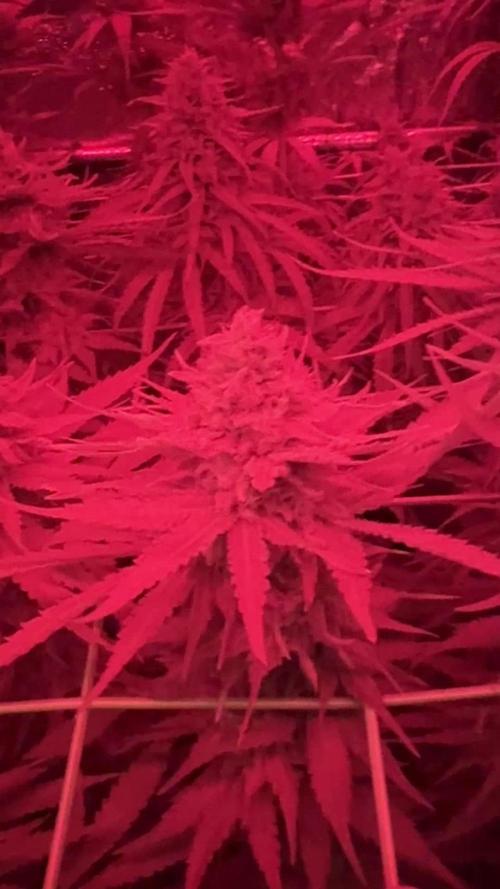
⚙️ Smart Growing with Sensors
The WCS2 substrate sensor from TrolMaster has been invaluable this week. It constantly reads moisture, EC, and temperature directly from the soil, helping to decide exactly when to feed and when to hold back. Instead of guessing, we’re guided by real data, a powerful ally for keeping the roots in balance.
💧 Nutrient Recipe Update
This week we reintroduced Aptus All-In-One Liquid at 1 ml per liter, complementing the standing mix of Aptus Regulator, CalMag Boost, and Plagron Power Buds, Sugar Royal, and Green Sensation. The reasoning is simple: as the flowers demand more, a little extra balanced nutrition ensures the canopy stays lush while the energy shifts toward bud production.
💡 Inner Canopy Lighting
One of the biggest joys this run is the extra canopy lighting. The Future of Grow and ThinkGrow LEDs shine from above, but the added under-canopy strips are filling gaps and ensuring photons penetrate deeply. Instead of shadowy corners, the girls are glowing top to bottom, every leaf touched by light.
🌿 Recap & What’s Next
From seed to now — germination, veg, stretch, and into this fifth week of flower — the Gelonades have shown resilience and individuality. Pheno #2, with her unicorn leaves, continues to amaze, while both are stacking into tall, elegant forms.
For next week, we expect more density building, pistils shifting color, and the first whispers of resin glands sparkling under the LEDs. The journey forward promises more fragrance, more structure, and more beauty still to come.
💚 Closing Thought
This week, the Gelonades remind us of the elegance of balance, between sativa and indica, between stretch and strength, between data and instinct. Every leaf, every branch, every bud is a note in a song that is only just beginning to play.
May the branches stretch without fear,
may the buds swell with light,
and may each day bring us closer
to the harvest of dreams.
📲 Don’t forget to Subscribe and follow me on Instagram and YouTube @DogDoctorOfficial for exclusive content, real-time updates, and behind-the-scenes magic. We’ve got so much more coming, including transplanting and all the amazing techniques that go along with it. You won’t want to miss it.
•GrowDiaries Journal: https://growdiaries.com/grower/dogdoctorofficial
•Instagram: https://www.instagram.com/dogdoctorofficial/
•YouTube: https://www.youtube.com/@dogdoctorofficial
⸻
Explore the Gear that Powers My Grow
If you’re curious about the tech I’m using, check out these links:
• Genetics, gear, nutrients, and more – Zamnesia: https://www.zamnesia.com/
• Environmental control & automation – TrolMaster: https://www.trolmaster.eu/
• Advanced LED lighting – Future of Grow: https://www.futureofgrow.com/
• Root and growth nutrition – Aptus Holland: https://aptus-holland.com/
• Nutrient systems & boosters – Plagron: https://plagron.com/en/
• Soil & substrate excellence – PRO-MIX BX: https://www.pthorticulture.com/en-us/products/pro-mix-bx-mycorrhizae
• Curing and storage – Grove Bags: https://grovebags.com/
⸻
We’ve got much more coming as we move through the grow cycles. Trust me, you won’t want to miss the next steps, let’s push the boundaries of indoor horticulture together!
As always, this is shared for educational purposes, aiming to spread understanding and appreciation for this plant. Let’s celebrate it responsibly and continue to learn and grow together.
With true love comes happiness. Always believe in yourself, and always do things expecting nothing and with an open heart. Be a giver, and the universe will give back in ways you could never imagine.
💚 Growers love to all 💚


Likes
12
Share


@NorthEuropeanGrower
Follow
Finally two of them started to flower. (Northern Lights and White Widow)
All seems to be stoped from growing taller.
Whats you expectations for this no money grow? Am I gonna have something in the end? And is it possible that the Wite Widow can be harvested in august?


Likes
15
Share


@TheBulldozerSicily
Follow
Dopp 1 settimana di sola acqua e ambiente molto umido, Aggiungiamo i nutrienti all'acqua, 50 ml gro 50 ml Micro 50 ml Bloom
Portando l'ec dell' acqua da 250 a 1000... ma domani aggiungeró un pp d'acqua per scendere l'ec a 850. Nelle foto ci sono anche 3 autofiorenti che non appena si sggiusta il tempo andranno fuori dalla tenfa, outdoor proviamo anche questo!
Likes
3
Share

@FicoCG
Follow
Hey Leute,
Chup Chup die kleine Lokomotive ist stark am Dampfen!!!
Die Woche 7 ist im vollem Gange und die Buds werden immer größer ^^
Ich konnte noch schnell genug reagieren, habe mich jetzt bei einem ppm von 1200 eingependelt.
Die Hitze von der Lampe ist immens, habe sie jetzt auf 75% dauerhaft reduziert, und die Höhe eingestellt, ca 1200 ppfd im ganzen Zelt.
Die Lemon Skunk (Red No. 2) rechts hinten macht mir etwas Sorgen aber jetzt ist es auch nicht mehr so lange bis zur Ernte!!!
Ich bin mal gespannt ob das mit dem Roten Licht wirklich eine Wirkung hat und ich bessere Buds und früher ernten kann.
Sie haben immer noch immensen Durst alle 4 Tage 5 Liter pH und Dünger Wasser.
Ich hoffe es gefällt euch wie sie aussehen, schade, dass man den Duft nicht durch Handy schicken kann!!!
Liebe Grüße Fićo!

Likes
5
Share


@RumplePuffskins
Follow
It’s getting cold and damp. Fingers crossed for a couple warm weeks into croptober

Likes
4
Share


@QixxGrows
Follow
Day29: New sets of leaves. I'll repot and switch to proper Veg Lights on the weekend.
Day30: I'll repot tomorrow.
Day31: Repotting done. She had a crazy amount of roots in the seedling pot. MUCH more than I expected. I switched to Veg lights at 90% power.
Day32: Settling in new pot
Day33 & 34: I had to perform some maintenance on the tent. Lost some hours due to that.
Day35: Growth really looking healthy. Although she's not really stretching high, she does look rather happy. I do like them thicc ;)
General: I need to put the camera somewhere else so that the growth can be better seen. Right at the end I'll edit out the white flashes. They're caused by the humidifier running and will be really easy to cut out without losing the gist of the grow :)

Processing
Likes
1
Share


Processing
Likes
1
Share


Likes
1
Share

@Organic_G
Follow
Sehen einfach wunderschön aus, habe die für die letzten paar Tage rein geholt da es sonst zu Kalt draußen war
Heute wird der Rest im Zelt geerntet und dann bekommen die ein neues warmes, sonniges Plätzchen im Zelt um nochmal ordentlich Blüten auszubilden…
Von der Optik absoluter Stunner, Purple in Kontrast zum knall Grün der Blüten, welche später noch Purpeln werden 😍😍

Likes
16
Share


@Chubbs
Follow
420FASTBUDS
FBT2107 WEEK 8
The two of these girls are growing amazing. One definitely is much larger than the other but both appear happy & healthy. I decided to do some LST training on them to allow more light to the lower flower sites. So far it looks like they're enjoying it and bounced back without skipping a beat. I did back off on the feeding of nutes since I started seeing crispy edges on my leafs and since then doesn't look lime it's got worse so back on track. Happy Growing
Likes
5
Share


@pzwags420
Follow
Start of week 3 blueberry is flowering and the stretch is almost over. The seedlings are growing nicely.the box got up to 100f this week during mini heat wave had to put ice blocks in rez to lower temp down from 80f. I look forward to the 3 other new strains I’m running. My GSC seedling is looking a little pale I should have waited longer to change rez over to bloom nutes. I have top dressed some organic fertilizer near drip line of nutes 4-6-4 one month release. I applied to all seedlings except blueberry. I reduced blumat on gsc, ww, and ch until surface dried a little bit as my gsc was showing signs of overwatering. Gsc is starting to green back up. My bb had to nanners i plucked them I hope these are all. It could be from the high temps or the one night I had a light leak. BB larger plant receving 1000 ppfd.i turn light back down a notch Gsc leaves started cupping now she’s getting just 550 along with other seedlings.will continue to monitor for improvement and ramp lights up a little later if needed as plants should grow into light.
Likes
2
Share


@Mr_nugs_lover_David
Follow
The nuggets are very sticky and compact, they are frosty as hell and the aroma is very strong already. I loved this strain. She's such an amazing autoflowering strain. Very powerful.