
Likes
Comments
Share


@farah4weed
Follow
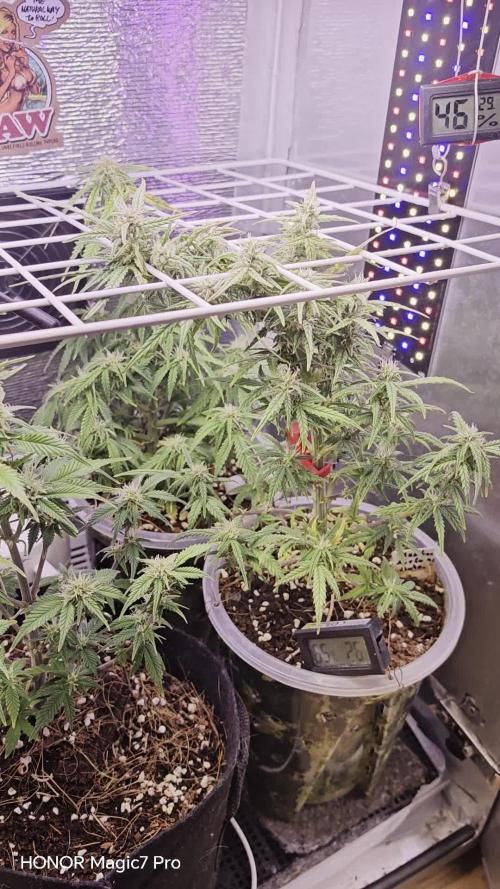
I used overdrive fertilizer again this week.
My God, girls get more beautiful like this.
The last weeks make me very happy.😍🌷💐💥⚘️👽👽🎍
From now on, I will be very careful because the more I improve the conditions, the better results I get
Especially the temperature difference between night and day.
humidity
Box ambient temperature
👊👊💧♠️


Likes
24
Share


@Wicked_Stix
Follow
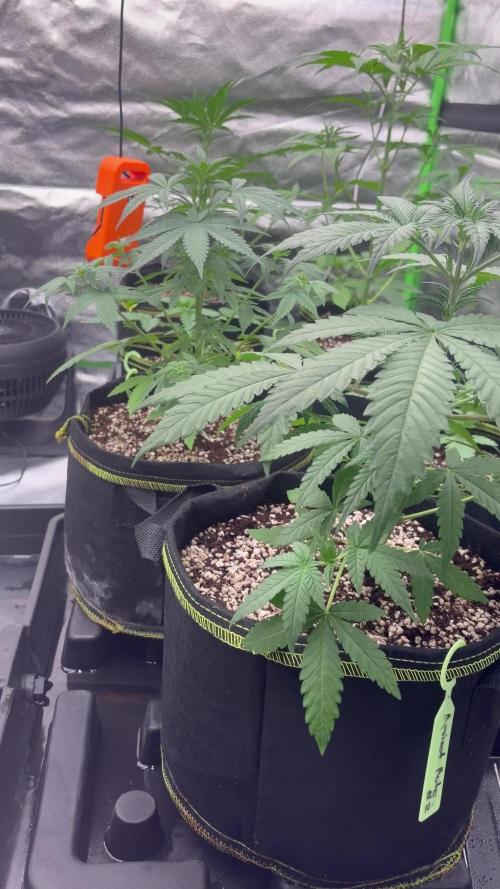
We are at 21 days from these girls breaking the surface and they are making progress. I noticed at the beginning of the week that they were a little overdosed on nitrogen so I added 2 gallons of tap water to the reservoir and adjusted the ph to 6. They are still looking a little heavy on N but their growth rate is going great so I think it should balance out by the end of next week. I dont plan on doing a water change until I flower them. I left the plants alone most of the week. Tied most of them down to spread them out and defoliated a few lower leaves on day 20. The branches on most of these plants are thick and solid already. They don't budge easily. Bananasicle is looking pretty funky with uneven branch and node growth but we are just going to push forward. Still pumping nutrients and beaming light 24 hours a day. I'm thinking day 28 we will switch them to flower and see if any of these ladies can bring some❄️🔥💨
Likes
7
Share


@AlexiBazayep
Follow
This is my frist time growing
Week 2
I'm Start to LST But look Like DST(Down stress traing)🤣🤣🤣
Just use little dry poo of mr.kook kook😂🤣🤣
Week 3
I don't know why many people told me befor grow like "you must not train hard with auto you must only LST and i ask why they told this a rule i want to show them but i don't know where this way i can show 🤔🤔😏
Week 4
I try to start to mix a nutrient like to mix a cocktail(i was experian be a mixologist) but i don't know about vollum i try to looking many % on this nutrients but 10 brand 10 way ok i random 😂😂😂😂😂
Week 5
Wow this I think this look grow very fast ok i'm add more nutrients and do the defoliation and i will hst on next week😙😙😙
Week 6
Hey what happen about my picture in 1-3 week why i did't see if another see normol is ok if did't see how i can do?
I'm do the hst already but i think my plant will be flowing i stop Nitrogen and add P K and i will make double element sub food plant yes my leaf is burn 🤣🤣🤣😂🤣
Week 7
Wow this smell like a kaluh and little green techture and little aroma i very love this smell
I don't wan't belive i can grow this plant before i growing i working in my own business and ex-partner they said"you just only watching video and youtube don't have experien to grow like him if me don't have him i will never see this ganja pants in my life"
Yeah 3 mount after i quick this job and call my ex-chainese friend(yes i was sleep with her🤣) Her said now LM301h is the best ok I trurt her and start grow till to day after i harvert i will give the bud to some people test and coment and after that i will back to tell you this way that I'm hope this Right or Wrong thank you i hope i don't wan't see a Red spider mite😂


Likes
6
Share


@colla69
Follow
Everything going well so far, Res change on day 19 + started ScrOG
Day 21 will have the first 12h night.
Need to keep scrogging during the stretch.. but i won't be here -.-
UPDATE:
I will be going away at the and of this week for Approx 14 Days..
Day 25 [f3] I will move the plant to a bigger container so that it has enough water to survive on its own
Likes
20
Share


@Hawkbo
Follow
Shes a bushy one, all these plants are growing so bunched up cuz they were stunted before the flip, expecting a disappointing run overall for quality although roughly 80% of the tent is purple so it should look cool atleast


Processing
Likes
4
Share


@HeavensHarvest89
Follow
I'm starting to feel like a broken record but week 11 was another easy week finishing out the week with soil ph right at 6..8 and she is just getting fatter and fatter by the day. now day 2 into week 12 with another 2 weeks to go before I chop her.. cant wait to see the final product

Likes
48
Share


@GERGrowDesigns
Follow
A Special Project from Germany and Welcome to Flower Week 4 of GoodTimesGenetix Blue Cream Haze
I'm excited to share my grow journey with you from my
GoodTimeGenetix Seeds .Im the First Person outside my Friends Company who got hands on this Strain .
He Managed over a long time to Cross these Strains:
-Blue Dream (Blueberry x Super Silver Haze - Female)
-Ice Cream Haze (Gelato x Wedding Cake x Crockets Haze - Male)
They Done a lot of Tests for a Nearly Perfect Stabilisation of this Genetic and Feminized them aswell .
This one is Professionell Created In Germany , Growed in Germany and presented To the World on Grow Diaries.
Here’s what I’m working with:
• 🌱 Tent: 120x60x80
• 🧑🌾 Breeder Company: GoodTimesGenetix
• 💧 Humidity Range: 60
• ⏳ Flowering Time: 8-9 Weeks
• Strain Info: 23%THC
• 🌡️ Temperature: 26
• 🍵 Pot Size: 20
• Nutrient Brand: Hy-Pro
• ⚡ Lights : 600W x 2
I would truly appreciate every bit of feedback, help, questions, or discussions – and of course, your likes and interactions mean the world to me as I try to stand out in this exciting competition!
Let’s grow together – and don’t forget to stop by again to see the latest updates!
Happy growing!
Stay lifted and stay curious!
Peace & Buds!


Likes
16
Share


@Le_Duc_Du_Bud
Follow
Salut a tous 🍁
On es arrivé à la fin je termine cette semaine de rinçage à l'eau clair et on coupe.
L'odeur citronné Skunk Vien d'apparaitre et cela et dingue je kiff

Likes
5
Share


@Lagriculteur420
Follow
This week plant continue growing and Blooming, i Can see the very first small pistil, i've reworked my lst and made a top crop superguano top dresses

Likes
52
Share


@Santica_Garden
Follow
So we've reached the end of Week 4 from Seed, day 28 and things are looking much better than they did before..... Apart from one of the plants which I explain in the video I have uploaded. Happy Growing guys, any questions just ask away! 👍🏾🌱💚😎

Likes
46
Share


@Capo420
Follow
Been an awesome week 😎
Lots of things going on last week.. We started LST, made a few adjustments, gave the ladies a haircut, and further refined the nutes👍
Looking forward to seeing some signs of flowering this week. 🙏
I had believed that I was a man of patience 😅
Stay tuned for pics and videos throughout the week.🙌
Happy Growing!
🤙💚💪🌱😎🌱💪💚🤙
Likes
11
Share


@Andres
Follow
he behaves well outdoors we will see what he can offer us later ... it is not long before he starts his flowering ...
Likes
2
Share

@Fyno_TH
Follow
Noticed Magnesium deficiency on lower leaves. Increased dosage in this week’s feeding and monitoring pH to ensure recovery
Likes
37
Share


@Astrolavos
Follow
I'm so excited! This week she almost achived double size and show her first "hairs".
Along with the 3x50W leds i added a 250W HPS lamp for the flowering stage.
With the adding of HPS lamp the temperature rise about 5 celsius degrees and she became very thirsty! The "nutrients day" i use tap water and all the other days i use RO water only.
My grow room has a short ceiling so i'm forced to light the plant from the sides and it seems to respond well on that!


Likes
9
Share


@SkunkyDog420
Follow
Hallo zusammen 🤙.
Sie wächst sehr schön und macht keine Probleme.
Die 7 Woche ist rum und man könnte sie ernten. Trichome sind alle weiß und die Buds Steinhart.
Rabattcode für den BIOTABS-Webshop https://biotabs.nl/en/shop/ GDBT420, damit erhalten Sie 15 Prozent

