
Processing
Likes
Comments
Share


@DIRTYKEG
Follow
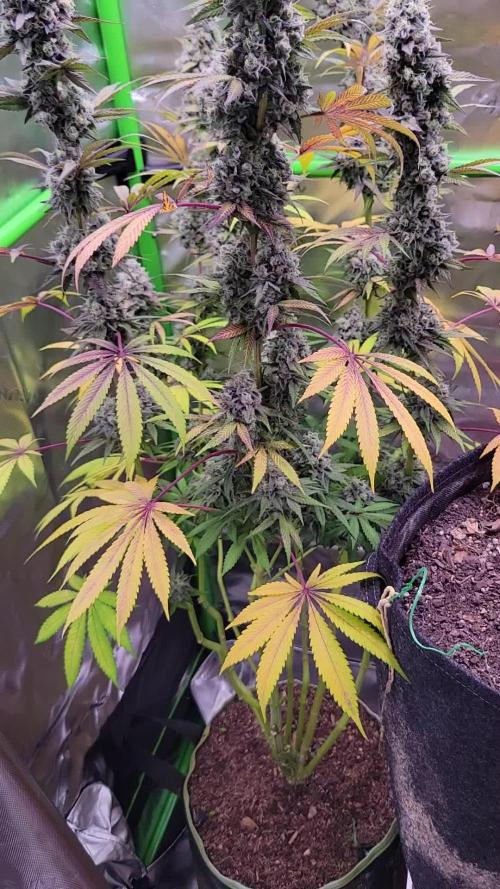
Wow I love it so crazy and fun at this stage the defoliation was allot more work then I thought jeez..... but there looking beautiful but hope you like now I got to go defoliat the last 2...


Likes
24
Share


@Mastr
Follow
This strain my favourite I love her orange smell and lots resin on sugar leaves lots off them
I let her grow atleast another week or more and still feed her with nutrient maybe start flush next week will update every other day new pic or videos thanks everyone
Update I think she is bruce banner coz she slow flowering and take over 11 week to grow witch is and also smell and bud shape
Today I seen most steam bend down and they need support so I try my best
I will feed her till day 84 then I give her just ph water for week and hopefully around day 90 she is ready
Day 83 top leaves start getting yellow 💛 so it's good thing plant go to last week off flowering

Likes
21
Share


@DeepRootsGrowTrees
Follow
SATIVA DREAM by KANNABIA
Week #6 overall June 11th-18th
Week #5 Veg
This week she recovered from the break in her stem and was doing well so I topped her towards the end of the week.


Likes
5
Share


@HIAZ_urbanbudfarmer
Follow
Going to mainline this plant, was topped today at the 3rd node. Interested to see how this pheno turns out as I've done a few runs with this strain recently, both from seed & clone. Two very different phenotypes, 1 grew very bushy with bigger buds & the 2nd was quite different with smaller buds. Both were pretty similar when it came to quality & potency but phenotype 1 yielded more each time around an ounce +. She is in week 3 day 16


Likes
18
Share


@DogDoctorOfficial
Follow
Seedsman Seeds Germination Report - Run 01: The White OG Journey
Kickoff to Germination: The Start of Something Great!
Welcome to the beginning of this adventure with The White OG feminized seeds from Seedsman Seeds. Excitement is in the air as we’re searching for strong, resilient plants, and this journey has all the best tools and tips. Starting with five seeds, we’re aiming for a solid beginning and maximum potential. Let’s explore every step in detail to make this grow as robust as it can be!
Germination Process: Tools of the Trade
TheCannaKan: The Ultimate Germination Gadget
I’m thrilled to share my love for TheCannaKan, a little germination wonder! This tool is essential for any grower who wants to start their seeds with precision and care. I noticed rapid results in just 24 hours, with the seeds showing signs of life. At about 32 hours, I transferred them to the Root Riots, which brings us to the next exciting stage.
Why I Love TheCannaKan:
• Quick Results: Seeds sprouted rapidly, minimizing wait time.
• Consistency: Keeps moisture levels optimal for uniform germination.
• User-Friendly: Simple yet effective for both new and experienced growers.
Root Riots and Their Role in Root Development
After sprouting, I placed the seedlings into Root Riot cubes under a dome. Root Riots are fantastic for stabilizing young plants, providing an airy and nutrient-friendly environment that promotes robust root growth from the start.
Benefits of Root Riots:
• Root Aeration: Soft yet structured, these cubes support root expansion.
• Moisture Retention: Holds just the right amount of water for growing seedlings.
• Enhanced Root Health: The cubes are ideal for preventing damping-off and ensuring healthy, white roots.
Nutrients to Kickstart Growth: Aptus Holland Regulator and Startbooster
To give the seedlings a perfect start, I added Aptus Holland’s Regulator and Startbooster (1ml/L each). This mix promotes early root and stem strength, giving seedlings the ability to absorb light and nutrients more efficiently.
• Aptus Regulator: Enhances plant resilience, aids in nutrient absorption, and promotes early vitality.
• Aptus Startbooster: Adds a balanced mix of growth hormones and nutrients that are ideal for the early stages, encouraging healthy roots and faster seedling growth.
Light and Environment: Future of Grow FOG LED with TrolMaster Tent X Controller
I’m using a Future of Grow (FOG) LED at 600W, but keeping it dimmed down to around 200 PPFD. This setting is controlled by the TrolMaster Tent X Controller to give the plants the perfect start without overwhelming them with intense light. Controlled lighting helps seedlings to develop without stress, encouraging healthy growth and internode spacing.
Shoutouts:
• Future of Grow LED: High-quality, efficient LED light that adapts well to seedling and veg stages.
• TrolMaster Tent X Controller: Reliable and intuitive control over light, humidity, and more. Perfect for a hands-off, efficient environment setup.
Observations: One Seedling Takes the Lead
At the end of this germination stage, it looks like one seedling has emerged as the strongest, while the others may need a few more days. Patience and observation are key; some seeds naturally take a bit more time to sprout. I’ll keep monitoring these with hope, allowing each seedling its own rhythm.
Grower’s Notes and Tips
• Consistency Matters: Germination is all about steady conditions—consistent moisture, gentle nutrients, and stable lighting make all the difference.
• Document Everything: Keeping a log of each step (like this one!) helps track growth patterns and provides valuable insights for future grows.
• Stay Positive and Patient: Not every seed will sprout at the same rate. Trust the process and remember each plant is unique.
Community Shoutouts
Thank you to everyone who makes this process smoother and inspiring—TrolMaster, Aptus Holland, Future of Grow, and Seedsman Seeds for amazing genetics and tools, as well as the growers’ community who share insights, tips, and encouragement along the way.
Next Steps
Now that we’re through germination, we’ll move into the early growth phase. I’ll keep documenting the lighting adjustments, nutrient changes, and growth patterns of each plant, especially that eager seedling leading the way!
Growers Love, and here’s to a strong start for the future of this grow! 🌱
DISCOUNT CODE - SeedsmanSeeds - DOGDOCTOR 10% off
As always thank you all for stopping by, for the love and for it all , this journey of mine wold just not be the same without you guys, the love and support is very much appreciated and i fell honored and so joyful with you all in my life 🙏
With true love comes happiness 💚🙏 Always believe in your self and always do things expecting nothing and with an open heart , be a giver and the universe will give back to you in ways you could not even imagine so 💚
Friendly reminder all you see here is pure research and for educational purposes only
💚Growers Love To you All and remember to keep that smile big and alive 💚

Likes
21
Share

@PavementPunk
Follow
Autumn is in full force. These colors are lovely only to be outdone by the smell which is still developing into a beautiful bouquet of aromas. Describing it is tricky but its a dank floral and sweet treat that hits your nose. Perfect for my tastes. I like sweet and fruity ok but man that gassy stank is where its at! I raised my other plants about 3 inches to make up for the fact they are only getting 12 hours of light. My grow is still a bit unorganized but hopefully i can get it sorted out. Trying to keep a constant flow of harvests coming in. Zamnesia hooked me up with some free seeds and a 20% off coupon code to share which is: ZAMMIGROW2024 if any of yall wanna give permanent marker a grow. I recommend 👌 she is a pleasure to grow. Got some exciting new Zamnesia grows coming soon! Im also in the process of mixing up my own living soil ill update with that soon too. Also please excuse the absolute jankiness of my current boxy setup lol it is a biproduct of my unorganized grow. Im better than that. Happy growing friends ✌️ 🧡
Likes
56
Share


@nonick123
Follow
Día 8 (28/10) Subo a DLI 20
Spray solo H2O RO en el top del sustrato
Retiro la cúpula de humedad, porque una de las CBD Auto 20:1 tenia el tallo ligeramente doblado por falta de resistencia
Sin la cúpula y con el ventilador a la potencia mínima (1/10), van a tener una suave brisa que va a hacer que se fortalezca el tallo!
Día 9 (29/10) Las plantas se han estirado mucho y se tambalean un poco
Creo que deberían haber tenido un DLI más alto desde el principio!
Día 10 (30/10) CBD Auto 20:1 y LSD-25 Auto se encuentran "tumbadas" porque el tallo se ha estirado mucho!
Hago un soporte casero con una brocheta de madera + alambre + clip de enrejado para mantener los tallos verticales!
Spray solo H2O RO en el top del sustrato
Día 11 (31/10) Las plántulas se muestran verticales y felices! Una de las CBD Auto 20:1 está mostrando un desarrollo muy rápido!
Spray solo H2O RO en el top del sustrato
Día 12 (01/11) Spray solo H2O RO en el top del sustrato
Día 13 (02/11) Las plántulas se están estirando mucho! Creo que las falta DLI
Subo el DLI a 30
Spray solo H2O RO en el top del sustrato
Día 14 (03/11) Introduzco la 1ª BioTab a 5 cm de profundidad, lado derecho
1er Riego! 750 ml de H2O RO + ORGATREX 5 ml/L + BACTREX 1 g/L
💦Nutrients by Bio Tabs - www.biotabs.nl/en/
🌱Substrate PRO-MIX HP BACILLUS + MYCORRHIZAE - www.pthorticulture.com/en-us/products/pro-mix-hp-biofungicide-plus-mycorrhizae
"GDBT420" 15% DISCOUNT code for the BIOTABS Webshop https://biotabs.nl/en/shop/
Likes
6
Share


@Lomba610
Follow
is getting bigger and bigger, I made some toppings and continued with lst, out of curiosity I measured it, it occupies a space of 60x60cm impressive how fast it grows, this week I raised the ec to 2000, I think next week the I move 80x80cm to another box and make it bloom 🤩💪🏼


Likes
36
Share


@JeyGanesha
Follow
L'attesa si fa sempre più lunga,🤣più si avvicina il giorno del taglio netto e più sembra non passare... .. questi profumi mi fanno venire l'acquolina in bocca 😜🤤🤤🤪🤣😂 beh dai ancora poco e la gustero per bene😂👍🙏
Likes
20
Share

@DogDoctorOfficial
Follow
WEEK 14 — WEEK 10 FLOWER
Final Week Before Harvest – The Grand Finale
What a journey… from the tiniest seeds to this breathtaking final chapter. Here we are, my love: the last week before harvest. The girls have spoken, and their trichomes are almost fully there — cloudy, sparkling, just a kiss away from perfection. We’re now on pure water, letting them finish their last dance with all the grace and beauty they’ve built over these 14 weeks.
A Quick Recap: From Seed to Now
We started with two gorgeous blueberries, strong genetics shining from day one. Veg was steady, lush, full of life. Then came the transition to flower — explosive stretch, structure forming, and soon those first tiny white hairs welcoming us into the next phase.
We faced challenges. We faced heat. We faced bud rot. But we also faced everything together, and we acted quickly, smartly, and with love. And the girls rewarded us — every week fuller, denser, more fragrant, more colorful. Their personalities came alive in the phenos, and now they are standing in their final glow.
This Week’s Highlights
Oh my God… they are shining.
Absolutely shining.
Trichomes: Mostly cloudy, a few amber, perfectly on schedule — harvest any day now.
Colors: Yellows, fiery reds, deep purples, fading leaves telling us nature’s clock is ticking right on time.
Aroma: Classic, old-school blueberry. Sweet, berry-rich, nostalgic, absolutely unmistakable.
Buds: Fat, heavy, dense, dripping in trichomes. Both phenos are glowing — one brighter green, the other with deeper shades of red and purple.
Fading: Beautiful senescence on both girls — natural, graceful, textbook.
We are right at the finish line.
Harvest Expectations
In the next few days, the scissors will sing.
We’ll be harvesting full plants, hanging whole trees to dry — slow, gentle, respectful. Their size and colors will make it a little tricky, but we’re doing everything we can to give them the perfect drying process they deserve.
Drying time will depend on the room conditions, but we’ll aim for a slow, even dry to lock in the terps and the beauty they built during this whole journey.
What to Expect Next
Harvest — very, very soon
Whole plant hang
Slow dry
Monitoring temp & RH
A cure worthy of these colors
Final bud shots
Wet & dry weights
And of course… the big smoke report
What Not to Expect
No more feeding — only water
No more big changes in color or structure
No more pushing — they are done building, now they’re finishing
No surprises — just the smooth landing toward harvest day
Gratitude – From My Heart to Everyone’sTo the lovers, the haters, the curious ones, the loyal ones, the new followers, the silent readers, the loud supporters — thank you.
To the community, always sharing, always inspiring — thank you.
To the sponsors who kept these classics alive — thank you.
To everyone who stopped by even for a second — thank you.
Every energy counts, every click counts, every comment counts.
And if you want to see the entire journey in 4K, flower to trichome, leaf to fade — come join us on YouTube. Everything is there. Every detail. Every shine.
📲 Don’t forget to Subscribe and follow me on Instagram and YouTube @DogDoctorOfficial for exclusive content, real-time updates, and behind-the-scenes magic. You won’t want to miss it.
• GrowDiaries Journal: https://growdiaries.com/grower/dogdoctorofficial
• Instagram: https://www.instagram.com/dogdoctorofficial/
• YouTube: https://www.youtube.com/@dogdoctorofficial
⸻
Explore the Gear that Powers My Grow
If you’re curious about the tech I’m using, check out these links:
• Genetics, gear, nutrients, and more – Zamnesia: https://www.zamnesia.com/
• Environmental control & automation – TrolMaster: https://www.trolmaster.eu/
• Advanced LED lighting – Future of Grow: https://www.futureofgrow.com/
• Root and growth nutrition – Aptus Holland: https://aptus-holland.com/
• Nutrient systems & boosters – Plagron: https://plagron.com/en/
• Soil & substrate excellence – PRO-MIX BX: https://www.pthorticulture.com/en-us/products/pro-mix-bx-mycorrhizae
• Curing and storage – Grove Bags: https://grovebags.com/
⸻
We’ve got much more coming as we move through the grow cycles. Trust me, you won’t want to miss the next steps, let’s push the boundaries of indoor horticulture together!
As always, this is shared for educational purposes, aiming to spread understanding and appreciation for this plant. Let’s celebrate it responsibly and continue to learn and grow together.
With true love comes happiness. Always believe in yourself, and always do things expecting nothing and with an open heart. Be a giver, and the universe will give back in ways you could never imagine.
💚 Growers love to all 💚
Likes
11
Share


@artems
Follow
Marker is doing great, enjoying its meals as usual. The berry-like scent is a pleasant surprise, no gas yet though. Excited to see how it develops! 😊🌿

Processing
Likes
7
Share


@Kushizlez
Follow
Day 10F-17F
(Day 10F) Everything is looking on point. I’m going to soak in a gallon of lite compost tea diluted to 400ppms on each plant except for #5. I’m still a little worried I won’t make it through the stretch but at the same time I fear N toxicity just as much. I will give one more lite tea before the end of stretch, most likely at the end of this week.
(Day 12F) Ladies responded nicely to the tea except for BBB#1. It just isn’t looking as vigorous as it was last week. It’s the only one without an air hose so I guess it couldn’t hurt to grab one. The air hose does without a doubt prevent overwatering in soil and I’m surprised I don’t see more people using it. It’s cheap, effective and gives me similar results to growing in pure coco. I’m going to give one more light foliar spray of 3ml of calmag, 3ml of kelp and 2.5ml of insect frass.
(Day 14) Got the air hose hooked up to all 5 plants now.
I hate that I’ve been forced to defoliate so much in early flower and it is definitely reducing bud size. Last round my bbb’s had pistil clumps twice the size at this time and they were dealing with severe deficiencies. I’m hoping it’s just genetics or the fact they are larger plants.
(Day 15) I’m starting to see signs of N toxicity on the some of the new growth and overall growth on all plants except #1 has slowed. It was most likely caused by the foliar spray/tea combo. No more feeding anything for the next 12 days at least. Luckily it’s still pretty early in flower but I know that N tox can hit really hard after the stretch stops. I would be pretty upset if I vegged for 80 days only to get severe N tox in mid flower. Since it’s not breaking down in the soil, I should be fine. I’m going to defoliate some more of the large bottom fan leaves as they hold large reserves of extra nutes I don’t need. Hopefully these small defoliations aren’t stressing them at all. Next round I plan to do a big strip one week before flower, at transplant and a second big strip on day 21.
(Day 17) I think I was over-worrying about the seriousness of the N tox. I’ve seen it hit very hard in mid flower and can’t be too careful. It’s almost always caused by water soluble nitrogen so I’ll try to stay away from that unless I absolutely need it. My case does not look to alarming just yet. I noticed the stunting on #3 right after that last tea so I am going to stop giving the last liter of compost tea because of how unbalanced and separated at the bottom it is. It sure helped out the other 4 plants that didn’t get the granulars from the bottom of the bucket. I‘m planning to give a bloom tea around day 26 and a final top dress a few days later. #1 has now out stretched everything else in the tent. I honestly was not expecting that. If #3 didn’t get stunted this whole week I think it would be the taller/heavier plant.
Likes
28
Share


@ButtersStotch
Follow
2020-02-18 (Day 81) - I spoke too soon. This girl is stretching WAYYYY more than any other girl in the tent, I have to raise 1 light daily it seems. All in all even with the asymmetry this is the most beautiful plant I've grown. As stated in my other journals my heater crapped out and I am not buying another one so she'll have to deal with the cold night time temps. Hopefully the stretching slows down and she can start putting all her energy towards bud development. This is the thirstiest of all the other plants in the tent drinking roughly 1 gal every other day. Stay tuned to see this girl develop!

Likes
14
Share


@ApothecAries
Follow
I gave half doses of recommended indo products. This week i started pumping full doses of carbohydrates ( Sticky Bandit ) to each plant. Top fed Goguano Super Bloom 2-9-5