


Likes
Comments
Share


@Lebigrow59
Follow
Seventh week of flowering:
I opted not to put a net to facilitate access to the room.
As expected, the buds are starting to be too heavy.
I hang them one by one, on hooks high up.
The buds swell and still smell !
I increase the EC to 2.60
Good hydration, no dead leaves to remove.
See you next week !

Likes
7
Share


@Naujas
Follow
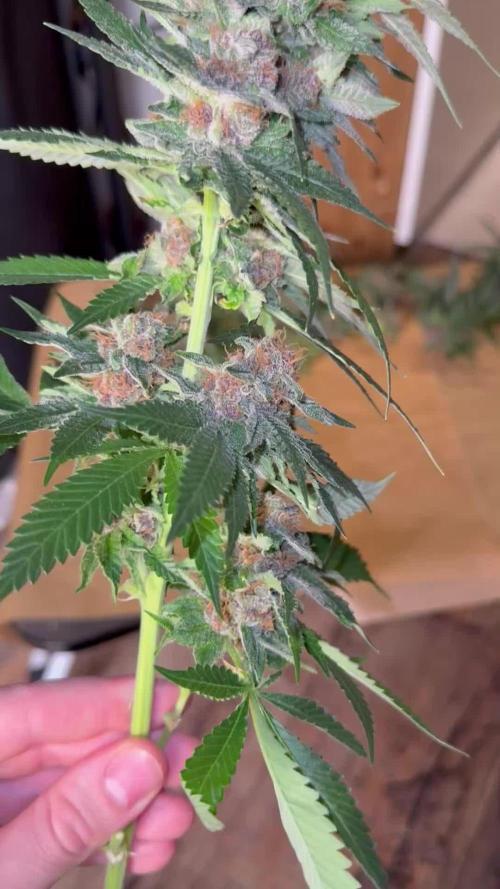
49 days have passed, it's true that this week I have a real summer, it's +29 outside, because of this, the temperature in the trunk is even higher, 32°-33°, which is why the girl experienced a lot of stress, her leaves look strange, although I always check the pH, I also gave a lot of nutrients, so I think it's the fault of the high temperature, despite this, her flowers continue to develop perfectly :) good luck to everyone.




Likes
2
Share


@Firepharmer
Follow
Trichomes trichomes !! What a beautiful plant 🌱 to grow , not big bud producers but absolutely coated.u can definitely tell it’s got the GCS in her , Terps are getting stronger now that really forum cut Girl Scout cookies terps with some creamy peanut tons . The stretch is about over now


Processing
Likes
15
Share


Likes
34
Share


@Canna96
Follow
Hey now, hope everyone is well, this week went pretty good, both Glueberry OG Autos sprouted, and look good for a week in. They are currently in Pro-Mix seedling starter mixed with perlite but will be transferred to Coco Coir/Perlite as soon as their roots fill up the solo cups. I have grown seedlings in Coco Coir many times but I prefer to start them in ProMix because as there are no nutes in coco, you have to start with tiny quantities of nutes and work them up each feeding, and seedlings can be very finicky to EC/PH etc., and some strains can even be much more so than others. With Pro Mix, there is enough nutes for the first several weeks so I just give them water with a plastic syringe every 2nd or 3rd day. I have found that starting seedlings in Coir doesn't really produce a big advantage (at least for me) but her time in Coir will come.
A couple things I also do is make sure to go by container weight above all else to know when to water. It is very easy to overwater seedlings and drown them, as I did when I first started. The other thing is I just lightly water around the very edge of the cup, to prevent drowning the roots, and also to force them to work their way out to the edges of the container instead of straight to the bottom.
I started prepping a few bricks coco for this grow last night, I am re-using the coir from my last grow. I flushed it down to .4 EC and I currently have it soaking in a Cal Mag solution of 2.0 EC. I will let it soak for a few days then flush it again back down to around .4 EC. This is important to prevent cal mag deficiency down the road. To flush I just use a garden hose and a couple of saw horses with a 2X4 running through the handles of some fabric pots filled with my coir. It makes it easy to flush, and also easy to catch runoff underneath and measure the EC. I inspected and tested 2 of my drainage system this afternoon as I always test them outside with a few gallons of water before I set them up in the tent. Not much to do this week but hand water them every couple days, and hopefully by next update one of them will be ready or damn near ready for her final home which will be a 5.4 Gallon Airpot. I will be giving the other away to a friend to see what he can do with it. Once in her final home she will get fed 4x per day, and the runoff will go to my tomatoe plants outside which will also be in coir.
I am super excited to crank this Medic Grow Spectrum X up and see what she can do. I am currently running her at 30% which is about 230 watts. I will be adding more seedlings to the tent here shortly to try and fill her up, but I started with the longest autoflowers and am trying to time them so they are all ripe within a relatively close time frame. Thanks for stopping by, stay safe, and Blaze On! 💪
Website: https://medicgrow.com/
https://growdiaries.com/grower/medicgrowled

Processing
Likes
13
Share


@FrenchDoctor
Follow
Day 2 of Bloom ! 😇 just Start bloom nutrients too.
Lights : Metal Halid for Grow 400W + 300w panel same of bloom / HPS for Bloom 400W + 300W led panel ( low coast amazon panel lol )


Likes
4
Share


@Fatbudz
Follow
I said!! it's huge
ready for flowering!! one week to change the light schedule to 12/12
I've already lost count of the toppings I've made. I will always take some of the bottom leaves out. that no longer catch light and only waste energy. I water every two days. small quantities and One feeding per week. I make adjustments whenever necessary. I also don't spend a lot of nuts as long as she doesn't really need food as in flowering. you will realize soon
Likes
7
Share


@Zaphod420
Follow
Been Flushing since day 60 and she has finally reached the end. REALLY like how she turned out and I think am about to but something really special in a jar!

Likes
22
Share


@CampaCavallo
Follow
Ultimo weekend per la Big Bud... porca vacca ho fatto le foto con l'obiettivo sporco... Scusate ragazzi

Likes
6
Share


@Back_woods_buds
Follow
Just to catch you up to speed since I’m starting the week before flower The big one I started from seed and then there’s a clone of her maybe the clone only be rooted for a week but the mothers 7 weeks since she popped up and she’s a been pretty easy she’s real Bendy but as usual I push it too far and have to get the tape out and she’s come back fine every time so far been pretty easy and probably one of the easiest ones I’ve ever claimed I mean this thing routed bike and my humidity was real low I didn’t have an even expecting it to route I was just I had to cut the branches so they weren’t in the dirt

Likes
17
Share

@TrickzGrowz
Follow
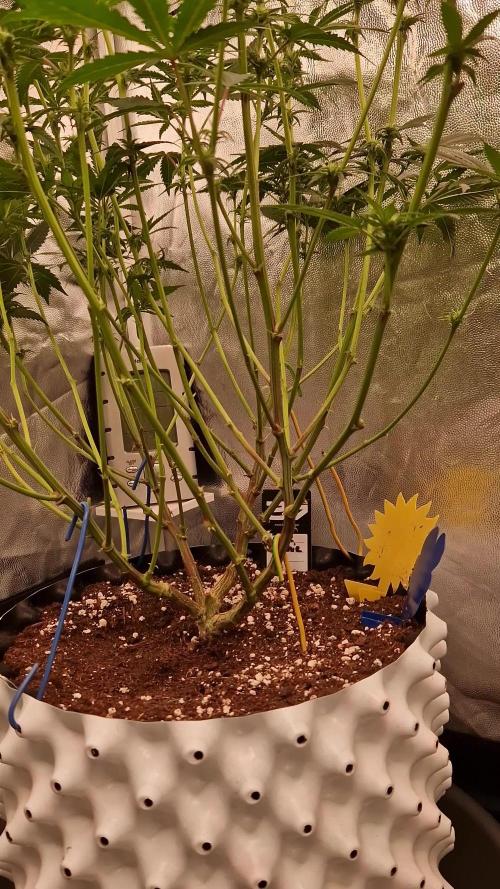
Bei ihr hätte sich das Scrognetz wohl gelohnt. Viele Triebe die am abhauen sind und schon viel höher sind. Hier und da musste ich nochmal toppen. Sonst macht Sie sich sehr gut.
Likes
Comments
Share


@pareto
Follow
Looks absolutely awesome. This is my first photoperiod and you can really tell the difference in density and overall quality.
I wet trimmed her and froze the sugar leaves to try to make my first hash.
--------------------------------------------------------------------------------------------------------------------------------------------------------------------------------
Set up cost (fixed costs)
-Lamp: 40€
-Timer: 3,5€
-Pot: 4€
-Total fixed costs: 47,5€
Given 5 years (or 15 grows) usage time translates to around 3,17€ per grow in materials.
Variable costs:
-Seed: free (gift)
-Soil: 6€
-Fertilizer: 3,50€
-Power: 15,21€
-Total variable costs: 24,71€
-Total costs per grow: 27,88€

Likes
2
Share

@Phileed
Follow
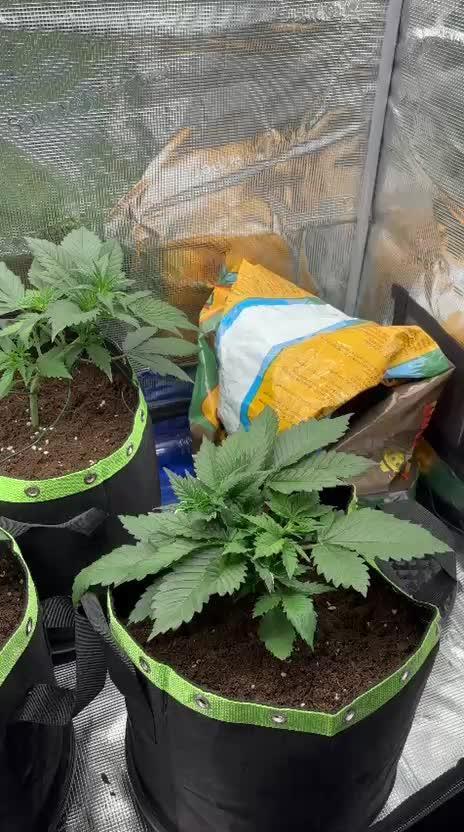
End of week 3 at the beginning of this week I did some lst… on some it turned out better than others but have to do some defoliation in next days.
Pls send some suggestions ( I really appreciate) since it’s my 2nd time growing
Week 2 for papaya cookies… lst very soon

Likes
5
Share


@Elmike
Follow
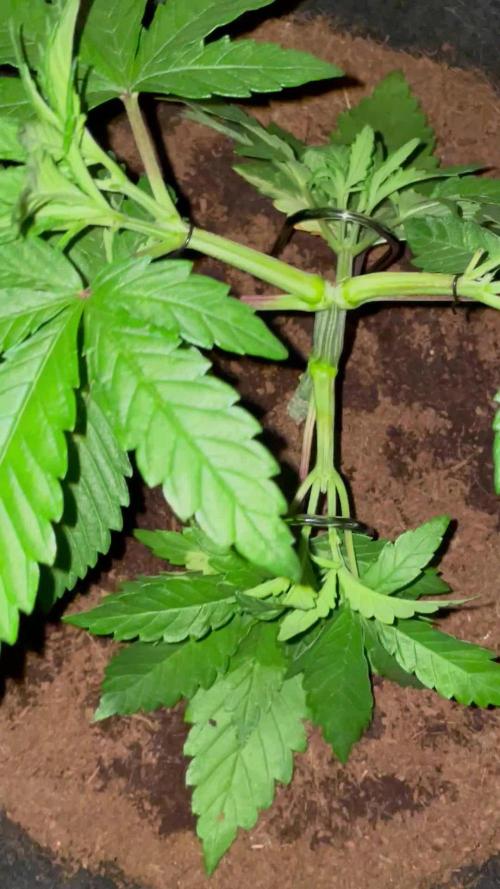
Comment dire... cette plante n'a pas battu des records de production... Par contre les têtes son très compacte et lourde malgré leurs tailles moyenne. Curieux de voir le poids une fois le produit

Likes
117
Share


@PEAKYPLANTERS
Follow
HOLY GOD ..... WHAT MUSIC! BOYS !
MY FRIENDS ARE STRETCHING AND GAINING WEIGHT !!!
VAMOS!
LET'S GO TO GET THE PRIZES IN THE RANKING AND BREAK THE PODIUM!
HAPPY AND ABUNDANT HARVESTS FOR EVERYONE

Likes
48
Share


@pifflestikkz
Follow
Day 99
07/10/24 Monday
Flushing this week
Using de-chlorinated tap water 10L pH 6 with Flawless finish.
Seeing her finalise and ripen this week will be satisfying 😍
Watching her colours transform, she's just stunning 👌
Picture and video update 📸
Day 101
09/10/24 Wednesday
De-chlorinated tap water pH 6 only today.
Day 103
11/10/24 Friday
De-chlorinated tap water pH 6 only today again pH 6. Only 1.5L
Day 104
12/10/24 Saturday
Another Flush today, using 10L de-chlorinated tap water pH 6 with flawless finish.
She really has darkened in colour now, fans showing a deep dark Purple / Black, the buds themselves are a deep dark purple, and absolutely laced with trichomes 🤤
Picture update tonight📸💚


