
Likes
Comments
Share


@420DeepGrow
Follow
Gracias al equipo de AnesiaSeeds, Marshydro, XpertNutrients y Trolmaster sin ellos esto no sería posible.
💐🍁 Sticky Boof:
Prepárate para dejarte llevar por Sticky Boof, nuestra última obra maestra que está poniendo el listón muy alto para los amantes de las índicas. Nacida del legendario cruce de Super Boof y Cadillac Rainbow, Sticky Boof es una potente planta con un asombroso 80% de dominancia Indica que promete una relajación sin igual.
Prepárate para un viaje épico con el asombroso 37,5% de THC de Sticky Boof.
Sumérgete en una cosecha abundante con Sticky Boof, que produce hasta la friolera de 500 g/m² en interior y 800 - 900 g por planta en exterior. Esta variedad es generosa y está lista para llenar tu alijo de cogollos de la mejor calidad.
Sticky Boof es todo rapidez y eficacia, acelerando el tiempo de floración en sólo 7 u 8 semanas.
💡TS-3000 + TS-1000: se usaran dos de las lámparas de la serie TS de Marshydro, para cubrir todas las necesidades de las plantas durante el ciclo de cultivo, uso las dos lámparas en floracion para llegar a toda la carpa de 1.50 x 1.50 x 1.80.
https://marshydro.eu/products/mars-hydro-ts-3000-led-grow-light/
🏠 : Marshydro 1.50 x 1.50 x 1.80, carpa 100% estanca con ventanas laterales para llegar a todos los lugares durante el grow
https://marshydro.eu/products/diy-150x150x200cm-grow-tent-kit
🌬️💨 Marshydro 6inch + filtro carbon para evitar olores indeseables.
https://marshydro.eu/products/ifresh-smart-6inch-filter-kits/
🍣🍦🌴 Xpert Nutrients es una empresa especializada en la producción y comercialización de fertilizantes líquidos y tierras, que garantizan excelentes cosechas y un crecimiento activo para sus plantas durante todas las fases de cultivo.
Consigue aqui tus Nutrientes:
https://xpertnutrients.com/es/shop/
💻 Trolmaster Tent-X TCS-1 como controlador de luz, optimiza tu cultivo con la última tecnología del mercado, desde donde puedes controlar todos los parametros.
https://www.trolmaster.com/Products/Details/TCS-1
🍣🍦🌴 Xpert Nutrients es una empresa especializada en la producción y comercialización de fertilizantes líquidos y tierras, que garantizan excelentes cosechas y un crecimiento activo para sus plantas durante todas las fases de cultivo.
Consigue aqui tus Nutrientes:
https://xpertnutrients.com/es/shop/
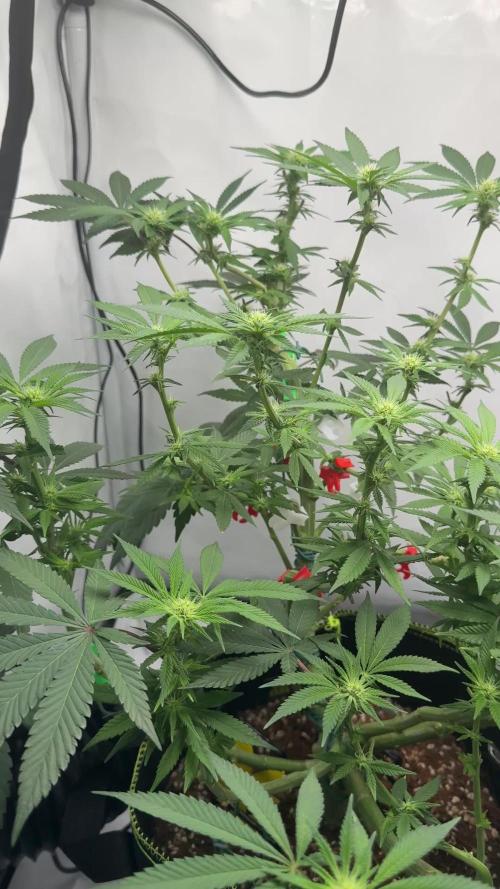
📆 Semana 6:
Buena semana, ha habido sol agradable y buenas temperaturas, empieza q tomar fuerza.
Mantengo las dosis de nutrientes a 1/3 de lo recomendada por el fabricante al estar en suelo virgen ☘️🌲🌳.

Likes
27
Share


@ohserp
Follow
defoliating this week and going to begin cutting off the nutrients ive been giving them. Plant 2 is ahead of the others currently, with a super citrus smell coming off of it. It smells like dank oranges. It smells super clean, very excited to see the progress they make this week. They grow up so fast 😄

Likes
1
Share


@VirginiaGrownExotics
Follow
She’s budding up nicely finally done stretching and starting to smell strong

Processing
Likes
16
Share


@fvckinginfamous
Follow
First day of second week, its been 8 days since this babies sprouted, and from my newbie eyes, they seem to be growing quite happy and healthy
Starting to add Bio/Grow since yesterday, going for 1ml/l for at least 2 or 3 more days, then doubling the dosage to see how they handle
Day Number 11 Update>
Plant 2 in the center seems to have much wider leaves than 1 and 3, obviosly because its recieving more light than the others
Upping just a tiny bit of the Bio/Grow since today
Likes
4
Share


@amazingautoflowers
Follow
Howdy All,
Happy New Year!
The girls are getting close. The pictures were taken on the 29th. Today is the 3rd of Jan. They are getting close as you can see in the pictures. I began flushing last week with just Regeisys and still giving Terpinator. They are not going to finish at the same time, it looks like I have 2 that will go first and then the other 2 within a week or so.
They smell great, and as the Pics show they are frosty. Don't want the Trichomes to get to amber, maybe 25% of them and we are about there.
I will follow up early next week.
Happy Growing in 2020 everyone!.
Likes
8
Share


@Dapper_Buds
Follow
Week 6 and these girls got a scrog net added. As the plants are getting extremely heavy. Started to unfold an open up eagle spread style. So had to lend a helping hand. They got a scrog net added an the untrained plant got tied up from tents upper support bars an lower branches got some support also from the net. So far everything is going smoothly. The e680s light is putting in that work work

Likes
Comments
Share

@HOME_GROWBOOK
Follow
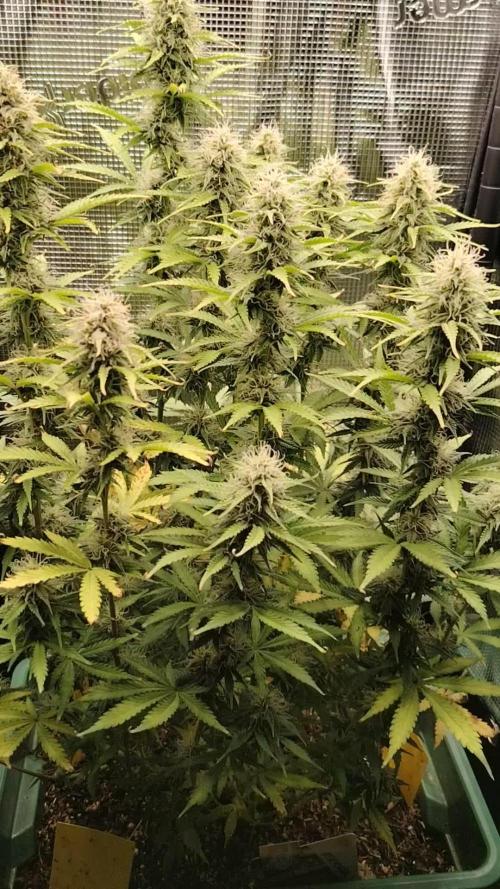
Der Stretch ist offiziell vorbei! Beide Sorten – 24K Gold und Gelato 33 – haben ihre Endhöhe erreicht und konzentrieren sich nun voll auf die Blütenproduktion.
Das Blätterdach steht dicht und gleichmäßig, alle Spitzen sind auf einer Ebene und perfekt im Lichtfeld.
24K Gold zeigt jetzt kräftige Blütenansätze an allen Haupt- und Seitentrieben. Ihre Tops sind bereits mit einem feinen weißen Flaum bedeckt, die Blütenstruktur wirkt kompakt und gleichmäßig.
Sie duftet bereits leicht süßlich mit einem typischen Kush-Unterton.
Gelato 33 präsentiert sich etwas buschiger mit engen Internodien. Ihre Blütenstände sind kleiner, aber sehr zahlreich – viele kleine Tops, die sich gleichmäßig entlang der Triebe bilden.
Das Blätterwerk bleibt sattgrün und gesund, keinerlei Anzeichen von Stress oder Nährstoffmangel.
Nach dem Entfernen des Netzes stehen die Pflanzen frei und stabil.
Eine gezielte Entlaubung wurde abgeschlossen, um Licht und Luft optimal zu verteilen.
Düngung & Setup:
• 💧 Canna Coco A + B → 6 ml/l
• 📈 EC 1.6 | pH 5.8
• 🌡️ 25–26 °C Tag / 21 °C Nacht
• 💧 Luftfeuchtigkeit 50 %
• 💨 Starke Umluft & stabile Tropfbewässerung
Der Übergang in die Hauptblüte verläuft absolut stressfrei – die Pflanzen sind gesund, vital und bereit, Masse aufzubauen.
Ab nächster Woche folgt der Fokus auf Blütendichte und Harzbildung – das spannendste Stadium beginnt jetzt!

Processing
Likes
3
Share


@Mr_nugs_lover_David
Follow
She looks beautiful, she's a beautiful autoflowering plant, very sweet aroma just like perfume. Love her, she's 100% healthy and producing very tasty flowers. Let's see how she keeps developing

Likes
80
Share


@SlowpokeFuegobud
Follow
Welcome growmies, to the becoming of Amaretto Tarmac. You don't need to ask me twice concerning almonds, amaretto, or marzipan.. 😋 😍
Genetics: Amaretto Sour X Apollo Black Cherry
And OMFGS she turns purple!! 💜
Thanks @SeedstockersOfficial for the beautiful goodie pack!! :squirrel: 💚 💨 Can't wait to grow the new stuff!!
Everybody, if you like, check out the other Seedstockers' new strain I grow here on GD: Terp&Tonic Auto!
https://growdiaries.com/diaries/178026-grow-journal-by-slowpokefuegobud
Thanks @GreenBuzzNutrients for sponsoring your products, I am very happy!! 💚 If anyone wants to give those nutes a try, you find a generous discount code in my setup description! 😙
_______________________________________________________________
Strain description:
Amaretto Tarmac was born from the cross of two varieties with a high pedigree: on the one hand, the tasty American Amaretto Sour; and, on the other, the resinous Apollo Black Cherry. This union results in a sativa-leaning strain that will certainly captivate those users looking for a psychoactivity that is both powerful and energising, and which induces creativity.
This is a 5-star strain whose terpene profile is something incredibly special: the combination of a hot tarmac aroma on a bitter background, along with an Amaretto flavour and a mix of cherry, blueberry, and kola undertones. A truly unique taste that is a must for those with the most demanding palates who are in search of new experiences.
With a relatively short flowering period for an 80% sativa-dominant strain, Amaretto Tarmac will be ready for harvest in just 8 weeks (in late September when grown outdoors). This beauty is also highly decorative as she can express two different types of phenos: one with more greenish tones, and another one with lovely shades of purple.
______________________________________________________________
Setup:
140x70x200 cm Spiderfarmer tent
2x Monkey 16W fans (not oscillating)
1x Secret Jardin 30W
1x box fan 50W oscillating (on lowest level)
LED
Full Spectrum 320W AGLEX AGL-320W-MA
5,6 kg
foldable, dimmable
864 pieces Samsung LH301H
864umol/s
2,7umol/J
full spectrum white + RED 660nm + IR 740nm
wavelength range 380-780nm
covering 3x4ft
Green Buzz Nutrients https://greenbuzzliquids.com/
❗ Use code GD42025 for generous 25% discount (for orders of minimum 75€)
Biobizz Lightmix
Carbon Active Granulate Filter 125/360 cm³/h
PrimaKlima exhaust EC 125-400/240 cm³/h


Likes
64
Share


@Roberts
Follow
Baked Bomb auto is growing nicely. She us kinda droopy, but I think because it is morning for the plant. The light might be a piece strong fir her stage if growth. She should be requiring a lot of light very soon. It has been extra cold this year. That could also be playing a role into some of it. She is growing steady regardless. Thank you Spider Farmer, and Bomb seeds. 💣 🤜🏻🤛🏻🌱🌱🌱
Thank you grow diaries community for the 👇likes👇, follows, comments, and subscriptions on my YouTube channel👇. ❄️🌱🍻
Happy Growing 🌱🌱🌱
https://youtube.com/channel/UCAhN7yRzWLpcaRHhMIQ7X4g

Likes
4
Share


@AustinRon
Follow
OG 4Q24 Seedling Week 2
Orangegasm (Fem) [ IRIE Genetics ]
12/12 @ Bolt (Day 21)
Germination: 20 November 2024
#3A Earliest Harvest Date: 7 February 2025
#3B Latest Harvest Date: 17 February 2025
_________________________________________
Start of Week: [Mon Dec 2, 2024 CR2 4Q24 15:S:1:1]
End of Week: [Sun Dec 8, 2024 CR2 4Q24 21:S:1:7]
OrangeGasm Fertigation: Max EC: [ 2.4, mS]
_______________________________________
Week 2 Objectives
- Continue to root out Seedlings
- WHEN We’ve ROOTS AT THE BOTTOM - Up Plant to 1 GAL and Flip
- Restart EC Ramp (from 1.0 mS/cm2) WHEN ALL Seedlings are standing up STRAIGHT.
- Maintain Environment
Feed Schedule:
- RLA Hydro Chart, Max EC: 2.4
- RLA Foliar (Veg, No add’l PK)
- Weekly: Cytoplus or TM-7: [ 1.25, ml, gal] Through Bolt III
- Wetting Agents
- Dr Bronner’s Hemp Soap: [ 6, drops, gal]
- Quillaja 60: [ 1.25, ml, gal]
- Biology
- Photosynthesis Plus
- Mammoth-P
RLA Foliar through BOLT III
- Monday: Silica Skin, Solar Rain
- Wednesday: CalMag Fuel, Lush Green
- Friday: Solar Rain
Environment, Rooting Cuts, Week 0
- ECRange: [ 1.1, 1.7, mS]
- TempMax: [ 82, °F]
- RHMax: [ 69, %]
- VPD: [ 0.85, ±0.05, kPa]
- LightIntensityRange: [ 410, 530, µMol/m2/s]
- LightPeriod: [ 18/6] # Light Hours, Continuous Dark
Lighting Notes:
- @19.5” Canopy Distance, the dimmer shows 10% of the PPFD Delivered, i.e. 100% = 1000 µMol/m2/s, therefore we’ll maintain light distance (19.5”) and control Light Delivery from the Dimmer. Max will be 85% ( 850 µMol/m2/s)
__
Mon Dec 2, 2024
OG 4Q24 15:S:2:1
- Foliar: Silica Skin, Solar Rain
- TM-7: [ 1.25, ml, gal]


__
Tue Dec 3, 2024
OG 4Q24 16:S:2:2
- Let’s Resume EC Ramp: EC: [ 1.1, mS/cm]
- AM: Watered 50 ml/pot
- All seedlings have ‘Popped,’ Good turgidity, stems firming, big leaves . . .

Photosynthesis Plus: [ 3, ml]
Quillaja 60 Powder (Surfactant): [ 0.625, tsp]
TM-7 (BioAg, µNutrients): [ 0.625, tsp]
Starting with 9.4 EC, Diluted GH pHDown 50:1, and applied 4.2 ml. Reduced to 6.9pH. Took EC from 0.3 to 0.4. We DON’T need additional Phosphorous when phDown’g.
__
Wed Dec 4, 2024
OG 4Q24 17:S:2:3
- Foliar: CalMag Fuel, Lush Green
Ordered ph UP to address acidic Dehu Water.
Fertigation: 2024-12-04T09:32:20-0600: 50 ml/pot

Foliar:
- [X] CalMag Fuel: [ 2.5, ml, pt]
- [X] Lush Green: [ 0.625, ml, pt]
__
Thu Dec 5, 2024
OG 4Q24 18:S:2:4
EC: 1.3
After Foliar (CalMag Fuel/Lush Green), ‘mutant’ is filling in color.
We may have TWO ‘Jagged’ Girls - Serrated/Funky Leaves, TACO Leaves (Natural Fold)
Fertigation @ 1000, 50ml/pot


If so - This is Golden Goat Leaning, Frosty as Hell, Moderate Yielder

Per 0.5 gal feed water:
- [x] Primer A&B: [ 3.4, ml]
- [x] Silica Skin: [ 2.0, ml]
- [x] CalMag Fuel: [ 2.0, ml]
- [x] Lush Green: [ 1.4, ml]
- [x] Root Anchor [ 1.4, ml]
- EC: [ 1.3, mS]
__
Fri Dec 6, 2024
OG 4Q24 19:S:2:5
Foliar:
- CalMag Fuel: [ 2.5, ml]
- Lush Green: [ .0625, ml]
Fertigation:
- EC: [ 1.4, mS]
Per 0.5 gal feed water:
- [x] Silica Skin: [ 2.2, ml]
- [x] CalMag Fuel: [ 2.2, ml]
- [x] Lush Green: [ 1.5, ml]
- [x] Primer A&B: [ 3.7, ml]
- [x] Root Anchor [ 1.5, ml]
- [x] Photosynthesis Plus: [ 3, ml]

Wet Run Irrigation - 8 Emitters | Measure to assure relatively even delivery . . .
__
Sat Dec 7, 2024
OG 4Q24 20:S:2:6
- [ ] Assemble and Wet Run Irrigation
- [x] EC: 1.6

0.5 Gal Feed-water: EC: [1.5, mS]
- [x] Primer A&B: [ 4, ml]
- [x] Silica Skin: [ 2.5, ml]
- [x] CalMag Fuel: [ 2.5, ml]
- [x] Lush Green: [ 1.6, ml]
- [x] Root Anchor: [ 1.6, ml]
- [x] TM-7 (µNutrients): [ 1/8, tsp]
- [x] Photosynthesis Plus: [ 3, ml]
- [x] Quillaja 60 Powder: [ 0.125, tsp]
__
Sun Dec 8, 2024
OG 4Q24 21:S:2:7
440 x 4: 3520 ml/day (Less than 1 Gal)
EC: [ 1.6, mS/cm]

Likes
34
Share


@gottagrowsometime
Follow
Welcome to my ganja runt auto comp grow. Be sure to drop a like or comment so I can visit your grows if youd like, either way thanks for dropping by, good luck and stay safe😎
2/5/22 Popped Today VD1 for Ganja Runtz Auto 17-25% THC. Think after Its grown I'm going to send a sample to the dam to get tested. If it's nice that is. As it's a big gap and wondering where I can get her to.
Am starting her on TERRA POWERS growth base nutrients and am following it's chart as guide to use and will decide on the ML/L depending on the PPM as I'm using the full 19 nutrients so the PPM will be way up there unless I break it down into equal ppm feeds when it gets bigger and give 2 1l mixes on later stage of growth and a flush in between. I'm going to try and push her to the max that stays withIn the boundaries of not stalling her with any tox, so light tip burn will be fine and is the norm when using heavy bloom boosters (SyntheticNutrients), the best growers in the world get tip burn it's just a by product of your plant taking up max nutrient and the tips are so gentle they get tip burn, but in saying that, some ppl don't like to push their plants, nice a less harsher taste. 100% natural/normal folks and actually looked for as if you aren't seeing this your plant actually has more feed it can take, meaning you aren't maxing out her 3-5wk stretch window in flowering, (personally in think, a slight push is better than a light pull back, when dealing with autos you HAVE TO MAX YOUR VEG TIME. I'll hopefully keep tip burn away until we get into flower and then tip burn is an after thought, and a welcome sign, for me it is. Now on the other hand, if I start seeing 'the claw' or/And very dark green/shiny leafs we got a normal tox that is an often occurrence in growth phase, nitrogen toxicity. (YOU WANT TO PULL BACK ON ANYTHING nitrogen based by a lot) Let's try stay away from that, "the claw, N tox",. Shes on a light feed. EC is 1.01 = 502ppm. PH is still a stable 6. Absolutely great products guys. I mixed a solution 3 days ago. Still holding the same PH/EC.
Tip to higher RH. I've wrapped wet squeezed bath towel around my pots as it dries it raises RH, cups of water do not work with led lights.
Will give pics and updates on growth and nutrient changes if any. But it'll just be straight love/care and gentle handling, (if any, some times I touch the tips with the corners of tissue if I splash nutrients on the top), other than that it shouldn't be touched unless it's bent and needs did an up.
3/5/22 Doing really well I decided to give the soil a once or feed of 2ml/L of biobizz calmag. It won't hurt in the least but will counter any possible calmag def and help overall with nutrient uptake.
6/5/22 So, it's begun. I've created a negative pressure environment, 1st time, let's see if it makes an impact. On wk 3 onwards I'll be running the intake extraction for 5mins every 30mins and I'll have 2 co2 bags up. If the RH becomes a problem or temp I'll put the extraction/intake back on 100% of the time. The extraction fan/intake is set at a ratio of 2 to 1. (100% extraction 50% intake) making a negative pressure environment, best way to show you have done this, the walls in your tent should bow in lightly.
RH has climed to 77%. I'm going to pull it back down to 73%. And try keep it in a lower temp range.
Thanks for reading.
gottagrowsometime
Likes
5
Share


@ScouseCityLX
Follow
Exited to try one of fastbuds newer strains! Was hard to decide over this and Banana Purple Punch but I went for Cherry Cola Auto this time!
Likes
120
Share


@OrganicNature420
Follow
Germination date 🌱 02/12/2021
Day 87 02/03/2022
Strain 🍁 Barneys Farm Biscotti Mintz
(Biscotti x Mintz)
THC% • 30% 🤤
💡 Mars Hydro FC-E6500
• Power draw 650W + 5%
• Max coverage 5 x 5
• LED 3978 pcs high quality chips
• Max Yield 2.5g / watt
• Noise level 0 DB
• Removable Driver & Light bars
• Daisy chain
• Fast cool system
https://marshydroled.co.uk/ 🇬🇧
PROMO CODE • (organicnature420) DISCOUNT
https://www.mars-hydro.com/ 🇺🇲
PROMO CODE • (ORG420) DISCOUNT 👍🏻
⛺ Mars Hydro 150 x 150 x 200cm
📤📥 AC infinity 6inch
💧 10lt dehumidifier
❄️ 3.1kw air con system
💉 Nutrients GreenBuzzLiquids 🇩🇪
⭐⭐⭐⭐⭐
Organic Grow Liquid • 1-4ml until 2wk flower
Organic Bloom Liquid • 2-4ml flower stage
Organic More PK • 2-4ml +wk3 of flower
Organic Calmag • 1-2ml/lt whole grow
Fast Plants Spray • first 2wks at night lights off
More Roots • 2-5ml veg +2wks flower
Fast Buds • 5ml 12days before flower until wk1
Humic Acid Plus • 2-5ml whole grow
Growzyme • 2-5ml whole grow
Big Fruits • 2-5ml flower stage
Clean Fruits • 5ml flush 1wk
Ph powder
Root Gel
Living Organics
https://greenbuzzliquids.com/
PROMO CODE • organicnature420 15% off ✌️🏼
🥥 Growing Media • Coco Coir
Notes 📝
Packed on some lovely weight the last week. I could easily flush this tomorrow with clean fruits for the next week but definitely want to see if she will get bigger. Only a slight Amber on the trics so another week will be fine. Girls look a little different, ones alot more ginger than the other but both look fire 🔥
Remember to give GreenBuzzLiquids a follow, I promise you won't be disappointed 👍🏻
Discount codes in bio for Mars and GreenBuzzLiquids 👍🏻 game changers 🏆


Processing
Likes
14
Share


@edaricogardens
Follow
Great growth this week despite a pretty scary heat wave that rose my tent temp from 78-84/85...but she survived! I plan on doing some Light Stress Training to her next week to keep her on the shorter side due to vertical limitations in my grow tent🤦♂️🏽


Likes
16
Share


@Cauli
Follow
Week 5 already of Guava.
She finally reached a good size and the first pistils started to show.
Very excited about her stretching and the growth in the next weeks.
Had some aphids this week, but spotted them early and could just remove them (about five or six only).
So far no new are visible, but will watch closely.
Processing
Likes
84
Share


@Hempire
Follow
I cut a few of leaves that covered the secondary branches of light. Moreover my Moby dick’s plants grow up bushy and to my mind it covers too much of light.


Likes
18
Share

@All_our_small_plants
Follow
2000 ml alle 2 Tage
PH-Wert: 6
EC-Wert: 1,6
Temperatur: 22ºC
Luftfeuchtigkeit 62%
Schädlingsbekämpfung: Nematoden
PPFD: 510 µmol/m²/s
DLI: 33
Düngemittel: Mineralischer Dünger 3,5-6-6
Besonderheiten: Wurden direkt in die erde gepflanzt in einer Kokos-Quelltabletten.
-Tag 71 Heute haben wir sie mit 2000 ml Wasser gegossen, angereichert mit 1,5 ml Calmag, 4 ml Canna PK 13/14, 2 ml 3,5-6-6, 1 ml Plagron Green Sensation, 1ml Plagron Power Buds, sowie 0,32 ml HY-PRO Generator. Der EC-Wert betrug 1,650 mS/cm und der pH-Wert lag bei 5,8 😚
-Tag 73 Heute haben wir sie mit 2000 ml Wasser gegossen, angereichert mit 1,5 ml Calmag, 6 ml Canna PK 13/14, 2 ml HY-PRO Epic Blast sowie 0,32 ml HY-PRO Generator. Der EC-Wert betrug 1.540 mS/cm und der pH-Wert lag bei 6 Ihre Buds werden immer dichter und sie riecht sehr gut 😍
-Tag 75 Heute haben wir bei ihr den pH-Wert kontrolliert, und er liegt bei 6,6. Der EC-Wert lag bei 580. Wir haben ihr Wasser mit einem pH-Wert von 5,7 sowie Mikroorganismen mit Weizensirup gegeben.
-Tag 77 Heute haben wir ihr wieder de Runoff Kontrolliert und er ist nach wie vor bei 6,6, wir werden ihr heute wieder Dünger geben. Ihr Buds werden immer Kompakter und sie hat einen Sehr intensiven Geruch bekommen 😍
