


Likes
136
Share


@Kitties_and_Colas
Follow
~_~_~_~_~_~_~_~_~_~_~_~_~_~_~_~_~_~_~_~_~_~_~_~_~_~_~_~_~_~_~_~_~_~_~_~_~_~_~_~_~_~_~_~_~_~_~_~_~_~_~_~_~_~_~_~_~_~_~_~_~_~_~_~_~_~_~_~_~_~_~_~_~_~_~_~_~_~_~_~_~_~_~_
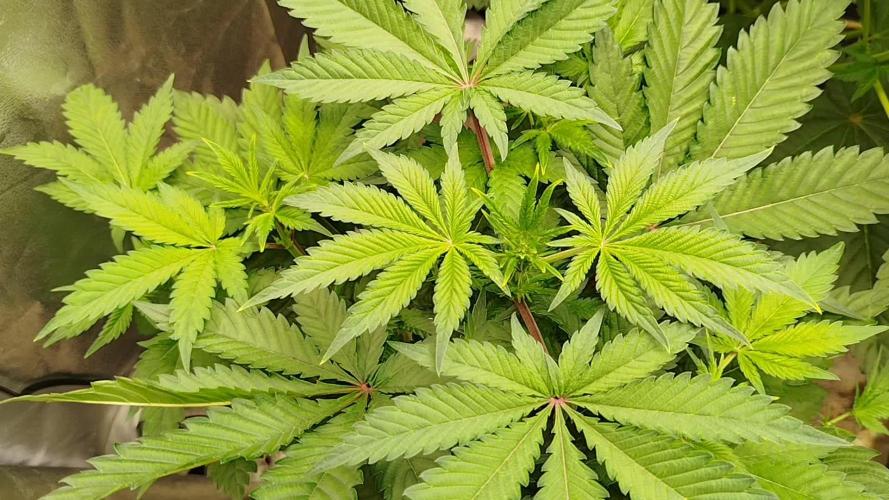
We're getting close! These buds are getting absolutely caked under the MarsHydro..you can tell these plants are going to be killer...I haven't pulled the glass out to inspect this week but last week we were only about 20% cloudy, probably 2 more weeks if I had to guess..flushing these seems to be tricky, we've been using water only for approximately 12 days and their color refuses to fade, some are still a little glossy..I think we're going to start watering these every other day with a gallon each until they're finished, harvesting anything that dark has never been good. We have a few plants lined up to flower the day these come down (White Widow likely) ..every Banger clone taken in week 2-3 of flower are growing and of good size now, we'd like to put a few outside this summer ... Not too much else to report, its been an awesome week, thanks for dropping by and happy harvests everyone!! ❤️💡🌱😽💨
⚡Mars Hydro/SP-3000⚡ Specifications ⚙️:
Diodes: Samsung LM301B / Osram 660nm (960 total!)
Driver: Meanwell 300watt 🔌 (300W±5% @AC120V-277V)
PPF: 824umol/S ☢️
PPE: 2.8 µmol/j 〰️〰️
Lifespan: 50k+ hrs ⌛
Weight: 10.1 lbs (4.6kg)
Veg Coverage: 3 x 5 ft 🌱
Flowering Coverage: 2 x 4 ft 🌼
-The SP-3000 uses an aluminum heatsink (no fan) and the driver can be placed outside the tent 🌡️⬇️
-IP65 waterproof ratings, tolerant to high humidity grow environments 💦 ..
-Up to 15 can be daisy-chained together and all controlled from a single light! 💡~💡~💡~💡~💡
~_~_~_~_~_~_~_~_~_~_~_~_~_~_~_~_~_~_~_~_~_~_~_~_~_~_~_~_~_~_~_~_~_~_~_~_~_~_~_~_~_~_~_~_~_~_~_~_~_~_~_~_~_~_~_~_~_~_~_~_~_~_~_~_~_~_~_~_~_~_~_~_~_~_~_~_~_~_~_~_~_~_~_
Likes
5
Share


@Weedganja420
Follow
Esta preciosa cepa ha crecido bastante rápido llegando a ser la más alta del armario, durante la floración ha creado unas increíbles flores llenas de resina que poco a poco se caían del peso de las mismas.
Una locura de genética que todos deberíamos de cultivar al menos una vez.
Espero que os guste estas bonitas fotos.

Likes
10
Share


@greennug
Follow
happy with plants at this stage. cant wait to see them bulk up. they are starting to smell a little now the sour lemon tart is alot more pungent than critical orange punch at this stage.
Likes
4
Share


@TrippyFreeman
Follow
Man at this point we are bushed out and everyone needed a defoil like crazy
Changed my lights spectrum to flower
I also went full tilt into the nute line I’m now running the base micro bloom and grow added bud candy b52 and big bud


Likes
15
Share

@GreenEldritchGardens
Follow
Extreme gas.
Sharp fuel.
Cat piss.
Permanent marker funk?
The fragrance is no longer a whisper.
It a proclamation.
Plant #1 — The Fat One — has entered a phase of growth so aggressive that even the ancient watchers of the garden might pause in admiration. Reaching an astonishing height of 75 centimeters, it has become a living monument of stem, leaf, and emerging floral intent.
The stretch has been extraordinary.
What was once merely the largest specimen now dominates through both mass and elevation. Thick branches spread outward like the limbs of an ancient forest god, while enormous leaves continue to harvest the artificial starlight with relentless efficiency.
Plant #2 — The Battered One — remains close behind, pursuing a different but equally impressive destiny. Though it has not reached the towering height of its larger rival, its structure has become astonishingly dense. Branches emerge from every available space, weaving together into a bushy labyrinth of foliage and future flowering sites.
Where Plant #1 seeks the sky, Plant #2 seeks dominion.
Plant #5 — The Red One.
For the first time since its selection, signs of struggle have become difficult to ignore.
Overshadowed by its larger siblings, it finds itself competing beneath an increasingly crowded canopy. Its leaves have taken on a lighter green coloration, whispering of deficiencies and unmet needs. Though still alive and developing, its growth has slowed compared to the dominant pair.
Likes
18
Share


@Jackweed77
Follow
the girls have grown longer than I expected🤷♂️ ... luckily the stretching period is over 🤪... we hope that the flowers will surprise me as well as the stretching😍💚👊

Likes
7
Share


@LoganatorDude
Follow
This is towards the end of last week.
The BB crosses are doing excellent. They have all gone through some extreme temps with intense temp and RH fluctuations. I’ve concluded that the plants 1 week behind experienced too much heat on this one day when some things came up and I wasn’t around to get them out of the hot sun in time, and they were stunted by excessive heat over 90F. The others didn’t show much signs of stress at all. I’m not giving up on the little ones, but I am giving them a large amount of grace and understanding. They can just continue to grow and do their best. Maybe they will come back into full speed in a week or so. Maybe not. At least I will grow them out to learn what happens. From now on I will be extra careful with all stimuli my seedlings are receiving.
Showing sone other plants of same age, some of which are photoperiods that began flowering about a month and a half early, with 15 hours of daylight! Why?
My first guess is some form of extreme rodelization. I did notice on both A-Trains that they each had a node with two pollen sacks developing as well as the burst of female bracts. So I nicked off the pollen sacks right away, and I’ve been putting them under a light for the nights to hopefully reveg them. Either way, a fun anecdote for some new knowledge and experience! I’m sure they would bud out Fat! Seeing how much they did in 2-3 days! But maybe there’s other elements at play.


Likes
9
Share


@MG2009
Follow
04/28/2020
Week #8 of flowering begins will post more pics latter.
04/29/2020
Did some leaf removal had some powdery mildew on some leaves took infected leaves off, plus some for good measure. Drying out every day or two today she took one liter before run off. You can see in the video the colors? And sparkling buds?
04/30/2020
Day 50
I decided to take the top buds in pics , 47 grams wet.
It is a 9-12 week strain but I think she need a week or two? But we will see.
Likes
15
Share


@Dayexpress
Follow
I started this week with lst to open the canopy. Also removing severl bud sights that will not be getting enough light and defoliated some as well. Next week she will be readu for flower.

Likes
6
Share


@IQuSX
Follow
Hi, topman!
In my opinion, this would be an important performance!
The roots of the second plant replace the first plant in the root ecosystem! I have not seen such experiments! And I think this method will be used next time by other growers!
For comparison, there are ordinary processes!
Follow the process and be one of the first to witness the AUTO stimulations Revolution!
Now the left one is 15 days old, and the right one is 31 days old from moving under the light!
Likes
48
Share


@GERGrowDesigns
Follow
Dear Growers ,
Welcome to Veg week 3 Day 19-28 from Kannabia Purple Dream Auto .
Whether you're a beginner or an expert, you are warmly invited to join, ask questions, and share your own experiences along the way!
Project Setup & Conditions:
• Brand/Manufacturer: Kannabia Seeds
• Tent: 222cmx150cmx150cm
• Light: 2x 720 Watt Full Spectrum
• Humidity: 50%
• Soil: Narcos Organix Mix
• Nutrients: Narcos Products
• pH Value: 6
If you want Germinitation results like mine , check out Kannabia Seeds with my link [https://www.kannabia.com/de?ref=61966] and grab the germination device or the strains I used . Trust me – it’s worth it for sure !
Get another 20% Discount at all products using the code [GGD] at the checkout.
Congratulations on Your Own Projects!
We celebrate your growth, your creativity, and the passion you bring to the table. It’s truly inspiring to witness at Each visit .
Stay curious and keep up Growing —we look forward to welcoming you back for the next chapter soon!

Likes
25
Share


@m0use
Follow
Continuing with just feeding water for the plants as the medium is fortified for a few weeks of its growth. I moved the planters away from an exhaust so they would not get heat stress or wind. They seem to be liking it in there new home under my window on the deck.
Likes
31
Share


@MadeInGermany
Follow
Info:
Unfortunately, I had to find out that my account is used for fake pages in social media.
I am only active here on growdiaries.
I am not on facebook instagram twitter etc All accounts except this one are fake.
Flowering day 54
since time change
to 12/12 h.
Hey everyone :-).
We arrive in the flowering week before the last :-).
She has developed perfectly up to now 👍.
It will be harvested in the next 10-14 days.
Until then, she still has enough time to use up all her nutrients.
The trichomes are already 60% milky, 30% clear and 10% amber.
This week it was poured 3 times with 1.2 l each.
As always, the tent was cleaned and everything checked.
Have fun with the update.
Stay healthy 🙏🏻
You can buy this Strain at :
https://www.royalqueenseeds.de/feminisierte-hanfsamen/220-pineapple-kush.html
Type:
Pineapple Kush
☝️🏼
Genetics:
Pineapple x O.G. Kush
👍
Vega lamp:
2 x Todogrow Led
Quantum Board 100 W
💡
Bloom Lamp :
2 x Todogrow Led
Cxb 3590 COB 3500 K 205W
💡💡☝️🏼
Soil :
Canna Coco Professional +
☝️🏼
Fertilizer:
GHSC Powder Feeding Bio
☝️🏼🌱
Water:
Osmosis water mixed with normal water (24 hours stale that the chlorine evaporates) to 0.2 EC. Add Cal / Mag to 0.4 Ec Ph with Organic Ph - to 5.5 - 5.8 .
Likes
3
Share


@PoshGrow
Follow
Welcome to GhostGrow Chapter One by PoshGrow!
🌳 Week #4
First week of flowering. Rearanged LST, removed biggest fan leaves.
Strains look very happy & healthy, very tought, bushy.
Watering when needed, every other watering I used Fox Farm Big Bloom, Grow Big & Tiger Bloom.
I wont be moving plants around, they will keep their positioning till the end of the grow, so in further pictures I wont put tags with strain names😉✌️
Likes
9
Share


@Colo420
Follow
Las vacaciones complican tealizar el seguimiento de manera prolija, pero ahí seguimos.
Aclaro nuevamente que 2 de las plantas (fancy) estan en periodo 12/12 hace 15 días.
El resto está esperando que baje un poco la temperatura para transplantar a exterior y comenzar floración.


