




Likes
6
Share


@Saltoa
Follow
Do you care about the flowers blooming.Do you have an intense smell in your nose
Likes
10
Share


@TiRobotProds
Follow
Good👍🏼 je recommande. Les pistils sont sortis la floraison commence 1,5L d'eau réparties sur toute la semaine. Le niveau du ph es de 6,4 et L'EC a 1,4.

Likes
422
Share


@Crashoverite
Follow
Hi all 🧑🌾
Welcome to my 🍌💜👊 week update.
Hope everyone keeping well and having a great week😁
Thank you so much for so much support on this bananas ride 🙏💜💚💜💚
Everything still going pretty well. Girls are developing and stretching like crazy. Athena currently Dec 14 90cm and main stem of Xena is not far of this height either. Unfortunately noticed first signs of calcium deficiency(my opinion) on Athena. Thankfully started feeding both girls with calmag weeks back but the dosage wasn't not enough for Athena. Started small treatment very next day on Dec 11 (see description below) I belive got my baby back on right track.
Week 9
Dec 11-17
Dec 11
Watering was planned for Tuesday but due to calcium deficiency decided for a little treatment. Watered both girls with mixture of reduced content of growth nutes by 50% calmag at 1.2 ml per ltr. Reduced solution PH to 6.2 as apperently it's ideal for calcium consumption. Over period 4h I have watered Athena with 5ltr with couple runoffs. Xena 3ltr. Total of 7-10 leaves affected mainly at top colas close to the light.
Dec 12-13
Purely observation and all looking well. Of course all affected leaves will progres of showing signs but good news is that growth and development booming and don't see any new leaves with symptoms.
Very nice trichomes development in recent days and more and more colours.
Dec 14
Second watering for this week 6.5l Increased calmag to 1.4ml per ltr and if still things will be looking well reduce to 1 or 1.2 on next feeding.
Dec 15
Very nice respond on yesterday feeding. They definitely fatten over night and getting more and more frosty. Will need to remove some foliage soon as getting extremely bushy again.
Dec 17
Xenas main stem top cola almost touched the light today. Tied her to left side of the cabinet, applied selective defoliation on both girls, tied few branches to netting and on the end of this busy day a third watering for this week. 7 ltrs beetwen both. Runoffs Xena PH6.4 Athena 6.3.
Very nice week have to say. I belive that calcium deficiency on Athena is no longer a case here and both girls developing very nicely. Both are still stretching, buds are gaining in size and both girls started exploding with trichomes,
Thank you all again for such amazing support 🙏peace and love brothers and sisters ✌️💚💜💚💜💚
Stay tuned for new week update 😉🧑🌾✌️💚

Likes
13
Share


@XanHalen
Follow
Apr 09:
Things are chuggin along, i think light may have been a factor in the brown spots, seeing similar symptoms on one of the other plants but very very minor in comparison....
I think it was too little calmag, i may have locked them out mid veg by using high concentration of nutes without watering till runoff (i now know, that is a no-go), and light stress. i have had them under 850-1050 ppfd when flipped to flower...
one of them is loving the light, one is big and bushy (had to defoliate later than i wanted), and one has good bud structure but pistils seem thin, and growth seems slower (the one with the brown polkadot party on its body) so thinking it may be stunted.
either way, im seeing denser buds, and im learning the ropes, thats enough for me :)
Apr 12:
Last feed day...
Trichomes look just about ready, will do 2 runoff waterings 48hrs apart, then 24-36 hr darkness...
Will try to post trichome pics....
Super excited to see the improvements from this run vs last run...!

Likes
207
Share


@DogDoctorOfficial
Follow
DAY 23 Flower under VIPARSPECTRA P2000 with APTUSHOLLAND and they are loving both the light as the food and im loving the fact that they are loving it all 😆😆😆💚💚💚🙏🙏🙏 felling supper blessed with it all and with the fact that the universe allows me to take care of this sacret plant and grow my oun medicine 🙏🙏🙏💚💚💚🙌🙌🙌 special shout out to ZAMNEZIASEEDS for sending me this seeds for me to test, loving the quality on this genetics 🙌🙌🙌 , shout out to VIPARSPECTRA for sending me this LED for me to test and review, with his performance as been outstanding so far, seems like the perfect light for a 3x3 grow space , and a shout out to APTUSHOLLAND for the quality on the nutrients department, it truly is one last thing to worry wen you know by fact that what you feeding your girls is simple the best ( in my humble opinion, all i write here reflexes only my opinion and my experience 💚)
I decided to take some leafs of them to help the airflow , but i will take more asap.
One more week up weed go 😆💚
Day 24 and i defoliate them 😆😆😆💚💚💚
Growers love to you all , and as always thank you guys for reading my diaries , i truly appreciate your time , your love and it all 🙌🙌🙌
And with enormous honor and pleasure that i start collaborating with Zamnezia and Viparspectra
For this run i will have the pleasure of growing some Runtz genetics from Zamnezia seeds that they wore kind enough to send me for test and review 🙏🙏🙏💚💚💚🙏🙏🙏 and for the testing and reviewing i was blessed with the VIPARSPECTRA model P2000💚💚💚🙏🙏🙏 they wore amazing and send me this LED light for me to do some testing and some reviews. Special thanks to Zamnezia and to Viparspectra for this opportunity, lets make magic together 💚💚💚🙏🙏🙏
All i grow is medicine for myself, for me and for my best friend with is me 😆 nothing to sell, so don’t even ask 😅💚💚💚
All info and full product details can be find in can find @
https://viparspectra.eu/collections/grow-lights DISCOUNT CODE 5% - DOGDOCTOR ( all store )
https://www.zamnesia.com DISCOUNT CODE 10% - GROWITGD ( just for seeds )
https://aptus-holland.com/
More info and updates @
https://growdiaries.com/grower/dogdoctor
https://instagram.com/dogdoctorofficial
https://youtube.com/channel/UCR7ta4DKLFMg2xxTMr2cpIg
💚💚💚Growers love to you all 💚💚💚

Likes
14
Share


@DreamIT
Follow
Sponsored by:
🦎THE HIGH CHAMELEON🦎-💡VIPARSPECTRA💡-💐GREEN BUZZ LIQUIDS💐-🛠️WEDRYER🛠️
🏁 10/8 New sponsor at DreamIT. I am delighted to warmly welcome The High Chameleon to my journals and growboxes. The shipping was fast and the package was anonymous. Instead of the usual plastic to keep the seeds in place, I found a nice bag of chopped hemp, a smart and ecological choice. In addition, a very practical grass holder with attached grinder, really practical and comfortable. I will open a diary for each seed that I will try to grow with different types of training techniques, I will decide which ones along the way. let's begin !!
12/8 seems to be opening, I hope for the best
18/8 everything is going well
__________________________________________
Personal advertising (contains affiliate links)
__________________________________________
🦄 Check out The High Chamaleon website, their first selection criterion is the strong signature of terpenes by taking rare strains while being 100% organic and respecting nature. Safe anonymous shipping!
✅ https://bit.ly/TheHighChameleon
__________________________________________
Did you know that Green Buzz Liquids fertilizers are 100% vegan? A complete line of products ready to give the best to each of your plants! Visit the site and see my journals to see how they work 🦄
🤯 And with the code "dreamit" you will immediately receive a 15% discount on your purchases
✅https: //bit.ly/GreenBuzzLiquidsPro
__________________________________________
👀 Are you looking for a good lamp to start with? 👀
🌞Viparspectra has something more than the others, take a look at their site.
⏩ Use "GDVIP" for an extra discount or "DREAMIT3" for an extra 5 %% discount
👀 Search for it on Amazon
✅Amazon USA: https://amzn.to/30xSTVq
✅Amazon Canada: https://amzn.to/38udUVe
✅Viparspectra UE: bit.ly/ViparspectraUE
✅Viparspectra USA: bit.ly/ViparspectraUS
______________________________________________
🌈 Tired of blowing on your weed hoping it dries quickly? Check out the Wedryer website! You will find a well-made accessory that will help your weed dry in just 8-10 days without the annoying risk of finding mold or other annoyances! (no affiliate links)
✅https: //bit.ly/Wedryer_
______________________________________________
📷🥇Follow the best photos on Instagram 🥇📷
https://www.instagram.com/dreamit420/
Backup
https://www.instagram.com/dreamit4200/
🔻🔻Leave a comment with your opinion if you pass by here🔻🔻
🤟🦄💚 Thank you and good growth 💚🦄🤟

Likes
9
Share

@Alvareas
Follow
Der Grow:
Diese Woche ist die Pflanze explodiert.
31 cm sind es am Ende der Woche gewesen.
Zum Glück habe ich bei diesem Run die Abluft von Anfang an außerhalb des Zeltes platziert, sonst würde es eng werden.
Ich hoffe das es in der 3 Woche nicht noch einmal 30 cm werden, sonst bekomme ich Probleme mit der LED.
Die Buds entwickeln sich auch sehr schön.
Von Tag zu Tag fängt die Pflanze mehr an zu duften.
Ich kann den Duft nur schwer beschreiben, aber es erinnert mich irgendwie an einen starken frisch gemahlenen Kaffee mit leichten Skunk Tendenzen.
Die Erde performt immer noch einwandfrei.
Es sind keinerlei Mängel zusehen.
Auch Cal/Mag musste ich nicht hinzugeben.
Bis hierhin klare Empfehlung von mir.
Am Ende der Woche habe ich alle Blätter bis zum Netz entfernt.
Die Parameter in Woche 8:
Controller Einstellung Tag: Advanced AI Luftfeuchtigkeit 50% - 60%
Controller Einstellung Nacht: Advanced AI Luftfeuchtigkeit 50% - 60%
Durchschnittliche Tagestemperatur: 25 Grad
Durchschnittliche Nachttemperatur: 22 Grad
Durchschnittliche Luftfeuchtigkeit Tag: 55%
Durchschnittliche Luftfeuchtigkeit Nacht: 55%
Durchschnittlicher VPD Tag: 1,3
Durchschnittlicher VPD Nacht: 1,1
LED Leistung: 40% = 145 Watt
Beleuchtungsdauer: 12 Stunden
Umluft: Stufe 1 oszillierend


Likes
1
Share


@Raddawg
Follow
Getting taller, getting bushier, very thirsty girls! Feeding nutrients every 2-3 days depending on moisture retention in the soil, follwed by flushing with ph balanced h2o every 2-3 days

Processing
Likes
3
Share


Likes
6
Share


@Ninjabuds
Follow
Permant marker the one seedling I could not be more happy with. It has a distinct different look to it than any other plant in the tent with strong growth going on. I'm sad about the other seedling thou the 1st set of leaves were kinda deformed and it has like a spiral thing going on where new growth comes from. Hopefully it comes back around, I always like seeing atleast 2 phenos of a strain I feel it gives you a better idea of what a strain is.
It's looking like a good start to a week the plants are strong they are getting to the point I can let the dried dry out completely. I'm thinking by the end of this week the plants will be starting to be sold.
Last week I put all the plants into my bigger 2x4 tent with my medicgrow mini sun 2 the 500w version. Only a few of the plants were ready for that light. Seems like the only plants that really have good resistance and have a strong start are the weedseedsexpress.com seeds. Shout out to weedseedsexpress.com for the strong plants.
I ended up putting all the plants back into my 2x2 tent with the 55w amazon light it has alot more blue light in its spectrum. It's kinda weird b4 I switched the plants to the 2x4 tent they were getting 220umol under my amazon 55w led then when I put them under the 500w light 25% strength about 50in from plants and they were getting only about 195umol in that tent but it was stressing most the plants. I assume a larger light has more side lighting hitting the plants. I think when useing larger lights it's good to measure umols from the top but also coming from the sides. I think durring seedling stage they only need about 50% the umols coming from the side the plants as the top is receiving.
When I put the plants back in the small tent about the same umols as they were getting b4 the switch and they were still a little stressed. So for a few days I put the small light at the top the tent giving them 100umols for a few hrs then 130umols the rest the day.

Likes
110
Share


@420DeepGrow
Follow
ACTUALIZACIONES A DIARIO!!
Miles de gracias al equipo de Royal Queen Seeds y a @James por proponerme esta aventura tan trepidante y poder conocer de cerca las nuevas F1 y sobre todo a la gran Titan F1. Espero que lo disfruteis y os sirva como referencia.
¿Qué piensas cuando lees la palabra “Titán”? Hay quienes la asocian con los hijos de Urano de la mitología griega. Otros saben que Titán es la luna más grande de Saturno. ¿Y entre los cultivadores de hierba? Estas personas reconocen a la Titan F1 como una variedad de marihuana con una genética de vanguardia. Se trata de uno de los primeros híbridos F1 autoflorecientes, y es una variedad pionera que ofrece productividad, resistencia y algo completamente nuevo.
La Titan F1 deleitará tu olfato durante la fase de floración y más allá. Esta variedad autofloreciente ofrece un potente perfil de terpenos compuesto principalmente por mirceno, farneseno, ocimeno, pineno, bisabolol y limoneno.
Gracias a MarsHydro 😊🙏 por darme la mejor luz que hay en el mercado.
La marca numero uno en focos 💡, carpas de cultivo ⛺️, extractores 🌬️ y demás aparatos que necesitas para tu cultivo.
Para esta aventura arrancaremos con 💡Mars Hydro TS 1000 Full Spectrum LED Grow Light 150W Regulable y 1 semilla autofloreciente a un ciclo de 20/4.
Verdaderos 150w con este TS1000, la mejor luz de cultivo LED para principiantes.
Ofrece una luz adecuada para 2-4 plantas 🌱. Su precio razonable, la marcada mejora del rendimiento y el control variable de la producción la hacen amigable para los nuevos cultivadores. Todo un tesoro para cualquier cultivador que este comenzando.
Usaremos para esta aventura una carpa de 60x60x90, MarsHydro una carpa para los más exigentes.Con una solapa de cremallera mejorada, dobles cremalleras de metal con forro,reflectante diamante tipo Mylar, postes de metal para una estructura mas solida, no se puede pedir nada mas.
Garantizando una respuesta en solo 24 horas tanto si has usado antes la marca como si no.
🌻🚀 Consigue tus semillas aqui:
https://www.royalqueenseeds.es/semillas-de-marihuana-hibridas-f1/624-titan-f1.html
💡 MarsHydro TS1000:
https://www.amazon.com/gp/product/B07PLY1WKK
⛺️ 60 x 60 x 90 MarsHydro:
https://www.amazon.com/dp/B081PN2QDN/
Segunda semana de crecimiento, las ramas laterales ya han comenzado a formarse, hasta ahora es de las geneticas que mejor ha respondido, por no decir la mejor. Felicidades Royal Queen Seeds.
📅 Dia 14: Riego con nutrientes EC 350
📅 Dia 15: Descanso, va como una Titan
📅 Dia 16: Riego con nutrientes EC 350, van como un rayo.
📅 Dia 17: Descanso
📅 Dia 18: Descanso, se pueden apreciar las primeras preflores en uno de los ejemplares, se declara oficialmente la floracion.
📅 Dia 19: Riego con nutrientes EC 650
📅 Dia 20: Descanso, tengo que quitar algunas hojas bajas porque estan muy compactas y asi evitar hongos, es una planta increíble 😄

Likes
4
Share


@IndicaVibeMe
Follow
Phenotype #4 & #5 Female plants = Pollinated successfully by brother Phenotype #1 Male
Also mixed this Mystery Purp Male Pollen w/ a Jackpot Seed i found in my weed bag from a Lume Dispensary.
☆First & Probably last time, only found 1 Single Fat seed ☆ Going to ne excited to grow these cultivars. Going to plant immediately the F2 Genetics when seeds are ready for harvest.
Phenotype #4 is mostly sinsemilla
except for the very bottom branch successful pollination by brother Phenotype #1



Likes
2
Share

@Weedbuddy420
Follow
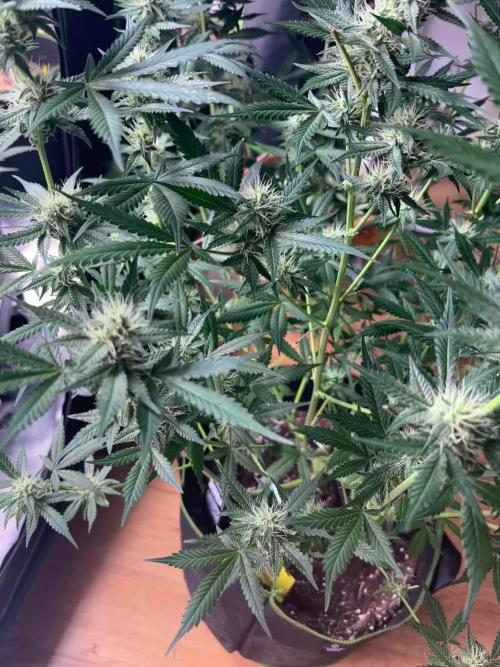
Also ich kann nur sagen es riecht schon richtig lecker. Man kann richtig Cherry raus riechen einfach lecker. Ich könnte reinbeißen heute hab ich sie noch entlaubt damit sie gut Licht, Luft und mehr Kraft für die Buds hat weiterhin keine Probleme

Likes
4
Share


@DogDoctorOfficial
Follow
? 8×8 Adventure – Week 10
Blueberry Muffin – Pheno B
The Small Delight Continues to Surprise Us 💚🌸
Hello everyone, and welcome back to another week of the 8×8 Adventure! 🌱💚
And last but certainly not least...
Here comes our second Blueberry Muffin.
If you've been following both phenotypes, you already know that these two girls may share the same genetics, but they certainly didn't receive the same instruction manual. 😂
And this week, Pheno B continues to play the same card she's been playing since the beginning:
"I'm small. I'm slow. But look how beautiful I am."
And honestly...
She has a point.
Because compared with the rest of the room, this girl is slow as fuck. 😂
But she's also becoming an incredibly beautiful, compact and increasingly dense flowering plant.
So let's give this little delight the spotlight she deserves.
────────────────────────
🌸 Week 10 – The Small Delight
Pheno B continues to be one of the most compact plants in the entire room.
At approximately 75 cm, she isn't trying to compete with the taller girls.
She's not racing toward the ceiling.
She's not stretching dramatically.
She's simply building.
Slowly.
Quietly.
And beautifully.
That's actually one of the most fascinating things about having so many different genetics growing together.
Some plants seem determined to conquer the room.
Others seem perfectly happy occupying their little corner and making the most of it.
Blueberry Muffin Pheno B definitely belongs to the second group.
She's small.
She's compact.
She's increasingly dense.
And she's absolutely covered in developing flowers.
So maybe...
small isn't such a bad thing after all. ?🌸
────────────────────────
🌿 Compact Doesn't Mean Unproductive
This is something that's becoming increasingly obvious with her.
Her size doesn't tell the whole story.
She's not particularly tall, but she's building a very compact flowering structure.
The branches are carrying numerous flowering sites, the flowers are becoming more defined, and the plant is gradually developing that dense appearance we've been watching for.
She's basically concentrating everything into a smaller package.
And I really like that.
Because the purpose of this project was never to see which plant could become the tallest.
It was to see what the different genetics would do when given the same opportunity.
And Pheno B is showing us exactly what she wants to do.
She's telling us:
"I'm going to take my time."
"I'm going to stay compact."
"And I'm going to make it beautiful."
Fair enough, girl.
You do you. 😂💚
────────────────────────
🌸 The Flowers Keep Developing
The most important change isn't her height anyway.
It's what's happening at the flowering sites.
And those are looking fantastic.
The flowers continue to gain structure and definition, with fresh pistils covering the developing buds and the individual sites becoming increasingly substantial.
There's a very noticeable difference between looking at her now and looking back at the early flowering photographs.
She's no longer simply starting flower.
She's building it.
And because she's so compact, the flowers appear packed throughout her structure.
This is where that small size becomes particularly interesting.
Instead of putting a huge amount of energy into vertical expansion, she's gradually turning that compact architecture into a flowering structure.
She's still moving slowly compared with some of her sisters...
But she's definitely moving.
And that's what matters.
────────────────────────
💡 The LED Canopy – Feeding Her With Photons
This week I also want to give the lighting another proper spotlight, because across these individual diaries we're seeing something fascinating.
The Future of Grow LEDs continue providing the main artificial sun over the room.
And every day, millions upon millions of photons arrive at the canopy.
Those photons are the starting point for the energy that drives photosynthesis.
But what I particularly enjoy about this setup is that we're not thinking about the canopy as a completely flat surface.
The plants have depth.
They have upper leaves.
Inner growth.
Lower flowers.
Different angles.
Different orientations.
Different distances from the light.
And that's where the additional contribution from Lumiflora becomes particularly interesting.
By bringing light into areas that naturally receive less direct illumination, we're trying to make better use of the three-dimensional structure of the plants.
Not simply:
"More light."
But:
"More useful light reaching more of the plant."
And with a compact plant like Pheno B, that's particularly interesting.
Her flowers are packed into a relatively small structure.
So managing how photons interact with that structure becomes another part of the equation.
────────────────────────
☀️ The Plant Doesn't Know What Brand the Light Is
One thing I always find fascinating about lighting is that the plant doesn't care about the logo on the fixture.
She cares about photons.
Where they arrive.
How many arrive.
How consistently they arrive.
And whether the rest of the environment allows her to actually use them.
That's why lighting can't really be separated from everything else.
Light interacts with:
🌡️ Temperature
💧 Water availability
🥥 Root-zone conditions
💨 CO₂
🌿 Leaf health
⚗️ Nutrition
🌸 Developmental stage
Everything is connected.
And right now, we're giving Pheno B a strong and consistent artificial sun while maintaining the rest of the environment as steadily as possible.
She's responding in her own way.
Which, apparently, means:
very slowly. 😂
But beautifully.
────────────────────────
? Her Own Little Architecture
If I had to describe this phenotype in one sentence, I'd probably say:
She's becoming a little compact powerhouse.
Not a huge plant.
Not a dramatic plant.
Not the plant that's going to win a height competition.
But she's developing a very interesting architecture.
The flowers are sitting close together.
The branches are supporting a dense structure.
The foliage remains lush.
And the overall plant is becoming increasingly compact as flowering progresses.
That's her personality.
And I'm not trying to change it.
This is one of the things I enjoy most about phenotype work.
You can guide a plant.
You can manage it.
You can shape its environment.
But eventually...
the genetics introduce themselves.
And Pheno B has introduced herself quite clearly.
"I'm the small one."
😂?💚
────────────────────────
💧 Keeping the Roots and Irrigation Consistent
While the plant above the substrate is taking her sweet time, the root environment continues receiving the same consistent attention.
Current watering remains around:
💧 1.3 L per plant / 24 hours
The solution is approximately:
🌡️ 25°C
and the substrate is around:
🌡️ 26°C
The idea remains exactly the same as throughout this project:
Keep the root environment as consistent as possible and allow the plant to determine what she does with it.
We're not increasing inputs simply because we think a plant should be growing faster.
We're watching.
We're measuring.
We're responding.
And with Pheno B, that patience is particularly important.
Because if we tried to force her to behave like one of the faster phenotypes...
we'd be fighting the very characteristic that makes her interesting.
────────────────────────
🥥 Nutrition – Staying Steady
The feeding strategy also remains stable.
We're continuing with:
• Terra Bloom — 2.2 ml/L
• Pure Zym — 1 ml/L
• Power Buds — 1 ml/L
• Sugar Royal — 1 ml/L
• pH Plus / Lemon Kick — as required
Current readings are approximately:
⚗️ pH — 6.0
⚡ EC — 2.0 mS/cm
And once again...
She looks happy.
Beautiful green foliage.
Healthy flowering development.
No obvious reason to start changing everything simply because another week has passed.
The best feeding strategy isn't necessarily the one that changes the most.
Sometimes it's the one that gives the plant exactly what she's already responding well to.
So for now...
We stay the course.
────────────────────────
🌡️ Summer Is Still Summer
The environmental conditions remain very close to our previous week.
We're currently around:
• 🌡️ Day temperature: 29.9°C
• 🌙 Night temperature: 25°C
• 💧 RH: 60%
• 🥥 Substrate temperature: 26°C
• 💦 Solution temperature: 25°C
• ⚗️ pH: 6.0
• ⚡ EC: ~2.0 mS/cm
• 💨 CO₂: ~693 ppm
• 💡 Light schedule: 12/12
• 💧 Watering: ~1.3 L/plant/24h
• ? Pot size: 15 L
• 📏 Height: ~75 cm
Summer continues to make absolute temperature consistency a little challenging.
Some days are warmer.
Some days are cooler.
Sometimes we're fighting for that perfect number and the weather simply says:
"No." 😂☀️
So we're doing what we can.
The variables we can control are kept as stable as possible.
And rather than obsessing over a single degree here or there, we're looking at the whole environment and, most importantly...
the plant.
And the plant looks good.
────────────────────────
🌬️ Dense Is Beautiful – But We Still Watch the Canopy
As Pheno B becomes more compact and increasingly dense, canopy management remains something we're keeping an eye on.
The plant doesn't need dramatic intervention right now.
The major structural work has already been done.
At this stage, we're mostly observing how the flowers and foliage develop within that compact architecture.
The more dense the flowers become, the more important it becomes to maintain good airflow through the room and around the plants.
We're not trying to turn her into an empty skeleton.
Quite the opposite.
We're preserving that beautiful lush structure while making sure the environment around it remains manageable.
It's a balance.
And that's what we're watching.
────────────────────────
💡 Every Flower Has a Different Relationship With the Light
Another thing I love about photographing her at this stage is seeing how differently the flowers sit within the canopy.
Some are facing directly toward the LEDs.
Others are tucked between leaves.
Some receive additional light from the inner-canopy setup.
Others are naturally more shaded.
That's normal.
A plant isn't a perfectly engineered solar panel.
It's a three-dimensional living structure.
And our lighting strategy is simply trying to give that structure the best possible access to photons without unnecessarily disturbing the plant's natural architecture.
Future of Grow provides the main light.
Lumiflora helps bring additional illumination into the less-exposed areas.
And then...
the plant decides what to do with it.
That's the part we can't program.
And honestly?
That's the fun part.
────────────────────────
📸 The Camera Is Starting to Tell the Story
The photographs this week are another reminder that size really doesn't tell the whole story.
Look at those flowers.
Look at the structure.
Look at the density.
Look at the colour.
This girl may be slow...
but she certainly isn't boring.
😂?
And that's why these individual diaries are so valuable.
If we only photographed the entire room, Pheno B might disappear into the bigger picture.
But when we isolate her...
we can appreciate what she's actually doing.
A compact flowering plant slowly becoming denser.
Week after week.
She's writing her own story.
And I'm very happy to let her take her time.
────────────────────────
🧠 Slow Doesn't Mean Behind
This is probably my favourite observation this week.
Pheno B is slow compared with the rest of the room.
There's no question about it.
Some of her sisters are moving much faster.
But that doesn't mean she's behind.
She's simply developing according to her own rhythm.
There's a difference.
A plant doesn't know that another phenotype next door is growing faster.
She doesn't care.
She has her own genetic programme.
Her own structure.
Her own timing.
And our job is not to make every plant identical.
It's to understand them.
And this little Blueberry Muffin is teaching us patience.
Lots of patience. 😂
────────────────────────
🔮 Looking Ahead
From here, I'm keeping things simple.
No unnecessary changes.
No chasing height.
No trying to force her to become something she's not.
We're going to continue providing:
💡 Quality photons
💧 Consistent irrigation
🥥 Stable nutrition
🌡️ A controlled environment
🌬️ Good airflow
⏳ And plenty of time
Then we'll see where she takes us.
The flowers are continuing to develop.
The plant remains beautifully green.
Her structure is becoming increasingly compact and dense.
And if she wants to take her time...
well...
we have time.
────────────────────────
💚 Final Thoughts – Small, Slow & Beautiful
Every room has those plants that immediately demand attention.
The big ones.
The fast ones.
The dramatic ones.
And then there are plants like Blueberry Muffin Pheno B.
She quietly sits there.
She doesn't stretch like crazy.
She doesn't try to dominate the canopy.
She doesn't rush.
She simply keeps doing her thing.
Slowly.
Very slowly. 😂
But beautifully.
She's becoming an increasingly compact flowering plant, and I really like the direction she's heading.
The lighting is giving her plenty of photons.
The irrigation remains consistent.
The nutrition remains steady.
The environment is being kept as stable as summer allows.
And now...
we let her continue.
Because maybe the small delight doesn't need to become a giant.
Maybe she just needs to become the best version of herself.
And that's exactly what we're going to let her do.
?🌸💚
────────────────────────
🙏 Thank You
A huge thank you to Zamnesia for giving us the opportunity to explore these Blueberry Muffin genetics and discover just how different two phenotypes from the same cultivar can become.
Thank you to Plagron for supporting the garden throughout this flowering journey.
A massive thank you to Future of Grow for providing the main LED lighting and giving these girls the photons they need to keep building.
And thank you to Lumiflora for helping illuminate the deeper and less-exposed areas of the canopy and making this lighting experiment even more interesting.
Thank you to everyone following the 8×8 Adventure on GrowDiaries.
This project continues to remind me why I love documenting plants individually.
Same genetics.
Same room.
Same general conditions.
And yet...
completely different personalities.
Blueberry Muffin Pheno B may be the smallest and slowest girl in this particular race.
But she's beautiful.
She's becoming dense.
She's developing flowers.
And she's doing it her way.
So let's give our little delight the spotlight.
She deserves it.
Until next week...
Growers Love, happy growing, and take care everyone! 🌱💚?🌸
Likes
22
Share

@Marijuanaut
Follow
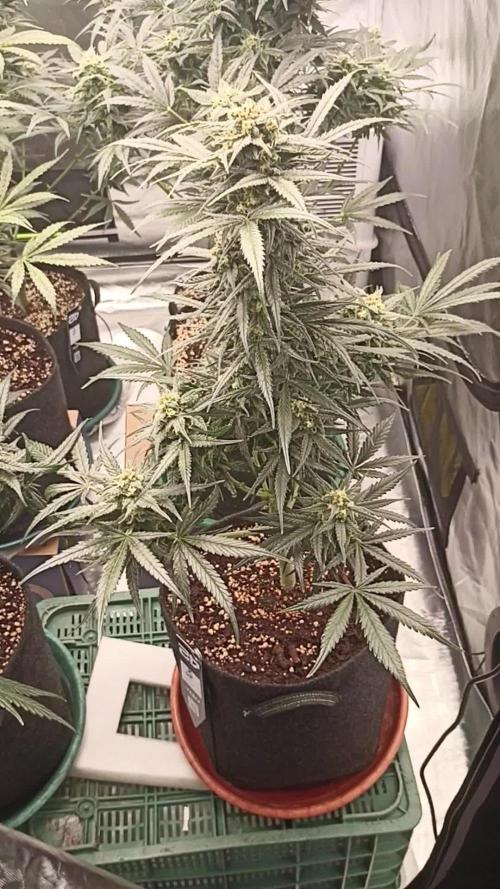
Almost there! 😍
The shorty is going first... the other two might need a couple weeks. 😋
Some signs of Cal deficiency specially on the Banana one 😎
💚💛❤️
Likes
12
Share


@eldruida_lamota
Follow
Buenas tardes familia, actualizamos semana de nuestras power plant xL, de estas 3 geneticas , aún siendo de las que mas problemas dio, es mi favorita, por tamaño , brazos largos laterales y su corta floración para ser predominantemente Sativa.
La necesidad de tutorarlas se debió Más que nada por el peso de las flores, así la planta centra en seguir engordando.
Es la última semana que les echamos productos,desde ahora solo agua controlando el PH igual.
Pronto limpiamos raíces y provocamos estrés hídrico.
En cuanto a la flor, se ven flores compactas con un olor muy dulzón y agradable.

Likes
15
Share


Likes
19
Share


@Reaper
Follow
start of week 7, crystals everywhere buds still need to get fat the smell is all over the place
ppm 1100
plagron green sensation 150 ppm
calmag 300ppm
basic nutes 650 ppm
ph 6.3