
Likes
Comments
Share


@047BrunoGrower
Follow
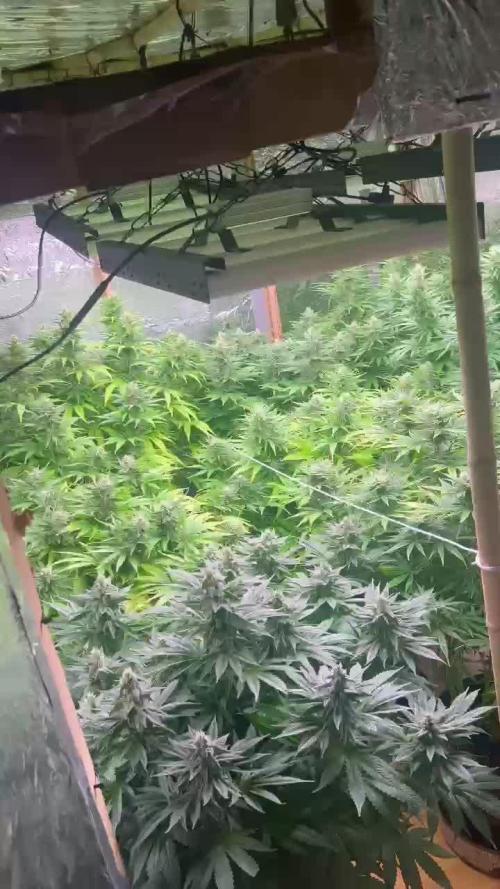
She looks beautiful and has fully recovered from the period when she was held back by over-watering
PPFD 600
VPD 1.19

Likes
10
Share


@iLoveGoodWeed
Follow
Um suprise how fat does this buds getting. Some of the buds are start getting some frost. Will be done great CBD/THC oil.

Likes
28
Share


@Virke
Follow
Turned 12/12 on NY evening and hope for the best. They are looking beautiful, have enough space for some fat buds hopefully😊. That dark green colour is amazing and a plant ( Imperium X) is perfect for all kinds of training.
Good luck with your growing🙏🏻🍀


Likes
4
Share

@PotusArg
Follow
Semana 6: estoy muy emocionado y contento con el progreso que están teniendo las plantas. Las puntas ya se ven grandes y cubiertas de muchos tricomas. Dentro de poco cortaré las Wedding Gelato. Algunas plantas, principalmente las Desfran y las Wedding Gelato, cargaron tanto peso que varias puntas comenzaron a doblarse, así que tuve que improvisar sobre la marcha y logré mantenerlas erguidas.
Esta semana también comencé a usar Overdrive en las Gelato.
Cualquier comentario o consejo sobre lo que opinan de mis plantas, o cosas a tener en cuenta, será realmente apreciado.
Week 6: I’m very excited and happy with the progress the plants are making. The tops are already looking big and covered with lots of trichomes. I’ll soon be harvesting the Wedding Gelato. Some of the plants, mainly the Desfran and the Wedding Gelato, got so heavy that a few of the tops started to bend, so I had to improvise on the spot and managed to keep them upright.
This week I also started using Overdrive on the Gelato.
Any feedback, advice, or thoughts about my plants, or things I should keep in mind, would be greatly appreciated.

Likes
3
Share

@zenderman
Follow
9/6/26
beginning second week(day 8)of flowering stage.
10/6/26-watered with CANNA TERRA FLORES,BIG BUD,CAL-MAG XTRA and BUD CANDY.

Likes
36
Share


@BudsBros
Follow
All the plants are beautiful but some are beautiful. This is the case of Red Hot Cookies, a young lady who stands out, stands out among the others and despite the 6.5 pot she is also growing and swelling well. But her strength is beauty for real, look at these flowers to believe. They are an intense red that goes towards purple which contrasts greatly with the truly wonderful white hairs. Also wonderful are the leaves that are tinged with the classic RHC color near the flower

Likes
11
Share


@Bluemels
Follow
Tag 25: Es geht gut voran mit der Chocolate Haze. Sie streckt sich jetzt schon enorm, so dass ich wohl bald anfangen sie runter zu biegen 💪
Tag 28: Ich beginne die Chocolate Haze zu LST.
Tag 30: Ich beginne mit dem scrog.
Likes
37
Share


@Zurban_Poison
Follow
Hello everyone,
people! I am very glad that the gorilla girl has become so beautiful!
she is very slim and beautiful! buds grow every day. just a billion trichomes on them!
because of the trichomes, the red tint on the buds is poorly visible, which is manifested due to the genetics of this strain ..))
the smell is amazing! the buds begin to harden and get heavy like a stone !!
Yesterday I gave her one of my favorite boosters from Overdrive! to give a second breath to the plant and to extend flowering a little more and get more harvest))
Overdrive is a very cool thing if you use it at the right time!))
Likes
6
Share


@Muravushka
Follow
During my previous grow, I harvested and made some bubble hash. Afterward, I dropped the used, wet buds onto this coco, and it seems some seeds sprouted from the leftover material. I’m not even sure if they’re photoperiod or autoflower, but hey—let's roll with it!
Both my pH meter and PPM meter are broken. I have no idea why they keep breaking so often. They’re ADWA meters, and while you can replace the reading elements, the replacements cost half the price of a new meter. It’s frustrating, and I really don’t want to keep buying them every time I start a new grow
Likes
44
Share


@TheMachinist
Follow
*********HARVESTING MARCH 14, 2018***************
(my first harvest!)
Mar. 11, 2018
FINALLY!!!! 4/5 plants are showing me nearly mature (for our purposes anyway) buds. Most of the top colas are turning a light golden and the sugar leaves are crisping up nicely, starting to see amber on the calyx's.Have watered with plain R/O water ph 7.0 with nothing added for the last 2 weeks. I'm pretty sure I will do a complete harvest and not try to stagger it, I'd like for the bottom buds to get a chance to fully mature but for this round I want to just do a single harvest and keep the immature buds separate. It's been pretty dry here but I think a 5 day dry will be possible, after all the point is to bring the moisture content down enough to seal em up and cure properly.
...
Mar. 9, 2018:
Nothing new to report. Lost a couple very small buds due to falling over and breaking their stems. No way i'm going to tie up the dozens of golf ball sized buds in danger of falling, i'll just continue to tuck them back in and hope for the best. The frostiest plant seems like it will need at least a week or two longer than the rest, only just showing signs of amber on the fan leaves, and sugar leaves aren't crunching yet. One girl is very near ready, as soon as I see 10-15% amber on the calyx's and the buds have a golden hue with discolored and crispy sugar leaves then it's chop chop. Measured my runoff at 450ppm still
Mar. 6-7, 2018:
We are at the end of week 7 of flower. Going to be feeding water only for the duration of the grow. I'm hoping to see the buds start to enter the last stage and give me that golden hue I'm looking for. Getting more amber trichomes on the fan leaves and should see the golden hue migrate to the calyx's.
...
Mar. 5, 2018:
Starting day 92 from seed and 46 days since first pistils. None of the buds are shooting out new pistils so hopefully over the next 2 weeks the calyx's will swell and the trichomes will mature and the bud will take on that finished look. I'm already starting to see a few ambers, but with the crop being seeded it wont' be easy to track the calyx development as some are filled with seeds and already appear swelled.
Likes
8
Share


@Staffedition
Follow
Привет друзья мои!
Моё растение остановтдось в росте и я не могу понять из-за чего.
Все мои растения растут в одинаковых условиях. Что с этим малышом случилось, не понятно!
Возможно попалась плохая генетика!
Всем мира и добра и хорошей генетики!

Processing
Likes
12
Share


@Adam420
Follow
Finally, she has flowered. 😫
15 weeks and to think I almost didn’t keep her.
Complete stop in growth and last leaves forming with pistils.
She’s showing her colors
Likes
45
Share


@chapadux420r
Follow
Wazzuuuup guy’s?
So it’s week 7, the lady’s are officially on the flowering stage!! (Since 4/10)
It’s all going very well, they are happy and so am I, been watering every 3-4 days with 1.2l each (before flowering I’ve watered with approximately 2l) and they have good colour and you can see some stretch. Well, not much but they are trained after all 🤷♂️🏻
Just some yellow leafs below the canopy but guess that’s normal, they are really needing some defoliation but I’m going to wait 2-3 weeks because I don’t want to stress them on this early stage
I’m thinking about adding the scrog net but I don’t know if it’s too late for that, what do you guys think?


Likes
18
Share


@Northern_Ent
Follow
Aug 2: Sunday Punch EV continues to be a great plant. Third week of 12 h darkness is now done and lots of nice buds are starting to form. The buds even have their first bit of frosting showing this morning. Quite hot today but it will cool off a bit tomorrow.
Aug 3: started leaving plant outside again so back up to 15.5 h of daylight here now. Continuing to use far red light at dusk as a bloom booster.
Aug 7: rained over the last few days. Have been shaking water from the colas to keep them dry to prevent bud rot. Some rain on young buds is fine and plants love the rain, but wet buds can cause bud rot.
Have stopped using molasses now. Great for growing, but not for smoking, so avoid using in the last four weeks or so of flowering.

Likes
Comments
Share


@Nickeluring
Follow
We start to see some beautiful flowers being created. She is taking a nice shape. It is a bit hot at the moment and I hope the plants can cope...
Likes
41
Share


@PatriciaGant
Follow
Dane, We all should help one another.
Human beings are like that.
We should live by each other’s happiness - not by each other’s misery.
We don’t want to hate and despise one another, share the Joint.
And mother earth is rich and can provide for everyone.
We can Grow enough Happiness, In this paradise, there is room for everyone.
We only exist to bring joy into the world and The way of life can be free and beautiful,
but we have lost the way.
Grow High and Give the world A smile.
At the end we own nothing more then all our memories, lets make them amazing for everyone,
nothing to loose only everything to win.
A last kiss goodby, a second one, softer and long as a sign, that you are woth it.
That Everyone worth who loved and give.
Enought Hippie Talk, now have a nice day and an even better grow, thx for watching by.
week report
main harvest only few days away.
81 1-2 days more maby more
82 a week more maby
the 12/12 light seems to slow her down


Likes
2
Share


@Exoticfarm99
Follow
Finalizamos cultivo de la mano de nuestro amigo de UKHTA Seeds proveniente de Rusia y afianzándose en España con llegadas de nuevas genéticas que los ponen en los tops, sin duda una experiencia única con esta variedad, unos colores espectaculares, aromas a frutas y muy dulces, parecen chucherías, vamos a disfrutarlos💪💪🍇🍓 muchas gracias por esta oportunidad y por poder probar esta variedad que sin duda entra en mis tops💪


Likes
20
Share


@Mr_weed_pt
Follow
Last week. 9 weeks have pass now 48h of darkeness and then chop chop..