
Likes
Comments
Share


@Natrona
Follow
Lemon Cake & Lemon Drizzle
Week 5 This week 5/5-5/11
Germination April 6.
Vegetation
Week 1 water only
Week 2 water only
Week 3 added recharge and TPS1 increased ppm to 570.
Week 4 continues with recharge and TPS1. I added Fox Cal mag increasing ppm to 685 - 805.
Week 5
TPS1 9ml/gal
Recharge 5 ml/gal
Fox Cal-mag 5 ml/gal
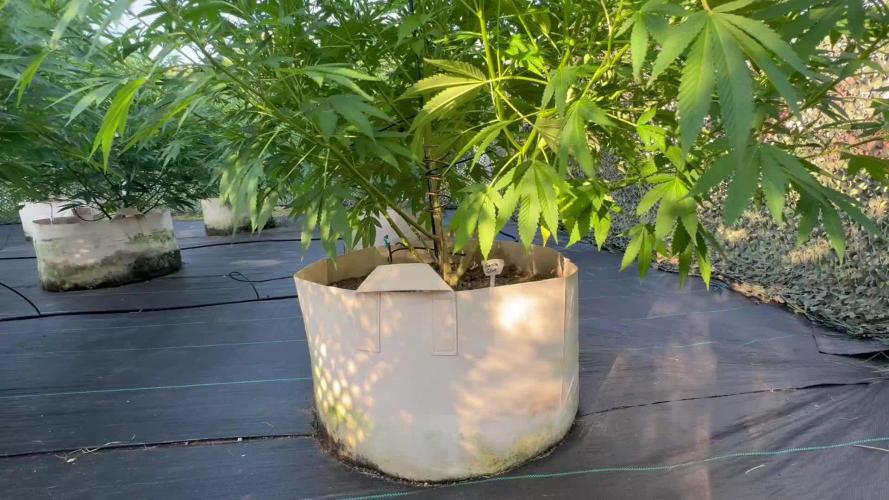
This was an exciting week for my ladies. It started out with the usual feed and defoliation and training. With my upcoming vacation, I am going to be hardening off these ladies to relocate to their outside location. I checked the expected weather forecast for the week. Looks good to start hardening off. Partly cloudy with temps in the low to mid 80s just like in their tent. So that’s good. Night temperatures were in the 50-60s. This is much cooler than what they are used to as our house is at 73. Our summers are hot and humid with frequent thunderstorms. They need to get used to what mother nature will provide.
I had planned to bring the plants back in the sunroom but since conditions were similar, I let them stay outside every night. And every night but 2 it rained. I did not water or feed nutrients this week.
I am attempting the scrog technique on all plants. I am using a peony cage as the support structure. The cages are about 2 feet high. This may not be enough side or top support as she grows and may have to resort to tomato cages.
Took pics May 6,9, & 11 Lemon girls both had mutations at germination. Lemon Drizzle split ot topped herself. This creates two main plant stalks. The primary and a smaller secondary stalk.
Lemon drizzle has stretched above the scrog top opening up her structure. Today she has an erratic top canopy in multiple levels with multiple bud sites. Interesting her nodes have for this week started to develop off set from each other.
Does that mean she is going into flower sooner than expected?
Thanks for the visits, likes and comment, I appreciate all the plant love💚.
Have fun & love what you grow 💚
Sending you good vibes of love, light, and healing 💫
💫Natrona 💫
BARNEYS FARM- LEMON DRIZZLE
Lemon Drizzle Cannabis Seeds
Type: Feminized Weed Strain
Lemon Drizzle Strain by Barneys Farm
Indulge yourself in the tantalizing aroma of our Lemon Drizzle strain, a sensually crafted cannabis strain that is sure to tantalize your senses and leave you in a state of blissful euphoria. Bred from a seductive blend of Super Lemon Haze and OG Kush, this sativa-dominant weed strain will transport you to another plane of existence.
With a flowering time of 60-65 days, Lemon Drizzle's exquisite buds are bursting with a potent THC percentage of 20-25%, ensuring an unparalleled and satisfying high. The complex terpene profile of this alluring strain is sure to captivate your senses with notes of zesty lemon and a hint of earthy Kush undertones, providing a flavor explosion that you won't forget.
This tempting beauty grows to a height of 1m - 1.2m indoors and 1.5m - 2m outdoors. You'll be impressed by the generous indoor yield of 550g/m2, while the outdoor yield of up to 1.5 - 2kg is beyond substantial. Experience the ultimate in relaxation with Lemon Drizzle's outdoor flowering time, which begins in early October, allowing you to bask in the sweet sunshine and savor the heady effects of this tantalizing strain. Succumb to the charms of our Lemon Drizzle strain and discover a world of unadulterated pleasure that will leave you in awe.
Is Lemon Drizzle Indica or Sativa?
The Lemon Drizzle strain by Barneys Farm is 85% Sativa 15% Indica.
What is the best way to store my Lemon Drizzle strain seeds?
To properly store Lemon Drizzle seeds, it is recommended to keep them cool and dark in an airtight container ideally in a refrigerator with proper labeling and dating, avoiding freezing.
Lemon Drizzle Cannabis Seeds Strain Specifications
Type: Feminised
Genetics: Super Lemon Haze Strain x OG Kush Strain
Photoperiod: Normal
Sativa %: 85%
Indica %: 15%
Flowering Time (days): 60 - 65
Feminised Outdoor Harvest Month Week: 1st-2nd week - October
Indoor Height (cm): 100-120cm
Indoor Yield (g): up to 550-650 gr/m²
Outdoor Height (cm): up to 150-200cm
Outdoor Yield (g): up to 1500 gr/plant
Taste: Sour, Lemon, Sweet, Citrus Fruits
Aroma: Sweet, Sour, Citrus, Pine, Earthy
Effect: Energizing, Uplifting, Focused, Motivated
PREMIUN CULTIVARS LEMON CAKE
Lemon Cake Seeds
Lemon Cake strain seeds generate typical Sativa buds known for their heavy trichome covering against a bright green background. Let's look at this great strain and learn about its genetics, growing information, and how to obtain it.
Cultivar Profile
Terpenes Caryophyllene, Myrcene, Terpinolene
Strain Type Sativa
Difficulty Moderate
Height 30 in – 78 in
Yield (oz/ft2) 1 – 3
Flowering Time 9 – 10 weeks
Harvest Month October
Pack Size 3, 6, 12, 24
Seed Type Feminized
Brand Premium Cultivars
The History of Lemon Cake Strain Seeds
Lemon Cake by the European-based firm Heavyweight Seeds is a strong Sativa-dominant hybrid of Lemon Skunk and Cheese. Lemon Cake seeds are easy to cultivate, especially outdoors, with a 9-10 week flowering cycle, squat shape, and large output.
How to Germinate Lemon Cake Strain Seeds
There are several ways to sprout your Lemon Cake strain seeds, but they are more complex, inexpensive, and efficient than the paper towel technique. Premium Cultivars suggests this method since it is simple to implement, involves commonly available tools, and ensures germination. Here’s a 9-step process for geminating Lemon Cake seeds:
1. Collect your essential tools: Lemon Cake seeds, dinner plates, distilled or bottled water, tweezers, and a working table.
2. Wet your paper towel sheets and gently squeeze the excess water.
3. Set one of the paper towels on the dinner plate and the other aside for later usage.
4. Pick your Lemon Cake strain seeds with tweezers and spread them on the towel sheet, allowing an inch between them.
5. Cover your cannabis seeds using the second paper towel. Check if the towel is moist, and if not, add water.
6. Lift the towel sheets and ensure no standing water is present. Return the paper towel and your Lemon Cake seeds carefully.
7. Place the setup in warm, dark areas, particularly a cupboard or drawer (20-120 hours).
8. Check to determine whether your Lemon Cake cannabis seeds are sprouting regularly, and if the paper towel remains moist, add water if it does not.
9. Once taproots have emerged from your Lemon Cake seeds, transplant them to your ideal growing medium.
Why are Feminized Seeds Better than Regs?
Feminized cannabis seeds yield only female plants (or around 99.9% female). Conversely, regular seeds generate a mix of male and female plants. Each seed strain has advantages and cons, with the grower’s specific needs ultimately determining the best. Gardeners mostly use regular cannabis seeds to create their strains, but feminized cannabis seeds are great for farmers looking for a cannabinoid-rich, bud-producing crop. Male cannabis plants generate just pollen sacs and no resinous blooms.
This resin contains cannabinoids and terpenes, which are responsible for cannabis’ desirable properties. If male plants pollinate female plants, their blooms will cease releasing resin and begin producing seeds. In short, male cannabis plants do not aid in pursuing massive, powerful harvests. Nonetheless, male plants are critical to the survival of the species as well as the breeding and improvement of cannabis strains. So don’t dismiss them right away!
Growing Lemon Cake Strain Seeds
The Lemon Cake cannabis strain has grown in popularity due to its ease of cultivation and high yields. It’s a medium-sized plant with long branches that can use some assistance toward the end. It is rather ordinary in terms of temperature and disease resistance since it is not overly prone to unfavorable circumstances or pests. However, if you grow with hydroponics, you won’t have to bother with any of that.
Should I Grow Lemon Cake Strain Seeds Indoors or Outdoors?
Lemon Cake thrives in both indoor and outdoor environments. The height of this cannabis strain is one factor to consider: it can reach heights of 200cm, requiring either a large grow space or a yard to attain its full potential.
Growing Lemon Cake Strain Indoors
If you want to cultivate your Lemon Cake seeds (you can buy these finest seeds from Premium Cultivars) inside, you should invest in exhaust fans or carbon air filters due to the room’s strong odor. Also, if conditions are ideal, growers should expect a large yield after 9-10 weeks of flowering.
Growing Lemon Cake Strain Seeds Outdoors
Outdoor growers can harvest their Lemon Cake buds around the middle of October.
How Much Do Lemon Cake Strain Seeds Yield?
Lemon Cake can produce roughly 25 ounces per plant outdoors and 21-25 ounces per square meter when grown inside. Although you might be tempted to cut it down right away, waiting as long as possible before harvesting it and curing it correctly to enhance the quality is recommended.
How to Get Better Yields from Your Lemon Cake Strain Seeds
Harvest rewards are frequently a mirror of cultivation care, so be kind to your Lemon Cake plants, and they will be gentle with you. However, growers should regularly top and prune their Lemon Cake plants to improve airflow and light exposure, thus raising yields.
The Best Grow Medium for Lemon Cake Strain Seeds
Cultivators can grow Lemon Cake seeds in hydroponic or soil systems. However, experts propose using a precise hydroponic arrangement to achieve optimal production and control its occasionally unpredictable growth rates.
The Best Climate for Lemon Cake Strain Seeds
Lemon Cake strain enjoys warm, semi-humid areas and is inherently resilient, having excellent mold and disease resistance. Growing outside is only acceptable in warmer climates, as this cannabis strain needs sunlight.
Problems to Look Out For When Growing Lemon Cake Strain Seeds
When cultivating Lemon Cake cannabis seeds, the primary issue to watch out for is dehydration and overwatering when the crops are little and susceptible. If the leaves of your Lemon Cake plant turn yellow, this indicates that the plant isn’t receiving enough oxygen to the roots.
How Difficult is it to Grow Lemon Cake Strain?
One of Lemon Cake’s noteworthy characteristics is its simplicity of cultivation.
Are Lemon Cake Strain Seeds Suitable for Beginners?
Yes, these cannabis stain seeds are great for novice growers, and they will obtain outstanding results.
The Best Grow Techniques for Lemon Cake Strain
Topping
Topping encourages the plant to grow horizontally rather than vertically, but when it does so is determined by soil condition, plant health, light, plant size and age, and growth goals. Topping cannabis reshapes the crop in a way that improves light dispersion significantly. Cutting one tall branch to make multiple new ones at the same height guarantees that lower (buds on lower branches) also receive more light.
Another essential reason to top your cannabis crop is for better height management. Logically, the two new branches develop slower than the one branch. Topping a cannabis plant separates its development into several branches. Making the plant grow less in height while putting more energy into expanding broader. This is incredibly convenient for growers, especially for limited indoor plants.
Trimming
Trimming can be an excellent technique for cannabis producers who have been cultivating a plant for a long time to connect with it while boosting the quality and form of the buds. There are two methods for trimming cannabis plants: wet and dry. Wet trimming, as the name implies, happens when the cannabis plant is still wet. This means you harvest your plants and immediately begin the trimming procedure. Conversely, dry trimming will necessitate drying your crops out for a few days before you start trimming the bud.
If you’re cultivating cannabis at home, you’ll almost certainly have to perform all this by hand. For devoted producers, machine trimmers are available, making the operation considerably less labor-intensive. However, due to their high cost, commercial farmers mainly utilize them. Trimming can be time-consuming for many growers, but it’s also thrilling since the growth process is almost complete, and your cannabis is almost ready to have. After you’ve completed trimming, there’s one more step left until you have a great bud: curing.
Pruning
Pruning is the practice of eliminating extraneous shoots, branches, and leaves from a plant to push it to redirect its limited energy into its present and established development. When left to its own devices, a cannabis plant will frequently grow too large to sustain itself properly with the quantity of energy it generates. If left untreated, this can lead to several minor bud sites as the plant strains to survive while creating bud during flowering. By eliminating unneeded and weak growth, you push the cannabis plant to focus on what remains, resulting in a stronger plant capable of producing a few huge buds rather than many little ones. This frequently leads to higher total yields.
Equipment and nutrients
Pots: 5gallon Air pots
Soil Fox Farm Happy Frog Amended with worm castings, dolomite lime and mychorihiza Recharge
=================================
Equipment: AC Infinity
CLOUDLAB 844 – Advance Grow Tent 48”x48”x80”
CONTROLLER 69 PRO – Grow Tent Controller
CLOUDLINE LITE 6 - Inline Fan 6"
IONBOARD S44 – LED Grow Light Board 400W
CLOUDRAY S6 – Oscillating Circulation Clip Fan
Carbon Filter 6”


Likes
13
Share


@MrPott
Follow
With the switch of 18 hours of light, Aimee is definitely growing well. She is looking a bit skinny but I won't get myself into paranoia and just give her time. I think this will be the last time I LST her as I'm satisfied with the flat canopy. Now it's just about feeding her and enjoy watching her grow (:

Likes
1
Share


@PhinolaGreen
Follow
7. Woche Sie befindet sich mitten in der Bloom. Letzte Woche hatte sie Probleme mit Calmag und dann hab ich bisschen gegengesteuert. Soweit sehen die Ladys gut aus 😃 👍🏻

Likes
5
Share


@Rizza78
Follow
2 weeks to flower in main tent. Red Hot May have had a little nute burn. Lighting is at 628 on Par meter. 78deg avg. Malt was accidentally super cropped. Healing from splitting her branch. Oozecake aka Judy is my prize now. She fought through some mold 1st week. Transplanted her with only 1 node. Then her 2nd transplant to 1 gallon she was stunted for a week.


Likes
12
Share


@Sundance
Follow
The weak plant is small and sick. The healthy plant is beautiful even I expected a little bigger plant. Leaves and flowers started to be purple.


Likes
38
Share


@DudeGrowsWeed
Follow
I attended NECANN (New England Cannabis Convention) in Burlington, VT this weekend - Great event!! While I was there I purchased these two Baox hemp clones. The baox strain is supposed to have very high CBD content with very low THC (less than 0.3%). I have obtained a hemp farming license from the state department of agriculture. I will be expanding my grow room setup over the next few weeks and adding a separate flowering tent for photo period plants, including these hemp plants. I am hoping to learn a lot about CBD here. My family has been using a variety of CBD products recently and enjoying the results. Hopefully I will be able to make some of these products on my own in the future. 👍
Likes
57
Share


@DogDoctorOfficial
Follow
Ladies and gentlemen, welcome to the grand finale of my Medusa F1 journey! Week 10 has arrived, and it's a spectacle of colors that even the most talented painters would envy. The buds on my Medusa are a visual feast, showcasing a symphony of pinks, purples, reds, and greens. It's like stepping into a surreal world of botanical beauty.
As we approach the harvest, it's time to bid farewell to additional nutrients. Just like saving room for dessert after a sumptuous meal, we're allowing the plant to focus all its energy on maturing those magnificent buds. It's the VIP treatment, giving them the undivided attention they deserve.
Now, let's talk trichomes, those tiny resinous wonders that hold the key to potency. I've become a trichome connoisseur, inspecting them daily with a fascination that could rival an alien investigator. These shimmering crystals are like a galaxy of diamonds, reflecting the culmination of our hard work and dedication.
A special shoutout goes to Royal Queen Seeds for blessing us with the Medusa F1 genetics. They've truly crafted a masterpiece, and I'm honored to have been a part of this growing adventure. Thank you, Royal Queen Seeds, for making our dreams come true.
As we approach the final curtain call, I invite you all to savor the beauty of cannabis cultivation. Embrace the vibrant colors, relish the trichome spectacle, and celebrate the magic of nature's artistry.
As always thank you all for stopping by and for supporting me on this journey, i am super passion about growing and fell blessed to have you all with me on this new journey <3 <3 <3
Genetics - RQS MEDUSA F1
Ligth - LUMATEK ZEUS 465 COMPACT PRO
Food - APTUS HOLLAND
All info and full product details can be find in can find @
https://www.royalqueenseeds.com
https://aptus-holland.com/
https://autopot.co.uk/
https://lumatek-lighting.com/
With true love comes happiness <3<3<3 Always believe in your self and always do things expecting nothing and with an open heart , be a giver and the universe will give back to you in ways you could not even imagine so <3<3<3
<3 <3 <3 Growers love to you all <3 <3 <3
Medusa F1
Medusa is a true F1 hybrid created from pure, inbred cannabis lines. She boasts uniform grow traits, mouthwatering aromas and flavours, and plenty of potency. If you're looking to bring stable, elongated plants into your room, tent, or garden, look no further. Mouthwatering Aromas, High Potency, and Mid-Size Plants
Though she won't turn you to stone like the mythical goddess after which she's named, Medusa F1 is bound to get you plenty stoned in her own special way. Combining genetics from inbred lines deriving from Sugar Magnolia, a thick and sweet indica, and American Beauty, a fast, fruity hybrid loved for its well-balanced, positive high, the result is an autoflowering F1 variety that produces fresh flavours, a unique cannabinoid profile, and large yields.
A very aromatic cultivar with a vibrant concentration of terpenes bearing notes of fresh mint alongside an upfront peppery kick, backed up by hints of fresh fruit, berries, and tangy fuel. Her thick, frosty flowers consistently produce high levels of THC and CBG, as well as high concentrations of myrcene, ocimene, farnesene, and caryophyllene. As a result, Medusa F1 has strong effects that relax and stone the body from head to toe (brought on by particularly high concentrations of myrcene and farnesene) while motivating the mind with an uplifting, creative, and motivating kick (thanks to high concentrations of ocimene).
Medusa F1 seeds produce elongated autoflowering plants with long, strong branches and well-spaced internodes. Plants regularly grow up to 80–85cm tall and boast a fast flowering time of just 42–45 days (72 days from germination to harvest). Thanks to her genetics, Medusa F1 produces plenty of thick flowers with big, swollen calyxes that make for very easy trimming. Medusa F1 is very stable, handling stress and unfavourable growing conditions with ease, though she is somewhat susceptible to Botrytis, so make sure to keep tabs on the humidity in your grow room/garden
Processing
Likes
6
Share


@field_nigga
Follow
So pretty im genuinely happy and interested. GOD IS GOOD
Haven't started flower mode yet though..maybe at 10 weeks?

Likes
1
Share

@Anon73
Follow
Performed final lollipopping of the inside and lower plant areas. Growth has slowed and flowering is more pronounced.
The puffball stage has arrived.
Top dressed with Gaia Green 70% flower and 30% grow.
Almost zero bug damage, which is shocking.

Likes
11
Share


@ganjaman24
Follow
It’s bern roughly two months these guys have been growing! Lst’d Both but untied the gg because I wasn’t sure she was benefiting from it so I’m going to do it over. These ladies (I hope) will start their flower journey next week when I revive my new flower tent 😎..stay tuned for some epic buds..I hope!!

Likes
4
Share


@GreeneScene
Follow
Watering when dry only & doing my experimental grooming still . From the looks of it it’s working exceptionally well. Not much to report other than it’s time to do more LST. Only 1 of the 3 have thrown preflower pistals beginning 1 week ago .
Another week on the GreeneScene in the books 📚

Likes
12
Share


@Kenpowarrior
Follow
●heavy defoliation done and 2 days drying out they were to wet. Then i got some brown tip leaves.😔😟
●got drinks and food again.(24/1) hope the rest will not do the same.
●honeys still weak🤔
●wrong settings of nutriens on diarie. All set to 2,5L before. Changed it to 1L
●when white is your new favo color!🤤😎👍❄️😁
Likes
67
Share


@GanjaReaper
Follow
Day 69:
As you can see, lucky the buds gone bigger but because of these intense feeding to fix the grow, they start to get nutrient burns. So for the new week i might only give water until the end with maybe some Regulator, enzymen, humic-blast...
They also don't drink fast anymore. Another indicator that they having a hard time taking all the nutrients and that they are at their end of their stage.
Some smaller plants, that finished growing and flowering faster, are already done and will get cut down in the comming days.
These plants are some Gorilla's and some are cherry cola's.
As you see, some have been foxtailing because i had to raise the lamps everytime. I personally don't like fox tail buds but i know some people that love them, pure flower to smoke.
I really liked to make those photos in the dark, It shows many flowers and thc.
Likes
12
Share


@Jays_Not_Here_Man
Follow
The 34 street seed Cookies had Lot’s of LST and training this week! The girls did very well overall after being topped, and have recovered very nicely. I also finished up my drying my last harvest, so after a cleanup session, my big tent was ready to go again!
This week was pretty easy, just watching the girls and adjusting the ties to keep the side branching going. I like to come in regularly and bend and twist the shoots between my fingers encouraging healthier stems.
While I’m in there I’ll adjust the wire ties a bit to keep things even. After 2-3 days with the tie downs on, I’ll take them off and let the plant recover.
With the environment dialled in at 79 degrees and 63% RH, it’s giving me a VPD of 1.0-1.1 , great for optimal growth. 💪
I think I am going to split the girls up, 4 (2 of eachin the one tent, 2 in my small tent, both with a Scrog in place.
I’ll be transplanting this weekend, It won’t be long before these girls are ready for flower, October is a busy month for me so I may wait until the beginning of November to switch to flower light timing. Happy Gardening 🇨🇦❤️🌱😎💨

Likes
1
Share


@BruWeed
Follow
De una semana a otra crecio mucho. Los cogollos se encuentran nevados en resina y su olor es mas fuerte. Por el momento no tuve ningun problema, todo 10 puntos.


Likes
148
Share


@BioBuds
Follow
Well, she keeps disappointing me a bit. If you see her development compared to the two other strains, she is miles behind. Not stretching that much, and flowering stays behind. Im checking for male signs every day as I suspect she might go on me.
All conditions are the same. This is a 9 euro seed. 4 of them didn't germinate. 50 bucks down the shitter. The plant right next to her comes from a one dollar seed, xtrakush at weedseeds.site.
That's why I plead for the growers to share their lucky shots and give the small-time breeders a break.
Also a plea for an expiry date on the products, for the price vs cost of production, we can expect that service.
that way renowned breeders also protect their name when third parties sell old seeds to growers that leave bad reviews.
Maybe she surprises me yet, but we are long way from the silverback we wanted.
Thanks for checking in, see you next week!!
Bud
