The Grow Awards 2026 🏆
Likes
Comments
Share
@Targona
Follow
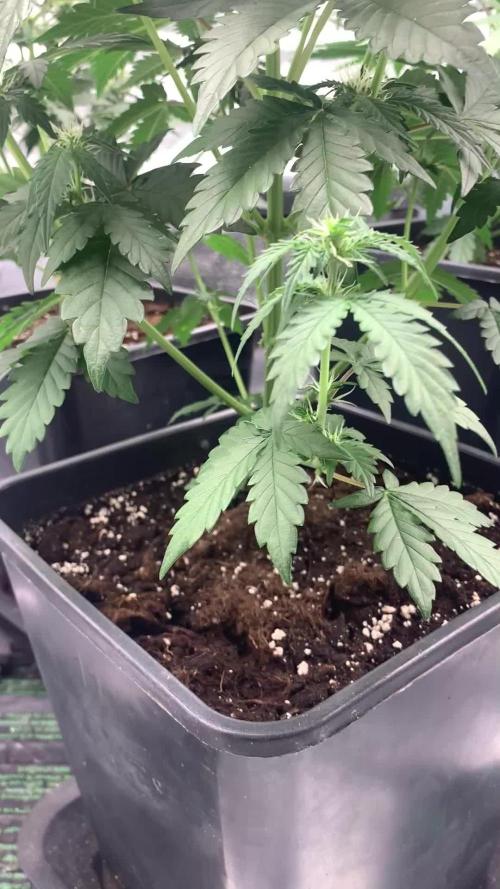
26 days since my little girl sprouted from a seed🌱 Third week of growing my Gorilla Cookies Auto 🦍🍪🦍 Nutrients: I use Advanced Hydroponics Of Holland nutrients - three basic components, always according to the table for vegetative growth 💓 - - Dutch Formula 1 Grow - supplies the plant with substances necessary for the perfect development of roots, stem and leaves; intended for the growth phase 🌾 - Dutch Formula 2 Bloom - contains a large amount of nutrients needed for rapid growth and development of fruits, provides energy to the plant; intended for the flower phase 🌸🌿 - Dutch Formula 3 Micro - increases oxygen intake, improves plant immunity, ensures better absorption of nutrients; intended for the growth and flowering phase 🌴 -------------------------------------------------- -------------------------------------------------- -------- BioBizz Calmag - The special Calmag supplement was designed for professional and hobby growers who need to supply calcium and magnesium in organic quality to plants for a long time or immediately. 100% organic 💩💩 and certified BioBizz Calmag product is made from calcium carbonate and magnesium sulfate supplemented with humic acid. -------------------------------------------------- -------------------------------------------------- -------- BioBizz Bio pH- is an organic pH regulator. Aqueous solution of citric acid, which occurs naturally in citrus fruits 🍋🍋 -------------------------------------------------- -------------------------------------------------- ------- During the flowering period, I add Advanced Nutrients stimulators: - Bud Ignitor (first two weeks of flowering) - flower stimulator 🌸🏵️ - Bud Candy - carbs for my girls 🍭🍭🍭 - JUNGLE - ENVIRON X is a highly effective complex product stimulate the formation of flowers. Contains no synthetic growth regulators (PGRs). • multiplies yield and increases product quality In general: Gorilla Cookies Auto 🦍🍪🦍 - The girl went into the flowering phase, so I adjusted the nutrients. She grew a lot in height, because she germinated 10 days later than the other girls in the tent. It responds very well to nutrients, is strong and has a beautiful green color 🍃💚 Training: During this period, I usually do another defoliation and LST 💚🌞🌞 Light: Mars Hydro TS1000 The plants react effectively and the light is technically very well managed - I try to have 50cm between the light and the plants, so I move it up regularly 💡💡💡 See you soon 😍💚
Likes
57
Share
behold the epic conclusion of my Medusa F1 odyssey! Week 11 brings us face to face with an absolute masterpiece – our mighty Medusa in all her glory. She has blossomed into a cannabis goddess, and I can't help but feel a mix of pride and hilarity. So, picture this: with scissors in hand and a grin on my face, I bravely took the plunge and performed the cosmic haircut of the century. I snipped the entire girl, leaving her looking like a botanical version of a cool, upside-down pineapple cake! It was a sight to behold, and I couldn't help but laugh at the quirky transformation. With our Medusa delicately suspended upside down, she's now getting ready for her final act of drying. It's like she's doing an acrobatic performance, waving her buds at us from above. Who knew cannabis cultivation could be so entertaining! In all seriousness, though, our Medusa's buds are absolutely mesmerizing. They've reached their peak density and glisten with an abundance of trichomes. The colors are a true botanical wonder, like a vibrant firework display against a night sky. Speaking of trichomes, I continue my daily trichome investigation with the precision of a detective. Each day, I observe those tiny resinous diamonds, searching for the magical moment when they're just right – cloudy with a hint of amber. And the aroma, oh the aroma! Terpenes fill the air with an intoxicating fragrance that makes my nose dance with joy. If only we could bottle this cosmic perfume! Before I conclude, I must extend my heartfelt gratitude once again to Royal Queen Seeds. Their Medusa F1 genetics have granted us this cannabis goddess, and I can't thank them enough for this delightful journey. As we prepare for the final chapter, drying and curing our Medusa to perfection, I invite you all to join me in celebrating the whimsy and wonder of cannabis cultivation. Let's cherish this upside-down adventure, savor the captivating colors, and delight in the celestial magic of our Medusa F1. As always thank you all for stopping by and for supporting me on this journey, i am super passion about growing and fell blessed to have you all with me on this new journey <3 <3 <3 Genetics - RQS MEDUSA F1 Ligth - LUMATEK ZEUS 465 COMPACT PRO 
Food - APTUS HOLLAND 
 
All info and full product details can be find in can find @ https://www.royalqueenseeds.com 

https://aptus-holland.com/
 
https://autopot.co.uk/ 

https://lumatek-lighting.com/ With true love comes happiness <3<3<3 Always believe in your self and always do things expecting nothing and with an open heart , be a giver and the universe will give back to you in ways you could not even imagine so <3<3<3 <3 <3 <3 Growers love to you all <3 <3 <3 Medusa F1 Medusa is a true F1 hybrid created from pure, inbred cannabis lines. She boasts uniform grow traits, mouthwatering aromas and flavours, and plenty of potency. If you're looking to bring stable, elongated plants into your room, tent, or garden, look no further. Mouthwatering Aromas, High Potency, and Mid-Size Plants Though she won't turn you to stone like the mythical goddess after which she's named, Medusa F1 is bound to get you plenty stoned in her own special way. Combining genetics from inbred lines deriving from Sugar Magnolia, a thick and sweet indica, and American Beauty, a fast, fruity hybrid loved for its well-balanced, positive high, the result is an autoflowering F1 variety that produces fresh flavours, a unique cannabinoid profile, and large yields. A very aromatic cultivar with a vibrant concentration of terpenes bearing notes of fresh mint alongside an upfront peppery kick, backed up by hints of fresh fruit, berries, and tangy fuel. Her thick, frosty flowers consistently produce high levels of THC and CBG, as well as high concentrations of myrcene, ocimene, farnesene, and caryophyllene. As a result, Medusa F1 has strong effects that relax and stone the body from head to toe (brought on by particularly high concentrations of myrcene and farnesene) while motivating the mind with an uplifting, creative, and motivating kick (thanks to high concentrations of ocimene). Medusa F1 seeds produce elongated autoflowering plants with long, strong branches and well-spaced internodes. Plants regularly grow up to 80–85cm tall and boast a fast flowering time of just 42–45 days (72 days from germination to harvest). Thanks to her genetics, Medusa F1 produces plenty of thick flowers with big, swollen calyxes that make for very easy trimming. Medusa F1 is very stable, handling stress and unfavourable growing conditions with ease, though she is somewhat susceptible to Botrytis, so make sure to keep tabs on the humidity in your grow room/garden
Likes
15
Share
@DRO420
Follow
Buds are forming nicely , all hairs are still white and all the flowers are showing trichomes.
Likes
26
Share
@Rangaku
Follow
Apricot is a leggy little thing , doubled in size the last week . Transplanted her into her forever home and tied her down this week and fully expect her to double in size width and height the coming week , traditionally these autos love getting spread right out . Starting to take shape in the tent now .
Likes
8
Share
Well another week gone and looking good ✌️🏻
Likes
3
Share
Going into week 5. DIY Scrogg net made a huge difference. The girls have grown into gorgeous ladies. Very bushy. Had to perform roughly 30% defoliation today due to fan leaves covering all the important branches. Trying to get an even canopy is much harder than expected however daily changes make a big difference. Added 5ml Calmag solution to current feed & the results are looking amazing. Life is looking pretty good at this stage!! Unfortunately, the camera pictures don't agree.
Likes
9
Share
These girls are done.im just doing the final flush then I will have a smoke report in 3 weeks.im overall pretty satisfied with this grow.my plants would have been better but I had some unseen circumstances.
Likes
7
Share
Bien pues ya tenemos en marcha el 2º seguimiento del perfil... Son 6 white truffles, 6 Apple&Bazzokies de GBSTRAINS y 5 GG4 de GBSEEDS que se empezaron a germinar el 15 de mayo por la tarde sobre las 19:00 Todas nutridas con BOOM nutrients jejeje Todas las semanas iremos viendo los cambios y la evolución, los riegos y las flores que vendrán :) El 16 de mayo del 23 sobre las 07:00 de la mañana pase las semillas del vaso con agua, a los tapers con servilleta. Ahí estuvieron 24 horas mas haciendo un total de 36 horas germinando para después, pasarlas a las macetas de 1 litro. 22/05/23 actualizado, meto unas fotos mas de como van las semillas después de 7 días desde que se empezaron a germinar en el vaso de agua. A día 22/05/23 llevamos 7 días desde que se empezaron a germinar. ACTUALIZACION DE ESTADO: 30/05/23 Subo unas fotos después de 8 días. Llevamos 15 días desde que se empezó a germinar las semillas en vaso de agua. A partir de aquí, empiezo a contar semanas de crecimiento. Trasplantaremos a maceta definitivas de 7L dentro de una semana o 2.
Likes
4
Share
@Jofflepov
Follow
Cookies and Cream is more sativa then expected. The plants were difficult to germinate but since they're growing outside there is no stopping. Flowering is slowly starting to develop. I see many budsites but still small budlets.. ik hope there is enough time this season to finish because this strain is hyping me up
Likes
13
Share
Nice dense buds. Pain to trim, but worth it. Seemed a bit nutrient sensitive. I am really impressed with the potent stativa-leaning buzz, will be growing this again, that’s for sure.
Likes
9
Share
Two low branch broke off due to wind and stem wasnt stong enough for weight of the buds....other than that just a handful or two of defoliation every two day or so....makes trimming ez lol
Likes
2
Share
@Ninjabuds
Follow
The gran turismo seedling is the biggest of the smaller seedlings it has super healthy leaves and is starting to pick up the seed it’s growing it’s gonna be a very nice plant This past week was smooth sailing I topped all the plants
Likes
15
Share
@NSCanna
Follow
Compost tea turned out well, let it go for 26 hours total and geared it towards fungal. Also took some soil samples several days later around the stalks and found a lot of nematodes and protozoa which is what you want to see. Lots of different types of nematodes so what your looking for are the bacterial feeders (there are charts online that show you how to identify them). Mycorrhizae can be identified by it's dark colour, uniformity and segmented nature. Testate amoebas live in a translucent shell like a snail and are easy to spot but hard to spot moving due to my shitty microscope, but look for the tentacles. Also found some eggs with movement inside, no idea what they are but they have vacuoles and flagella. She is really getting sticky and smelly now; berries with herb notes. You can see the resin stretching over the trichomes in the last pic. No signs of senescence yet so I'm not going to feed them, they should have plenty of food anyway as this is a second run of the same soil.
Likes
5
Share
Buds buds buds fattening. Light power up at 100% slowly:)
Likes
22
Share
@Prilyfe13
Follow
April 20, 2024 Happy 420 Everyone! A new diary for a new contest by Seedsman! Sit back, because there's a lot to talk about today. Just like all of my grows, this run will have daily updates with pictures, a weekly video and as much detail as I can muster in the stats. Let's get started. First off, let's talk about the setup. I have 4 plants in my main tent that won't be done for a couple more weeks. So these ladies will be starting out in an AC Infinity Germination Center with their Germination grow lights, a heat mat and a small computer fan to keep the air fresh. The DLI will be around 12 mol/m²/d. They will be planted in root Riot Plugs until they show roots. Then in their final 3 gallon fabric containers. Then into the Mars Hydro 2x2 tent with the TS600 light. 100 watts of pure power. Haha. This should only be for a couple weeks. Just enough time for them to be well established. Then they will go into my AC Infinity 3x3 tent with the S33 grow light. 240 watts of power. I have 2 oscillating clip fans running a slight breeze at all times. I'm using a 4" exhaust fan with filter. I'll be using the AC Infinity bottom feed wick system. I've been using it for quite a while and I find it to extremely efficient. More about this later on in the grow. Let's talk about the strain. Sour Diesel Auto by Seedsman. This strain should be with us for the next 8 to 10 weeks. In my experience, add another week or two just Incase. We can expect a really good yield if I don't screw anything up. Up to 650/m². She has some environmental requirements. Heat is the main thing. Slightly humid for the veg stage and dry for the flowering stage. Being a sativa dominant strain, she will grow tall. I'll be implementing LST and light defoliation for this plant without a doubt. That's about it for now. I'll describe characteristics throughout the run. Finally to our actual ladies. I'm germinating 5 in a glass of water. I plan on keeping 4 total. That's all my tent can fit. So I'll do away with the 5th and work with the 4 best seedlings. They should sink overnight and start to open up. As soon as I see the tap roots, they go in the Root Riot Plugs. That's all for today. See you tomorrow. Oh, and thanks for reading. Wish me luck on this journey. It is a grow off after all. Lol April 21, 2024 4 of the 5 seeds have sunk to the bottom of the cup with my assistance. The 5th one I still floating. However, I don't see any tap roots, so another day or 2. I may pop the sunken seeds in the Root Riot Plugs tomorrow afternoon. The 5th seed may be the reject. If it doesn't pop in a couple days, I'm calling it a loss and working with the 4 other seeds as I originally planned. I could also go down to 3 plants, but I frankly would like the even number of 4. 1 per quadrant. We shall see. I wonder if I should do three 5 gallon plants or four 3 gallon plants. We shall see. The biggest obstacle will be the tight space I have to work with for the next 2 to 3 weeks while the plants already in there are done. I plan on dry trimming for a faster dry. Normally, I like to hang the whole plant. This time around will be wet trimmed and hung in parts. OR placed in my bud drying rack. That's large enough to hold all 4 plants' buds. I should also mention that these seeds are in constant darkness until they go into the plugs. Kind of obvious, but these diaries are not only for my records but set up as an educational piece of work. The environment is looking fine. The air temp is 82°, but the water is definitely no where near that warm. I did have to drop the exhaust fan down and increase the heat mat temp to get the water temp up to a proper temp. Germination Center Environment: I'll be keeping the temp around 82° and the humidity doesn't matter for now. When it matters, I fill the bottom of the Germination Center with water. It helps perfectly with the humidity for growing seedlings. It will also help regulate the temp to around 78° to 79°. April 22, 2024 All 5 ladies have sunk to the bottom of the cup. Now it's just a matter of time for the taproots come out. Somehow, the Germination Center was cold this morning. Like 68° cold. So I took the riser off the dome and cranked the heat mat to bring the heat and humidity up. That being said, the seed water is much cooler than I want. I like warm water for germination. Oh well. The heat mat should fix things in a matter of hours. Everything else looks good. Germination Center Environment: Currently it's at 77° and 94% humidity. It should level out to about 80° and the humidity should stay about the same. I also took the fan off the dome. I'll put it back on when they pop out of their plugs. April 23, 2024 All 5 seeds popped. They all have tiny taproots just starting to form. This is when I plant them in the plugs. They should take a couple days to break surface, but definitely germinated. Now it's just a matter of choosing the 4 best looking seedlings. They are now in the Root Riot Plugs with the temp at 77° and humidity at 95%. The dome is on without the extension for now. Once they show leaves, I'll install the extension and turn the light on. I'll be leaving the light on for 24 hrs. While in the Germination Center. Once out and established, I'll change it to the normal 18/6 light schedule. I was considering starting at 18/6 from the beginning, but I've tried that and feel like it wasn't as successful as 24 hours. Especially because these are autos. The kickstart of light makes total sense. We will see if my theory is correct. Germination Center Environment: Temp: 77.4° RH: 95.4% VPD: 0.15 kPa April 24, 2024 Nobody hopped surface yet today. I don't even see green in the plugs yet. I'm definitely not worried about it. I expect them to break surface in a couple of days. Maybe tomorrow or the day after. Honestly, I won't mind if they take a little bit longer and I can keep them in the Germination Center for a bit longer. It will work out best for my whole grow operation. Small as it is. I gave each seed plug a bit of filtered water today. Just to keep the moisture up. It shouldn't matter too much. The plugs are pre-moistened, so there shouldn't be any issues there. I'll be turning the lights on when I start to see green. They will be on 24 hours for the first week. Then into the main light at 18/6 for the rest of the grow. The environment is a bit bouncy while I work to get the system right. The heat mat is perfect a it's setting, but the fan needs to be messed with and the dome port needs to be adjusted as well. So far it's not too bad, but the temp keeps dropping below 75°. I'll keep a closer eye on it while I get it to acclimate to the proper total environment. Germination Center Environment: Temp: 80.4° RH: 94.7% VPD: 0.19 kPa April 25, 2024 Some ladies are starting to show green! Today we have 3 of the 5 ladies breaking surface with the shells. One of them is absolutely going to have helmet head. Or whatever it's called. I'll be needing to fix that. I'll wait til tomorrow to see how things go. The other 2 are still working their plugs. That being said, I reinstalled the dome extension and turned the lights on to 20% power. The DLI is around 10 mol/m²/d. I'll increase the light power in a day or 2 when the rest of the babies pop up. We should end up with the DLI of 12 mol/m²/d when we start seeing leaves. The environment hasn't been the best. Not my best start by far. I can't keep the temp at a good range. My night time temps are super low and then I get a decent day temp, but then it gets too hot. I'm going to have to figure out the heat mat I think. It's back to normal now, but was like 65° last night. Not good. With the light on now, the temp shouldn't be a problem. Germination Center Environment: Temp: 72.6° (too low) RH: 76.8% VPD: 0.64 kPa April 26, 2024 So far I have 4 ladies fully showing with the 5th lacking any movement. She mush not have actually popped. Or maybe a little late. I'll give it 2 more days and see what happens. Anyway, I think I already have my 4 plants now. They will be labeled A through D. Everything looks great for now. The environment is looking great at 80° and a humidity of 82%. I won't need to mist them at all at this rate. Maybe when they get into the nursery bags I'll need to mist. We shall see. I'll be leaving the light at 20% for another day or two. Then I'll increase the intensity to 12 mol/m²/d. It should start this run out swimmingly. One of the babies had a helmet, so I gently removed that this morning. Other than that, nothing else for the day. Germination Center Environment: Temp: 78.7° RH: 80.0% VPD: 0.69 kPa April 27, 2024 This is when I normally would start a new week, but these ladies are only in the very early seedling stage. Not on veg. Honestly, I would love for a seedling stage week. Now I'm kind of stuck until I see the first set of true leaves. Another few days no doubt. So it throws off my schedule. Oh well. I'll do my best to keep track. I have 1 seed that rooted, but never grew up. I'm calling it a loss for now. So 4 of 5 seeds made it out of the plugs. I also have a 4th one that is super wonky. I'll keep it for now. If it looks all messed up over the next few days, I'll have to toss that one as well and just work with 3 plants. Hopefully it won't come to that. The 3 seedlings that are looking good, look really good. Roots already starting to get exposed. They will be going in the 1/5 gallon nursery bags in a matter of days. Maybe even tomorrow. I don't like too much root to show before transplanting. So that may be a thing tomorrow. I'll increase the light intensity when they are transplanted. It makes the most sense based on the speed they grow. The environment is pretty good. Hovering at a temp of 80° and 87.4% humidity. I also gave them a small misting to keep the humidity up and the babies getting all the water they can get without overdoing it. Germination Center Environment: Temp: 81.2° RH: 88.9% VPD: 0.41 kPa
Likes
14
Share
4e semaine de floraison les bud sont beau et résineux elle on une odeur tropicale/exotique/haze/ assez présente super agréable, jaurai du la rempoter mais c'est une sativa qui a la trik comme pas possible jai donc pris le risque de traiter les racine au bactérie ensuite propolix ensuite bactérie. Comme j'ai facilement accès au racine je surveille qu'elle ne bruisse pas je sais que je vais perdre énormément en poid mais la taille est incroyable si je ne n'aurai pas fait le LST en mode banzai + les taille successive je pense que la plante ferait bien 2.20m en pot de 7L . En balcon c'est pas idéal le baobab de 2metre on va donc faire une exception pour cette fois La.plante devien chiante avec l'engrais elle a besoin de beaucoup d'engrais et beaucoup d'azote surtout en mis flo jai donc mis un peut de supermix de plagron par griffure et du bat guano en 10 et 5gr par griffage
Likes
5
Share
@Ewok923
Follow
It's going great just checking the Ph daily and making sure the canopy is ready for flower trimming to where I only have the very top 2 sections on all 6 of my plants
Likes
2
Share
the temperature has risen to 32 degrees.. but flowering continues without problems.I have no way to lower the temperatures, just over a month and they should be ready. I made a mistake by adding the top dress, thinking it would help during the flowering stage. But since the plants only spent one week in supersoil before I switched to flowering, I added a tablespoon per 7 liters during the third week of 12/12 light. Given how short the vegetative phase was, I’ve realized that the top dress wasn’t necessary. waiting until the end of September for the next run the height of only 150 cm of the growbox does not help in counteracting the heat. Tropicana Banana make a nice top
Likes
47
Share
Removed autoflower and put her in her own pot outside the tent. Foliars applied in strong blue 430nm with 4000Hz tone. 20-minute dose prior to application. In essence, you're seeing a combination of the infrared light reflected by the plant, which the camera perceives as red, and any residual visible blue light the plant reflects, which results in a purple hue. I was doing more stretching of the stems, adjusting weights, just a little too much, and it snapped almost clean. I got a little lucky in that it was still connected, wrapped her almost instantly while holding her in place with yoyos. I am hopeful she will recover and reconnect the xylem and phloem channels. Oopsy level stress event. A couple of days later, the stem was tied in place to hold it, and I spent some time gently caressing the stem, bending slowly over time as it becomes more pliable the more you bend it. A little delay, but the core framework is now in place. If your soil has high pH,it's not ideal, you want a pH of 6.4, 6.5, or 6.6, which is ideal. If you are over a pH of 7, you have no hydrogen on the clay colloid. If you want your pH down, add Carbon. If you keep the pH below 7, you will unlock hydrogen, a whole host of new microbes become active and begin working, the plant will now be able to make more sugar because she has microbes giving off carbon dioxide, and the carbon you added hangs onto water. Everything has electricity in it. When you get the microbes eating carbon, breathing oxygen, giving off CO2, those aerobic soil microbes will carry about 0.5V of electricity that makes up the EC, The microorganisms will take a metal-based mineral and a non-metal-based mineral with about 1000 different combinations, and they will create an organic salt! That doesn't kill them, that the plant loves, that the plant enjoys. This creates an environment that is conducive to growing its own food. Metal-based: Could include elements like iron, manganese, copper, or zinc, which are essential nutrients for plants but can exist in forms not readily accessible. Non-metal-based: Examples like calcium carbonate, phosphate, or sulfur, also important for plant growth and potentially serving as building blocks for the organic salt. Chelation in a plant medium is a chemical process where a chelating agent, a negatively charged organic compound, binds to positively charged metal ions, like iron, zinc, and manganese. This forms a stable, soluble complex that protects the micronutrient from becoming unavailable to the plant in the soil or solution. The chelate complex is then more easily absorbed by the plant's roots, preventing nutrient deficiency, improving nutrient uptake, and enhancing plant growth. Chelation is similar to how microorganisms create organic salts, as both involve using organic molecules to bind with metal ions, but chelation specifically forms ring-like structures, or chelates, while the "organic salts" of microorganisms primarily refer to metal-complexed low molecular weight organic acids like gluconic acid. Microorganisms use this process to solubilize soil phosphates by chelating cations such as iron (Fe) and calcium (Ca), increasing their availability. Added sugars stimulate soil microbial activity, but directly applying sugar, especially in viscous form, can be tricky to dilute. Adding to the soil is generally not a beneficial practice for the plant itself and is not a substitute for fertilizer. While beneficial microbes can be encouraged by the sugar, harmful ones may also be stimulated, and the added sugar is a poor source of essential plant nutrients. Sugar in soil acts as a food source for microbes, but its effects on plants vary significantly with the sugar's form and concentration: simple sugars like glucose can quickly boost microbial activity and nutrient release. But scavenge A LOT of oxygen in the process, precious oxygen. Overly high concentrations of any sugar can attract pests, cause root rot by disrupting osmotic balance, and lead to detrimental fungal growth. If you are one who likes warm tropical high rh, dead already. Beneficial, absolutely, but only to those who don't run out of oxygen. Blackstrap is mostly glucose, iirc regular molasses is mostly sucrose. Sugars, especially sucrose, act as signaling molecules that interact with plant hormones and regulate gene expression, which are critical for triggering the floral transition. When sucrose is added to the growth medium significantly influences its effect on floral transition. Probably wouldn't bother with blackstrap given its higher glucose content. Microbes in the soil consume the sugar and, in the process, draw nitrogen from the soil, which is the same nutrient the plant needs. Glucose is not an oxygen scavenger itself, but it acts as a substrate for the glucose oxidase (GOx) enzyme, effectively removing oxygen from a system. Regular molasses (powdered if you can) soon as she flips to flower or a week before, the wrong form of sugar can delay flower, or worse. Wrong quantity, not great either. The timing of sucrose application is crucial. It was more complicated than I gave it credit for, that's for sure. When a medium's carbon-to-nitrogen (C:N) ratio reaches 24:1, it signifies an optimal balance for soil microbes to thrive, leading to efficient decomposition and nutrient cycling. At this ratio, soil microorganisms have enough nitrogen for their metabolic needs, allowing them to break down organic matter and release vital nutrients like phosphorus and zinc for plants. Exceeding this ratio results in slower decomposition and nitrogen immobilization, while a ratio below 24:1 leads to faster breakdown and excess nitrogen availability. Carbon and nitrogen are two elements in soils and are required by most biology for energy. Carbon and nitrogen occur in the soil as both organic and inorganic forms. The inorganic carbon in the soil has minimal effect on soil biochemical activity, whereas the organic forms of carbon are essential for biological activity. Inorganic carbon in the soil is primarily present as carbonates, whereas organic carbon is present in many forms, including live and dead plant materials and microorganisms; some are more labile and therefore, can be easily decomposed, such as sugars, amino acids, and root exudates; while others are more recalcitrant, such as lignin, humin, and humic acids. Soil nitrogen is mostly present in organic forms (usually more than 95 % of the total soil nitrogen), but also in inorganic forms, such as nitrate and ammonium. Soil biology prefers a certain ratio of carbon to nitrogen (C:N). Amino acids make up proteins and are one of the nitrogen-containing compounds in the soil that are essential for biological energy. The C:N ratio of soil microbes is about 10:1, whereas the preferred C:N ratio of their food is 24:1 (USDA Natural Resource Conservation Service 2011). Soil bacteria (3-10:1 C:N ratio) generally have a lower C:N ratio than soil fungi (4-18:1 C:N ratio) (Hoorman & Islam 2010; Zhang and Elser 2017). It is also important to mention that the ratio of carbon to other nutrients, such as sulfur (S) and phosphorous (P) also are relevant to determine net mineralization/immobilization. For example, plant material with C:S ratio smaller than 200:1 will promote mineralization of sulfate, while C:S ratio higher than 400:1 will promote immobilization (Scherer 2001). In soil science and microbiology, the C:S ratio helps determine whether sulfur will be released (mineralized) or tied up (immobilized) by microorganisms. A carbon-to-sulfur (C:S) ratio smaller than 200:1 promotes the mineralization of sulfate, when the C:S ratio is low, it indicates that the organic matter decomposing in the soil is rich in sulfur relative to carbon. Microorganisms require both carbon and sulfur for their metabolic processes. With an excess of sulfur, microbes take what they need and release the surplus sulfur into the soil as plant-available sulfate A carbon-to-sulfur (C:S) ratio higher than 400:1 will promote the immobilization of sulfur from the soil. This occurs because when high-carbon, low-sulfur materials (like sawdust) are added to soil, microbes consume the carbon and pull sulfur from the soil to meet their nutritional needs, temporarily making it unavailable to plants. 200:1 C:S 400:1: In this range, both mineralization and immobilization can occur simultaneously, making the net availability of sulfur less predictable. This dynamic is similar to how the carbon-to-nitrogen (C:N) ratio regulates the availability of nitrogen in soil. Just as microbes need a certain amount of nitrogen to process carbon, they also require a balanced amount of sulfur. Both mineralization and immobilization are driven by the metabolic needs of the soil's microbial population. Sulfur is crucial for protein synthesis. A balanced ratio is particularly important in relation to nitrogen (N), as plants need adequate sulfur to efficiently use nitrogen. A severely imbalanced C:S ratio can hinder the efficient use of nitrogen, as seen in trials where adding nitrogen without balancing sulfur levels actually lowered crop yields. Maintaining a balanced carbon-to-sulfur (C:S) ratio is highly beneficial for plant growth, but this happens indirectly by regulating soil microbial activity. Unlike the C:N ratio, which is widely discussed for its direct effect on nutrient availability, the C:S ratio determines whether sulfur in the soil's organic matter is released (mineralized) or temporarily locked up (immobilized). Applied 3-day drought stress. Glucose will hinder oxygenation more than sucrose in a solution because glucose is consumed faster and has a higher oxygen demand, leading to a more rapid decrease in oxygen levels. When cells respire, they use oxygen to break down glucose, and this process requires more oxygen for glucose than for sucrose because sucrose must first be broken down into glucose and fructose before it can be metabolized. In a growth medium, glucose is a more immediate and universal signaling molecule for unicellular and multicellular organisms because it is directly used for energy and triggers a rapid gene expression response. In contrast, sucrose primarily acts as a signaling molecule in plants to regulate specific developmental processes by being transported or broken down, which can be a more complex and slower signaling process. Critical stuff. During wakefulness (DC electric current) life can not entangle electrons and protons. During daytime, the light is sensed multiple color frequencies in sunlight. Coherence requires monochromatic light. Therefore at night IR light dominates cell biology. This is another reason why the DC electric current disappears during the night. The coherence of water is maintained by using its density changes imparted by infrared light release from mitochondria in the absence of light. This density change can be examined by NMR analysis and water is found to be in its icosahedron molecular form. This is the state that water should be in at night. This is when a light frequency is lowest and when the wave part of the photoelectric effect is in maximum use. 3600