The Grow Awards 2026 🏆
Likes
Comments
Share
MAY 20TH - TODAY is the first day the plants wake up from their 18/6 cycle down from 2 weeks at 20/4. They got their first SCHWAZZE and shaping at this stage getting them ready to grow into the beautiful sea of green each of these beds are to become. The uniformity of the clones reminds me how much of this has become muscle memory to me, From doing thousands of plants per grow this has become second nature for me. The ladies are 100% organic at this point and our feed I am considering releasing it for anybody who is interested as a way to fund raise at the same time ! If anybody is interested in the recipe let me know in the comments, If we get enough interest I will put up a site that will constantly update with each weekly feed & steps done on the plants. ANNOUNCEMENT : ** It has taken me 20 re trys & double the amount of ERROR codes to get this update LIVE. I will be staying on this website until the end of this grow year, Then I will be setting up a Patreon & migrating over to Patreon and Twitter ( X ) I am completely done with GROW DIARIES.** SUPPORT OUR SPONSORS !!! PROMO CODE GREEN PLANET : LEGACY PROMO CODE MARS HYDRO : LEGACY PROMO CODE SEEDSMAN : LEGACY10 
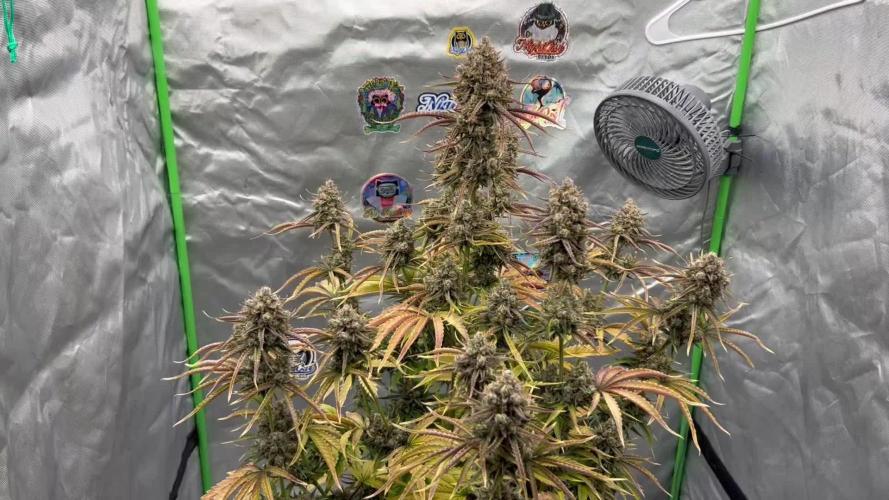
MAY 22ND 2024 - SCHWAZZE COMPLETED YESTERDAY. These photos where taken DIRECTLY after their SCHWAZZE. NOW 2-3 WEEKS of 18/6 then another SCHWAZZE, Top DRESSING of Mineralized Phosphate, Power Bloom and Glacial Rock Dust and swap to 14/10. We will be using 14/10 for 3 weeks then going to 12/12 to flower these beauties out. MAKE SURE TO FOLLOW OUR SOCIALS & JOIN OUR GREAT COMMUNITIES ! TWITTER : https://x.com/LegacyMrketFarm YOUTUBE : www.youtube.com/channel/UCR89iF2Iqy3zlHZhFfU2MMg YOUTUBE GAMING : www.youtube.com/channel/UCw8-qCFg-PUf00waTO5JOGw
Likes
9
Share
@deFharo
Follow
Nueve semanas de floración para esta cepa Diesel hija inesperada de Diesel, semilla fecundada y nacida en casa, cepa fuerte como la madre-padre, ha sobrevivido al oídio y a la plaga de arañas, el rociado con azufre y otro después con tierra de diatomeas en conjunto con las bajas temperaturas están, por el momento, salvaguardando el cultivo. La progenitora de esta semilla la coseché después de 10 semanas de floración, casi 11, esta hija va por el mismo camino y quizás se alargue más, las colas están engordando claramente y los tricomas transparentes todavía dominan el escenario. DECODIFICANDO LA NUTRICIÓN 😎 - Sigo calentando el agua de riego entre 21-23°C Día 112. Agua de montaña (Ca, Mn, Mg, Si, Fe...) PH: 8, EC: 0.27. Día 113. Agua de lluvia y montaña al 50% (EC: 0.12), Humato potásico de leonardita (Húmicos, fúlvicos, K...) al 1%, Biol de guanos con Microorganismos Eficientes (P, MMA, BAL...).PH:6.60 EC: 1.30. 500ml , Día 113. Componentes sólidos a partes iguales destinados al aporte de nutrientes y materia orgánica, mezcla dirigida principalmente como estimulador del cultivo, 10g por maceta: Bocashi de algas, Guanos de aves y murciélago, Humato PK en polvo, Dolomita, Sal de Epsom, Polvo de semillas de algodón, Alga Kelp. Día 115. Agua de lluvia y montaña al 50% (EC: 0.12), Humato potásico de leonardita (Húmicos, fúlvicos, K...) al 2%. PH:6.65 EC: 1.33. 500ml , 😁 ORGANIC TIP >>> Hidrolizado potásico de leonardita con fósforo (Humato PK). Este producto lo vengo usando en mis cultivos desde el final del crecimiento vegetativo hasta el final de la floración y ahora es una de mis fórmulas indispensables. La leonardita es un mineraloide derivado del lignito y compuesto en su mayor parte por materia orgánica que se encuentra en el proceso de convertirse en carbón, no es soluble en agua. La leonardita es la mayor fuente existente de Ácidos Húmicos, Fúlvicos e Himatomelánicos. Yo lo uso como aporte sólido a los sustratos para mejorar la estructura del suelo haciéndolo más esponjoso, estimula el suministro de oxígeno a los microorganismos, incrementa el crecimiento y la división celular y la retención de agua y nutrientes. También lo uso solubilizado para riegos, donde la digestión por parte de la planta es inmediato. Para hacer soluble la leonardita uso un tipo de hidrólisis alcalina con Hidroxido de Potasio al que en esta ocasión he añadido Roca Fosfórica (P) y Azomite (Si, Mg, K, Fe... + trazas de 70 minerales). El proceso es simple: MATERIAL: Agua pura 2000ml. (Yo en este preparado he usado mi agua de manantial alcalino (PH: 9.2 EC: 0.85), esta agua está muy mineralizada (Ca. Si, Fe, Mg, Mn...) quiere decir que tiene hidrolizados esos minerales los cuales se añaden naturalmente al producto.) Leonardita: 150g Roca fosfórica: 10g, Azomite: 5g Hidróxido de potasio: 45g. PROCEDIMIENTO: 1) Juntar la leonardita con la roca fosfórica y el azomite. 2) Añadir el Hidróxido de potasio disuelto en 500ml de agua. 3) Mantener una hora y agitar de vez en cuando. 4) Añadir el resto del agua. 5) Mantener en el recipiente sin cerrar, para dejar paso al oxígeno, durante al menos tres días. 6) Remover o agitar al menos 2 veces al día durante estos 3 primeros días. (Cuanto más o mejor se agite el resultado de la hidrolisis será mejor.) 7) A partir de los 3 días ya se puede usar... pero yo prefiero esperar una semana al menos. 8) El producto se puede almacenar a la sombra durante años, el paso del tiempo hace más añeja la mezcla. COSTO APROX. DEL PREPARADO: 3€. USO FOLIAR AL 1% Y RIEGO DEL 1 AL 3%. ========================== • CONOCE MIS TÉCNICAS DE CULTIVO Y MIS FERTILIZANTES ORGÁNICOS AVANZADOS.... HACER ES COMPRENDER!! 😉 - ORGANIC GROWING TIPS!! 👇 3M • PURPLE BUD SEMANA 17: Activación de Microorganismos Sólidos (MMA) y biol de frutas con minerales. SEMANA 20: Agua de montaña y estructurada. SEMANA 21: Abono sólido y mulch. 3M • Anubis y Auto Magnum SEMANA 1: Super sustrato y aireación de macetas 3M • Frodo's & OG Kush SEMANA 7: Elaboración de auxinas. SEMANA 10: Humato potásico de leonardita enriquecido con minerales. 3M • Diesel bastard. SEMANA 11: Sólidos y Mulch SEMANA 13: Aireación forzada del sustrato. SEMANA 14: Elaboración de un Lacto fermento de auxinas, nutrientes y minerales. 3M • Sweet Zkittlez SEMANA 2: Agua estructurada, agua viva. SEMANA 3: Ormus y agua de coco. SEMANA 5: Compactación con luces Cool White. SEMANA 6: Cicatrizante y protector de cortes o podas apicales. 3M • Sweet Clementine SEMANA 5: Elaboración de Lacto fermento multi frutas y minerales. 3M • Fresh Candy auto SEMANA 4: Recuperación de esporas de Microorganismos y Micorrizas. 3M • Tropicanna Poison SEMANA 7: Elaboración de un semillero de Microorganismos de Montaña Sólidos (MMS) SEMANA 10: Extracción de HBO con el método QWISO 3M • Black Domina SEMANA 6: Reutilización de residuos: Mulch de palos secos. 3M • Monster Bud Kush SEMANA 7: Elaboración de un Bocashi de Pasto ensilado enriquecido con nutrientes y minerales. 3M • San Fernando Lemon Kush SEMANA 5: Reutilización de sustrato orgánico. SEMANA 16: GD TIP: ¿Lente u objetivo? 3M • Magnum Auto SEMANA 5: Aprovechamiento de residuos caseros. Cáscaras de frutas. Deshidratación y almacenaje. 3M • Quick Sherbet SEMANA 12: Crema tópica de karite y HBO. 3M • Purple Shot SEMANA 18: Tierra a la tierra.😎 3M • Gorilla Glue SEMANA 4: Fibra de coco con Microorganismos de Montaña Activados (MMA) para mezclas de sustratos. 3M • Diesel S1 SEMANA 17. Humato PK. Hidrolizado potásico de leonardita y fósforo.
Likes
283
Share
D21 - Start of week three of veg for the second girl, while it is only the start of week two for the first girl as I had to replant her. I will probably do the first topping on the second girl this week but I'll see in a few days where she's at. I gave both girls around one liter of water @ pH 5.9. A bit on the low side as I used too much pH down but it'll be fine for one watering. D24 - Yesterday I switched my light from the seedlings program to the veg program, and I'm now reading around 500-600 PPFD across the canopy. On the high end for sure, so let's see how the girls handle it. However, the daytime temp in the tent jumped up to around 30 degrees C after I switched the lights. #tinytentproblems I also added some support to #1 as she has a relatively thin stem but large leaves, so the oscillating fan keeps knocking her around. The second girl also initially had a slender stem, so I guess it is their genetics. (#1 is 12 cm tall and 15 cm wide, while #2 is 20 cm tall and 35 cm wide.) I will need to top the second girl this week as she grows a lot each day. I'm considering mainlining her but haven't made up my mind yet. I gave both girls around one liter of water @ pH 6.5. D25 - A couple of days ago, switching the lights to the veg program made the cover crop explode and turn into a jungle. I decided to trim down the red clover to increase the airflow around the girls and reduce water use. I watered the girls only yesterday, but they were already thirsty again, so I think that the clover was drinking quite a bit as well. After cutting back the clover, I gave each girl around 1.2-liters of water @ pH 6.5. D27- Today was the last day in week three of veg for the second girl and the last day in week two for the first girl. I really should have topped the second girl already, so that will need to be done as soon as possible. She is 26 cm tall and 38 cm wide, while the first girl is 13 cm tall and 27 cm wide. Yesterday, I removed the support from the first girl as her stem had gotten more robust, so it was no longer necessary. Today, I started brewing compost tea (worm castings, neem meal, kelp meal, biochar, rock dust, algal limestone, bentonite, and molasses) which I will leave overnight and feed to the girls tomorrow.
Likes
19
Share
@Arcadium
Follow
Hot dry week, had a wild storm roll through with tons of lighting, but barely a drop of rain. Added one last layer of netting for support. Removed a few more inner nodes that weren't keeping up with canopy. Did another batch of compost tea this week, spray of LCPT. Will start BT next week as I've seen some cattepillars. Flowering is coming along nicely as well, lots of pistils, and node tightening.
Likes
6
Share
@Headies
Follow
week 10 we put in a scrog net on the sleeping beauty and continued lst on the tropicana poison. I also FIM'ed them, again, trying to make them bush out like crazy to each fill a 4x4, 4x8 total
Likes
4
Share
Likes
6
Share
Noch keine Ideen. Es gibt aber einige Gedanken und Erfahrungswerte, die definitiv folgen werden. Einige Dinge haben mich sehr enttäuscht und in zwischen weiß ich auch warum.
Likes
27
Share
@m0use
Follow
SPONSORED DIARY===SPONSORED DIARY===SPONSORED DIARY Seeds finally popped up and out of the medium, this plant is a bit behind its Granddaddy Purps sibling but it should catch up in no time. giving them 24hr lighting till week 3 then will reduce it down to 18/6. Added in a few pics this week of the tent and light. nothing much else to report. SPONSORED DIARY===SPONSORED DIARY===SPONSORED DIARY Big shout out to @SpiderFarmer for supplying the 2x2x5 Grow tent and The SF1000 100w LED light. I will be uploading all relevant photos of the products in the next week when they arrive, maybe do a little unboxing video. Who knows. A 2nd big shout out to Dr.Seeds for supplying the 3x5pac of seeds I will only be featuring two of the three strains in two separate diaries. You the users will get to decide what ones I grow. I have setup a Grow Question on each diary to vote for your strain of choice for that diary. https://growdiaries.com/grow-questions/47600-drseeds-1-vote-what-i-grow "Diary #1" https://growdiaries.com/grow-questions/47600-drseeds-1-vote-what-i-grow "Diary #2" Cast your vote for each diary. Thought I would add in the relevant links if you wanted to read up on any of the products that will be officially featured in this grow. https://www.spider-farmer.com/ https://growdiaries.com/grow-lights/spider-farmer (+) https://www.spider-farmer.com/products/sf-1000-led-grow-light/ https://growdiaries.com/grow-tents/spider-farmer (+) https://www.spider-farmer.com/products/sf-2-x2-indoor-grow-tent-hydroponic-home-plant-reflective-aluminum-oxford-cloth/ https://drseeds.net/ https://growdiaries.com/seedbank/dr-seeds (+) https://drseeds.net/product/cherry-pie-autoflowering-cannabis-seeds/ (+) [No relevant GD affiliated link] https://drseeds.net/product/granddaddy-purple-autoflowering-cannabis-seeds/ (+) https://growdiaries.com/seedbank/dr-seeds/granddaddy-purple [Photoperiod not Autoflowering] https://drseeds.net/product/60-day-wonder-autoflowering-cannabis-seeds/ (+) https://growdiaries.com/seedbank/dr-seeds/60-day-wonder-autoflowering
Likes
5
Share
Likes
12
Share
*Week 3 Flowering 09/17* Fastbuds - Mimosa Cake (Auto) (2) Thus far the flower transition has run smoothly and both plants are running accordingly Nute feeds have increased *Week 3 End of week Flowering 09/23* Flowering for both Mimosa's is proceeding accordingly. Light defoliation was applied Light LST to heavy COLA's was applied, anchored to the trellis net. *FRONT TENT (MIMOSA-2) QUICK VIDEO ADDED*
Likes
10
Share
Well after asking some questions I discovered that all the autopots were 7 or more ph So I flushed plants down to 6.3ish and dumped entire autopot system. I had been checking reisvor but not the actual pots. They are freshly fed and phd down to 5.9. I hope that helps All the new growth looks green. i'm hoping things are better and just a bit stunted. Definitly FAR from where it should be though After a few days the res is 5.9 but the damn pots are fucking 7 again! I'm not gonna flush these bitches again. i dropped the res to 5.5 and mixxed in some of that in the autopots and the are now 6.2ish. Fuck it I hope that helps, they seem to be doing ok, so I think it was just on the edge of the spectrum. I hope dropping the PH gradually a bit works 🤷‍♂️🤷‍♂️🤷‍♂️ I have two plants that look good but small. 1 plant that looks small and fucked and one that looks big and fucked. I'm just looking for a game finish achievement Not much change over the last few days. more of the bottom leaves are yellowing and i can tell the plants are suffering but i think i just have to play this out. PH was 7 again in the res so i lowered it down to 6.2 and finally got a water pump in there. i'm hoping it circulates the water and helps keep the ph in check. The pots are higher again 6.6ish... This next feeding i will blast that down to 5.5 and try and hold it there a week. I got the tent camera going so i have a live feed up too. Its nice!
Likes
18
Share
Now we've reached day 25. We are in the transition phase, pre-flowering if you want, when the seedlings reveal their sex by showing the white fluff or the boyish balls. Here and in all F1 Hybrids you can be SURE, SURE as death that you will never see any balls. If you have underestimated this aspect of the F1 Hybrid, go back and think about how many times you found the balls on the paint, full of pollen that fertilized your ladies. Do you like having young ladies impregnate you? Absolutely not for me and this is a very valid reason why you can choose the F1 Hybrid. Really guys the seeds suck and the genetics of the various breeders if they don't do a job like this it means that they are super hybrid poles with genetic traces scattered here and there. Inglourious bastards. Here we don't want to be Aryan but to cultivate healthy plants with safe results. Our Watermalon Candy F1 per mea culpa mea culèa mea grandissima culpa shows some signs of overfeeding, the famous yellow tips of the leaves. Let's be clear, this is minor and is due to the fact that these genetics are so good that they need very little or no fertilizer in the vegetative phase. Then if you already have fertilized soil, forget about growing guys, another pro! I gave the recommended doses even a little less to tell the truth of both Aptus and Plagron and the plants more or less all have these small signs of over. LITTLE guys, wait until the end to save if you feel like it, or at least I recommend it. To fix this little thing we go to flush with pH 6.2 and only give Aptus Regulator which should rebalance the plant and soil before delicately moving on to fertilizers for flowering. Site Description ZAMNESIA SEEDS - WATERMELON CANDY F1 HYBRID AUTOMATIC: BUDS BURSTING WITH FLAVOR If you've been looking for a flavorful strain with superb genetics that's effortless to cultivate, the hunt is over. Thanks to reliable F1 hybrid genetics, Watermelon Candy F1 Automatic showcases the highest degree of productivity and efficiency. This strain takes everything you know and love about the original, and packages it in a plant with even greater potential. GROWING WATERMELON CANDY F1 HYBRID AUTOMATIC Derived from Watermelon, Candy Kush, and ruderalis, Watermelon Candy F1 Automatic is a finely tuned medley of genetics. This cultivar is fast to flourish and reliable to grow, no matter where you choose to grow. Taking just 9–10 weeks from germination to harvest, she provides a uniform growing experience culminating in a huge haul of buds for her size. Reaching heights of 65–80cm, Watermelon Candy F1 Automatic stays pretty grounded, making her perfect for smaller growing areas where space is a commodity. It also means you can fit more plants in if you have the room! Once ready to yield, growers will see a return of 400–450g/m² indoors and up to 100g/plant outdoors. Moreover, Watermelon Candy F1 Automatic is highly resistant to pests and disease, making it an ideal strain for newcomers and fans of low-maintenance cultivation. AROMAS, FLAVORS, AND EFFECTS OF WATERMELON CANDY F1 HYBRID AUTOMATIC If we haven't already sold you on the power of F1 hybrid genetics, the proof is in the pudding. Watermelon Candy F1 Automatic is teaming with terpenes and cannabinoids, making for a lively high coupled with huge flavors. Just one hit is all it takes to sample rich fruitiness mixed with sweet candies and a slight earthiness to back it up. And with an average THC content of 23%, the effects are euphoric at the start but settle into deep relaxation soon after. Whether you're chilling alone or with friends, Watermelon Candy F1 Automatic will see you right. As for fertilizers, I'm doing a small comparison experiment to finish off the fertilizers I had at home, it's not 100% indicative, it's only on two specimens but given the stable genetics I decided to try to compare the results of Plagron Vs Aptus , both excellent brands which they will certainly produce beautiful plants which are already of excellent stable genetics. In the next few weeks the comparison will be more evident now the seedlings are still very small and just potted. So seeds of all brands, in addition to these great F1 Hybrids and the entire Zamnesia line, fertilizers and everything related to the world of cannabis, you should buy them from the best online store in the sector www.zamnesia.io
Likes
6
Share
This is the begginig of the 5th week. the smell stert to show some signs!! Have goood aspect! :-)
Likes
4
Share
@Shook80
Follow
It's been hard to get on here I will post my harvest though
Likes
11
Share
Earthbox pics of Strawberry Truffle s1 | Perpetual grow 👽🐢👽🐢 harvest coming on new moon, flipping veg tent👍
Likes
50
Share
@6ix6ix6ix
Follow
Halo shalom buenas dias! All week been strugling witg the nitrogen overload that my soil in giving my poor plants. Tried washing out, but no significant results. However, adding PK (half of the recommended dose) gives really positive results, i see the buds develop more, however the leaves are also there. I’m really confused by the way the three plants are completely different on rip ess stage, bud formation and growth overall. They get absolutely same treatment and sit in the same tent. My feeling is that i have around a week with 2/3 plants and around two weeks with the “flagship” Today is 56 days since germination. Any suggestions how to dry plants during an active grow? Will the light somehow interfere?
Likes
20
Share
@Lazuli
Follow
Final 2 weeks maybe 3, Therese so many flowers on this plant its insane haha A heavy blueberry smell she got
Likes
23
Share
@deFharo
Follow
Semana 14 desde semilla. La planta sigue creciendo lustrosa y engordando las colas, a pesar de alguna incidencia. - A mitad de semana comencé a notar pequeñas quemaduras en la punta de las hojas más grandes, hice un riego con agua pura y medí la concentración de PPM en el agua escurrida en el plato. La medida me dió cifras locas de hasta PPM: 7500, es una medida altísima para mis propósitos, pero tampoco se puede comparar con altas concentraciones PPM surgidas de riegos con fertilizantes químicos, donde esas medidas hubieran matado irremediablemente el cultivo. Los motivos de estas altas concentraciones de minerales y nutrientes en el sustrato son por causa de un exceso de aporte de nutrientes líquidos, sin dar descanso y oportunidad al cultivo de ir digiriendo los nutrientes que le aplico, - Dos días después de la detección del desequilibro en el sustrato, puse 3L de agua de lluvia (EC: 0,036) y bajo el nivel de PPM hasta 1500. Como se demuestra un lavado de raíces en un sustrato puramente orgánico es mucho más fácil por la poca agua necesaria, ya que el arrastre o disolución de componentes sobrantes es mucho más directa y no necesita tanta agua como para disolver las sales acumuladas de fertilizaciones químicas. Cuando se hace un lavado de raíces como el anterior, se debe de tener en cuenta que, el elemento que más rápidamente se pierde por el lixiviado es el Nitrógeno, en base a esto observar las señales de falta de nitrógeno y corregir en posteriores riegos. • En base a lo anterior, partir de esta semana comienzo a aplicar otra estrategia para el riego con nutrientes, el cambio lo voy a hacer en todos los cultivos y se trata de esperar al menos 72h desde el último aporte de nutrientes (Sólidos o líquidos) para aplicar nuevos, mientras tanto, si la planta necesita riego, lo haré sólo con agua para de esta manera dar tiempo a la planta a digerir todos los nutrientes convenientemente, voy a bajar también el nivel de EC en todos los riegos durante todo el cultivo, además voy a hacer formulaciones nutricionales más simples y específicas, excepto componentes que sistemáticamente incluyo en todos los riegos como el Ormus, la melaza o la miel, con este cambio de estrategia estaré muy atento a las señales de la planta, el motivo del cambio es primero para reforzar mi autocontrol frente a mi afición a sobrealimentar las plantas debido a mi colección de preparados 😋, aunque no es fácil bloquear dramáticamente una planta cultivada con puros elementos orgánicos, estoy observando un exagerado EC en el agua sobrante de las macetas, esto me indica que los MM están haciendo muy bien su trabajo de disolver los componentes del sustrato, componentes que al añadirlos en demasía enriquecen sin medida el sustrato haciéndolo demasiado denso, perjudicando su eficacia. 😕 DIETA SEMANAL 1) Día 99. Ormus 2%, Bio frutas NP 2%, Lacto fermento MMM 1%, Hidrolizado de Pezuña 0,25% y Melaza. PH: 6.33 EC: 2.0 - 900ml. 2) Día 100. Ormus 1,5%, Humato PK 1,5% y Melaza. PH: 6.3 EC: 1.66 - 600ml. 3) Día 101. Ormus 2,2%, MMA 3%, Melaza y Lixiviado 2%. PH: 6.6 EC: 2.0 - 500ml. 4) Día 102. Ormus 1%, Humato Mineral 2% y Melaza. PH: 6.4 EC: 1.87 - 900ml. 5) Día 103. Sólo agua pura con miel. PH: 6.8 EC: 0.350 - 600ml. 6) Día 104. Agua pura con miel y 1% de MMA y Ormus. PH: 6.37 EC: 0.850 - 800ml. 7) Día 105. Agua de lluvia. PH: 6.8 EC: 0,036. 3L. (Recojo 1,8 litros de lixiviado que uso diluido para regar mis geranios y otras flores) 😂 GROWING TIPS Lacto fermento experimental con auxinas y enriquecido con minerales y nutrientes NP, para usar desde germinación hasta preflora. Debido a que disponía de 1,2 litros de auxinas líquidas y estaban a poco de caducar he comenzado este bio fertilizante con la intención de mantener una solución de riego rico en auxinas naturales y otros elementos específicos para enraizado y crecimiento vegetativo. 1) Obtención del suero de leche con leche fresca o pasteurizada. a) Calentar la leche entre 70°C a 90°C b) Apagar el fuego y añadir el zumo de 1 limón grande. c) Revolver con madera hasta que se vea la leche cortada. d) Dejar enfriar 30 minutos. e) Colar y filtrar para separar el suero de la materia sólida. f) De 1,5l de leche pasteurizada he sacado 1,2l. de suero. 2) Mezclar el suero con melaza y miel 3) Pesar los componentes sólidos y añadirlos al recipiente digestor. Añado zanahoria picada para garantizar la presencia de Boro. 4) Añadir al suero, Bacterias ácido lácticas (BAL), levadura de pan y Ormus. 5) Añadir la mezcla al barril. 6) Agitar vigorosamente. 7) Añado el agua de auxinas.* 8) Cierro herméticamente el recipiente y coloco la válvula de escape de gases. 9) Lo dejo fermentar al menos por 30 días. Cuanto más tiempo se mantenga en fermentación mejor es el resultado del lacto fermento, como el vino!! * Para todos mis fermentados y bioles uso agua de un manantial de montaña cercano, este agua es muy alcalina PH: 9.2 y contiene mucho mineral: EC: 0.85, la uso para compensar la acidez de los fermentados y garantizar un aporte seguro de carbonato cálcico y trazas minerales. El preparado comenzó a fermentar a los 20 minutos de cerrar el barril. Probaré este lacto fermento incluyéndolo en mis procesos de germinación y crecimiento. Saludos y hasta la próxima semana!! 😷
Likes
1
Share
Absolutely blown away by the new 2025 setup, prev ran 3 tents 😂, switched to AC Ifinity 2,4 x 1,2 single tent, 3 x 150 or 6“ fans. Fans all port outside, 2 exhaust with yet uncoupled carbon filters, 1 inlet with pollen filter. 6-7 air push fans (not all yet on 😂). SpiderFarmer 16L humidifier, inkbird RH control, inkbird heat control, heater, trotek dehumidifier (12L) with drain line and reservoir. Blumat system with RO fed 20L water butt, each pot with 3 long ceramic blumats. Data logger from SensorPush including WiFi hub and 4 sensors. One in cellar room (lung room), one above each plant canopy. Setup logger n sensors and track VPD. System running itself
Likes
50
Share
@Annakonda
Follow
Rinçage. Je coupe déjà la mimosa et la cereal milk aujourd'hui. Le reste à suivre.