
Likes
Comments
Share


@infamoustimmy
Follow
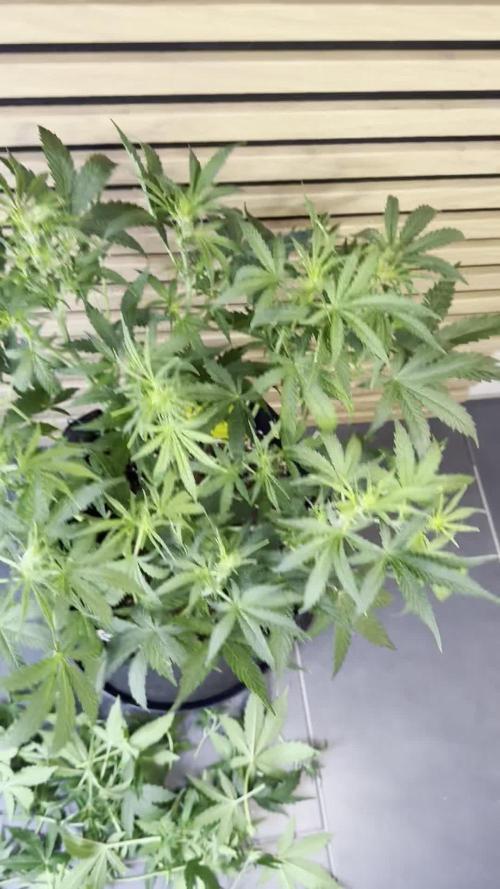
After having my first plant that I gave hose water and sunlight be cut in half by a caterpillar, and my first indoor plant to get botrytis. This has been my first fully successful harvest and I couldn't be happier.
Been listing to all of the GFYH podcast with Rasta Jeff and learned most of the steps through listening on repeat at work. This plant is very fun to grow, it will naturally fill it's canopy without much LST and occasionally topping.
I have no complaints about the nutrients, mostly using FoxFarm items, the trio is nice and I can see the difference when I pushed to far either way with them, the plants would respond pretty quickly and I could fix and possibly compensate for the mistake and they would bounce back like nothing. Not having experience with other brands I'll say that I am happy enough to keep it as a constant variable for my personal refinement in becoming a better grower.
I plan to continue growing this strain for a while so that I can have a way to see my improvement, and I will likely make another journal after at least a couple harvests.

Likes
7
Share

@Sundancers
Follow
„Jetzt wird’s duftend!“
In dieser Woche hat die Cinderella offiziell beschlossen, erwachsen zu werden – und das sieht man ihr an. Die ersten Knospenansätze sprießen wie kleine Optimisten aus jedem Seitenast und rufen: „Jetzt geht’s looos!“
Sie steht breit, selbstbewusst und unglaublich vital da – wie jemand, der genau weiß, dass ihm die neue Frisur steht. :-)
Die Blätter zeigen ein sattes, gesundes Grün, und die Blüten sind schön kompakt – ein Zeichen dafür, dass Licht, Luft und Biobizz-Nahrung hier ein echtes Dreamteam bilden. Die oberen Triebspitzen richten sich stramm nach oben und wirken, als würden sie schon Pläne für die kommenden Wochen schmieden.
Insgesamt startet die Cinderella mit ordentlich Power in die Blüte: stabil, buschig, wuchsfreudig und mit dem unmissverständlichen Ehrgeiz, in den nächsten Wochen noch richtig aufzudrehen. So darf eine Blütewoche 1 aussehen – energetisch wie der Startschuss zu einem wohlriechenden Marathon.

Likes
4
Share


@GarciasGarden
Follow
In this week they were beyond beyond ready for bigger pots so it was time to bring them to there new and final home in a super secret space that no one will ever find.. it’s a garage but We built a cool ass room in it lol ! Anyways the plants are healthy and ready for a new pot this is the transfer from rockwoool cubes into coco coir for the flowering phase. We use this method because of the taste you get from coco coir in your buds and the speedy growth you get from rockwool !

Likes
16
Share


@JohnnyBlaz3
Follow
She has been topped the day after the last post and shes looking great! The pics are about 6 days apart from topping til now. She is growing quite vigorously and looks like she will be staying the dominant female in the tent! Really excited to see this strain start to flower. I'm thinking about 2-4 days until transplant, then another week after that roughly i'll be putting the plants into flower. I will add that I went from a quality carbon filter to a crappy one and back to quality again. The difference in price is like $15 but the differnece in quality is substantial. Much better at freshening up the air. The newer plants in the tent are some autos if people are curious. I will be doing a seperate diary for one of the small ones, pineapple express.

Likes
22
Share


@Aeromax
Follow
Hey 👻
After many months without updates, here's a little one.
These are the originals mother plants, i took 100's of clones out of em and then flipped to bloom 2 months ago.
Here's a few pics of different bloom stages 👆
I began flush today after aprox. 60 days of bloom, i'm looking fwd to cut in 7-10 days, depending on trichomes 👍
I'm not expecting a big harvest but at least a quality one ! I kept a few phenos of Peach Tree, Pink Gasoline and L.A. Kush Cake 🙌
I'll post a final update when i'll harvest 😉

Likes
Comments
Share


Likes
120
Share


@Themythicalchristine
Follow
We had a nice jump in height this week; still drinking loads of water every day.
One of the plants has this wierd mutated limb that I have been watching progress, kinda interesting.
Just chugging along, second week of flower, everything looks to be on schedule so far.
🔮

Likes
26
Share


@MG2009
Follow
04/25/2021
Going well her first pistils are fading, or changing color but either way first flowering stage is coming to a close, I am going to feed her this week with Alaska fish fertilizer 5-1-1 this should help power through her last weeks of flowering without to much nitrogen. But I am betting on 4 more weeks of flowering...
What do you think?....

Likes
27
Share


@phobic94
Follow
De planten hebben een geweldige geur die heel zoet is ze zijn nu aan het drogen. Na het drogen post ik een rook ervaring
Likes
4
Share

@GREENPHOENIX6262
Follow
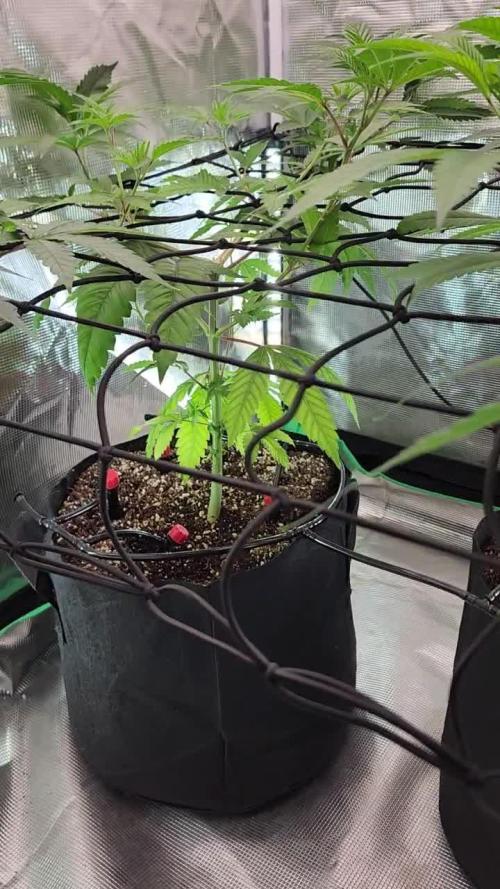
05/24 - Both have been transplanted into 5 gallon pots - Both are hooked up to the Vivosun smart drip emitter system - I have introduced three new components to their feeds (Silica,Horti Grow and Kelp) - They have been moved into the 3x3 tent from more room under a bigger light - I have dropped the net on them for maximum light exposure - Running the AC infinity supplement for added light exposure to underneath canopy and mid level grow.
😎😎😎😎😎😎😎😎😎😎😎 - Check my IG grow family - IG @GREENPHOENIX6262
05/27 - Both of the ladies are coming along quite masterfully - After being placed in the 3x3 and the trellis net dropped she has exploded in width and length - The LST has worked accordingly spreading out the plant to give even coverage throughout the top canopy, mid/bottom growth and root zone - The increase in nutrient feed has also helped the plants come along without being stunted while in training - The @VIVOSUN smart drip emitter has been a nice addition to the program giving the plants consistent feeds throughout veg - Temps and Humidity remain high (72 - 81 Temps/ Humidity 71-72%).
05/29 - Ending the week on a high note (Pun intended..LOL) - Both of the ladies blew out something mean and beautiful - I will need to keep on eye on both in regards to space capacity but I think they should be fine - Heavy nute feeds for the next 2/3 weeks as we prep for flower flip.

Likes
4
Share


@Autofeather
Follow
So the grow cycle was pretty easy. I work away from home and I sometimes have to leave for 4 days in a row. Before I'd leave for the four days I'd just add 4-6 cups of RO water with some Cal-Mag. When I can back she was always bigger and didn't have any problems. I was lazy this time and never checked the PH of the water. This strain is pretty resilient so props to sweet seeds.
I decided not to LST this plant, it was a little taller than I wanted but grew in a nice shape.
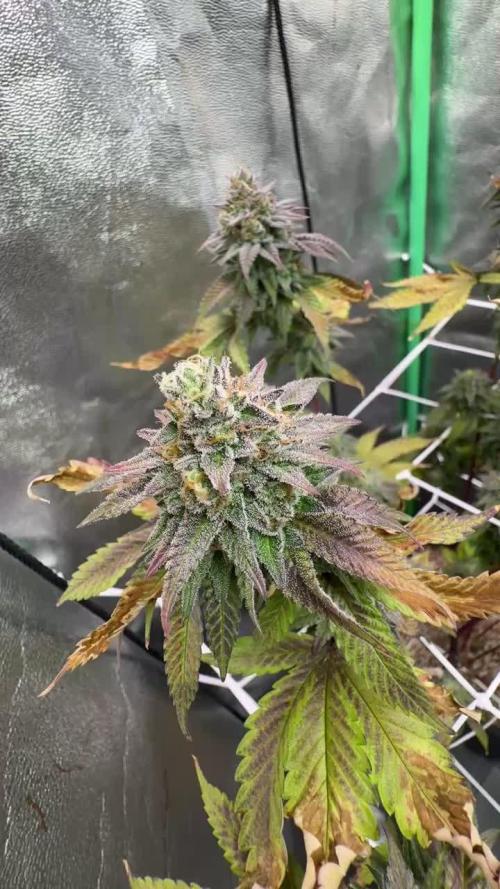
I still cant believe how purple this strain is.
I started to get foxtailing on the top bud not sure what would cause that.
Once again sorry for the lack of pictures. I'll let you know the smoke report later.
Likes
4
Share


@Satax
Follow
I think the final part start but I wish to push a little more!
So I keep the juice whiteout adding nutrient and will start the flush next week!

Likes
6
Share


@Budking420
Follow
These ladies are super healthy I want to feed them but a little worried about nute burn so I'll hold off a few days or dilute the feed I have. I just lowered the light a bit and dimmed it because I want them to stretch. That is known as crop steering I want them to all get tall and eventually I may set them in a greenhouse once flowering or big enough. Hope you enjoy & check back next week 2 see just how fast she grows. & remember its 4:20 somewhere!!!!!!!!!


Likes
2
Share


@GreeneScene
Follow
Day 1 — Monday 9/15/25.
Installed a timer on a 12/12 cycle finally taking this girl out of 24 hours light schedule . Because it’s day1 of flower I also gave her a full strength feed of flower nutrients which includes my new organic foop, stash, & incredible bulk . That’s 95ml per gallon of water plus 1/2 tsp of stash and 1/4 tsp of incredible bulk . She looks hungry hopefully this doesn’t overdo her . I’m thinking she still needs some “grow” nutes for these first 2 weeks atleast but I’m going to see how she responds to this strictly flower feed to make sure I haven’t overdone it .
I’ve moved the clones out the tent & cleaned out the crud in the humidifier since I stopped using purified water it gets build up .
That branch I tried taking back together has died ! Can’t save em all I only hate it bc it’s from the ONLY branch that regrew from that one half of my plant it’s near dead state . This 5x5 plant is only 1/2 of a plant trained to cover my tent’s entirety meaning if I had the other half I’d have a 5x10 plant . I’m
I dunno how long this girls is supposed to flower for . . 8 weeks ? 10 weeks ? 12 weeks ? I’ll need to find that out to adjust my feeding and light intensity accordingly .
It’s been FUN but now it’s time to get to the FUNNEST part ! The Bud!
Day2 flower 9/16/25 completed our HEAVY DEFOLIATION. Got about 93% of it out of there I’d say there’s about 7% more I want to get out of there . These next 3 weeks are the last times I’ll be able to pull leaves before these too many trichomes to not glue your fingers/tools together . Shes look crazy as she always does when I strip her back but her bones are great .
I broke another branch today while defoliating and trying to better spread out the canopy for coverage .
I’m undecided will I scrap the clone projects as I do not feel like slapping together another make shift setup for lighting purposes and I don’t want to let them get leggy between nodes before I decide what I want to do with them .
I may hate this bud and not want to grow out the clones . I may love the bud and be thanking myself I made these clones . I dunno viewers choice ! What do we do with the clones during flower??? Comment below
Lights out begins at 6:50pm she stays dark for 12 hours . Humidifiers refilled shes coasting into sweet dreams . Looking online quickly it says she flowers 8-10 weeks so that doesn’t really help me gauge when to stop feeding & when to start flushing so I’ll keep looking for more definite answers .
Day #3 flower 9/17 woke up to check in plant and make sure light was on. I found that one of the circulatory fans had fallen knocking down the tent camera! This particular fan is a wall Mount fan not made to be attached to a pole however through sheer tenacity & jerryrigging is there a fan with substantial circulatory capabilities in my tent for a reasonable price! Sooo I jerry- rigged it up again this morning in a slightly different manner using most of the original materials. The negative pressure in my tent with it fully sealed for the day cycle caused the fan to push on the “jerry-rigged” setup causing it to slide down about 16inhes. I’ve reinforced a stopping point just like last time but with far more girth than the last . Fingers crossed this makes it to the end of flower & remains as my circulation configuration because paying for a 4”. 6” or even 8” clip on fan is just ludicrous
Happy Growing ! Give us a like
Likes
69
Share


@PEAKYPLANTERS
Follow
Oh yes, my friends .... Peaky is back stronger than before to compete with the best!
Take a look at my updates
The best crops and
best regards


Likes
5
Share


@Oktoberfest
Follow
Von links nach rechts: Sleepy Joe, Lava Cake, Runtz.
02. Mai 2025
Die Wurzeln sind jetzt sehr gut entwickelt. Seit dem Einschalten des Lüfters haben die drei gut 20l Wasser verbraucht. 😅 Sie wachsen so unglaublich schnell, dass sie in drei Tagen fast die LED berührt haben. Dadurch leichte Verbrennungen an den Spitzen der Lava Cake. Viel höher darf die Runtz nicht werden, sonst muss ich die Spitze nach unten binden. Das Zelt ist nur 180 cm hoch.
Der Lüfter des Filters läuft jetzt schneller mit 50% Leistung. Die Luftfeuchtigkeit lag heute bei 75% und musste aus dem Zelt. Das führt aber auch dazu, dass die Wärme abgesaugt wird. Wird Zeit, dass es draußen konstant wärmer wird.
03. Mai 2025
Die Lüftung habe ich über den Trenntrafo wieder eine Stufe langsamer gestellt. Aber auch vorher lag die Temperatur nachts bei 22°C, also alles im grünen Bereich.
Licht:
Eine der zwei Sanlight S4W strahlt exclusiv seitlich auf die Runtz. Normalerweise würde ich das nicht so machen, aber die Runtz wächst sehr luftig und hat sehr großen Abstand zwischen den Blättern. Sie sieht gesund aus und wächst gleichmäßig. Die Rückseite der Pflanze zeigt keinen Lichtmangel durch unsymetrisches Wachstum. Eine Beleuchtung von oben wäre aktuell schlechter. Ich muss schon sagen, die Runtz überrascht mich immer wieder und ich mag das zwar hohe aber sehr luftige Wachstum!
Die Sleepy Joe und die Lava Cake sind vergleichbar hoch und teilen sich die zweite Sanlight S4W. Auch ihnen geht es gut, etwas größer wachsende Pflanzen sind mir aber lieber.
Wasserbrauch:
Bisher 30l. Heute den kleinen Tank mit 20l Wasser inkl. 64 ml Canna Aqua Flores aufgefüllt. 34 ml pro 10l bei hartem Wasser gemäß Rechner von Canna. Beim letzten Grow habe ich noch pH-down verwendet, das ist laut Canna nicht nötig und funktioniert aktuell perfekt! Canna: "Es sind pH-Stabilisatoren enthalten die ein Einstellen des pH-Werts unnötig machen." Quelle: https://www.canna-de.com/canna-aqua-flores
Die Pflanzen wachsen wie beim letzten Grow kräftig und gesund, ohne Anzeichen von Mangelerscheinungen. Und sie sind nicht übertrieben dunkelgrün durch zu viel Stickstoff. 😱
