


Likes
Comments
Share


@FarmerJons12
Follow
Very excited for my first grow ever. My soil is the Biobizz-Light Mix in a 11L pot .I got so impatient that i even dug it out at some point to see the progress...i hope it won't have any consequences. The first days, i only sprayed the soil with some water to keep the soil moist. At Day 4 of germination i watered it for the first time with 250ml tap water at 6,5ph.
I will run my light for 18 hours now at a distance of 60cm with full power. That will lead to round abot 215 ppfd and 12k lux for the final days of germination.
At day 6 after germination two darker spots appeared on the first 2 leafs. I hope it’s just because of some water drops on the leafs.
Watered every 3 days with 350-500ml of 6,5ph tap water.
23.05.24: For my definition the vegetative stage starts today. I will turn the light up to 500 pphd
Very excited what will happen next!

Likes
15
Share


@IsseyBukkake
Follow
We've made it to day 28! - 17/12/20
The girls seem to be happy and healthy today.
I won't be feeding/watering them as the pots are still heavy from yesterdays feed.
A few of the girls have started to show sex & the smell has picked up a little bit(inside the tent), so I'm hoping to see some flowering begin this week sometime.
(I've been using my iPhone as my only DSLR lens is useless for focusing on certain depths, but I hate the colour I get using the iPhone... I may be switching back to DSLR unless I can find a better camera app.)
update - day 29 (18/12/20)
Short update today.
Fed the girls today and will probably be feeding/watering every day from here on out, we'll see though.
veg growth has really taken off by now, I'm hoping to see some flowering this week.
update - day 30 (19/12/20)
I fed the girls today.
I need to find a better way to hand water, the plants are so short and bushy its a pain getting in between all the branches.
I wish i left my drip feed system up and running, I will definitely refine it and use it next run.
Update - day 31 (20/12/20)
Fed the girl's straight water today.
I'm going to purchase the pieces I need tomorrow to reconfigure my drip feed system & hopefully have it running by mid-week!
Update - day 32
I attempted to set up my drip feed system today but the plants are too thick around the base to place the halo around :(
I will have to wait until next season to set it up, oh well, I guess its hand watering for the next 5-10 weeks
Fingers crossed these girls start to flower ASAP.
I fed the girls today, everything is looking good so far.
I also moved the plants around to try to make hand watering easier, I had issues trying to water the whole pot instead of just one spot due to plants/branches being in the way.
Update - Day 34 - 23/12/20
It definitely seems ill be watering the girls every day from here on out.
All the girls look fairly happy and healthy, they're getting a bit big for the 5x5 they're in.
It looks like flowering has begun on 2 of the girls, hoping to see some more progress on the others in the next few days.
Thanks for stopping by! 🙏

Likes
13
Share


@Robeeriegenetics
Follow
Plants recovering well …heat is causing some problems in the indica room otherwise all is well …1 more week till flush then 1 more week after that til harvest
Likes
3
Share


@a_weed_session
Follow
Looks like most of the stretch has stopped for both plants. There appear to be two slightly different phenos with one slightly taller than the other. The shorter one seems slightly further along with a bit more flower development and some frost starting to show.
I've done a couple rounds of defoliation to get some better air flow and light to bud sites. I also went through and pinched off most of the lower bud sites that were not going to get sufficient light to develop.

Likes
2
Share


@Reelaxx
Follow
Kings juice , amazing strain flavors 10/10 , great without curing aswell as soon as it dried I started smoking it and left abit to dry final yield was 71 grams per plant my light was kind of ass . I was using blurples but still the quality of the harvest was really good


Likes
11
Share


@Mazgoth
Follow
This plant at week 4 was little bit stunned because she is getting all the cold and is stressed out,the fan hits directly into the plant.I was feeding all the plants same amounts of nutrients but this one didn’t handle it well so I flush her one time and at week 5 she got a lot taller and stronger 💪

Likes
5
Share


@Terpio1500
Follow
Week 2
I got Pistils showing
Gelato Cake.
Check out my other Dairies (The New & Jungle Verde)
Nutrients (floraflex) are in Grams/gal*
Light: HLG
Follow my IG @therealterpio for more updates & content!
Likes
10
Share


@HIAZ_urbanbudfarmer
Follow
Finished really fast! Not expecting a very big harvest, they needed a longer veg time, pretty small at start of flowering, didn't use massive bloom this run either
Going of the last run expecting good quality. Small buds.
Likes
7
Share

@DE_BW
Follow
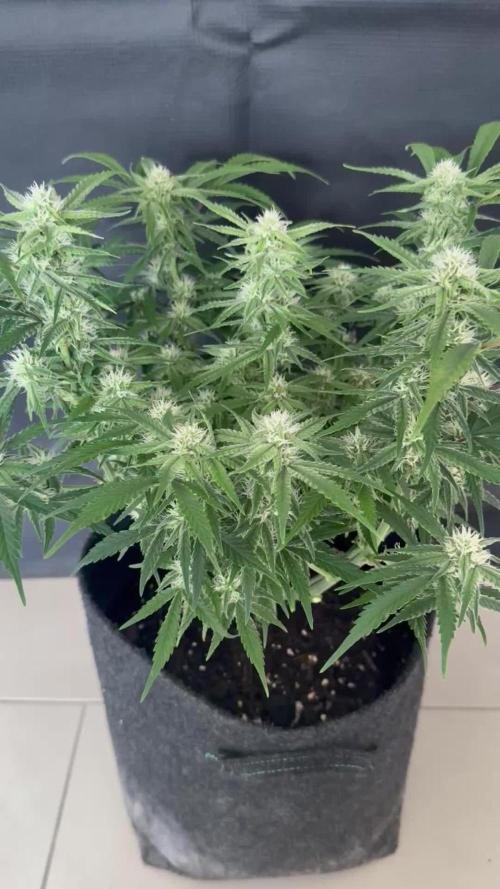
The plant has finished stretching and is now fully focused on flower production. Bud sites are stacking nicely across the entire canopy, with strong lateral branching and good light penetration thanks to earlier training. The structure remains compact at around 37 cm, but the number of bud sites suggests strong yield potential. Nutrients were adjusted to a bloom-focused mix (1.5 Micro / 1 Grow / 3.5 Bloom), and the plant is responding well with healthy color and increasing resin production.
Likes
121
Share


@NuggetPawn
Follow
So she was chopped (wet trimmed) yesterday (F74) and is now hanging up to dry at 55% RH and temps between 15 and 18ºc.
I made fresh frozen dry ice hash today using a 160 micron bubble bag, a flat surface, 8kg of dry ice and a couple 5 gal buckets. I already have the weights for that, which far exceeded my expectations. Those figures I will post once she is dried and in 1 quart screw top glass jars.
People suppose dry ice hash is inferior quality vs bubble hash. I am not experienced enough to comment on that but must say it is extremely easy to make hash with dry ice, it took 40 mins to process 995g of trim which included sugar leaves, some stems and popcorn buds. I then pressed it into 3.5g briquettes for storage using a pollen press. As you can see from videos, this stuff is all blonde - and after already trying some today with some friends, it knocked our boots off!
Will be back in 5-7 days with harvest figures, smoke analysis and other details!
Happy growing all!
P.s I ticked defoliation this week - the only week I intentionally cut any leaves off for the entire grow 😉

Processing
Likes
7
Share


@Andres
Follow
we will see what he offers us ... nothing more to say at the beginning of his first week outdoor ...
Likes
10
Share


@Ieiogrow94
Follow
Eccoci qui...
Tutto va per il meglio, questa settimana non ho applicato stress alle piccole, ma ho guardato l'evoluzione che hanno avuto dando i nutrienti.
Ora hanno un odore davvero intenso ed uno strato di resina pauroso, vediamo come si riprendono dalla defogliazione che ho fatto settimana scorsa.
Seguiranno aggiornamenti, grazie a tutti per il supporto🔥🌲❤️
Processing
Likes
7
Share


@vicisdope
Follow
Feb 18: addendum.
Just a note to mention that although the baby bud sites are a plenty, Overall growth isn’t as dramatic as I have seen.
I have been pruning fairly regularly through the first few weeks of flowering to expose light to the baby buds below, which is working for sure as they are getting bigger.
No trichomes tho on the leaves - or anywhere to be seen. This is different from my last photo grow, a NL #5.
Feb 14: Valentine’s Day so just a quick note
Things are holding steady - bud sites a plenty!
I think I fucked up the weeks. It hasn’t been 4 weeks

Likes
13
Share


@JiggiLotus
Follow
I want to thank you Paul @New420GuySeeds for this beautiful plant. She's getting close to that time. I'm both excited and a little sad cuz we've done this grow together. Kinda a fucked up reality.
Critical 47 has a few lower branches that are starting to drop due to the weight of the bud. I been curious if I could lop off some these baby branches at this stage without consequences.? Anybody know? Maybe sample the bud before the harvest.. would be nice.
Ive been doing my best at snapshots of trichomes so I may get a better ETA of the due date. This will be my first ever to harvest anything more than a common cherry tomato. Lol.
Any useful advice is welcome, start a chat if ya wanna!! I love company! And hey we already have a shared common interest! Gotta start somewhere.
So critical 47 is sticky and smells up the whole house, no deficiencies noticed, growth has stopped as far as I can tell, yet she is still feeding without waste.
I changed my regular fertilizer from the fox farm to Dr JimZ. With good results. The fox farm is a great fertilizer as well. I do mix the chicken soup for the soil with the fox farm trio. Cha Ching beastie blooms and open sesame. Dr. JimZ Bloom Kaboom is a once a month application for flowering plants. Good stuff.
If I were to grow her again I would, an I would definitely put her in a larger container without the burlap sack. Don't use that crap it's no good. Lol. It's created a protective base under the soil for pests to dwell. I'm sure when I pull it all up there's gonna be a super complexed colony of mighty gnats, I think of some ancient Greece city with all the thrills and shit. Lol. Gnat overlords. My own damn fault.
Gnats aren't that bad, they're just eating dead roots. There's definitely worse pests to have in the garden.
"Nicole, how do you keep them so dark green?" Easy. I put used coffee grounds into my cannabis plants top soil. If I don't make a tea with it. You can find these helpful recipes @RoyalQueenSeeds with all the good info and instructions. I also make banana brew for my girls, it's rich with everything they need. Helps them grow strong. The coffee grounds help them maintain that healthy green glow (nitrogen).
Thanks for stopping by and enjoy the rest of your week. Take care.

Likes
3
Share


@0JuJu0
Follow
Hey there,
I will say goodbye, fastbuds dont appreciate my work and this reports cost a lot of time maybe i come back. But i get 6 seeds for my 58 diaries waited 6 month to get the next seeds only to get no answer and no seed. My plan was big but i had to stop in the middle of the beginning so see ya and happy growing!
Likes
10
Share


@rickytpb
Follow
Week ten. I started giving booster one week ago, so her flowers are getting better every day. What do you guys think? How does she look? Shall I do more defoliation? But my tent is pretty small too. Consider that while responding, please.

Likes
2
Share


@SSKNFbyHAZE
Follow
Hi Growmies~!
What This Post is About
Today, I'll be recording how to cultivate soil microbes at home.
These microbes offer numerous benefits, and they are simple to make.
How I Came Up with This Technique
Since 2014, I’ve tried synthetic growing methods like DWC. While they gave quick results, I often ran into issues with consistency.
Nutrients would expire during breaks, meaning I had to keep buying new bottles.
I strongly felt I needed a change.
A couple of years ago, after taking a break, I started to research and switched to organic growing.
At first, it felt overwhelming with all the steps and prep work, but I saw real potential.
After experimenting with different methods, I came across Korean Natural Farming (KNF) and JADAM, introduced by Mr. Cho.
His simple, ultra low-cost techniques inspired me. They focus on letting nature do the work.
While growing,
I noticed that synthetic nutrient bottles were expensive, especially when trying to complete a full nutrient set.
Organic growing may require more attention and can be costly when investing in organic materials.
Preparing the soil in advance and top dressing with dry nutrients every other week - just these two methods were consuming space, time, and money.
Indoor farming is unnatural, while organic farming is a natural approach.
I had to bring these ideas together, but organic farming often seems geared toward large plots like farms.
Incorporating organic techniques into my indoor garden requires a lot of effort and careful calculations.
So this is one of my techniques for keeping my plants happy:
supporting their daily needs helps them snap out of deficiencies quickly, allowing them to grow consistently.
It took me a while to adapt this technique for indoor use.
I hope this helps, guys!
Supplies Needed
- Potatoes: Provide nutrients and food for the microbes.
- Sea Salt: Stimulates microbial activity and controls harmful organisms.
- Dechlorinated Water: Allows the microbes to grow and multiply.
- Compost, leaf mold, or worm castings: Contains natural microorganisms that are key for this process.
How to Make (1 gallon)
1 cooked potato (about 2 golf ball-sized)
1 pinch of sea salt
2 tablespoons compost or worm castings
1 gallon dechlorinated water
1. Mix Ingredients: In a clean container, fill it with the dechlorinated water, dissolve the sea salt, and add the compost along with the mashed potato.
2. Ferment: Optionally cover the container and let it sit at room temperature for 24-48 hours.
3. Strain (Optional): After fermentation, you can strain the solution if you prefer a clearer liquid.
Note: Watch the timelapse video to see how the microbes activate!
**WARNING**
Wear gloves if possible and/or avoid contact with open wounds
How to Use
IMPORTANT: Always dilute the solution before applying it to plants.
- Use when bubbles form a "pizza shape" on the surface.
- Dilute 5-10 ml per liter of water for bi-weekly feeding. (Test a small batch first to find the best rate for your setup.)
- Once the bubbles disappear, the microbes are likely inactive. You can either mix the rest with water as fertilizer or discard it.
Pros
Promotes Plant Growth
- Usually fixes deficiencies in as little as 6 to 72 hours.
- Improves nutrient absorption, and helps plants thrive.
Boosts Plant Immunity
- Works as IPM: Can be used as foliar sprays (no staining on leaves).
- Lowers the risk of powdery mildew and other diseases.
- Helps the soil ecosystem with beneficial organisms like predatory mites and springtails.
- Naturally reduces pest pressure (Less risk of fungus gnats and other pests).
Improves Soil Health & Supports Composting
- Quickly breaks down organic matter and nutrients.
- Makes growing organically in small containers, like 1-gallon pots, easy.
- Over time, soil becomes softer and richer, even in small pots.
Cost-Effective, Sustainable & Eco-Friendly
- No need for complex equipment like pH pens, air pumps, or other tools.
- Reduces the need for CalMag, N-P-K, or micronutrient supplements (just add a little bit of sea salt to every watering).
- No sugar sources needed in the soil.
- Works for all types of plants—houseplants, exotics, ornamentals, and crops.
Cons
- Limited shelf life; the solution will develop an unpleasant odor after a certain period.
1 Corinthians 10:26
Likes
4
Share


@UK420hydrogrow
Follow
mixed up feed in a 15 litre bucket moved them onto ten ml ph perfect a and b also 5ml B.52 and 10 ml voodoo juice noticed the clones have really started to grow new leafs produce new roots and showing healthy new growth be intrested to see how these do in veg has intend to plant these outside in uk and look forward to see how these develope
Likes
8
Share


@hooolian
Follow
27/02: the plants that looked wilted in the previous week have come back to life as they are being fed 1 litre of water now - it was an underwatering issue. all plants including the ones that were lagging behind have exploded with their stigmas and there are plenty of bud sites throughout. humidity is still a bit of an issue though I am installing an industrial sized dehumidifier into the grow tent as of next week. again there is some over crowding though I do not want to stress the plants by taking too many leaves at this stage. will give it at least another week before another trim. plants are on average around 30 inches high. reacting well to the nutes and all is going well.
Likes
11
Share


@TiRobotProds
Follow
Nous sommes à la 7ème de fruits gros colas principal, tête des tiges secondaire moyennement gros. Je n'envoie plus de nut irrigation a l'eau uniquement.
