
Likes
Comments
Share


@oldschoolS2
Follow
First week of flower almost done !
Some white hairs already
humidity has been above 60% all week some night times above 75% ...need to bring it down !
They look happy until now 😎😏
Day 7 all of them showing pre flower!!


Likes
21
Share


@SkunkyDog420
Follow
Hallo zusammen 🤙.
So das war es für sie. Sie riecht so schön nach Fanta richtig lecker, ich hoffe das der Geruch so bleibt.
Wir sehen uns in 3 Wochen.
Sie erhalten 25 Prozent Rabatt in unserem Shop
Mindestbestellwert beträgt 75 Euro
https://greenbuzzliquids.com/en/shop/
Code: GD42025
https://seedsmafia.com/de/

Likes
129
Share


@Ju_Bps
Follow
Hello growmies 👩🌾👨🌾🌲🌲,
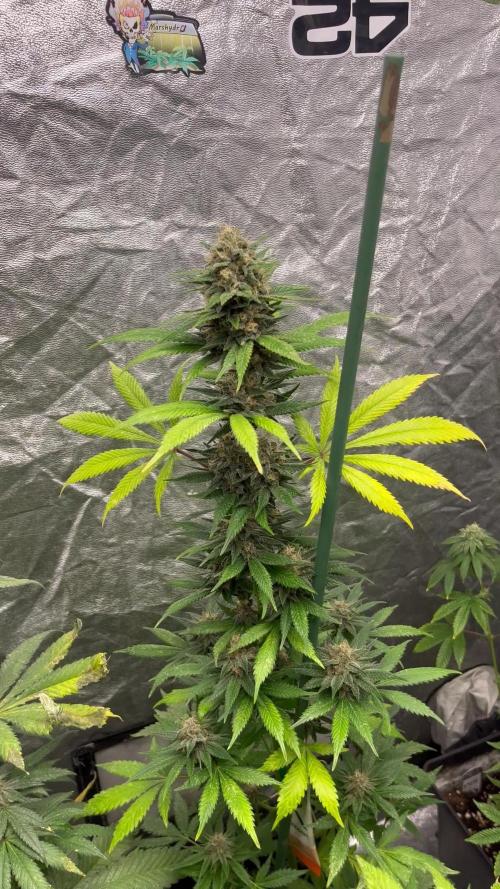
👋 Since the flush, the leaves with lot of yellow, keep turning yellow and have been removed, but the other leaves look under control.
Buds keep growing and pistils are more and more orange/brown,
Trichromes not yet milky (video)
Harvest maybe in 2 or 3 weeks.
💧 Give water each 2/3 days.
1,5l Water
1,5l Water + Easy Plus + Sugar Royal
PH @6
- Easy plus tabs
1 tabs/6l water
💡Mars Hydro - SP 3000
100% 44 cm.
🔥 Thanks community for follow, likes, comments, always a pleasure 👩🌾👨🌾💚🌲.
Mars Hydro - SP 3000 💡💡
https://www.mars-hydro.com/sp-3000-samsung-lm301b-greenhouse-led-grow-light
Zamnesia - Frosted Guava Auto🌲🌲
Discount code -20% with GROWITGD code 🔥🔥
https://www.zamnesia.com/7679-zamnesia-seeds-frosted-guava-automatic.html

Likes
14
Share


@Kakui
Follow
Exotic Genetix: Event Horizon (x3) y Toasted Toffee(x3).
Thug pug Genetics: Peanut Butter sunset(x3).
Una ves sean transplantadas a su macetero definitivo(5 litros) se comenzará con riego automático, drip to waste, y protocolo Crop Steering.
20 Octubre(15:30): 9 semillas en remojo, solución de 2 partes de agua de ósmosis + 1 parte de peróxido de hidrógeno 3%, 5.8pH, 0.6EC, 28°C~30°C. Antes ser puestas a remojar se lijaron las semillas para favorecer la absorción del agua.
21:30: puestas en toalla de papel con la misma agua de remojo, dentro de un contenedor de vidrio hermético y sobre una alfombra de calor a 28°C~30°C, para aumentar la actividad metabólica.
21 Octubre: Pre carga del coco, con solución de nutrientes Athena en 2.0EC y 5.7pH, saturación hasta lograr drenaje, el drenaje fue de 1.5EC y 5.6pH.
21:50: Todas las semillas presentan radicula de distintos tamaños(1cm aprox) son inmediatamente pasadas al sustrato.
22 Octubre: 21:10, se aprecian todas ya brotando, se mantiene el ambiente en 26°C~28°C y 70%+ de humedad.
23 Octubre: 9/9 semillas brotadas, se ven algunos Cotiledones.
24 Octubre: (9:30)8/9 cotiledones abiertos, altura entre 3cm~5cm, etapa de plantula iniciada.
Toffee n3 se atrofió por mala manipulación, espero que crezca aunque sea lento, si no, tendré que seguir solo con 8 plantas.
25 Octubre: Toffee n3 está viva!!! Estuve a punto de quitarla, y está mañana apareció sin su capucha, cotiledones afuera. Yujuuuu!!
26 Octubre: hoy tuvieron su primer riego con nutrientes Athena, 2.0EC y 5.8pH. Se regó hasta alcanzar drenaje, el drenaje fue de 1.9EC y 5.7pH.
27 Octubre: Se desarrollan a buen ritmo, algunas han estirado más que otras, alturas entre 4cm~7cm.
31 Octubre: Segundo riego, 120ml casa una, 2.0EC y 5.8pH, runoff de 2.3EC y 5.7pH.
2 Noviembre: Creciendo a buen ritmo, alturas entre 5cm y 9cm.
4 Noviembre: Riego 180ml cada una, 2.0EC y 5.8pH, runoff 2.8EC y 5.8pH, desde ahora se regarán más seguido, removí las primeras hojas, solo por comodidad para regar, de igual manera los primeros nodos y esas hojas se terminan podando pronto.
8 Noviembre: Riego 2.0EC, 5.8pH, 240ml cada una para aumentar el runoff, valores de runoff de 3.0EC y 6.0pH. Alturas entre 9cm y 14cm.

Likes
8
Share

@CologneGrow
Follow
Jetzt geht der Grow ganz klar in den Endspurt.
Den geruch aktuell in der Spätblpüte würde ich beschreiben mit süß, cremig, beerig und hinten raus deutlich gasig mit einem Hauch Kirsche. Die Buds sehen richtig ausgereift aus, sind komplett mit Harz überzogen und bekommen von Tag zu Tag mehr Charakter. Die Blüten wirken deutlich voller und kompakter, die Sugar Leaves sind dick bereift und überall kommen diese satten dunklen Töne durch, die zusammen mit dem hellen Frost und den orangenen Härchen einfach brutal gut aussehen.
Besonders in den Nahaufnahmen kommt die Reife jetzt richtig schön raus. Das Harz liegt wie Puder auf den Blüten, die Kelche wirken angeschwollen und insgesamt sieht alles deutlich fertiger aus als noch vor ein paar Wochen. Das ganze Dach hat inzwischen diesen schweren, reifen Look, bei dem man merkt, dass es langsam ernst wird.
31.03.2026


Likes
46
Share


@The_Bearded_Grower
Follow
welcome to 📅 Day 29 of the grow Day 1 of flower 7/5/2021 sorry for the late update I just found out my wife is pregnant with our first 👶.
the girls are doing great under the new grow feeding and coming along great. see you all on Thursday for my next update. Happy growing and keep your stick on the ice 🏒
Update: 📅 Day 4 of flower 7/9/2021 the girls are coming along very good and I have done the last of the pruning from here on out its just feeding
I would like to say a few words about Mars Hydro. the TS 1000 is a great light and I love the fact that the power supply is capable of being separated from the light and located outside of the tent to keep the heat down. I also like the fact that you can control the light intensity and daisy chain with another light witch is what I plan on doing.


Likes
9
Share


@NanoLeaf
Follow
End of Week 5
Brewed a nice veg-specific compost tea and the ladies loved it.
Trying to make sure the soil stays nice and moist to keep the microbes happy and letting the top 3 cm of the topsoil dry before each watering.
The ladies have gained some momentum and they're growing at a rapid pace .
I also performed some HST by defoliating a few fan leaves and softly pinching and bending some of the stems to open up the canopy whilst keeping the stress at a minimal.
Pest Report:
Didn't have much issues up until now...
I noticed about 5-10 tiny little thrips on some of the leaves and I applied an organic microbial insecticide (Agro Organics Bio-Insek, Google it!) that seems to have taken care of the problem. Now I will apply it weekly to make sure those buggers are ELIMINATED.

Likes
2
Share

@eldruida_lamota
Follow
Que pasa familia, vamos con la sexta semana de floración de estas Forbidden Mochi feminizadas de Seedstockers.
Vamos al lío, las plantas se trasplantaron a macetas de 7 litros.
El ph se controla en 6.5, la temperatura la tenemos entre 24/21 grados y la humedad ronda el 50%.
El ciclo de crecimiento puse 12h de luz, el foco está al 100% de potencia.
Tenemos como visitante de nuevo los trips, compré depredadores que colocaré a principios de semana.
Me gustaría estar más encima este cultivo pero la salud me está impidiendo un poco estar 100% con el proyecto.
- os dejo por aquí un CÓDIGO: Eldruida
Descuento para la tienda de MARS HYDRO.
https://www.mars-hydro.com
Hasta aquí todo, Buenos humos 💨💨💨

Likes
49
Share


@Xquisit
Follow
October 24, 2018, watered all plants. October 25, 2018 topped 3 plants for the 2nd time. GDP#2 did not do 2nd topping. October 27, 2018 watered all plants. GDP #2 was root bound, transplanted into one gallon pot. Bagseed #2 roots were peeking out of holes, transplanted in 2 gallon pot. GDP #1 roots are peek at the pot holes, will be transplanting very soon. Today is October 28, 2018, minimal defoliating. Going to allow plants to grow a bit without much defoliating. My goal is to get height of 1 foot to 1.5 foot before I begin flower stage since they double/triple in height then. I removed all items plants were sitting on for height. Lights are 18 inches from top of plants. When watering, ph is 6.2, temp 75F, ppm differs due to which week I am in for nutes. Today is November 2, 2018, I watered all plants with only cal-mag, no other nutes, ph 6.2. No pics yet, waiting a few days.

Likes
14
Share


@JuanHaze_Arg
Follow
Empieza el engorde con el monster bloom, los colores y los olores !!
1/10se riega con agua
3/10 se riega con pure zym, sugar royal, green sensation. Último riego con fertilizantes
5/10 se riega con agua
Likes
54
Share


@MadeInGermany
Follow
Hey guys :-)
She is growing great and will be ready for the flowering tent in the coming days :-)
A few cuttings are taken beforehand.
Was poured 2 times with 1 l each.
I'm looking forward to the start of flowering :-)
have fun and stay healthy 🙏🏻
👇🏼👇🏼👇🏼👇🏼👇🏼👇🏼👇🏼👇🏼👇🏼👇🏼👇🏼👇🏼
‘Powered by GreenHouse Feeding’
Copy the link for 10% off all Nutrients 👇🏼
https://shop.greenhousefeeding.com/affiliate/MadeInGermany_PassionGrower
👇🏼👇🏼👇🏼👇🏼👇🏼👇🏼👇🏼👇🏼👇🏼👇🏼👇🏼👇🏼
You can buy this strain at :
https://www.amsterdamgenetics.com/product/choco-cheesecake/
👇🏼👇🏼👇🏼
Use the coupon code: madeingermany
for 10% on all Amsterdam Genetics seeds
Water 💧 💧💧
Osmosis water mixed with Cal/Mag (24 hours stale that the chlorine evaporates) to 290 ppm and Ph with Ph- to 5.8 - 6.4
MadeInGermany


Likes
6
Share


@MrsGreen_98
Follow
Since joining growdiaries I’ve seen that 420 Fastbuds are one of the (if not) the most notorious genetics on here.. so I’ve got my hands on some Fastberry seeds (which with the promotion I got one free!!) I’ve been very bored with the kind of weed I have been smoking recently the taste of the buds aren’t too great so I’m very excited to give this strain a try with the promise of berry flavoured weed!!! Happy growing!
Mon 8th March - after a few days of being in a damp paper towel stored in a dark warm place she’s popped a little tap root. I will leave until tomorrow then I’ll plant her directly into her final 3 gallon pot. 🍁
Tue 9th March -
Placed into her final pot gave her a little water and placed dome over her until she pops.
Likes
31
Share


@TheHighentist
Follow
Was away 18/6 allday
19/6 *Water day / Looking thirsty
-Temp 25-27day/21-23night
-60% RH (2+-)
-950ml
to Biobizz Topmax, Bio heaven, and Bloom (1ml/L) biobizz grow 1ml/L
20/6
-Temp 25-27day/21-23night
-60%RH (2+-)
21/6 - I did some defoliation/trimming and removed a couple of branches that i didnt believe in.
-Temp 25-27day/21-23night
-60%RH (2+-)
22/6 Some pistils are starting to show, they look happy, but soon thirsty.
-Temp 25-27day/21-23night
-60%RH (2+-)
23/6 *Water day + i denoted lower shoots and romoved a couple branches and small leafs
-Temp 25-27day/21-23night
-58% RH (2+-)
-1050ml
to Biobizz Topmax, Bio heaven (1ml/L) Bloom (2ml/L)
24/6 Removed a couple of top fan leaves that were shading some tops.
It looks good an healthy
-Temp 25-27day/21-23night
-55%RH (2+-)
25/6
-Temp 25-27day/21-23night
-53%RH (2+-)


Likes
27
Share


@valiotoro
Follow
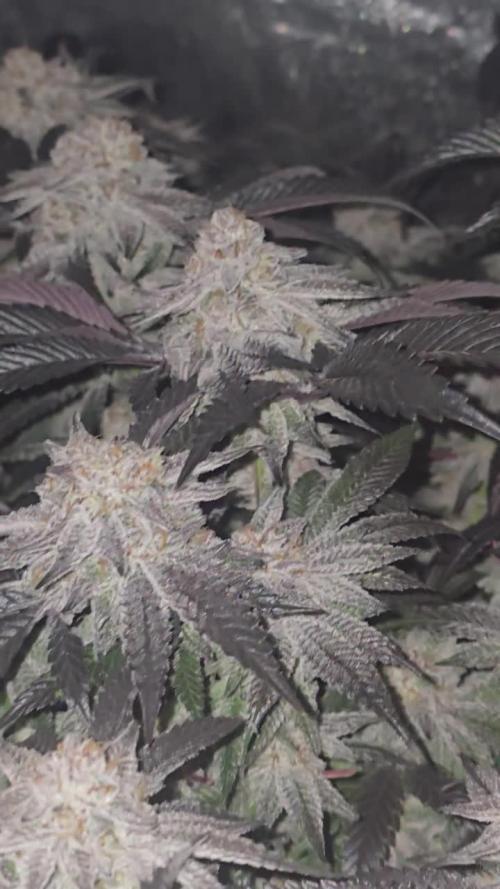
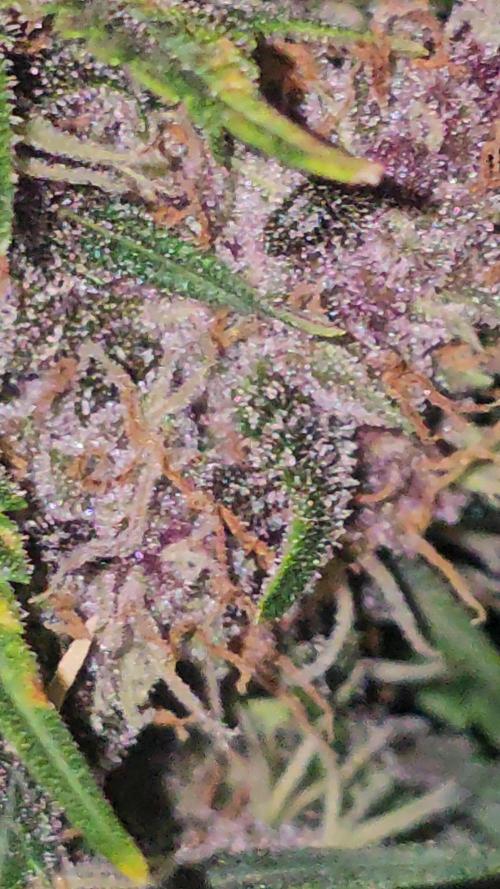
Pheno 1 dark purple : On the nose, it reveals a sharp burst of fresh lemon, layered with a powerful eucalyptus aroma that’s both invigorating and camphorous. A truly refreshing and vibrant terpene profile😈🍋
Pheno 2 Green : this one is a real surprise! If I close my eyes, it’s like Nutella! It’s as if you’ve just walked into a kitchen where hazelnuts have been freshly roasted 🤤🌰
Pheno 3 light purple : It’s a mix of the first two with a hint of amarena cherry at the end🍒🍧
Likes
2
Share


@Sixedgyvibes
Follow
I just let them chill and few them and have the extra water as I had to go on vacation for a week

Likes
13
Share


@GrowGuy97
Follow
1 of the bubba kush & 2 of the gorilla zkittlez are a little behind but over all everything seems to be going good so far!
Day 10 update transplanted all the ones in smaller pots to 5 gallon pots except 1 of the bubba Kush it still needs a few more days! Everything else seems to be going great!


