
Likes
Comments
Share


@420DeepGrow
Follow
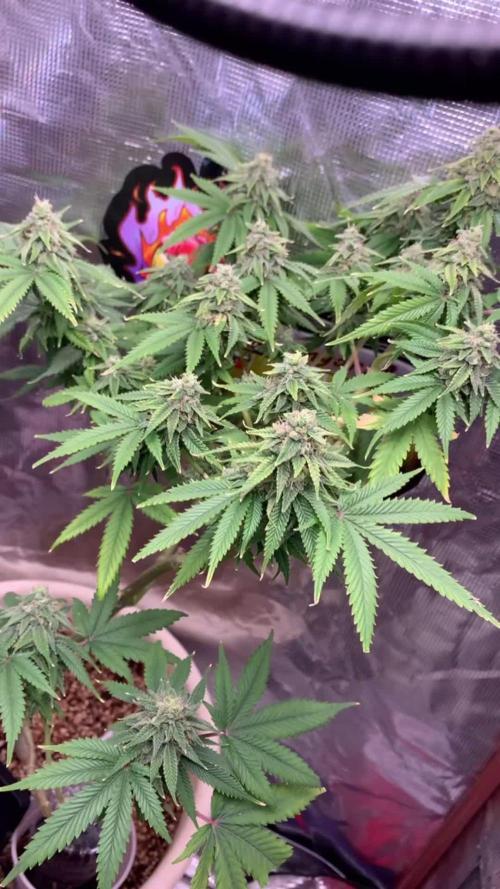
Gracias al equipo de AnesiaSeeds, Marshydro, XpertNutrients y Trolmaster sin ellos esto no sería posible.
💐🍁 Sticky Boof:
Prepárate para dejarte llevar por Sticky Boof, nuestra última obra maestra que está poniendo el listón muy alto para los amantes de las índicas. Nacida del legendario cruce de Super Boof y Cadillac Rainbow, Sticky Boof es una potente planta con un asombroso 80% de dominancia Indica que promete una relajación sin igual.
Prepárate para un viaje épico con el asombroso 37,5% de THC de Sticky Boof.
Sumérgete en una cosecha abundante con Sticky Boof, que produce hasta la friolera de 500 g/m² en interior y 800 - 900 g por planta en exterior. Esta variedad es generosa y está lista para llenar tu alijo de cogollos de la mejor calidad.
Sticky Boof es todo rapidez y eficacia, acelerando el tiempo de floración en sólo 7 u 8 semanas.
💡TS-3000 + TS-1000: se usaran dos de las lámparas de la serie TS de Marshydro, para cubrir todas las necesidades de las plantas durante el ciclo de cultivo, uso las dos lámparas en floracion para llegar a toda la carpa de 1.50 x 1.50 x 1.80.
https://marshydro.eu/products/mars-hydro-ts-3000-led-grow-light/
🏠 : Marshydro 1.50 x 1.50 x 1.80, carpa 100% estanca con ventanas laterales para llegar a todos los lugares durante el grow
https://marshydro.eu/products/diy-150x150x200cm-grow-tent-kit
🌬️💨 Marshydro 6inch + filtro carbon para evitar olores indeseables.
https://marshydro.eu/products/ifresh-smart-6inch-filter-kits/
🍣🍦🌴 Xpert Nutrients es una empresa especializada en la producción y comercialización de fertilizantes líquidos y tierras, que garantizan excelentes cosechas y un crecimiento activo para sus plantas durante todas las fases de cultivo.
Consigue aqui tus Nutrientes:
https://xpertnutrients.com/es/shop/
💻 Trolmaster Tent-X TCS-1 como controlador de luz, optimiza tu cultivo con la última tecnología del mercado, desde donde puedes controlar todos los parametros.
https://www.trolmaster.com/Products/Details/TCS-1
🍣🍦🌴 Xpert Nutrients es una empresa especializada en la producción y comercialización de fertilizantes líquidos y tierras, que garantizan excelentes cosechas y un crecimiento activo para sus plantas durante todas las fases de cultivo.
Consigue aqui tus Nutrientes:
https://xpertnutrients.com/es/shop/
📆 Semana 9:
Otra semana mas de lluvia y frio, este año se esta retrasando el crecimiento debido a las malas condiciones climaticas, espero que la próxima semana mejore.
Se aprecian bastantes preflores, parece que se forman los erizos.
Se aplican nutrientes según la dosis recomendada por el fabricante.

Likes
8
Share


@Plumbcat19
Follow
I am finding it difficult to get my camera to take photos and videos with the proper colour hence the double videos! It is unreal how thicc these are getting!! They smell wonderful! The other two plants are starting to show a bit more of their red/purple colours too! Noticing a bit of potassium stress from feeding but since they are nearly finished (I STILL CANNOT BELIEVE THAT!) I am only going to pull back a bit. They just need to survive another 14-21 days by the looks of them!

Likes
52
Share


@DevilsBud
Follow
New week for the 2 purple berry Kush
I think the purple berry Kush needs couple days more then the rest but it's going great there at a size that adding extra nutrients is waste and only making flushing take longer so starting to lower all nutrients and preparing for last week exited times
Happy growings Growmies 🤜🏻 🤛🏻
visit www.marshydro.eu
for your best gear and use the PROMO CODE: DEVILSBUD
Some info about the Marshydro FC-4800
Superb Quality LED Chips: The whole light is composed of 1206 pcs Samsung lm301b and Osram 660nm chips. More than two times as many LEDs are used to drive the grow lights at low currents and to avoid overdrive. Quality is guaranteed and efficiency is up to 2.8 μmol/j.
Even PAR Distribution and High PPFD Output: The multi-light bar design and the densely distributed light chips enable the LED grow lights to achieve the optimum PPFD required for plant growth over the entire effective coverage area.
Specifically Designed Spectrum: To ensure even plant growth, blue and red light are enhanced on the basis of a full spectrum combination. Not only does this accelerate plant growth, but it also improves the yield and quality of the plants at the same time.
Dimming Daisy Chain Function: The dimming function saves on electricity costs and enables brightness from 10% to 100% for the different stages of plant growth. A single master light can connect up to 30 lights in a daisy-chain system.
Business LED Grow Light: The light's wavy heat sink dissipates heat quickly and the IP65 waterproof allows the light to operate in humid conditions. 180° collapsible feature for easier installation. All these features provide favorable assistance for commercial cultivation.
And some tent info
●【Lock All Light Insid】MARS HYDRO Grow Tent Interior is made of diamond mylar. Non-toxic to the environment, no harm to plants. High-quality 1680D canvas being double stitched, (ALL OTHERS BRAND grow tent is 601D canvas) which is tear-proof for perfect light locking, No light leaks or rips at all.
●【Durability Grow Tent】Stable Metal corner adapters and poles are the trustful supporters of the tent. No rusting nor paint-falling. Quick easy tool-free installation. Carries strong heavy-duty SBS zippers, double layer lining to create a light-proof seal.
●【Easy Observation of your Plants】Special peeks window made by double layers of cloths. Observe the growing conditions of your plants without opening the tent and avoid disturbing plants. The peek window also serves to dissipate heat and ventilate air.
●【Removable Tray Keep Clean】The package includes a removable waterproof floor tray to hold soil and fallen leaves. The tray can be taken out easily to wash. Removable and water-proof makes cleaning easy.
●【Good Ventilation&Fast Assembly】 Circular double-sleeved vent holes with adjustable nylon strap for air circulation by exhaust fan, ducting, carbon filter, or reflector. Better allows proper light, heat, and airflow. Quick tool-free installation. Reinforced by a sturdy metal frame to ensure security and stability, supports up to 140lb. Perfectly safeguard your plants to thrive even in winter

Likes
22
Share


Likes
37
Share


@Ferenc
Follow
Last couple of days... No watering from today, (Day 129) and the light will be switched off as well from tomorrow (Day 130) so I will harvest them
approx on Day 132
or 133 on the 18th week :)


Likes
17
Share


@Zark002
Follow
Ela segue crescendo bem após a cobertura, devo fazer alguma defolhação?
Segue crescendo bem.
04.03 os galhos começaram a pegar força de crescimento, vou fazer umas amarras em breve, mas não sei se devo fazer desfolhação, se alguém puder ajudar nos comentários? Obrigado

Likes
295
Share


@Ju_Bps
Follow
Hello growmies 👩🌾👨🌾🌲🌲,
👋 Senesence in progress, but not yet ready for harvest, Harvest next week !
Continue flushing,
💪 Not too much work, just removed some leaves.
💧 Give water each 2/3 day
1.5 l Water + Flash Cleaner
PH @6
RQS - Easy Bloom Booster Tabs
1 tabs/5 l
RQS - Easy Grow Booster Tabs
1 tabs/5 l
RQS - Easy Micronutrients Plus
1 tabs/5 l (1 watering each 10 days.)
💡Mars Hydro - FC 3000
50% 50 cm.
Mars Hydro Fan kit
Setting 7
Have a good week and see you next week 👋
Thanks community for follow, likes, comments, always a pleasure 👩🌾👨🌾❤️🌲
Mars Hydro - Smart FC3000 300W Samsung LM301B LED Grow Light💡💡
https://www.mars-hydro.com/fc-3000-samsung-lm301b-led-grow-light
Mars Hydro - 6 Inch Inline Fan And Carbon Filter Combo With Thermostat Controller 💨💨
https://www.mars-hydro.com/6-inch-inline-duct-fan-and-carbon-filter-combo-with-thermostat-controller
RQS - Titan F1🌲🌲
https://www.royalqueenseeds.com/f1-hybrid-cannabis-seeds/624-titan-f1.html
Likes
3
Share


@Ieiogrow94
Follow
Eccoci qui...
Per problemi di lavoro ho tardato un pò la pubblicazione delle foto, la piccola è molto vigorosa ed emana un forte odore.. Già si può vedere la resina che si inizia a formare sulle cime in alto...
Sono estremamente soddisfatto della sua crescita finora e sono sicuro che mi riserva sorprese, odore veramente intenso.
Grande genetica, nonostante ha avuto una carenza siamo riusciti a recuperare ed ora produce tantissima resina, mi ha alzato le aspettative in lei ed ora si punta al raccolto.
Grazie a tutti per il supporto, NON VEDO L'ORA DI RACCOGLIERLA 🔥🌲❤️
Likes
6
Share


@eldruida_lamota
Follow
Que pasa familia, vamos con la segunda semana de floración de estas Wedding Cheesecake Fast Flowering, de FastBuds.
Agradezco a Agrobeta todos los kits obtenidos de ellos 🙏.
El ph se controla en 6.2 , la temperatura la tenemos entre 21/24 grados y la humedad ronda el 50%.Tienen un color espectacular, estan a 12-12, iremos viendo cómo avanzan.
Agrobeta:
https://www.agrobeta.com/agrobetatiendaonline/36-abonos-canamo
Hasta aquí todo, Buenos humos 💨💨💨

Likes
2
Share


@Grilla
Follow
Coming at you guys with my second grow here. I started late this diary, vegging is boring anyway. These guys should be done within the next week or two. I’ve honestly never smelled anything like the strawberry currently in my tent. I’ve been growing for a while and have been skeptical with the naming choices these breeders make. My last run I grew a strawberry crinkle. It didn’t have the slightest smell of sweetness. This girl is packing some unique Turpines and I can’t wait to try it.


Likes
6
Share


Likes
9
Share


@NewbieDoobies
Follow
She smells so sweet and citrusy it makes my mouth water whenever I check her, I think she’s not got long to go, every bud is nice and big by my standards grown with no issues throughout just in flush now to get ready for harvest time. Patience is key


Likes
61
Share


@Nebula420
Follow
Just a couple of hours since I returned from Africa, was there on volunteer work. I see a lot of comments written to me, I will answer everyone later) Happy New Year to all, love and peace all we need¦
Thanks to Seed Banks for amazing genetics, thank you for their great work, GD team for amazing project,
Thanks to everyone who follow my grow report, love u all, Peace!


Likes
45
Share


@masterofsmeagol
Follow
9/3 Shook the plants off this morning and took a few pics and did a video. Let's see if it uploads. Plants are doing good. Toasted toffy is due for another plant doctor application tonight. It seems like I'm losing lots of leaves. Looking back on my other diaries I guess it's normal. BUT I could've had pest/pathogen problems then. I'm over thinking it. Toasted toffy only needs a few more weeks. It will definitely outvrun the disease. The nugs are super dense too. The plant in the 50 is loosing leaves faster than I'd like. It is also one of the furthest along. The big leaves that turn yellow look like it's a calcium/magnesium issue. The stalk and branches are all bright green and healthy looking. So are the flowers. It could be something below the soil. I couldve been overwatering but last time I waited until it drooped. It will be fine though. I'm happy with my results so far. Not my best or biggest year but I'm going to put in the work and Mae these plants produce the best quality cannabis that im able too. Also I think plant doctor may kill insects. K bicarb with dawn does too. I've found a few dead bugs like flies and pillars. Pillars actually seem to be gone. Not many moths either. Unless I see them I'm not going to treat them for it. This is that magical time where you get to watch the plant produce those beautiful flowers. Despite some small problems I'm very grateful for what I have. I've worked hard for it.
9/4 Watered everything but the sherb pie which was still heavy with leaves yellowing. It's tied for the furthest behind in flower with the seed in the 10. I treated the toasted toffy with 1/4 gallon (4tsp/gallon) of plant doctor. I avoided flowers as much as possible and tried to just get a few leaves. I used the rest on the soil. I just wanted it to absorb a little faster. That's why I sprayed the foliage. It's not 4 days it's 14 days when tje plant doctor just leaves behind a bunch of potassium and phosphorus after it's done its job. Can't be used in a 14 day interval with copper and I think that's what treats septoria best. I dontvknow if I can use that in flower. Doesn't really matter. Things are looking good. Plant Doctor and the K bicarb seem to be doing there job effectively as long as i stick to the application times. I made a short video but didn't upload. I'll try again but I may have some medical emergencies that need to be dealt with. If not I should defoliate and tie down some event horizon branches. I thought about treating the other event horizon as well. I'm not positive it has septoria but it wouldn't hurt anything to be practice. It AT LEAST has a couple suspucuous spots. I smelled a skunk as soon as I got out of my car. It can't get in my grow but I might put out traps to catch it. We'll see how it goes. Video seems to be uploading. It's at 31% so I'll wait for it. I think I've got like four or five weeks on my toasted toffy and one event horizon and the one in the 50 that I THINK is red runtz. That's good that I'll have different plants to harvest at different times. It's seeds from here on out though. It was hard to find info on some of the strains I'm growing but they all have ONE thing in common. They are EXOTIC and they are at least MODERATELY DIFFICULT to grow. AT LEAST lol. Last year I picked the right seefs and strains and it greatly helped. Still, if these are difficult strains to grow, then I'm doing a good job.
EDIT: I WAS STONED BUT IM PRETTY SURE I TREATED THE PLANT IN THE 50 WITH PLANT DOCTOR. DIDNT SPRAY BUDS. TRIED TO GET THE LEAVES THEN USED THE REST ON THE SOIL. I REMEMBER BECAUSE A STREAM ACCIDENTLY HIT A COUPLE LEAVES ON THE HUGE PLANT IN THE 10.
9/5 Sherb Pie was light and drooping. It's not to far in flower and still seemed moist yesterday with a little bit of weight. I watered it a gallon. I defoliated a little but I need to go through that plant. I have a bunch of plants that need a little work. The 50 gal seed is losing lots of leaves. I must not be feeding it enough, overwatering or maybe theres some sort of lock out. The plant looks nice and healthy. Leaves just turn yellow and die. Looked like a calcium or magnesium deficiency but i saw a septoria spot. I wouldn't think I've over feed or locked out using the small amounts of nutes I've used. It will be time to feed again soon. It's in the middle of flowering and still has leaves. I'm hoping things work out. I just have an anxiety disorder and worry too much. I'm GOING To have a great harve! I just need to keep moving forward and putting in the work.
9/6 What a fucking shitty morning. I did research on how to keep skunks out of your garden. Because I smelled it and the neighbors shot a few. Dad put traps out and it caught one. It wasn't a no spray trap so I approached it with him. Both had tarps. I kept telling him to throw it while I was distracting it bur he got a cramp and only got it over half. The half away from my garden. It's pretty far and down in a field but still. We had talked all morning about how to release it. I offered to drive their dog to take it for a walk so his alcoholic girlfriend wouldn't spiteful put the dog on its run. It wouldn't be sprayed but I made it out like it would ruin my plants. Picked dad up and got him to the bathroom. In that 30 seconds the stupid bitch grabbed the dog and brought it outside despite me YELLING "Can't you wait 5 minutes!? We've been dealing with this all morning. I heard fuck you in my head and she did it anyway. Dog ran at the skunk barking and it sprayed. Not a lot but I was fucking pissed. She's a full blown alcoholic and doesn't like me around early or the fact that my old man's 80 and house is mine. Anyway I got back and there was NO SKUNK SMELL. AT ALL! I WATERED EVERYTHING BUT SHERB PIE AND FED EVERYTHING BUT SHERB PIE. ILL FEED AND WATER THAT TOMORROW. WATERED A GALLON WITH A QUART OF FEED. Researched my strains found out they were all "difficult" to grow. One year ago to the Day I cut my first tenth planet. I got a couple close to a few weeks but the others will be later. If I can pull this off though I'll have some crazy quality! Grateful for what I have that's for sure! I doubled beastie bloom this time. We'll see how it goes.nothings uploading. I did some vids a pictures but I'll have to upload today.
9/7 I think it rained last night. I forgot to water and feed the sherb pie but I'll do it when I get back. I shook off the plants the best I could. I need to get the leaf blower out now and put it to use. Buds are swelling like crazy. GMOs are very tight flowers. Same with the event horizon. Rock hard nugs. With the gmo's I'm not worried. The were monster cropped so they have enough leaves even if some do die off. The toasted toffy only has like four weeks left. Same with the event horizon. The plant in the ten is the furthest behind but it's extremely healthy. I removed some leaves from the bottom and large fan leaves. The plant in the 50 I hope finishes before it loses all its leaves. I treated it with plant doctor and SOME people strip their plants but I don't. I'm grateful for what I've got. Won't be the biggest harvest but WHEN I make it to the finish line I will have some incredibly potent strains. I'm proud of myself to even get these to finish seeingvthe level of difficulty on cultivation. I'm trying to upload some stuff. We'll see.
9/8 Apparently it rained pretty hard last night. Took forever to go through and shake everything off and defoliate what needs it. Sherb pie is praying to the sky and almost totally purple. It's flowering so much more in the last couple days. Everything has. Even the one in the ten is stacking up! I defoliated most of what needed it and I was soaked. I noticed a branch on the middle gmo that was getting heavy and starting to break away from the trunk. It wad wobbly but I don't think there was a break un the Cambrian. I made a sling with rope (couldn't find zip ties) and I pulled it tight amd secured that branch to the tomato cage. GMO buds are hard as rocks. Everything is in overdrive. They liked that beastie bloom. I have cha ching but nothings ready for that yet I don't think. We'll the event horizon and toasted toffy might be I'll have to check. It's been beautiful today but not too hot. Lots of wind which is good. I'll upgrade supports as needed. Flowers are progressing at an amazing rate. Weather is supposed to be great the next few days. I'll keep this updated.
9/9 Had to shake the plants off. WATERED EVERYTHING BUT THE SHERB PIE WHICH WAS REALLY HEAVY. It's also lost a lot of leaves and the majority of leaves have turned purple. Toasted toffy and event horizon and red runts are pretty far into flower. I tried to take some pictures. Even the ten is blowing up! That looks like I'm going to switch to cha ching when flower gets further. Trichs are developing nicely on the ones further in flower. This year it's going to be quality over quantity. All these strains are ranked HARD to grow but have insane cannabinoid profiles and high THC %'s. So if I can keep it together for another month I'll be golden. Looking forward to it. This is the fun part. It's also the anxiety provoking part. I've learned a lot just since joining grow diaries.

Likes
47
Share


@Northern_Ent
Follow
June 29: watered with compost tea. Bacteria in these teas seem to help hold the water and I don’t need to water this too often or too much. Did a foliar spray of potassium silicate and soluble seaweed extract.
Fast growth phase happening now.
June 30: forecast for next week is hot and the week after is a bit hotter. Having made it through the cold spring, the plants should get a lot bigger over the next couple weeks.
July 1: nice fast growth now 👍👍
July 4: did foliar spray of Extreme Blend in the morning.
July 5: she’s doing great with strong vegetative growth. After the last round of topping the fan leaves got quite a bit bigger and the growth tips have been a bit slower to start growing than on my other photoperiod. Looking nice and green and growing fast. Waiting a few more days before starting another scrog layer.
She has grown 7 inches this week. I love the “inch a day” stage. 👍
#seedsman420growoff
#seedsmanseeds

Likes
53
Share


@AutoCrazy
Follow
This plant is a Queen!! She is super healthy and has stretched like a champ. It seems like the stretch is slowing down which is good. She is the perfect size for my greenhouse at this point. I can still work around her easy enough at this point.
The pistils are flying out now and she is likely to start developing the frost that we all love and admire 😀.
I am watering with 7-10 gallons of water every 2-3 days at this point. I didn’t get around to top dressing her this week but I will this weekend for sure to make sure she stays happy.
Onward
😎🍿🍻🌱
