The Grow Awards 2026 🏆 


Likes
Comments
Share
@GreenOrganicGermany
Follow
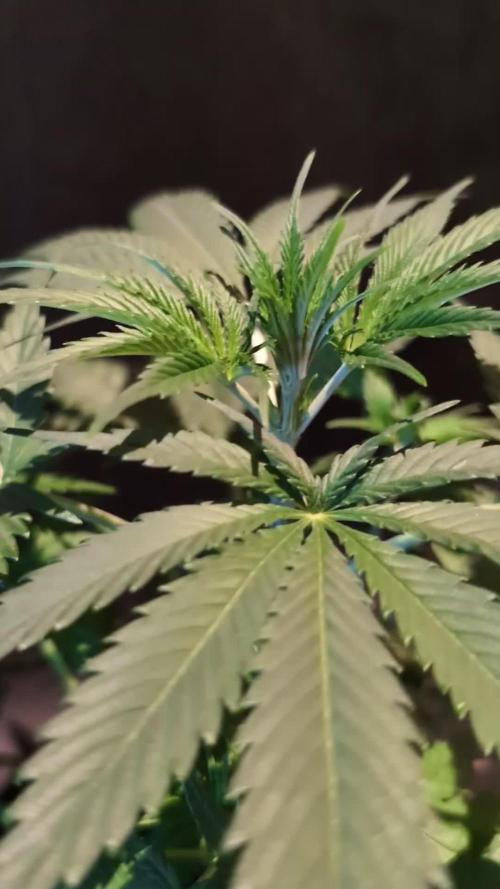
Und so langsam nähern wir uns dem Ende...und um ehrlich zu sein, können wir es kaum noch abwarten. Unsere Ladys schauen fantastisch aus !
Die Temperatur ist weiterhin konstant, immer etwa um die 27 ° Celsius. Bisher haben wir einen sehr milden, aber auch feuchten Frühling mit nur wenigen sehr kurzen Hitzeperioden.
In unserem Haus ist an sich kein Geruch wahrzunehmen. Dies liegt jedoch an unseren guten Abluft und dem großen Filter denn sobald wir die Box öffnet strömt ein unglaublich angenehmer, süßlich bis fruchtiger Geruch durch die Räume.

Likes
25
Share
@XperencdGmanXG
Follow
what can I say over 7 ft tall now which is impressive in this drought with only the pittance of water I've been giving them once a week. Just goes to show you that my water conservation techniques work. They are both starting to smell like a hint of chocolate and peanut butter. Can't wait to see how these ones smoke. They are also into full pre flower and should be in full flower by next weekend.

Likes
12
Share
@Ashbash
Follow
Fastest one I ever seen! Day 57 and it almost looks smokable haha. Lots of trichs visible just a little more fattening to go :)
Cal mag added for possible mag deficiency.
Day 59 - Added a video of the trichomes, a few amber there just a little longer now.
Likes
8
Share
@GoodTimesOrganics
Follow
Hi liebe Community and Welcome Back! 💚
Nach der fünften Wachstumswochen entwickelt sich die Orange Bud solide. Sie legt jetzt richtig mit der Wachstumsphase los.
Die neuen Blätter sehen sehr Gesund aus und insgesammt hat sich die Pflanze gut entwickelt.
Die Seittriebe beginnen nun in die Breite zu gehen und kommen allmählich gut hervor.
Diese Woche kam nochmal der Orgatrex Dünger von Bio Tabs NL zum Einsatz.
Die Umgebungsgegebenheiten sind aktuell gut:
—————
🌞 Temp: 21
🌚 Temp: 18°C bis 19°C
💨 RH: 48%
VPD: 1,00 kPa
💡ppfd: 330 mpm
—————
Viele Grüße 👋

Likes
4
Share
@Scandinavia
Follow
Always good seeds from RoyalQueen Seeds.. The pineapple kush was clones. Unfortunately something happened and it didnt got finished.
Other than that, some different strains i have beeen growing over the years :)0

Likes
21
Share
@MicrowGrow420
Follow
Recovered from the topping and defoliation well. Responding to bondage well. Began Biobizz nute feed at half strength. Just letting her do her thing and flower when she is ready.
Likes
6
Share
@GoldenWeedGrower
Follow
Legend
Timestamp: 📅
EC - pH: ⚗️
Temp - Hum: 🌡️
Water: 🌊
Food: 🍗
pH Correction: 💧
Actions: 💼
Thoughts: 🧠
Events: 🚀
Media: 🎬
D: DAY, G: GERMINATION, V: VEGETATIVE, B: BLOOMING, R: RIPENING, D: DRYING, C: CURING
______________
📅 D22/V18 - 07/05/24
⚗️ EC: 0.7 pH: 5.3
🌡️ T: 22 °C H: 50%
🌊
🍗
💧
💼
🧠
🚀
🎬 1 TL video
______________
📅 D23/V19 - 08/05/24
⚗️ EC: 0.7 pH: 5.3
🌡️ T: 22 °C H: 50%
🌊
🍗
💧
💼 Topping and LST
🧠
🚀
🎬 1 TL video of grow and one of the topping
______________
📅 D24/V20 - 09/05/24
⚗️ EC: 0.9 pH: 5.4
🌡️ T: 19 °C H: 50%
🌊
🍗
💧
💼
🧠
🚀
🎬 1 TL video
______________
📅 D25/V21 - 10/05/24
⚗️ EC: 0.9 pH: 5.4
🌡️ T: 19 °C H: 50%
🌊 12 L
🍗 Calmag, Grow A-B, B52, Hydroguard, Rhino Skin, Bud Candy
💧
💼
🧠
🚀
🎬 1 TL video
______________
📅 D26/V22 - 11/05/24
⚗️ EC: 0.9 pH: 5.4
🌡️ T: 19 °C H: 50%
🌊
🍗
💧
💼
🧠
🚀 Out of Home
🎬 1 TL video
______________
📅 D27/V23 - 12/05/24
⚗️ EC: 1.0 pH: 5.3
🌡️ T: 20°C H: 50%
🌊
🍗
💧
💼
🧠
🚀 Out of Home
🎬 1 TL video
______________
📅 D28/V24 - 13/05/24
⚗️ EC: 1.0 pH: 5.2
🌡️ T: 20°C H: 50%
🌊
🍗
💧
💼
🧠
🚀 Out of Home
🎬

Likes
203
Share
@yan420
Follow
🌈💐🍬🌈💐🍬🌈💐🍬🌈💐🍬🌈
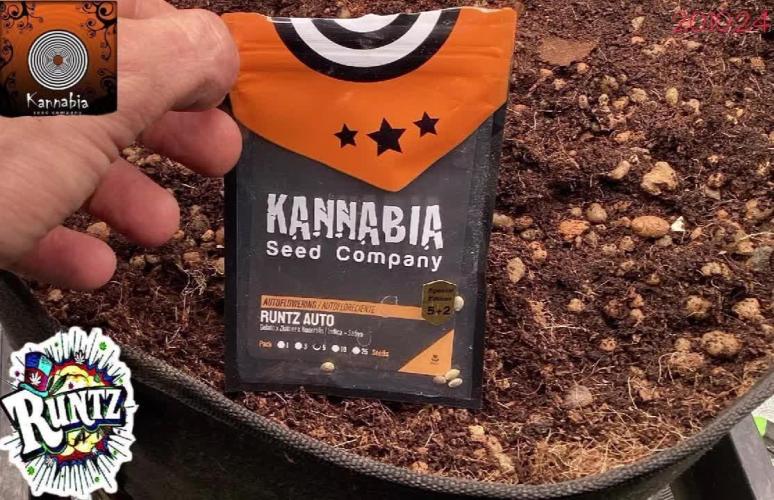
Hi and welcome to another grow again from Kannabia we are talking about my second attempt at the strain Runtz Auto it's going to be a single plant diary and I'll be LSTing HSTing topping and pruning like last time.
Only difference is that I’ll be trying a different nutrient schedule this time to try and avoid pH fluctuations as much as possible as the last pheno seemed a bit sensitive on pH issues, so I’ll be keeping it more simple but maybe at a higher dose let’s see what she wants.
Thank you Kannabia for the chance to try out your awesome seeds 🙏🏻❤️
🌈💐🍬🌈💐🍬🌈💐🍬🌈💐🍬🌈
💭❗💭❗💭❗💭❗💭❗💭❗💭
❗Events"&thoughts worth noting❗
💭❗💭❗💭❗💭❗💭❗💭❗💭
23.10.24(GW)(morning)The little lady popped her head above ground.
23.10.24(VW1)(afternoon)Soaked her with (*1) again, I really hope I won’t burn her, what I’m doing is not advisable but I’m a greedy man I guess, it’s all or nothing 😉
27.10.24(VW1) Add 10ml TriPartMicro to (*1) and use at next feed.
30.10.24(VW2) in the clip I’m just strengthening the main stem for her future training and not just being mean😉
02.11.24(VW2) Add another 10ml of TriPartMicro and get it to 20ml and let’s see how she reacts, use on next feed✅.
05.11.24(VW2) Topp her and prune nodes not needed and start training preparations, add clay pellets up to the first node from the bottom that I’ll keep (if possible of course)📸✅. *part of training preparation👇🏻
05.11.24(VW2) Add another 10ml of TriPartMicro and get it to 30ml and let’s see how she reacts, use on next feed✅.
08.11.24(VW3) noticed the leafs being too green nearing slight N toxicity so I’ll feed with (*1) at 50% strength the next two feeds observe and act accordingly.
09.11.24(VW3)Did first LST session and then fed her(📸)
13.11.24(VW4) She seems to be happy with nutes at 50% strength so I’ll keep it that way for another few days observe and give her a regular 100% strength feed hopefully timed right with the flowering stretch.
16.11.24(VW4) Pruned excess bud sites and defoliated (📸)
20.11.24(VW5) LST until stretch is over and maybe do one last pruning of excess bud sites just as the first bunch of pistils/buds appear.
23.11.24(VW5) Did my last major HST & LST session✅, end of the week I'm switching the diary to flowering as first pistils are visible and I'll keep on doing a light LST until harvest, might do a last pruning session though maybe middle or end of next week.
27.11.25(FW1) Did a defoliation and LST session✅📸.
Noticed some leafs with brown spots📸so she seems to need a bit more PK so I dropped TriPartMicro to 20ml from 30ml and increased GreenBuzzBloom to 40ml from 30ml✅.
02.12.24(FW1) Added 20ml TriPartBloom.
02.01.25)FW6) it's my last update before harvesting end of the week or middle of next week, still not sure.
04.01.25(FW6) Drop TriPartMicro to 10ml, increase TriPartBloom to 40ml, drop GreenBuzzBloom to 20ml
04.01.25(FW6) Still not sure when to harvest, trichomes seem "ready" with a couple of amber between the milky one, the buds themselves seem to need a bit longer as I still see white pistils here and there and hopefully they get a bit more fat.
09.01.25(FW7) definitely the last update, harvesting today or tomorrow.
💭❗💭 ❗💭❗💭❗💭❗💭❗💭
🐝🌼🐝🌼🐝🌼🐝🌼🐝🌼🐝🌼
🌼Day to day tasks & actions🌼
🐝🌼🐝🌼🐝🌼🐝🌼🐝🌼🐝🌼
07.01.25(FW6) fed with (*1) 5l
08.01.25(FW7) fed with (*1) 5l
09.01.25(FW7) fed with (*1) 5l
🌼🐝🌼🐝🌼🐝🌼🐝🌼🐝🌼🐝🌼
🍶💦🍶💦🍶💦🍶💦🍶
💦Nutrients in 30l(*1) 💦
🍶💦🍶💦🍶💦🍶💦🍶💦🍶💦🍶
💦TriPartMicro: 10ml*20ml*30ml*20ml *10ml
🍶TriPartBloom: 0ml *20ml *40ml
💦 Fermented🌿juice:0ml
🍶GreenBuzzBloom: 30ml*40ml *20ml
💦Cal-Mag: 60ml
🍶buxXtrade citric acid Ph-
💦🍶💦🍶💦🍶💦🍶💦🍶💦🍶💦
⚙️✂️⚙️✂️⚙️✂️⚙️✂️⚙️
✂️Tools & equipment ✂️
⚙️✂️⚙️✂️⚙️✂️⚙️✂️⚙️✂️⚙️✂️⚙️
✂️➡️2xMarsHydroSP3000
⚙️➡️MarsHydro150mmVentilatorACF
✂️➡️Trotec (big) dehumidifier
⚙️➡️Small no name dehumidifier
✂️➡️Kebab stainless skewers 3 (LST)
⚙️➡️wire+roast beefskewers(LST)
✂️➡️trimming scissors.(HST)
⚙️➡️Waterproof vacuum cleaner for
✂️spills.
⚙️✂️⚙️✂️⚙️✂️⚙️✂️⚙️✂️⚙️✂️⚙️
🍭🍦🍬🌈🍭🍦🍬🌈🍭🍦🍬🌈🍭
🍦RUNTZ AUTO KANNABIA
🍬🌈🍭🍦🍬🌈🍭🍦🍬🌈🍭🍦🍬
🌈Seed:Auto Zkittlez&Gelato😋.
🍭Effect: Balanced
🍦THC: 20 %.
🍬Features: For beginners
🌈Flavor: Earthy, Floral, Sweet
🍭Complete cycle: 70 days.
🍦Average height: 100.
🍬Yield: 450-500 gr/m2.
🌈🍭🍦🍬🌈🍭🍦🍬🌈🍭🍦🍬🌈,

Likes
Comments
Share
@Weedwithwes
Follow
Day 95 GDP harvested and starting dry process.
Day 95 for the
Tropicana cookies purple auto and northern thunderfuck auto.
Both looking great. Tropicana really starting to reek the whole tent out sweet funky arouma. Looks light it’s starting to fade out nitrogen as well 🤞
Northern is stacking up buds hopefully will continue fattening for a couple more weeks.
Soil all the flower tents look very alive and healthy. Lots of wigglers thriving under the mulch layer.
Likes
12
Share
@rickhaZe
Follow
Hemos comenzado la semana con un riego de solo tek bloom
sacando las hojas mas feas de nuestro cultivo, podas de hojas bajas, quemadas, etc.
aplicamos una microdosis de mosterbloom en donde diluimos un 0.3 en 6 litros de agua.

Likes
37
Share
@Roberts
Follow
It was a interesting grow I had Spider mites in flowering. I treated with lady bugs. Seemed to do the trick. All my other autos got hplvd. This likely had it too at end with close proximity to them. She made it. Great looking plant, and smell. Thank you Mars Hydro. DO NOT BUY AMS. The owner is a convicted criminal, and he stole 550 dollars from me. It's not worth it.
Thank you grow diaries community for the 👇likes👇, follows, comments, and subscriptions on my YouTube channel👇. ❄️🌱🍻
Happy Growing 🌱🌱🌱
https://youtube.com/channelUCAHN7YRZWLPCARHHMIQ7X4G

Likes
13
Share
@russrahl
Follow
I’m a week late posting on these as I was a week ahead in the timeframe for this diary because of the new Germination option. We are caught up now day wise anyway, and all is good. Finally got her into the flowering tent and into my 5 gal RDWC system under a 1000w HPS on a light rail mover. We flipped her to flowering as soon as we got her in because my DWC systems tend to grow big ass plants. Lol so I’ve decided to flip without much of my screen full and let the stretch fill it. I will also be hitting them at 1000w rite from the start instead of trying to turn it down and get it closer to save power consumption. I will be starting with the light already up as high as it can be at about 3 ft above the screen. I’ve also shortened the span of my rail mover and set my pauses shorter at about 10 sec. with the light at 1000w we get a better spread out on the light meter and don’t need to move the light as far. I’m also going to keep tucking till they completely stop stretching in an effort to keep them as low as possible. We also had some excessive nitrogen build up a couple weeks ago and dropped the ec way down to 0.2 for the next week. They responded quick and went in the opposite direction very fast and before I new it we had nitrogen deficiency. Lol so we got them sitting around 0.75 EC now and they are coming back around. Well that’s it for this week, Cheers! 💨

Likes
6
Share
@xchdave
Follow
Another week down, we're heading into week 8 of flower and it looks to be beginning it's fade with the top leaves going yellow.
I don't think this is a deficiency this late in the game,
The buds have matured alot this week with a lot of pistols turning from white to brown. Trichome production looks to be solid. Next week we will start checking the trichomes to see how far away from harvest we are

Likes
15
Share
@Shizzlemanizzle
Follow
Topping was great ! Starting now with LST using a wire but gently don’t want to harm the plant they opened up pretty good 🙏🏽 I am increasing water by looks.


Likes
5
Share
@Mr_nugs_lover_David
Follow
In this week the buds are starting to get more and more compact, very sticky flowrs, and the pheno #2 smells a little stronger than this pheno but still the same strong amnesia smell very apreciated, I'm a big fan of amnesia strains, and this amnesia pro by gea seeds is an amazing version of amnesia hypro very happy with her performance so far! Stay with me to see how this lady until the end of the road! 💛❤️💚👨🌾

Likes
36
Share
@Fayah_Burn
Follow
Today on Day 141 and at the same time @ the end of the 9th week of flowering it is Harvest day (final harvest) for the remaining two Tropicanna Banana's (Plants #1 and #3).
Plant #4 was harvested on Day 134 (8th week of flowering) - see harvest pictures week 8
Plant #3 was harvested on Day 138 (9th week of flowering) - see harvest pictures week 9
Did not take any wet weights as i am drying the buds on the stalks and i dont wanna know how many stalkes i grew 😂
Will be back soon with the dry weights of each one of the four ladies. Some pacience is asked now 😬
Likes
7
Share
@Karl_Heinz420
Follow
Original Sensible Seeds - Frosted Guava 🍈
Enjoy - Week 9 👨🏻🌾☀️
- 25-28 grad Celsius
- 55-60% humidity level
- 20l Air-Pot
(75% BioBizz All-Mix, 25 % BioBizz Worm Humus)
- RO-water (PH 6,25)
Day 59 👨🏻🌾 Frosted Guava
- Defoliation
Day 62 👨🏻🌾 Frosted Guava
- Defoliation
Sanlight Evo 3-60 40%: about 400 PPFD
Spider Farmer Glow30 6h/18h on

Likes
2
Share
@Bluemels
Follow
Tag 49: Es geht in die Blüte. Ich hoffe die Pflanzen wird nicht so groß. Glücklicherweise wird es jetzt draußen wieder etwas kühler.
Likes
225
Share
@The_Projexx
Follow
We are now on week 5 of flowering ! I've noticed the stretch has finally come to a halt and that the flowers are getting thicker and thicker by the day . GG#1 is recovering well from my mess up but some of the damages will remain . She's still in fantastic shape She just wont be what she could have been . GG#2 is pumping out all her flowers pretty well evenly and things are going great for her , during veg i fed her way way way way to much haha this is why she has the darker green then the rest even tho the rest are equally as fed as her granted one strain isnt GG like her but one of them is and its far less green haha . Another 2-3 weeks and it will be time to start my flush !
A special thank you to all my followers and the people who come down to show their support and liovemuch appriciated you guys rock ! I wish you all the best through the hollidays ! Keep on keeping on guys !
-Happy Growing!
Processing
Likes
23
Share
@CaliGrown
Follow
Like I said I messed this one up. Neglected her and it shows. Super big colas but stunted. And all maybe fault. Going to do Much better next bubbley Livers bean
