
Likes
Comments
Share


@Still_Smoq
Follow
#seedsman420growoff and #SeedsmanSeeds
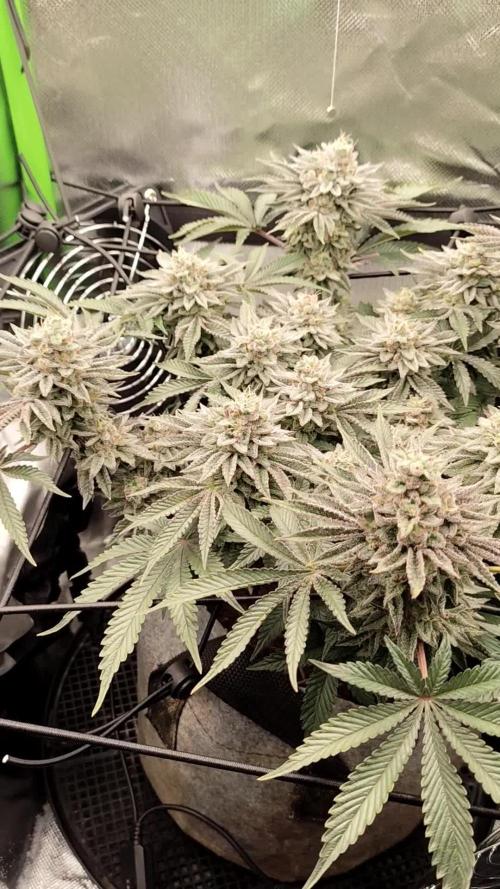
📆 Week 5, 25-31 May 2024
25-27 May - Observed and let the plant grow.
28 May - Defoliated plant.
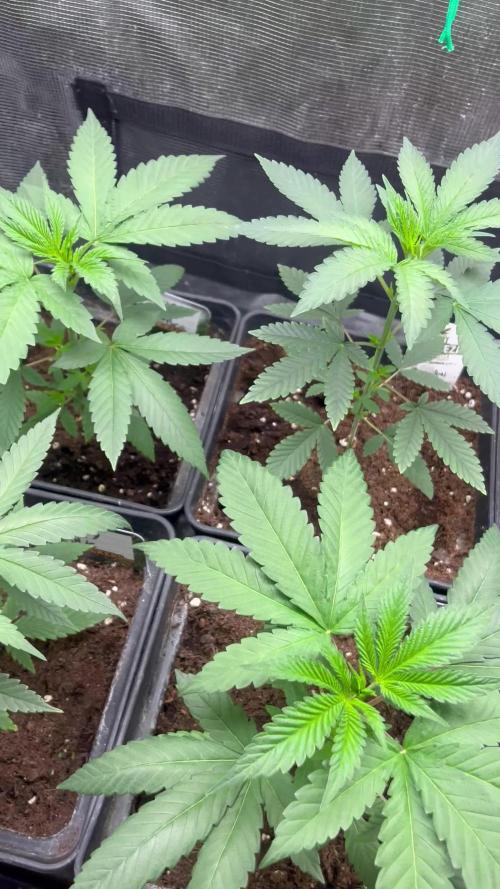
29 May - Placed scrog ring on trellis system, bent top of plant over 90 degrees, adjusted and spread branches (see pictures).
30-31 May - Observed and let the plant grow.
📑 I’m very pleased with the way this plant has responded to the nutrient schedule so far. Now it is time to see how she will do with training. I like using a version of the scrog method most because it gives me the greatest space for bud growth overall. My experiences have taught me that under these lights there is about 15-18” worth of quality vertical bud potential. Anything below that line is only draining on the plant, and not receiving adeqate DLI. So I dont need to focus on a tall plant - rather a wide one. Now that she is under a scrog the DLI has a significant canopy increase.
What I’ve done with this plant is cut all side shoots off the main branches up to the scrog. She will grow for another week to allow all for growth to develop just above that and then be flipped to flower. I’ve never grown this plant before, but assumeing she can double her size during pre-flower, I’ll have plenty of room in my grow tent.
The Trellis System: is made with 1/2” (12.7mm) white, SharkBite PEX, 1/2” pex clamps, small screws/nuts #6-32 x 3/8 in (to hold clamps opposite each other, this is what holds the structure together, side bars, rings, scrog), 1/2” pex straight coupling connectors (to connect rings, and extensions), nylon tape and nylon cord. The frame design is independant from the bucket and can be put on anytime before or after the start of the grow. It simply snaps together (nothing needs to be crimpted), the rings stay in tact with coupling and tape, the netting is strung once for the most part, I prefere 2” squares, and held in place by clamps. The size of the rings depends on the size of your pot, the bottom and top ring are measured seperately. The scrog ring is determined by the size of the tent or desired spread. It takes 5 side bars evenly spaced apart and snapped on the bottom ring 1st to hold the frame sturdy in place, their length should start flat from the bottom to about 8” above the top of the bucket. Place the pot into the bottom ring with 5 side bars already attached, lift up the bars, then put on and attach the top ring, this prevents it from moving. Both are then placed on a 12” Bonsai turn table for easy access and observation of the plant. The final scrog is placed on when the desired height is close to being achieved, then maneuvered down over the plant. A simple design that allows you to easily adjust the netting (place extenders on side bars faceing in opposite direction for additional height) and opens many other possabilities for training. See pictures for an example.
🍶 25 May nutrient solution changed
🍽️ 25 May feeding schedule updated
💧 Using reverse osmosis water with EC/TDS at 0
🐉 Nutrient Solution EC 2.3 at 73 degree F
🔆 Light power at 60%, DLI 30-35 canopy coverage at 18hrs
😤 Using General Hydroponics, HGC728040, Dual Diaphragm Air Pump, 320 GPH
That is it for this week. Thanks for the look, read and stopping by.

Likes
1
Share


@DankEngineer
Follow
Three of the four autos popped on day 4 and the fourth plant popped on day 5. Watered 1.5 oz when I planted in final smart pot size 3 gal. Watered 2 oz on days 3,5, & 6 when it looked dry on top. pH at 6-6.5 before I got a meter.


Likes
7
Share

@blablamesh
Follow
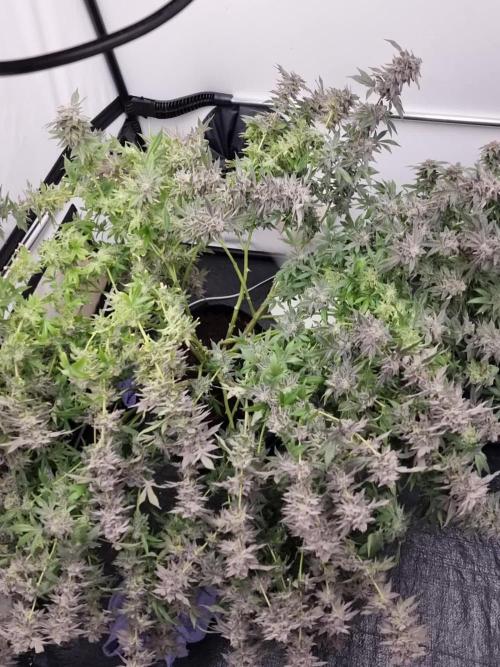
The grow is heading towards the end. This week I was feeding with 1.1 EC and yesterday I started giving only pH regulated water. I am not sure whether it is too soon, but we will see. I am planning to harvest next wednesday, if the trichomes are there. I've already vaporised some of the sugar leaves (without drying) and it tastes really amazing, the terpenes are very fruity. There is also some purple coming in this week. I actually might get my wish of purple weed fulfilled in the end:)

Likes
3
Share


@xipo86
Follow
day 42 of Flower... gettin bigger and smellier by the day. pistils starting to go amber.. i say 2 weeks for gorilla girl f1 and Mental Rainbow to be ready.


Processing
Likes
4
Share


@Ageddd
Follow
------------------------
HARVEST 1:
------------------------
Harvested this girl because she stopped eating and was drinking less water, and the weird flowers, so she was finishing, and im looking for something psycoactive, so the trichs are cloudy too... I expected less flowers, but there are some material behind leaves.
The smoke is really nice flavored, and it hits you with psychoactivity. Despite the production and weird buds it is really tasty and gets you in a really nice sativa mood.
The flavor would be like: An apple with Gasoline touches (i suppose its because of the Sour Diesel heritage)
15 gr.
------------------------
HARVEST 2:
------------------------
This plant was harvested in the optimal point to me, with cloudy trichs and a nice production. She really added weigth in the last weeks.
The smell is really like the original Lemon, has deep citrous notes.
Taste is very good, more powerful than the smell(Will complete this in a couple months when properly cured in jars).
I like the psychoactivity, its a nice day smoke, and a tasty one.
Overall a very good plant, i love the therpene profile (citrous/fruity), it is so refreshing when you smell the citrous flavour.
90 gr.

Likes
2
Share

@LittleBigTrees
Follow
This week they were ready for harvest.
one went into a drying rack the other was hung upside down to dry

Likes
80
Share


@JamMAKEcan
Follow
Well this is 10 weeks from seed.. Have to give her 11 weeks...
ANY ADVICE WOULD BE VERY MUCH APPRECIATED🤔🤔🤔
They are fattening up lots of red hairs🤔🤔🤔🤔yea 11 weeks

Likes
50
Share


@Roberts
Follow
This was my first time using plagron. I dropped the ball on it. I had lots of issues with getting the right amount of nutrition with the level of irrigation I use. The yield will be low but it should still have some kick. Thank you Plagron, Zamnesia, and Medic Grow. 🤜🏻🤛🏻🌱🌱🌱
Thank you grow diaries community for the 👇likes👇, follows, comments, and subscriptions on my YouTube channel👇.
❄️🌱🍻 Happy Growing 🌱🌱🌱
https://youtube.com/channel/UCAhN7yRzWLpcaRHhMIQ7X4g.

Likes
46
Share


@Biggy2k20
Follow
I think it's nearly time for flush. I have added a fan in there to reduce humidity levels. Everything is blooming as fattening up really well. Can't wait!

Likes
8
Share

@GERGrowDesigns
Follow
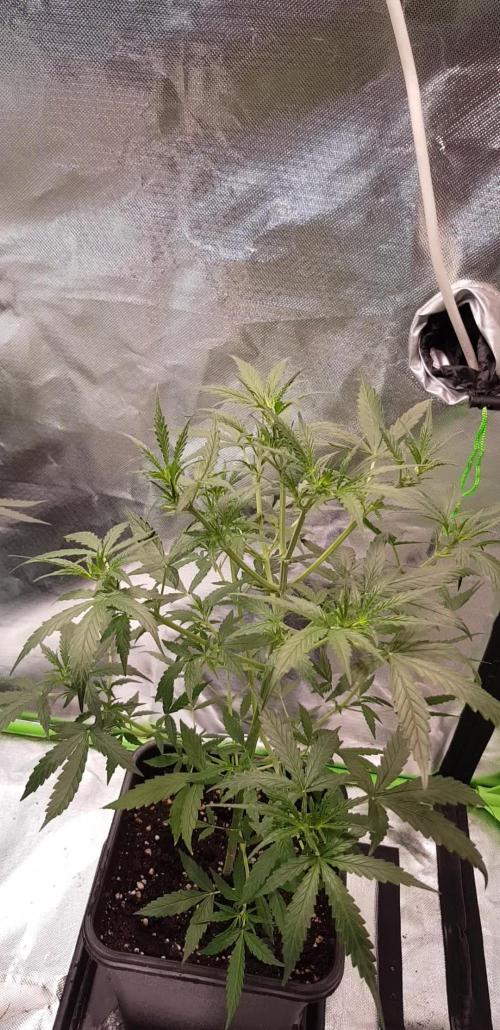
Welcome to Veg Week 4 of Divine Seeds Auto Big Demon
I'm excited to share my grow journey with you all as part of the Divine Seeds Autoflowering Competition 2025. It's going to be an incredible ride, full of learning, growing, and connecting with fellow growers from all around the world!
For this competition, I’ve chosen the Feminized Automatic strain: Big Demon
Here’s what I’m working with:
• 🌱 Tent: 120x60x80
• 🧑🌾 Breeder Company: Divine Seeds
• 💧 Humidity Range: 90
• ⏳ Flowering Time: 8W-10W
• Strain Info: 21-23%THC
• 🌡️ Temperature: 26
• 🍵 Pot Size: 0.5l
• Nutrient Brand: Narcos
• ⚡ Lights : 200W x 2
A huge thank you to Divine Seeds for allowing me to be a part of this amazing competition and Sponsoring the Strains. Big thanks for supporting the grower community worldwide! Your genetics and passion speak for themselves!
I would truly appreciate every bit of feedback, help, questions, or discussions – and of course, your likes and interactions mean the world to me as I try to stand out in this exciting competition!
Let’s grow together – and don’t forget to stop by again to see the latest updates!
Happy growing!
Stay lifted and stay curious!
Peace & Buds!

Likes
39
Share


@DogDoctorOfficial
Follow
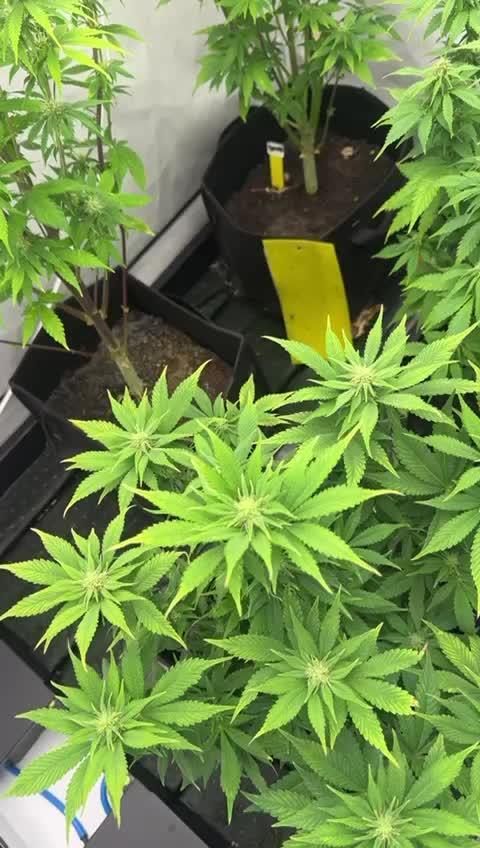
An in to soil she and her sister testers go, i know that for know everything looks the same , apart from the photos, but this will start changing with them growing. For now all of them are growing pretty much the same and now that they move in to soil and start feedings they will start showing the phenotype and genetic differences, but for now all looking great , healthy and strong af!!!
Haded a intro video from seed in to now, including how i transplant and what i use wen doing it so, and from here the moon is no limit for this babes i believe , so stay tuned as this testers they promise to be a interesting ride <3 <3 <3
She is growing amazing as all of them are, this one in particular is my favorite, but for now the only reason is her being number 9 hehehe
As always thank you all for stoping by and for supporting me on this journey, i am super passion about growing and fell blessed to have you all with me on this new journey <3 <3 <3
Genetics - Fast Buds Tester 08 09 10 11
Ligth - LUMATEK ZEUS 465 COMPACT PRO
Food - APTUS HOLLAND
#aptus #aptusplanttech #aptusgang #aptusfamily #aptustrueplantscience #inbalancewithnature #trueplantscience #fastbuds #dogdoctorofficial #growerslove
With true love comes happiness <3 <3 <3 Always believe in your self and always do things expecting nothing and with an open heart , be a giver and the universe will give back to you in ways you could not even imagine so <3 <3 <3
All info and full product details can be find in can find @
https://2fast4buds.com/ wen released
https://aptus-holland.com/
https://autopot.co.uk/
https://lumatek-lighting.com/
<3 <3 <3 Growers love to you all <3 <3 <3
Likes
12
Share


@cookingwithninja
Follow
day 30 video day 30 note crossed bridal party x pink paradise
day 31 crossed blackberry oreo bigstuff x pink paradise
day34 videos of each, a lot of photos. Rh% high I keep my terps non-volatile. Bridal rubbing sugar leafs smells like some sort of candy watermelon, blackberry neat skunky AF sugar leaf rub, pink is nice mellow I will have to check tomorrow. Dr. Thunder very oily with sugar leaf rub I swear you could deepfry with it. It also smells mellow skunky but will check again tomorrow it may have been terps overload on my fingers regarding thunder and pink paradise aromas. Pink caylaxes have shriveled and accepted pollen locations. I just don't think the seeds will be ready when harvesting in a few weeks. Start week 5 tomorrow and I don't think crosses will be ready so I will figure it out. Pink crosses would be fun next round but I have so many more selections to choose from to grow my next 4.Thunder smells like a citrus cleaner, almost pineapple front notes then a full citrus.
day35 defoliated like madd. no lie so sticky: 2 fingers lifted a ceramic cup like I was spiderman. 1 finger was a struggle.. science

Likes
Comments
Share


@Bakedgoldie420
Follow
Leider ist eine unnormal hoch gewachsen und hat sich das meiste Licht gekrallt.

Likes
59
Share


@JeyGanesha
Follow
Un altra settimana è passata e tutto procede bene.per fortuna non ho più trovato nessun nanners 🙏✌️💪..belle piantine mie, continuate così che farete delle belle pannocchie....
30/8/24 gente ho combinato una bella cazzata.pur avendo esperienza, mannaggia a me,mi sono portato a casa dentro il box, il cazzo di ragnetto rosso... fanculo...
Ho già iniziato a ripulire tutto, box e piante con Neem...li sterminerò tutti 😂..


Likes
82
Share


@BigBadLion
Follow
Heeeey all!
Sorry for the extremely slow update! The past few weeks have been crazy for me! 😱
This week I made a lot of defoliation and decided to be somewhat greedy. I'll let the plants grow a bit more so they'll stretch well during flower! So while I defoliate I'll allow the plants to recover properly! 💪
Near the end of the week I also made another mistake with Roko (poor baby! 😭). I broke another of the stems (the one that divided the plant in two, right in the middle) and I feared the worst! But so far the plant kept growing without any problems.
I'm still thinking a name for my 4th baby, she has surprised me greatly and I didn't notice how many new branches had grown until I defoliated her and I'm sure she'll deliver some great buds! 😍
Anyway everyone, this is all for now.
Thanks for reading this journal and soon I'll update the next week! 😃

Likes
7
Share


@STAYINGONMYMAINCBATORUNTWO
Follow
She’s mmmm. Aahhh flavours taste like a bit piney but overall has a sweet sherbety taste to her tropical almost fastbuds are the ones to go to for autos (although I’m about to test RQS autos) but if I didn’t have the heat I would of had more flavours but never the less it’s packing some 🔥🔥 buds come a bit pointy slimmer than my other dank nugs and grind out to a lot more than expected she’s a great one I’ll be doing her up again!
My girl had a bit of heat stress but recovered so well with some dense frosty pointy nugs! She grew to just about under a meter and had several branches (wish I topped her) great strain to grow fastbuds are amazing
She grew fast and branches out nicely! I defoliated twice once just after they began flower and once just before harvest and made the buds swell up nice and fat and dense even for pointy buds! The high is not one to mess with had me staring at fb videos for hours lol but great stuff from fastbuds be sure to grow it again!
Likes
1
Share

@ibbzy
Follow
Slowly recovering. Still most painful grow so far, the dying leaves irk me so much. But nonetheless steady growth on the buds and hopefully stays like this


Likes
4
Share

@eldruida_lamota
Follow
Vamos familia, actualizamos la quinta semana de vida de estas Permanent Maker de Seedstockers.
La temperatura que estuvo entre los 24-26 grados y humedad dentro de los rangos correctos.
Todavía estamos en el ciclo 16 horas luz, 8 oscuridad, estiraron bien y ensancharon bastante también, el color es verde sano.
Se nota que los nutrientes de la marca Agrobeta hacen sus funciones.
También realicé una poda de bajos que yo si las veo necesarias para explotar después la flor.
- os dejo por aquí un CÓDIGO: Eldruida ,descuento para la tienda de MARS HYDRO.
https://www.mars-hydro.com
Hasta aquí todo, Buenos humos 💨💨💨
