The Grow Awards 2026 🏆 


Likes
Comments
Share
@Aedaone
Follow
The temperatures, humidity, and watering volume(if measured) in grow conditions are all averaged for the week. The pH is soil pH. Any watering done by me is well water which is 7.6 pH and 50° F. Any listed nutrients are topdressed @ ml/gallon of soil.
Day 1 we started with lots of sunshine and clear skies.Then we had a pop up severe thunderstorm with grape sized hail. Thankfully it only lasted a few minutes.
Day 2 we have clear skies and sunshine. The temperature is mid 70's. You can see the hail damage that occured day 1. The #3 plant was topped by a hail stone. Luckily it only got the top and didn't take out the side branches growing out of the 4th node. This was very fortunate a topping above the 4th node done by nature.
Day 3 we had rain and thunderstorms through the previous night and into the morning. We had sunshine, clear skies, and temperatures in the upper 70's. That was followed by severe thunderstorms, rain, and a touch of hail from 4p.m. to 6p.m.
Day 4 we had relief from the rain. Temperatures were in the mid to upper 70's and lots of sunshine. We have a few days of sunshine in the forecast 🙏
Day 5 we had lots of sunshine and clear skies. Highs in the upper 70's and 49% humidity. We needed the dryness. 🙏
Day 6 we had clear skies and sunshine. Temperatures were in the mid to upper 70's.
Day 7 we had partly cloudy skies and temps in the middle 70's.
Overall this week was a success. We thankfully avoided any major damage from the hail. The girls more than doubled in height and really kicked out some branches after topping.

Processing
Likes
12
Share
@Italianganya88
Follow
Alles läuft super buds fangen langsam an anzuschwellen hab eine 2 Lampe mit reingebracht um mehr lichteinwirkung in der Blüte zu haben. Die einzige Frage die bleibt sollte ich langsam anfangen zu entlauben. Bin mir bei autoflower unsicher.


Likes
145
Share
@biggreens420
Follow
Last week for this girl next update is harvest flushing nicely no major fade yet but can see it starting in places buds are nice and dense not very huge but the quality and the pungence and stickiness coming from her is like nothing iv grown so far trichs are cloudy slightly amber in places ,just put in a new led for the last week im going to be running a few of these in my next grows so just testing can allready see more light penetration and spread compared to my old 300w led .Shes been my favourite so far beautiful to watch change and grow shes still on just water at 0.4m.s /400ppm just started using an e.c meter didn't use it before but ill start now chopped a little bottom branch of to test after a week flush not much else to report will be putting a lot of pics on as its her last week and wont be seeing her beauty much longer ...will be harvesting after 10 day flush instead of 14 day some issues just popped up else where shouldnt make too much difference hopefully thanks for reading happy growing guys


Likes
5
Share
@JeyGanesha
Follow
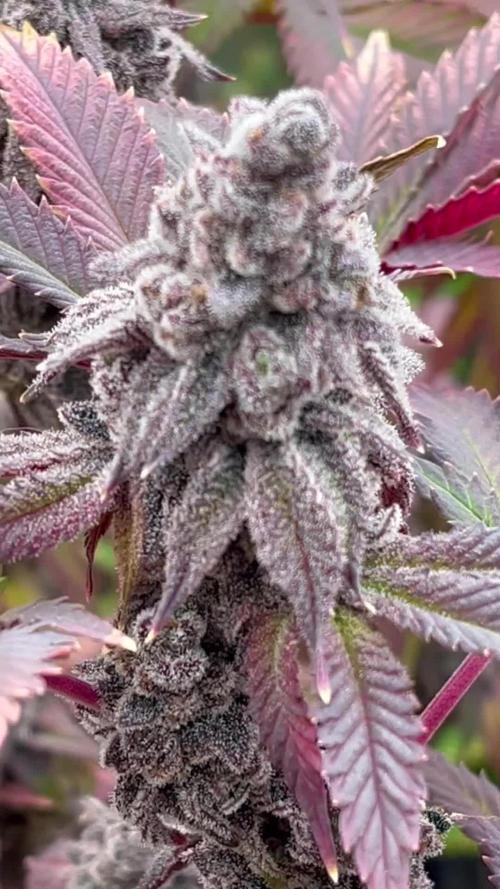
Queste grape ape sono cresciute benissimo la qualità è più che buona..per la mia patologia funziona benissimo. Molto efficace...sé ritrovo i semi la rifarò.....
Ogni volta per riuscire a fare 2 foto hai tricomi, è sempre un casino per mettere a fuoco 🔥. Però qualcosa di vede.........


Likes
11
Share
@TerpTurtle
Follow
Earthbox pics of Strawberry Truffle s1 | Perpetual grow 👽🐢👽🐢
harvest coming on new moon, flipping veg tent👍


Likes
12
Share
@Rodamis_Prime
Follow
Was a busy week in this tent . Needed my 2x4 tent for some tutankhamon that I have coming up so this big girl got a roommate . Starting to have to feed her every day and a half and she's drinking 1.75 gallon each time . Also had some leaves higher up taco and the tips of the edges go brown and figured out that I sm pretty much over driving the plant with the light . So dropped it down to 70% for now to see how it reacts .
Likes
12
Share
@DeepRootsGrowTrees
Follow
MIMOSA by ROYAL QUEEN SEEDS
Week #23 Overall
Week #6 Flower
This week she is doing great nothing really to report this week she's got good trichome coverage and she smells so sweet!!! Stay Growing!!
ROYAL QUEEN SEEDS MIMOSA
Likes
7
Share
@LittleBigTrees
Follow
Potted then up to 4ltr pots ready for flowering ✌️ switched to 12/12 on day 35

Likes
16
Share
@GRow_M8s
Follow
- Day 62 and the 4 of the mephs are with some amber crystals already ( Stomper#1,#2 & GWK#1,#2),
- Stomper #3 (D62) and SODK (D57) are a few weeks behind.
- Stomper and GWK produced a light>medium bud structure (tap water only🚿) with full of crystals 💎 (pretty cool for an auto with little effort), not yielders (soil organic) thought but with buds to make diamond rings.
- SODK looking more like a yielder from these 3 strains with more compact buds and indica structure.
- Humidity a little higher than the optimum this week, except Stomper#3 & SODK we didn't water the plants too much and we had some dry periods in the medium.
- Made a final defoliation before harvest (4), we will dry the buds in a dry machine (as the Root66 dairy 👀) and make the rest trimming before curing.
🔕 Smells were super stealth until now, no problem at all and the buds looking and smelling dense when touching and checking them.
⚠️ Next update --> next week with the first part of the meph harvest 🤯.

Likes
4
Share
@GoodTimesOrganics
Follow
Die Blue Dream zieht eine eher länglichere Blüteform entlang der Internioden.
Die Blätter färben sich wie angenommen in ein schönes Purple/Blue, was ihrem Namen nun alle Ehre gebührt.
Die Trichome haben stark zugelegt und dass Aroma hat sich definitiv von sumpfig/skunkig hin zu einem leicht fruchtig und doch scharf aromatisch und eher Erdig hin entwickelt.
Ich denke der Ertrag hält sich eher in Grenzen und dennoch ist die Pflanze ein absoluter Hingucker und zieht einen in den Bann. 🍵🌎🍇💚
Likes
11
Share
@DimJesus
Follow
Iniciando mi primer indoor, updates toda semana.
Ya he cometido algunos errores pero siempre aprendiendo, próxima semana comenzaré a fertilizar con advanced nutrients.

Likes
22
Share
@Robbaus
Follow
Ho smesso coi fertilizzanti base per la crescita della pianta, sono ancora un po' troppo verdi per essere alla dodicesima settimana. Tranne una Tropicanna Banana che è sempre stata una settimana avanti alle altre. Spero che nel mese che manca i fiori si gonfino come si deve, ho sempre un po' di paranoie soprattutto visti gli ultimi due giri che non ho avuto il risultato sperato. Però stavolta la situazione promette meglio, tra due settimane dovrebbero esplodere definitivamente. Sicuramente in questa settimana è aumentato a dismisura l'odore che emanano, si sente distintamente in tutta casa. E che profumo 😊🤤🍀
Likes
9
Share
@Rock_n_Roll_Randy
Follow
IF YOU WATCH THE VIDEO YOU CAN SEE THAT I MOVED THE LAST AUTOFLOWERS INTO THIS 5X5 TENT, AND MOVED THE PHOTOPERIODS INTO THE 8X8 TENT.
FOR EVERYTHING MARS HYDRO VISIT:
www.mars-hydro.com
www.marshydroled.ca
PROMO CODE: rocknroll
VISIT THE ALIEXPRESS STORE:
@marshydro_aliexpress
Instagram: @marshydropenny
Thanks for taking the time to read and check out my diary🤜🤛
TS3000 FEATURES:
WIDEBAND SUNLIGHT FULL SPECTRUM LED GROW, Infinite close to natural sun light, suit for all plants whole stages indoor growing, rapid plant response from seed to flower, achieve maximum quality and quantity, much better than traditional HPS grow systems.
HIGH REFLECTIVE & NOISE FREE-Fanless LIGHT BOARDS design will make your growing life easy and quiet, quickly heat dispersing material aluminum reducing light lost to aisles and walls, increase the light intensity up to 20%, allowing your plants receive more energy and without burning your plants for maximum headroom.
HIGH EFFICIENCY ENERGY SAVING PLANT LIGHT, high-power NEW LED grow, Compares to traditional 3000 watt HPS lamp and other brand led grow light while only 450 watts true output with 1016 LEDs, more scientifically and energy-efficient! Perfect for 5' x 5' veg stage, 4' x 4' bloom stage, higher intensity in a MARS HYDRO grow tent, reflective area, or by crossing over using multiple TS3000.
BOOM YIELD LARGE GROW LIGHT, NEWEST SMD LED technology provide highest PAR/LUMEN output(1095.6umol/), makes you get 30% higher yield compare OLD led lights, can get max yield at 2.5g/watt, less pay but get more yield, bring a amazing grow trip to any home grower as it beams huge amounts of light energy to plants below.
COMMERCIAL LED GROW LIGHT, Updated easy dimming & daisy chain function, main light controlled, especially come with two waterproof and dimmable Mean Well Drivers, auto sensing power supply works on both 120VAC and 240VAC and 277VAC, suit for Large Rooms and Commercial Setups.
Low Energy-Consuming LED Grow Light: Consuming 300w and also mounted with 1016 chips, TS3000 has the ability to replace a 450w HPS light while reducing 40% power intake.
High Efficiency LED Grow Light: With overall light output PPF 343umol/S as well as amazing PPE 2.3 umol/j, it's 50% even more photon efficient and can assure a 30% more return than the old HPS/MH lights.
Patent Highly-Reflective Hood Shape: The reflector design on TS3000 is patented, which can effectively gather the light dispersed in all directions to enhance its light intensity as well as assist plants in absorbing more light.
Full Spectrum Plants Favorite Spectra: By the unique mix of spectra that makes most light in the 400-700nm waveband, incredibly conducive to plant photosynthesis. Adequate IR(730-740nm) is additionally consisted of in the range to generate larger buds.
Dimming And Daisy Chain Feature Available: Upon an independent dimming button on the external driver, backing 0-100% settings adaptation and up to 30 LEDs daisy-chained in a group, it supplies different light levels for various plant stages meanwhile saving energy.
Safety Certifications And Service Warranty: CE, ETL, RoHS, UKCA security certifications accepted, 50,000 hours durability, 5-year service warranty, and local after-sales repair
5x5 GROW TENT:
LOCK ALL LIGHT INSIDE MARS HYDRO Indoor Grow Tent interior is made of diamond mylar which is highly reflective. (Other brand's mylar and reflective rate is as low as 50%, won't provide efficient light. )MARS HYDRO 1680D canvas, being double stitched, it is tear proof and has perfect light locking. Mars Hydro's grow tent keeps 100% lighting beams inside and helps your plant absorb more lights. EXTRA-THICK --No light leaks or rips at all
DURABILITY GROW TENT Stable metal corner adapters and poles are the trustful supporters of the tent, standing sturdy, neither rusting nor paint-falling, quick easy tool-free installation. Mars Hydro's heavy-duty metal zippers, with double layer black lining, are the best on the market which create a light-proof seal
EASY OBSERVATION FOR YOUR PLANTS. Special observation windows are made by double layers of cloth. Observe the growing conditions of your plants without opening the tent and avoid disturbing plants. The observation window also serves to dissipate heat and ventilate air
AUTOMATIC 6 INCH EXHAUST FAN KIT W/ CONTROLLER:
Mars Hydro 6'' Inline Fan uses a mixed-flow design to maintain peak performance in a high static pressure environment.
GROW TENT FAN: MARS HYDRO inline fans are designed to ventilate hydroponic grow rooms, transfer heating/cooling, cool AV closets, and exhaust odors.
EFFECTIVE VENTILATION: Variable speed controller for easy fan speed adjustment. Optimal ventilation for your planting.
LOW NOISE LEVEL: Durable plastic fan housing and blades for extremely low noise(32dB-A); create a truly quiet growth environment.
EASY INSTALLATION: Removable duct ends with locking tabs for quick removal and easy maintenance and a cord length of 4.9 feet for hassle-free setup. This grows tent fan with a controller for easy fan speed adjustment.
BASIC PARAMETERS: Ventilation exhaust fan size: 6” | Dimensions: 315mm*225mm*210mm. | Weight: 2.7. | Airflow: 402CFM | Noise: 32dB-A | Bearings: Dual Ball.
Likes
4
Share
@Exoticfarm99
Follow
Está semana echamos te de compost aireado + 200gr de humus de lombriz

Likes
34
Share
@Salokin
Follow
Hello Growmies,
As we approach the zenith of week 11, the crescendo of our Watermelon Candy F1 Hybrids' lifecycle is upon us. In harmony with the symphonic change in colors, their leaves continue the fade, a beautiful degradation that nature orchestrates so well, offering a visual feast that marks the prelude to their grand finale.
Each Watermelon Candy, from #1 to #3, has now fully embraced the transition, parading a spectrum of colors from golden yellows to deep purples, like the setting sun giving way to twilight's embrace. The buds, dense and resplendent with trichomes, now resemble crystalline sculptures, each one capturing the essence of our nurturing dedication.
The aroma has deepened, each inhalation a tapestry of earth and sweetness, indicative of the rich, flavorful experience soon to be savored. It's a heady bouquet that promises much to the connoisseur and a testament to the TrolMaster's steadfast governance over their environment.
Watermelon Candy #1, with its standout bud formation, is a sculpture in botanical form, a true marvel of genetic and environmental synergy. Its siblings, #2 and #3, are not a step behind, flaunting their heavy blossoms with a gravitas that speaks to the imminent harvest.
With the harvest scheduled for next week, the excitement is palpable. Our routine remains unaltered; like the beat of a drum leading to the climax of a song, we maintain the rhythm that has served us well thus far. The anticipation of the cut is an excitement unto itself - the final act in our labor of love.
Patience is our companion in these final days as we prepare for the harvest. The Watermelon Candy F1 Hybrids stand at the ready, soon to transition from their vegetative state to a form that will bring joy and relief to many.
Stay lifted,
Salokin

Likes
49
Share
@Hashy
Follow
Week 9 5th week of flower.
Light settings
12/12 on at 9.00am off 9.00pm
Light power= 75% 184w
Radiator settings
LIghts on
Turn on if temp drops below 23c
Turn off if temp goes above 23c
Lights off
Turn on if temp drops below 18.5c
Turn off if temp goes above 18.5c
Dehumidifier settings
LIghts on
Turn off if humidity drops below 60%
Turn on if humidity goes above 60%
LIghts off
Turn off if humidity drops below 62%
Turn on if humidity goes above 62%
Extractor settings
temperature 25c with 1c steps
Humidity 50% with 2% steps
Max speed 10
Min speed 7
VPD aim 0.8-1.2
DLI aim 30
Wednesday 22/3/23 Day 57 (Day 29 flower)
Nothing
Thursday 23/3/23 Day 58 (Day 30 flower)
Autofeed 4 20 minute runs
(last weeks nute schedule)
Feed 12L Ec=1.93 Ph=6.6/6.5
4.5L left
Roughly 2.5L each.
#2 run 0L Ec= Ph=
Pump wasn't submerge properly.
Friday 24/3/23 Day 59 (Day 31 flower)
Moved light more over towards the cheesecake.
Big defoliation
Saturday 25/3/23 Day 60 (Day 32 flower)
Autofeed 4 20 minute runs
Slightly less powerful pump
Calmag 0.5ml/L
4 drops ph d
Feed 10L Ec=0.4 Ph=6.1/6.2
1.5L left
Roughly 2.2L each.
#2 run 0.4L Ec=2.6 Ph=5.9
#2 Height= 49CM Dist= 45CM DLI=25.6
Sunday 26/3/23 Day 61 (Day 33 flower)
Nothing
Monday 27/3/23 Day 62 (Day 34 flower)
1.00pm alter heater settings to 22.5c
6.00pm
Extractor settings
temperature 24c with 1c steps
Humidity 50% with 0% steps
Max speed 10
Min speed 4
Tuesday 28/3/23 Day 63 (Day 35 flower)
Feed
(This weeks schedule)
Autofeed 4 15 minute runs
Normal pump
4 drops ph d
Feed 15L Ec=1.75 Ph=6.4
8.75L left
Roughly 2.08L each.
#2 run L Ec= Ph=
#2 Height= 50CM Dist= 44CM DLI=26
Another week done for the grow. Things are going great.
#2 Tropicana Cookies FF is doing great, the way she grows really reminds me of pineapple express, I'm thinking she is going to produce some nice sized buds.
Power used for week
Light
(2.22+2.21+2.21+2.21+2.22+2.21+2.22)=15.5Kw
Extractor
(0.57+0.57+0.57+0.54+0.57+0.53+0.54)=3.89Kw
Fans
(0.5+0.53+0.52+0.69+0.9+1.08+1.06)=5.28Kw
Dehumidifier
(1.49+0.34+0.71+1.48+0.0+0.0+0.0)=4.02Kw
Radiator
(2.42+2.47+2.74+3.62+5.24+2.1+1.45)=20.04Kw
Water pump.
(0.0+0.01+0.0+0.01+0.0+0.0+0.01)=0.03Kw
Total for the week=48.76Kw
Back in a week.
Thanks for stopping by.


Likes
14
Share
@Greenmartini
Follow
All good this week too. The strawberry lemonade turning purple!:)) gg#4 it’s a hermy… the other plants are good! White widow xxl it’s the first to harvest…In 3 weeks…. Fxxk